
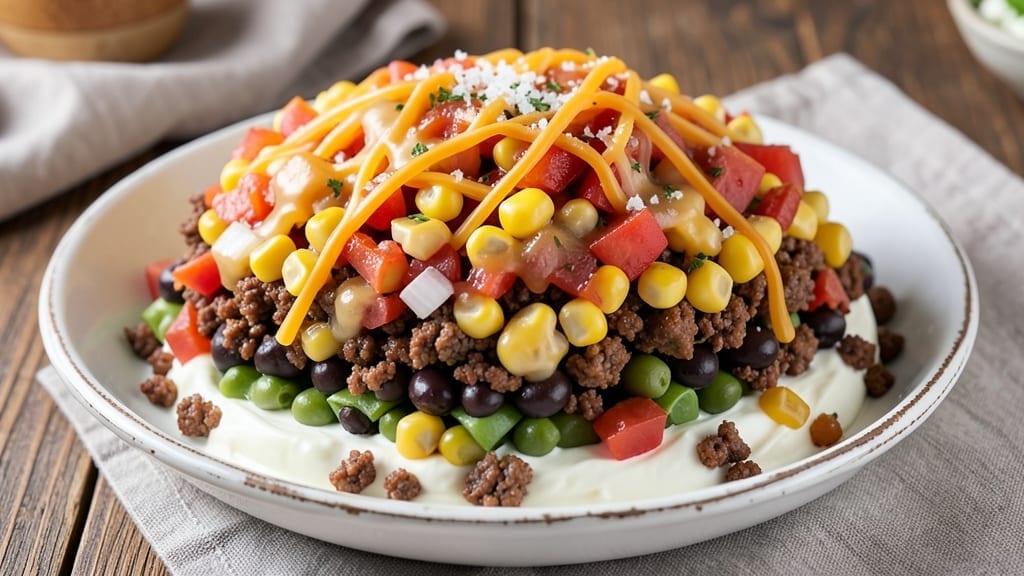
This 7 layer salad dip recipe delivers the perfect balance of creamy, crunchy, and tangy flavors in every bite—ideal for game day, parties, or a satisfying snack.
The key to success lies in assembling each layer in the right order, starting with the base of seasoned ground beef and ending with a sprinkle of fresh herbs. I’ve perfected this recipe over years of hosting gatherings, and it never fails to disappear quickly.
The beauty of this dip is its versatility—it’s hearty enough to serve as a main dish when paired with tortilla chips or crackers, yet light enough to enjoy as a side.
Each layer contributes something unique: the sour cream adds creaminess, the cheese brings richness, and the black beans and corn provide texture and depth. The final touch of salsa and green onions brightens the flavors, ensuring every bite is vibrant.
What you’ll achieve is a dip that’s creamy yet crunchy, with layers of flavor that keep guests reaching for more. The tortilla chip stack on top adds an extra layer of texture, making it not just a dip, but an experience.
This recipe is foolproof, customizable, and guaranteed to impress—whether you’re feeding a crowd or treating yourself to a satisfying snack.
Serve it at your next gathering with an assortment of chips, veggies, or even as a topping for baked potatoes. The possibilities are endless, but the assembly process is simple. Let’s get started!
Ingredients for 7 layer salad dip
Here’s everything you need to build this crowd-pleasing 7-layer dip with perfect layers of crunch and creaminess.
| Ingredient | Amount | Notes |
|---|---|---|
| Ground Beef (80% lean) 🥩 | 1 ½ lb | Brown and season with taco spices |
| Sour Cream 🥛 | 1 ½ cups | Full-fat for best creaminess |
| Shredded Cheddar Cheese 🧀 | 2 cups | Medium cheddar preferred |
| Black Beans 🌱 | 1 ½ cups | Drained and rinsed well |
| Corn Kernels 🌽 | 1 ½ cups | Canned or frozen, drained |
| Salsa 🍅 | 1 ½ cups | Medium or pico de gallo |
| Green Onions 🧅 | ½ cup | Thinly sliced, white and green parts |
| Tortilla Chips 🍟 | 6 cups | Crushed for topping |
| Taco Seasoning 🌶️ | 2 tbsp | Homemade or store-bought |
| Salt 🧂 | 1 tsp | Kosher or sea salt |
| Black Pepper 🌶️ | ½ tsp | Freshly ground preferred |
| Vegetable Oil 🫒 | 2 tbsp | For browning beef |
The ground beef is the foundation—80% lean ensures it stays flavorful without getting greasy. I always grab mine from Costco when I’m making a big batch, but the regular supermarket stuff works fine. Look for good marbling if you’re buying a whole chuck roast to grind yourself. Brown it well in vegetable oil—this makes all the difference. Taco seasoning is key here; if you’re using store-bought, La Victoria or Old El Paso are my go-tos. Freshly ground black pepper adds that extra kick that jarred seasoning misses.
No sour cream? Greek yogurt works in a pinch—it’s tangier, so use slightly less. The cheddar should be medium—not too sharp, or it’ll overpower. Kraft 2% or Mexican blend melts perfectly. Black beans can be canned or cooked; just make sure they’re drained and rinsed well. Corn? Frozen works best—it’s pre-cooked and ready to go. The salsa is where you can get creative: mango-habanero for heat lovers, mild pico for families. Green onions add freshness, so don’t skip them—they brighten up every bite.
This dip keeps beautifully—3-4 days in the fridge sealed tightly. The tortilla chips stay crispy on top for 2 days if you press fresh ones down before serving. I always double the batch because it disappears fast. For extra crunch, toast the chips lightly before crushing them. The layers can be assembled a day ahead, but add the salsa and green onions right before serving so they stay vibrant. Freezes well too—just reheat the beef layer separately and assemble fresh.
Why You’ll Love This Recipe
- No-Fuss Layers: The only “chopping” I do is grab a handful of pre-shredded cheese and scoop beans straight from a can. Brown the beef, drain it, and boom—you’ve got a base that’s ready in 15 minutes. Honestly, I’ve made this while waiting for a pot of pasta to boil.
- Creamy-Meaty Magic: That first layer of seasoned ground beef? It’s like a warm, savory hug under all the cool toppings. The sour cream ties it together with this velvety richness that makes every bite feel indulgent—no fancy sauce needed.
- Game for Any Gathering: I’ve served this at tailgates (with tortilla chips), as a side for potlucks (with crackers), and even as a quick lunch (straight from the bowl with spoons). The layers hold up perfectly—no soggy disasters here.
- Budget-Friendly Leftovers: A pound of ground beef and a few pantry staples stretch this into meals for days. I’ll make a big batch Sunday, snack on it all week, and still have enough to toss into tacos or quesadillas by Friday. (Yes, even on a Tuesday night.)
Step-by-step instructions for 7 layer salad dip
Build this crowd-pleasing dip layer by layer—creamy, crunchy, and packed with flavor.
Brown the Ground Beef
Heat the 2 tablespoons vegetable oil in a large skillet over medium-high heat. Add the 1.5 lb ground beef (80% lean) and cook, breaking it apart with a wooden spoon, until it’s no longer pink in the center—about 5-7 minutes. This ensures the meat is fully cooked and safe to eat.
Drain any excess fat from the skillet, then return the beef to the pan. Stir in the 2 tablespoons taco seasoning, 1 teaspoon salt, and ½ teaspoon black pepper. Cook for another 1-2 minutes until the spices are evenly distributed and fragrant. Let the beef cool slightly before transferring it to a large mixing bowl—this prevents the sour cream from curdling when combined later.
Layer the Creamy Base
In the same bowl with the cooled beef, add the 1.5 cups sour cream and 2 cups shredded cheddar cheese. Use a sturdy spoon or spatula to gently fold everything together until the cheese melts slightly and the mixture becomes smooth and creamy. This layer is the foundation of your dip, so take your time to ensure it’s well combined.
Next, fold in the 1.5 cups black beans and 1.5 cups corn kernels. Be careful not to overmix—just enough to distribute them evenly. The texture should be thick but still spreadable, like a rich, hearty dip. If it feels too thick, add 1-2 tablespoons of water to loosen it slightly. Taste and adjust seasoning if needed—you might want to add a pinch more salt or pepper to balance the flavors.
Add the Final Layers
Stir in the 1.5 cups salsa and ½ cup green onions, mixing gently to distribute them evenly. The salsa adds a bright, tangy kick, while the green onions bring a fresh, oniony crunch. Save a few green onions for garnishing on top later if you like.
Now, transfer the mixture to a large serving dish or bowl. Smooth the top with a spatula, creating an even surface for the final layer. Sprinkle the 6 cups crushed tortilla chips evenly over the top. Press down lightly so they stick, creating that classic 7-layer look. The chips will add a satisfying crunch that contrasts beautifully with the creamy layers below.
Chill and Serve
Cover the dish and refrigerate for at least 1 hour before serving. This chilling time allows the flavors to meld together and the dip to thicken slightly, making it easier to scoop and serve. The longer it chills, the better the texture and flavor will be.
When ready to serve, give the dip a final stir to redistribute any settled ingredients. Garnish with extra green onions or a sprinkle of crushed tortilla chips if desired. Serve with tortilla chips, veggies, or even as a topping for nachos. The contrast of creamy, crunchy, and savory layers makes this dip irresistibly delicious!
Pro Tips For Making 7 Layer Salad Dip
- Brown the Beef Right: Cook the ground beef until it’s actually brown—no gray left behind. I used to rush this, and the dip tasted flat. Push the crumbles to the edges of the pan and let them crisp for 30 seconds at the end. That’s where the flavor hides.
- Drain and Pat the Beans: Rinse the black beans thoroughly in a colander, then pat them dry with paper towels. Wet beans dilute the dip and make it soggy—trust me, you’ll notice the difference when the layers hold their shape.
- Layer Cheese Last: Add the shredded cheddar right before serving—not when you first assemble it. It melts into the sour cream and turns the dip into a sad, grainy mush. Keep it separate until the chips hit the bowl.
- Use Cold Sour Cream: Chill the sour cream in the fridge for at least 30 minutes before mixing. Warm sour cream separates and curdles, turning your creamy base into a lumpy disaster. Cold = smooth, every time.
Best sauces and condiments for this dish
Creamy Sour Cream Twist
Elevate your dip by swapping regular sour cream for a blend of sour cream and Greek yogurt (½ cup each). The yogurt adds tanginess and thickness, while keeping the dip rich and creamy.
I like to add 1 teaspoon of lime juice to brighten the flavors—it cuts through the richness beautifully. For extra decadence, fold in 2 ounces of cream cheese with the sour cream for a velvety texture. 🥛
Spicy Kick Options
If you love heat, mix 1 tablespoon of hot sauce (like Cholula or Valentu Gloss) directly into the sour cream layer. For smoky depth, add 1 teaspoon of smoked paprika to the beef while browning.
My go-to is 1-2 tablespoons of chipotle in adobo, blended into the salsa layer—it adds a slow-building heat that pairs perfectly with the creamy base. Adjust to taste, starting with less and adding more gradually. 🌶️
Cheese Swaps
Medium cheddar is classic, but don’t be afraid to experiment! Monterey Jack melts smoothly and adds a buttery note, while pepper jack brings a subtle kick. For a Mexican-inspired twist, use Oaxaca cheese—it stretches beautifully and adds a mild, tangy flavor.
If you’re avoiding dairy, nutritional yeast (¼ cup) mixed with the sour cream layer adds a cheesy, umami depth without the cheese. 🧀
Crunchy Toppings
Beyond tortilla chips, try crushed Doritos for a sweeter, tangier crunch or toasted pepitas for a nutty contrast. For extra texture, sprinkle crumbled bacon or fried shallots on top before serving.
I also love adding crushed tortilla strips (like Fritos) to the final layer—they stay crispy longer than regular chips. For a smoky touch, toast corn tortilla chips in the oven with a pinch of cumin before crushing. 🍟
Fresh Herb Garnishes
Green onions are a must, but don’t stop there! Finely chop cilantro and mix it into the salsa layer for extra freshness. A sprinkle of diced jalapeño (seeds removed) adds a bright, spicy pop.
For a brighter finish, toss microgreens or baby arugula over the top just before serving—they add a peppery crunch that cuts through the creaminess. 🌱
Nutrition facts
Frequently asked questions
Can I make this dip ahead of time?
Assemble all layers except the tortilla chips and salsa 24 hours ahead. Store in an airtight container in the fridge. Add the chips and salsa just before serving to keep them crispy. The flavors actually improve overnight as everything melds together.
What can I substitute if I don’t have sour cream?
Use Greek yogurt (same amount) for tanginess, or mix ½ cup mayonnaise + 1 tbsp lemon juice for creaminess. For dairy-free, try coconut yogurt or cashew cream (blend soaked cashews with water). The texture will be slightly different but still delicious!
Why is my dip too runny?
This usually happens if the cheese didn’t melt properly or too much liquid was added. Fix it by chilling the dip for 30 minutes to thicken, then stir in 1 tbsp cornstarch mixed with 2 tbsp water. For prevention, always use full-fat sour cream and let the cheese melt completely before adding other ingredients.
Can I bake this dip instead of serving it cold?
Yes! Transfer the assembled dip (with chips) to a baking dish, cover with foil, and bake at 350°F for 20 minutes. Uncover and bake 5-10 more minutes until bubbly. The chips will get extra crispy, and the cheese will melt beautifully. Serve warm with chips or as a loaded potato topping!
How do I make it vegetarian?
Replace the ground beef with 1.5 cups cooked lentils or crumbled tempeh. Season with 1 tbsp soy sauce + 1 tsp smoked paprika instead of taco seasoning. For extra protein, add ½ cup refried beans to the creamy layer. The texture stays hearty and satisfying!

- Pea Soup Instant Pot Recipe: Velvety Green Smoothness in 20 Minutes - November 1, 2026
- Pork Loin Pulled Pork Crock Pot Recipe: Slow-Smoked Tenderness With Zero Dryness - November 1, 2026
- Baked Potatoes in Crock Pot Recipe: Buttery Interiors and Crispy Top Magic - November 1, 2026