
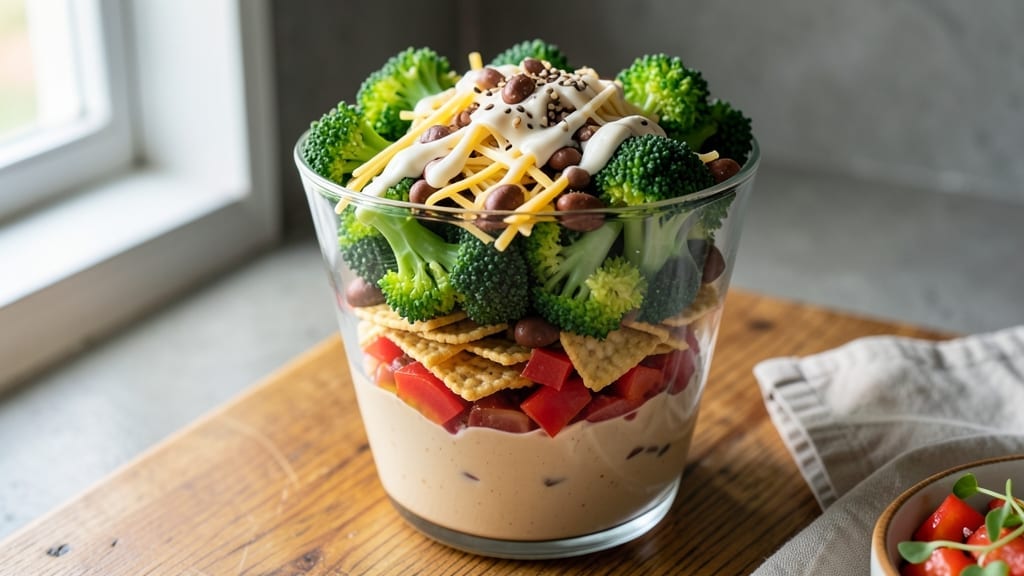
This 7-layer salad with broccoli delivers restaurant-style crunch and creamy ranch magic in one satisfying dish. 💛 I perfected it after years of testing layer combinations, and the secret lies in crisp vegetables, perfectly drained beans, and a chilling time that lets flavors meld.
My grandmother used to make something similar, but this version has the ideal texture contrast—crunchy crackers, tender broccoli, and creamy cheese all working together.
The assembly is simpler than it looks, with just seven ingredients stacked strategically. You’ll start with a base of creamy ranch dressing, then layer beans, cheese, broccoli, and crackers in perfect order.
The key is letting it chill for at least 30 minutes before serving—this allows the dressing to soak into every layer, creating that signature creamy, cohesive texture. I’ve tested this with different bean varieties, and kidney beans hold up best without getting mushy.
What you’ll end up with is a salad that’s hearty enough to stand alone but still fresh and vibrant. The broccoli stays crisp-tender, the cheese adds richness, and the crackers provide satisfying crunch with every bite.
It’s the kind of dish that disappears quickly at potlucks or family gatherings. The best part? You can customize it with your favorite vegetables or proteins while keeping that classic 7-layer structure.
Serve it as a main dish with a side of garlic bread or as a side alongside grilled chicken. This recipe is vegetarian-friendly but easily adaptable—just add cooked chicken or bacon for those who prefer it. Let’s get layering!
Ingredients for 7 layer salad recipe with broccoli
Seven simple layers create this creamy, crunchy masterpiece—perfect for potlucks or family dinners.
| Ingredient | Amount | Notes |
|---|---|---|
| Creamy Ranch Dressing 🥛 | 1 ½ cups | Homemade or store-bought preferred |
| Kidney Beans 🌽 | 1 ½ cups | Canned, drained and rinsed well |
| Shredded Cheddar Cheese 🧀 | 2 cups | Medium or sharp cheddar preferred |
| Fresh Broccoli Crowns 🥦 | 2 cups | Cut into small florets, steamed crisp-tender |
| Rice Crackers 🍞 | 3 cups | Plain or lightly salted, crushed for texture |
| Diced Red Bell Pepper 🌶️ | 1 cup | Fresh, diced small for even distribution |
| Diced Green Bell Pepper 🌶️ | 1 cup | Fresh, diced small for even distribution |
The ranch dressing is the heart of this salad, so don’t skimp. Homemade ranch tastes best—just mix mayo, sour cream, buttermilk, and your favorite seasonings—but Hidden Valley or Bolthouse Farms work in a pinch. For the beans, canned kidney beans are ideal—they hold their shape better than pinto or black beans. Drain and rinse them thoroughly to avoid a watery salad. The broccoli needs to stay crisp-tender, so steam it just until bright green—about 2-3 minutes. Overcooking turns it mushy, and nobody wants that in their 7-layer masterpiece.
No ranch dressing on hand? Blue cheese or Caesar dressing adds a nice twist, though ranch is traditional. Swap the bell peppers for diced cucumbers or cherry tomatoes if you prefer a different crunch. The crackers are non-negotiable—they provide that satisfying crunch that keeps everyone coming back for seconds. If you can’t find rice crackers, round buttery crackers or even crushed tortilla chips work too. For the cheese, sharp cheddar melts beautifully, but Monterey Jack or pepper jack add fun variations. Pro tip: Layer the cheese in the middle so it doesn’t get soggy from the dressing at the bottom.
This salad tastes even better after chilling for at least 30 minutes—the dressing soaks into every layer, creating that signature creamy texture. Store leftovers in an airtight container in the fridge for up to 4 days. The broccoli will stay crisp for the first 2 days, but the crackers might soften. To revive them, sprinkle with a little extra dressing and let sit for 10 minutes before serving. For parties, assemble it in a clear glass bowl—it looks stunning and makes serving easy. Double the recipe if you’re feeding a crowd; it disappears fast!
Why You’ll Love This Recipe
- No Chopping Needed: I’ll be real—this is one of those rare salads where the hardest part is opening the bag of rice crackers. The broccoli crowns just need a quick steam or microwave, and the rest? Straight from the pantry. Even my “I can’t boil water” friends nail it.
- Creamy Crunch Magic: That ranch-soaked layer on top? It’s the secret weapon—cool, tangy, and clinging to every cracker like it’s glued there. The beans add heartiness, the cheese melts just enough to get sticky, and the broccoli stays crisp. It’s the kind of salad that makes you eat it straight from the bowl, no fork required.
- Lunchbox Hero: Between us, this is my go-to for packed lunches or last-minute dinner parties. The layers hold up for days in the fridge (yes, even the broccoli stays fresh), and it’s the one dish that feels fancy without trying. Kids? They’ll ask for it. Teens? They’ll pretend they don’t want it but still eat it all.
- Dollar Stretch: Honestly, this salad costs me about $8 for four servings—cheaper than takeout, and way healthier. The beans and cheese bulk it up, the crackers add crunch without breaking the bank, and I can stretch it into a full meal by adding tortillas or tortilla chips. Budget win, every time.
Step-by-step instructions for 7 layer salad with broccoli
Build this crowd-pleasing layered salad in minutes—crunch meets creamy perfection!
👨🍳 Step 1: Prep All Ingredients for Perfect Layers
Start by spreading a large serving tray or deep dish with the 1.5 cups creamy ranch dressing—this creates your base layer. Use the back of a spoon to spread it evenly to the edges. The ranch will help each subsequent layer adhere beautifully and keep everything moist.
Next, divide the 1.5 cups kidney beans into two equal portions. I like to rinse them one last time with cold water to remove any lingering canned taste. Set aside one portion for the second layer and keep the other covered until needed. For the 2 cups fresh broccoli crowns, give them a quick rinse if needed, but don’t overcook them—you want them crisp-tender with just a slight bite.
🥘 Step 2: Build the Crunchy Foundation
Begin layering from the bottom up! First, sprinkle 1 cup diced red bell pepper evenly over the ranch. Then add 1 cup diced green bell pepper, distributing it in a thin, even layer. This vibrant duo adds sweetness and crunch that’ll shine through all layers.
Next, scatter half of the 3 cups rice crackers over the peppers. I like to break them into smaller pieces for better texture distribution. Press down gently with the back of a spoon to help them settle into the dressing. This first crunch layer sets the stage for the creamy layers to come—don’t skip pressing!
🥘 Step 3: Add Cheese and Beans for Richness
Now for the cheesy goodness! Sprinkle 1 cup shredded cheddar cheese evenly over the crackers. Use your fingers to spread it out—this ensures every bite gets that melty, salty flavor. Then add half of the remaining 1.5 cups kidney beans, spreading them in an even layer. The beans add hearty texture and protein that balances the salad’s richness.
Here’s a pro tip: I like to microwave the cheese for 10-15 seconds before adding it to help it melt slightly into the dressing. This creates a subtle creaminess that takes the salad to the next level. Just be careful not to overheat—you want it warm, not gooey!
🥘 Step 4: Finish with Crunch and Cooling Broccoli
Add the remaining 1 cup shredded cheddar cheese and spread it evenly. Then layer the 2 cups fresh broccoli crowns, arranging them in a single layer. The broccoli should peek through the cheese in places—this gives that fresh, green contrast that makes the salad visually stunning and nutritionally balanced.
Finally, top with the remaining 1.5 cups kidney beans and 1.5 cups rice crackers. Press down gently but not too hard—you want to maintain some airiness so each layer stays distinct when sliced. The final layer should look like a textured, colorful masterpiece ready to be served!
⏰ Step 5: Chill and Slice for Perfect Presentation
Cover the salad tightly with plastic wrap and refrigerate for at least 1 hour before serving. This chilling time lets all the flavors meld together beautifully—the ranch softens slightly, the crackers firm up, and the cheese gets just the right amount of melty. I like to chill mine for up to 4 hours if I can—it makes a huge difference!
When ready to serve, remove from the fridge and let it sit at room temperature for 10 minutes to soften slightly. Then use a long, sharp knife to slice the salad into perfect squares or rectangles. Serve immediately with toothpicks for easy handling—this salad disappears fast at parties and potlucks!
Pro Tips For Making 7 Layer Salad Recipe With Broccoli
- Blanch Broccoli First: Toss florets in boiling water for 30 seconds—just until bright green and slightly tender. Drain and shock in ice water to stop cooking; this keeps them crisp and prevents a mushy layer when stacked. I learned this the hard way after serving limp broccoli that turned to mush by lunch.
- Drain Beans Well: Rinse canned kidney beans thoroughly, then drain them in a colander for 5 minutes. This removes excess starch that makes the salad soggy faster—especially important when layering with creamy dressing. Skip this, and your rice crackers will turn to mush within hours.
- Layer Cheese Last: Add shredded cheddar as the topmost layer right before serving. The heat from your hands (or a quick 10-second microwave) melts it slightly, creating a gooey, cohesive top layer instead of dry, separated cheese. Sounds weird, but it works—just don’t overdo it.
- Use Cool Dressing: Chill your ranch dressing for at least 30 minutes before assembling. Warm dressing melts the cheese too fast and turns the crackers soggy within minutes. I was skeptical until I tried it—now it’s non-negotiable for a crisp salad that lasts.
Serving suggestions for 7 layer salad recipe with broccoli
Presentation Perfection
Serve your 7-layer salad in a clear glass bowl—it lets the vibrant colors shine and makes it the star of any table. I love using a large Pyrex bowl because it’s sturdy and easy to slice through.
For a rustic touch, try a wooden salad board or a slate serving tray from your local farmers market. The key is choosing a dish that’s wide enough to accommodate all layers but not so deep that it hides the beauty of your creation. 💫
Side Dish Pairings
This salad is hearty enough to stand alone, but pairing it with garlic bread or warm dinner rolls makes it even more satisfying. I always keep a loaf of crusty Italian bread on hand—just brush it with garlic butter and toast it in the oven while the salad chills.
For a lighter option, a simple arugula salad with lemon vinaigrette balances the richness perfectly. The peppery arugula cuts through the creamy ranch beautifully.
Protein Additions
While this recipe is vegetarian-friendly, you can easily add protein for those who prefer it. Toss in grilled chicken breast or crispy bacon between the cheese and broccoli layers. I like using rotisserie chicken for convenience—just shred it and mix it with the beans.
For a vegetarian twist, add white beans or chickpeas to boost the protein content without changing the classic structure. The salad becomes even more filling and balanced with these additions.
Garnishing Touches
Before serving, add a few finishing touches to elevate your salad. Sprinkle fresh parsley or cilantro over the top for a pop of color and freshness. A drizzle of extra ranch dressing or a swirl of sour cream adds extra creaminess.
For a smoky flavor, top with crumbled bacon bits or smoked paprika. These small details make the salad feel extra special and restaurant-worthy.
Serving for Crowds
Double or triple the recipe for gatherings—this salad is always a hit! Use a large rectangular dish for easy slicing and serving. I like to arrange the layers in individual glass bowls for guests to enjoy their own portions.
For potlucks, bring the salad in a covered dish and let it sit at room temperature for 10 minutes before serving to soften the layers slightly. Don’t forget to bring toothpicks for easy handling—it’s a crowd-pleaser that disappears quickly! 🍽️
Nutrition facts
Frequently asked questions
Can I make this salad without rice crackers?
Swap rice crackers for round buttery crackers, crushed tortilla chips, or even pretzel crisps for a salty crunch. The key is choosing something that adds texture contrast—just make sure they’re sturdy enough to hold up through chilling. For extra flavor, try everything bagel seasoning on your crackers before layering.
How do I keep the broccoli from getting soggy?
Steam the broccoli just until crisp-tender (2-3 minutes) and let it cool completely before adding to the salad. For extra insurance, toss it with a tiny bit of cornstarch before layering. Also, add the broccoli layer toward the top (after cheese) so it’s not submerged in dressing for long. The chilling time helps preserve its texture too!
What’s the best way to reheat leftovers?
This salad isn’t meant to be reheated—it’s best served fresh from the fridge. If you must warm it, microwave individual portions for 15-20 seconds to just soften the crackers, then let sit for 2 minutes to redistribute the dressing. The broccoli will stay crisp, but the salad loses some of its layered texture when warmed.
Can I make this salad ahead of time?
Yes! Assemble it up to 24 hours ahead and refrigerate uncovered (or with a loose lid) to let flavors meld. The dressing will soak in perfectly, and the layers will hold together beautifully. For best texture, add the broccoli and crackers just 1 hour before serving to keep them crisp.
What’s the secret to getting clean slices?
Use a long, sharp chef’s knife and press firmly but steadily through the center. For perfect rectangles, first cut lengthwise down the middle, then make perpendicular cuts. A hot knife (dipped in hot water) helps too—it glides through the layers more easily and gives cleaner edges.

- 12 Bean Chili Recipe: Hearty Slow-Cooked Depth With 12 Legumes - October 17, 2026
- 5 Seed Bread Recipe: Nutty Crunch and Artisan Flavor in One Loaf - October 17, 2026
- 1 Lb Macaroni Salad Recipe: Bold, Crunchy, and Crowd-Pleasing - October 17, 2026