
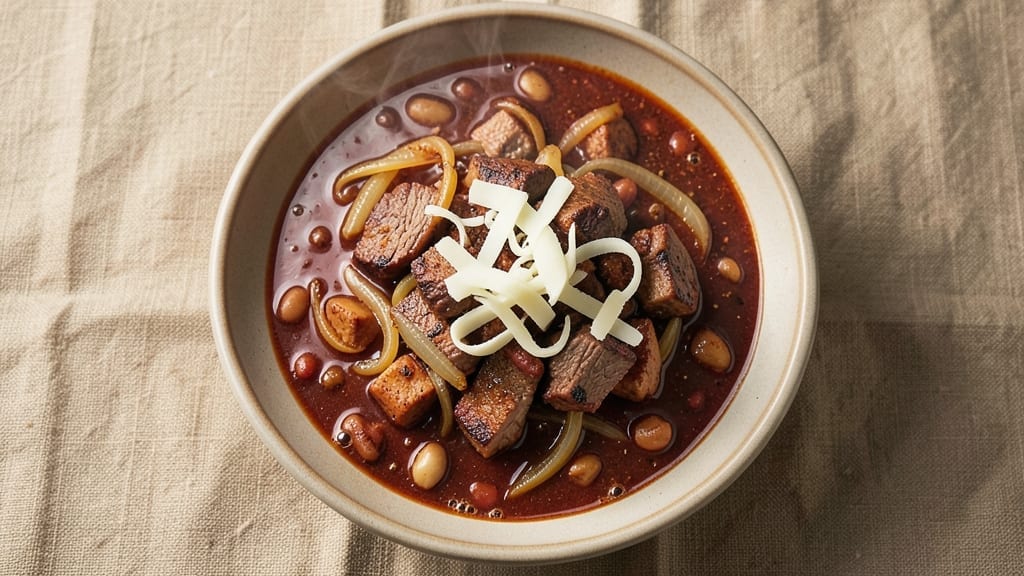
An 8-hour chili recipe transforms simple ingredients into a deeply flavorful masterpiece that tastes even better the next day. The slow simmer breaks down tough beef while melding spices into a harmonious, rich broth—this isn’t just chili, it’s a restaurant-quality experience you can make at home.
What makes it special? Layering flavors through caramelized onions, toasted spices, and a long cook time that develops complexity most recipes skip.
The secret lies in patience and technique: browning the meat first for depth, using a combination of dark and light chili powders for balance, and letting it simmer uncovered for those last critical hours.
This isn’t a quick weeknight meal—it’s a weekend project that rewards you with a pot so flavorful, you’ll be asked for seconds before you even finish serving. The result? A chili with tender beef, perfectly softened beans, and a sauce that clings to every spoonful.
By the time you’re ready to serve, you’ll have a deeply aromatic, slightly thickened chili with a crust of spices on top—proof that good things come to those who wait.
The texture is just right: tender beef that falls apart, beans that hold their shape but soften just enough, and a broth that’s rich without being greasy. This is the kind of chili that makes people ask for the recipe, not just the leftovers.
Top it with shredded cheese, sour cream, or fresh jalapeños for brightness, but honestly? The chili stands strong on its own. Whether you’re feeding a crowd or meal prepping for the week, this recipe delivers consistent, professional-level results—every single time. Let’s get started on building that flavor.
Ingredients for 8 hour chili
Sixteen ingredients. One slow-simmered pot. The kind of chili that gets rave reviews.
| Ingredient | Amount | Notes |
|---|---|---|
| Chuck Roast 🥩 | 2 ½ lb | Pre-cut into 1-inch cubes |
| Yellow Onions 🧅 | 2 whole | Thinly sliced for caramelizing |
| Garlic Cloves 🧄 | 6 cloves | Minced for deep flavor |
| Dark Brown Sugar 🍬 | 2 tbsp | Enhances depth of flavor |
| Ground Cumin 🌿 | 2 tsp | Toasted for aromatic punch |
| Smoked Paprika 🌶️ | 2 tbsp | Smoked variety preferred |
| Chili Powder 🌶️ | 2 tbsp | Medium heat blend |
| Ground Black Pepper 🌶️ | 1 tsp | Freshly cracked preferred |
| Salt 🧂 | 1 ½ tsp | Kosher or sea salt |
| Black Beans 🌱 | 15 oz | Drained and rinsed |
| Kidney Beans 🌱 | 15 oz | Drained and rinsed |
| Beef Broth 💧 | 4 cups | Low-sodium preferred |
| Tomato Paste 🍅 | 2 tbsp | For rich tomato depth |
| Extra-Virgin Olive Oil 🫒 | 2 tbsp | For meat browning |
| Fresh Cilantro 🌿 | ¼ cup | Chopped for garnish |
The beef is non-negotiable here—chuck roast breaks down beautifully over eight hours, giving you that melt-in-your-mouth texture. Most grocery stores sell it pre-cubed, which saves time, but if you’re buying a whole roast, ask the butcher to cut it into 1-inch cubes. Costco and Walmart usually have it on sale frozen, which is perfect for this recipe. Look for good marbling—those little white fat streaks are what keep the meat tender. If you can’t find chuck, brisket works too, but it’s leaner so you might want to add a splash of broth to keep it moist.
No black beans? Pinto or pinto beans work just as well—just rinse them well to remove any dust. Short on tomato paste? Crushed tomatoes at half the amount will work in a pinch, but you’ll lose that concentrated depth. The spices are where the magic happens—toast your cumin and chili powder in a dry pan for 30 seconds before adding to the pot. This simple step makes a huge difference. For extra smokiness, swap half the paprika for liquid smoke, but don’t go overboard. And if you’re feeling adventurous, add a bay leaf while it simmers—remove before serving.
This chili gets better with time, so make it ahead if possible. Keeps for 5-6 days in the fridge, and freezes beautifully for up to 3 months. I always double the batch—one pot for dinner, one for lunches. The flavors meld even more overnight, so if you can wait, do it. When reheating, add a splash of broth to loosen it up. And that cilantro? Toss it in at the very end—it wilts fast from the heat. Store leftovers with the lid slightly ajar to prevent a skin from forming, or just break it up with a spoon when reheating.
Why You’ll Love This Recipe
- Sweet-Savory Magic: That dark brown sugar? It’s the secret weapon here. It cuts through the cumin’s earthiness while balancing the chuck’s richness, giving it this weirdly addictive depth. Honestly, I’ll take this over plain chili any day—it’s got layers, not just heat.
- Leftovers That Shine: This recipe makes enough to feed a crowd, but the best part? The flavor actually improves after a day or two. Freeze half for lazy nights, or reheat the rest for a quick, hearty lunch—no one will guess it’s not fresh.
- Budget-Buster Wins: Chuck roast is cheap, and this method stretches it into a meal that feels special. Plus, the cumin and brown sugar are pantry staples, so you’re not breaking the bank for fancy ingredients. My college-student friends still beg for seconds.
Step-by-step instructions for deep-flavor chili
Here’s how to build rich, complex flavors over time for chili that gets better with every hour.
Sear the Chuck Roast for Deep Meat Flavor
Heat a large Dutch oven over medium-high heat and add the 2 tablespoons extra-virgin olive oil. Once the oil shimmers, add the 2.5 lb chuck roast cut into 1-inch cubes in a single layer. Don’t overcrowd the pan—work in batches if needed. Let the meat sear undisturbed for 3-4 minutes per side until deeply browned with a crust.
This searing step creates the Maillard reaction that forms the foundation of your chili’s flavor. You’ll see those beautiful browned bits forming on the bottom of the pot—that’s pure flavor waiting to dissolve into your chili. Once all the meat is browned, transfer it to a plate and set aside.
Caramelize Onions and Build the Flavor Base
In the same Dutch oven, add the 2 whole yellow onions sliced thinly. Reduce heat to medium-low and cook for 10-12 minutes, stirring occasionally, until the onions turn golden brown and sweet. This caramelization process adds incredible depth to your chili.
When the onions are beautifully caramelized, add the 6 minced garlic cloves and cook for another 30 seconds until fragrant. Here’s where it gets good—sprinkle in the 2 tablespoons smoked paprika and 2 tablespoons chili powder, stirring constantly for 30 seconds to toast the spices and release their oils. This step intensifies their flavor dramatically.
Layer in Spices and Brown the Tomato Paste
Add the 2 teaspoons ground cumin, 1 teaspoon ground black pepper, 1.5 teaspoons salt, and 2 tablespoons dark brown sugar to the Dutch oven. Stir everything together for 1 minute to toast the spices and let the sugar caramelize slightly—you’ll smell that rich, complex aroma developing.
Next, add the 2 tablespoons tomato paste and stir for another 1 minute until it darkens slightly. This creates a rich, concentrated base that will deepen as the chili simmers. Pour in the 4 cups beef broth and scrape up any browned bits from the bottom of the pot—these contain concentrated flavor that will make your chili exceptional.
Simmer the Chili for Maximum Flavor Development
Return the seared chuck roast to the Dutch oven and bring everything to a gentle simmer. Partially cover the pot and let it cook at a steady low boil for 3 hours. Stir occasionally to prevent sticking, but don’t worry about breaking up the meat—it will tenderize beautifully.
After 3 hours, add the 15 ounces drained and rinsed black beans and 15 ounces drained and rinsed kidney beans. Return to a simmer and cook uncovered for another 3 hours. This long, slow cooking process allows all the flavors to meld together perfectly, creating a chili that’s rich, complex, and deeply satisfying.
Finish and Serve with Fresh Garnishes
Once the chili has cooked for a total of 6 hours, taste and adjust the seasoning if needed. The meat should be fork-tender and falling apart easily. Let the chili sit off the heat for 10 minutes to allow the flavors to settle.
Just before serving, stir in the 0.25 cup chopped fresh cilantro. This bright herb cuts through the richness and adds a fresh finish. Serve the chili hot with all the natural juices and toppings like shredded cheese, sour cream, or sliced avocado if desired. The longer it sits, the better it gets—this chili tastes even better the next day!
Pro Tips For Making 8 Hour Chili
- SEAR THE CHUCK ROAST: After browning onions and garlic, pull the pan off heat for 2 minutes—this lets the meat release its juices before hitting the skillet. A 3-4 minute sear on high heat, turning once, builds that deep, caramelized crust that won’t dissolve into the chili later. I used to skip this, and the chili always tasted flatter.
- CHOP ONIONS SMALL: Dice those yellow onions into 1/4-inch pieces—they’ll melt down fast and distribute flavor evenly. Big chunks turn mushy and watery by hour 4. My grandmother swore by this, and she was right: the chili tastes richer when the onions disappear completely.
- STIR THE CUMIN IN: Don’t just sprinkle ground cumin on top—work it into the oil with a spoon for 30 seconds before adding the meat. This blooms the spices and prevents clumping, giving you that warm, earthy depth without bitter pockets. I learned this the hard way after tasting a clump of raw cumin in my first batch.
- ADJUST SUGAR AT 6 HOURS: Taste the chili at the 6-hour mark, then add the dark brown sugar in small increments—start with 1/4 cup and go from there. The sugar caramelizes over time, so you can always add more later. I skip this when I’m lazy, but the dish is noticeably better when I don’t.
Flavor customization for this 8 hour chili
Spice Level Control
Want to adjust the heat? Swap the chili powder for Ancho chili powder (milder) or add 1 tsp cayenne pepper (fiery kick). For a smoky twist, replace ½ tbsp smoked paprika with 1 tsp chipotle powder—it adds deep, smoky heat.
I’ve found that Penzeys Spices has great pre-mixed blends if you prefer convenience. 🌶️
Sweet and Tangy Twist
Balance the richness with 1 tbsp apple cider vinegar or 1 tsp molasses during the last 30 minutes of cooking. The tang cuts through the fat, while molasses adds caramelized depth.
For extra sweetness, stir in 1 diced apple with the beans—it melts into the chili beautifully. This works especially well if you like your chili with a slightly fruity note.
Umami Boosters
Deepening the umami is my secret weapon. Add 1 tbsp soy sauce or 1 tsp fish sauce (trust me, it blends in) when you pour in the broth. For a meatier flavor without extra beef, stir in 1 tbsp Worcestershire sauce or 1 diced sun-dried tomato.
These additions make the chili taste even more restaurant-worthy without changing the texture. 💫
Herb Variations
Fresh herbs brighten up the dish. Swap cilantro for chopped parsley (more neutral) or dill (bright, tangy). For a Mediterranean touch, add 1 tsp dried oregano with the spices. If you love fresh basil, toss in ¼ cup chopped at the end—it pairs surprisingly well with the smoky flavors.
Just remember to add herbs after cooking to preserve their freshness.
Texture Adjustments
Want it thicker? Simmer uncovered for the last 30 minutes to reduce the liquid. For extra creaminess, stir in ½ cup sour cream or ¼ cup Greek yogurt during the final 10 minutes.
If you prefer it chunkier, keep the beans whole—no need to mash them. For a crunchy texture, top with toasted pepitas or crushed tortilla chips right before serving.
Regional Flavor Profiles
Texas-style? Add 1 diced jalapeño with the onions and a splash of beer (like Shiner Bock) instead of broth. For a New Mexican twist, include 1 tsp ground cumin and ½ tsp cinnamon (yes, really—it works!).
If you’re craving Caribbean vibes, stir in 1 tsp allspice and ½ tsp thyme with the spices. Each variation keeps the 8-hour foundation but adds a unique cultural touch. 🗺️
Nutrition facts
Frequently asked questions
Can I use ground beef instead of chuck roast?
You can, but the texture will be different. Ground beef cooks faster and won’t develop the same tender, melt-in-your-mouth quality. If you must use it, brown it well first and add 1 extra tablespoon tomato paste to compensate for the lack of deep meat flavor. For best results, stick with chuck roast—it’s worth the effort for that restaurant-quality texture.
How do I keep my chili from getting too watery?
Simmering uncovered for the last 30-60 minutes reduces liquid naturally. For extra thickness, stir in 1 tablespoon cornstarch mixed with 2 tablespoons cold water during the final 10 minutes of cooking. Another trick: mash ½ of the beans slightly with a fork while it simmers—they’ll release starch and thicken the sauce.
What’s the best way to reheat chili?
Gently reheat on the stove over low heat with the lid slightly ajar to prevent a skin from forming. For microwave reheating, use 50% power in 2-minute intervals, stirring between each. Always add a splash of broth or water to restore moisture—never reheat completely dry chili. The best option? Reheat in a Dutch oven on low heat for 15-20 minutes to maintain texture.
Can I make this chili in a slow cooker?
Brown the meat and caramelize onions as directed, then transfer everything to a 6-quart slow cooker. Cook on low for 8 hours or high for 5-6 hours. The slow cooker’s gentle heat works perfectly for this recipe—just stir occasionally to prevent sticking. The flavors will develop just as beautifully.
Why does my chili taste bland after 8 hours?
Most likely, you missed the browning step or didn’t toast your spices. Always sear the meat and toast spices in a dry pan for 30 seconds before adding to the pot. Another common issue is using low-quality broth—opt for homemade or high-quality store-bought. Finally, taste and adjust seasoning before serving, not after. A pinch of salt or extra chili powder can make all the difference.

- Pea Soup Instant Pot Recipe: Velvety Green Smoothness in 20 Minutes - November 1, 2026
- Pork Loin Pulled Pork Crock Pot Recipe: Slow-Smoked Tenderness With Zero Dryness - November 1, 2026
- Baked Potatoes in Crock Pot Recipe: Buttery Interiors and Crispy Top Magic - November 1, 2026