
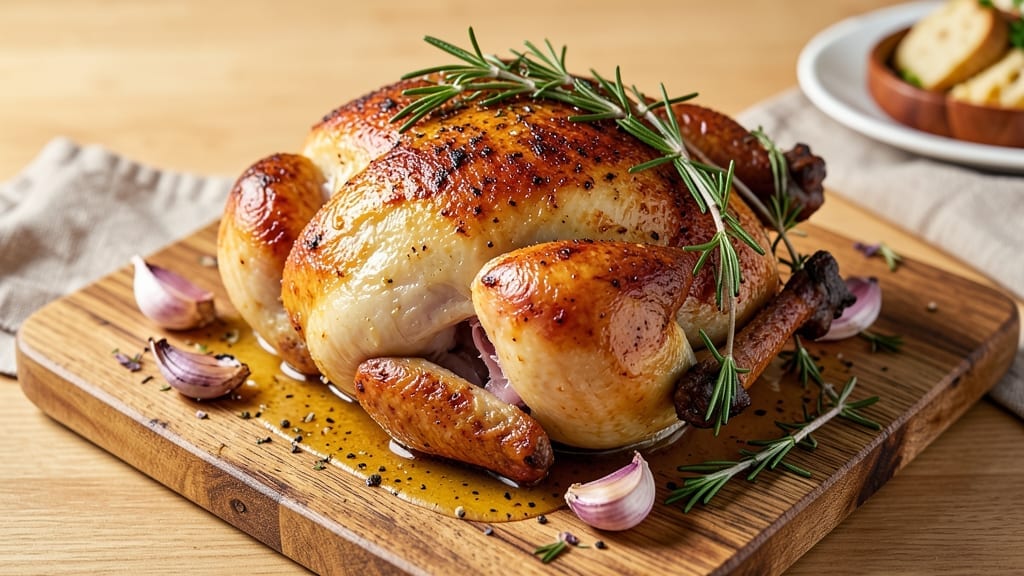
A 3 lb roast chicken delivers restaurant-quality results with crispy golden skin and juicy meat that practically falls off the bone. The secret lies in proper seasoning and a slow roast that transforms simple ingredients into a showstopping centerpiece.
I’ve perfected this method over countless holiday tables, and it never fails to impress—even skeptical eaters.
This recipe focuses on three critical elements: high heat for crispy skin, low-and-slow roasting for even cooking, and pan gravy that elevates the dish from ordinary to extraordinary.
With just 15 minutes of prep and 2 hours in the oven, you’ll have a whole chicken that’s tender, flavorful, and ready for carving. The key is patience—rushing leads to dry meat, but this method guarantees juicy results every time.
What you’ll achieve is a golden-brown crust that shatters at the touch, tender meat that pulls away cleanly from the bone, and a rich pan gravy that adds depth to every bite.
The aroma alone will have everyone gathering around the table, and the presentation makes it feel like a special occasion—even on a weeknight. This is the kind of chicken that makes store-bought options look like a compromise.
Serve with roasted vegetables, crusty bread for dipping into the gravy, or a simple green salad to balance the richness. The leftovers reheat beautifully for sandwiches or salads the next day. Let’s get started on a chicken that will become your new standard for weeknight dinners and holiday feasts alike.
Ingredients for 3 lb roast chicken
A 3 lb roast chicken transforms with these carefully chosen ingredients into a showstopping centerpiece.
| Ingredient | Amount | Notes |
|---|---|---|
| Whole Roasting Chicken 🍗 | 3 lb | Fresh, preferably free-range |
| Unsalted Butter 🧈 | ½ cup | Cold, cut into 1-inch pieces |
| Kosher Salt 🧂 | 2 tbsp | Diamond Crystal preferred |
| Freshly Ground Black Pepper 🌶️ | 1 tbsp | Coarse grind for texture |
| Garlic Cloves 🧄 | 6 cloves | Peeled, smashed slightly |
| Fresh Rosemary 🌿 | 1 tbsp | Chopped, stems removed |
| Fresh Thyme 🌿 | 1 tbsp | Leaves only, stems discarded |
| Lemon Juice 🍋 | 2 tbsp | Freshly squeezed |
| Vegetable Oil 🫒 | 2 tbsp | For coating roasting pan |
| Chicken Broth 💧 | 1 cup | Low-sodium, for gravy |
| All-Purpose Flour 🌾 | 2 tbsp | For gravy thickening |
| Fresh Parsley 🌿 | ¼ cup | Chopped, for garnish |
The chicken is the star, so quality matters. Look for a fresh, free-range bird with vibrant skin and no off-odors. Costco or Whole Foods typically carry excellent options, though your local butcher often has superior quality. Avoid pre-brined chickens—the salt levels can be unpredictable. For the butter, Plugrá or Land O’Lakes unsalted are reliable choices, but any high-fat, cold butter will work. The herbs should be fresh, with rosemary and thyme stems removed for maximum flavor. If using dried herbs, reduce to one-third the amount, but fresh is ideal for this dish.
No fresh herbs? Dried rosemary and thyme work at one-third the quantity. Short on lemon juice? Orange juice or vinegar can substitute, though flavor will differ slightly. For the gravy, low-sodium chicken broth is critical—high-sodium versions can make the dish taste flat. If you’re concerned about gluten, substitute the flour with cornstarch for thickening. The vegetable oil is just for the pan; avocado or canola oil both work well. For a richer gravy, deglaze the pan with a splash of white wine instead of broth, but ensure it’s dry before adding the flour.
Prep the chicken the night before if possible—pat it dry and refrigerate uncovered for 24 hours to enhance crispiness. Store butter pieces on a plate in the freezer until ready to use. Fresh herbs keep best wrapped in damp paper towels in the fridge for up to 5 days. The roasted chicken reheats beautifully—cover with foil and warm in a 350°F oven for 20-30 minutes. Gravy can be made ahead and reheated on the stove, stirring constantly to prevent lumps. Leftovers keep for 3-4 days in the fridge or 3 months frozen.
Why You’ll Love This Recipe
- I swear by this combo: butter and salt. That’s it. Just melt butter under the skin, sprinkle salt inside and out, and let the oven do the rest. No fancy rubs, no stress—just pure, golden, crispy perfection.
- Two-Ingredient Magic: I swear by this combo: butter and salt. That’s it. Just melt butter under the skin, sprinkle salt inside and out, and let the oven do the rest. No fancy rubs, no stress—just pure, golden, crispy perfection.
- Weeknight Hero: Honestly, this chicken is my secret weapon when I’m too tired to think. Toss it in the oven while I chop veggies or set the table—it’s done before the kids even finish their homework. (Yes, even on a Tuesday night.)
- Leftovers That Win: The first night, it’s showstopping. The second? Even better. Shred it for sandwiches, toss it into pasta, or just reheat slices with garlic butter—it’s that good. My freezer’s always stocked with these.
Step-by-step instructions for juicy roast chicken with pan gravy
Master this technique and you’ll achieve restaurant-quality roast chicken with crispy skin and rich pan gravy every time.
Prepare and Season the Chicken
Remove the chicken from the refrigerator and let it sit at room temperature for 30 minutes before roasting. This ensures even cooking throughout. Pat the chicken completely dry with paper towels—this is critical for crispy skin. I mean REALLY dry, especially in the cavity and under the wings where moisture tends to collect.
Rub the chicken cavity with 2 tablespoons kosher salt and 1 tablespoon freshly ground black pepper. Then season the outside generously with the remaining salt and pepper. The salt needs time to penetrate the skin, so I like to season the chicken 1 hour before roasting and let it rest uncovered on a wire rack in the refrigerator. This drying and salting process creates that perfect golden crust.
Create the Herb Butter and Sear the Chicken
In a small bowl, combine the ½ cup cold unsalted butter, 6 smashed garlic cloves, 1 tablespoon chopped fresh rosemary, and 1 tablespoon fresh thyme leaves. Rub this mixture all over the chicken, including inside the cavity. The butter will baste the chicken as it roasts, keeping it moist while creating flavorful drippings for the gravy.
Preheat your oven to 425°F. Place a roasting rack in a deep baking dish and coat it lightly with 2 tablespoons vegetable oil. Position the chicken breast-side up on the rack. The oil prevents sticking and helps create crispy skin. Roast for 1 hour, then reduce heat to 375°F and continue roasting for another 45-60 minutes or until the internal temperature reaches 165°F in the thickest part of the thigh.
Make the Pan Gravy
While the chicken roasts, prepare the gravy. After removing the chicken from the oven, carefully transfer it to a cutting board and tent loosely with foil. Let it rest for 15 minutes before carving—this resting period allows the juices to redistribute.
Place the roasting pan on the stovetop over medium heat. Add 1 cup chicken broth and scrape up all the browned bits from the bottom of the pan using a wooden spoon. This deglazing captures all the flavorful fond that would otherwise be lost. Bring the liquid to a gentle simmer and whisk in 2 tablespoons all-purpose flour to thicken the gravy. Cook for 2-3 minutes until the gravy coats the back of a spoon.
Finish and Serve
Carefully pour the gravy through a fine-mesh strainer into a clean saucepan and return it to the stovetop. Keep it warm over low heat until ready to serve. Carve the chicken into serving pieces and arrange on a platter. Spoon the gravy over the top and garnish with ¼ cup chopped fresh parsley.
For extra brightness, drizzle the chicken with 2 tablespoons lemon juice just before serving. The acidity cuts through the richness of the butter and enhances all the herb flavors. Serve immediately with roasted vegetables or crusty bread to soak up that delicious gravy.
Pro Tips For Making 3 Lb Roast Chicken
- Salt the Skin First: The butter won’t stick worth a damn if you wait. Pat that chicken dry with paper towels, then rub it with salt before adding butter—let it sit for 10 minutes. This pulls moisture to the surface, so when you add the butter, it’ll crisp up like a golden shield instead of steaming into a sad, pale mess.
- Don’t Crowd the Pan: I used to shove that 3-pound bird into a skillet too small for its frame, and the butter would pool instead of crisping. Use a roasting pan or a deep enough skillet—at least 12 inches wide—so the chicken has room to breathe. If it’s crowded, the skin won’t get that crackling crust, and the butter will turn into a greasy bath.
- Use a Meat Thermometer: Guessing is how you end up with dry, overcooked chicken or raw, sad centers. Stick that probe into the thickest part of the thigh (not touching bone) and pull it at 165°F. If you’re cooking it uncovered, start checking at 145°F—this bird cooks faster than you think, especially with high heat.
- Crush the Garlic: Whole cloves? Nope. Mince or crush those garlic cloves before stuffing them into the cavity—this way, they’ll actually infuse the meat instead of sitting there like decorative placeholders. I used to skip this, and the flavor was half as strong. A few rough chops with a knife or a quick press with the flat side of your knife makes all the difference.
Make-ahead tips for this recipe
Prep Ahead Strategy
Season and refrigerate your chicken 24 hours before cooking—this dries the skin perfectly for crispiness. Pat it dry with paper towels, then rub with 2 tbsp kosher salt and 1 tbsp black pepper.
Store uncovered on a wire rack in the fridge. The next day, just 30 minutes before roasting, take it out to bring it to room temperature. 💡
Herb Butter Prep
Make the herb butter mixture a day ahead and store it in an airtight container in the fridge. Combine ½ cup cold butter, 6 smashed garlic cloves, 1 tbsp each chopped rosemary and thyme, and 2 tbsp lemon juice.
This shortcut saves time on cooking day and keeps all flavors fresh. Just rub it on the chicken right before roasting.
Gravy Prep Shortcut
Deglaze the pan and make the gravy while the chicken rests—this keeps everything on schedule. Store leftover gravy in a sealed container in the fridge for up to 4 days or freeze it for 3 months.
Reheat gently on the stove, stirring constantly to prevent lumps. A splash of chicken broth helps thin it out if needed.
Chicken Storage Tips
Let the chicken cool completely before storing leftovers in an airtight container for 3-4 days in the fridge. For longer storage, freeze it for up to 3 months.
To reheat, cover with foil and warm in a 350°F oven for 20-30 minutes until heated through. Avoid microwaving—it dries out the meat.
Make-Ahead Timeline
Here’s my foolproof schedule: Night before, season the chicken and refrigerate uncovered. Morning of, prep the herb butter and store it. 2 hours before serving, roast the chicken (it rests while you make gravy). 15 minutes before serving, drizzle with lemon juice and garnish with parsley.
Everything comes together like clockwork! ⏰
Gravy Make-Ahead Hack
Make gravy up to 2 days ahead and store it in the fridge. When reheating, whisk in 1 tbsp cold water to prevent thickening. For extra richness, add a pat of cold butter while reheating.
This keeps the gravy silky smooth and ready to serve at a moment’s notice. Perfect for busy weeknights! 🍽️
Nutrition facts
Frequently asked questions
How do I know when my 3 lb chicken is fully cooked?
Use a meat thermometer to check the internal temperature in the thickest part of the thigh—it should reach 165°F. The skin should also be golden brown and crispy, with juices running clear when pierced. Never rely on color alone, as some chickens may appear cooked but still be underdone.
Can I roast this chicken at a lower temperature for more even cooking?
Yes! For a gentler approach, roast at 325°F for 3-3.5 hours instead of the high-heat method. This works well for larger birds but may yield slightly less crispy skin. The key is patience—low-and-slow ensures juicy meat throughout. For best results, baste the chicken every 45 minutes with its own juices.
What’s the best way to crisp up the skin if it’s not golden enough?
Boost crispiness by broiling for 3-5 minutes at the end (watch closely to avoid burning). For extra insurance, place the chicken on a wire rack over a baking sheet during roasting—this allows heat to circulate underneath. If the skin still feels soft, try brushing with melted butter at the end and broiling again.
How do I adjust this recipe for a smaller or larger chicken?
For a 2 lb chicken, reduce roasting time by 30-45 minutes at 425°F. For a 4 lb chicken, increase time by 45-60 minutes or roast at 350°F for even cooking. Always use a meat thermometer—larger birds need more time to reach 165°F safely.
Why is my pan gravy too thin or too thick?
For thin gravy, simmer longer to reduce. For thick gravy, whisk in 1 tsp cornstarch mixed with cold water. If it’s too thin, reduce heat and cook uncovered until slightly thickened. Always deglaze thoroughly—those browned bits are flavor gold! For extra richness, whisk in 1 tbsp cold butter at the end.

- Pea Soup Instant Pot Recipe: Velvety Green Smoothness in 20 Minutes - November 1, 2026
- Pork Loin Pulled Pork Crock Pot Recipe: Slow-Smoked Tenderness With Zero Dryness - November 1, 2026
- Baked Potatoes in Crock Pot Recipe: Buttery Interiors and Crispy Top Magic - November 1, 2026