
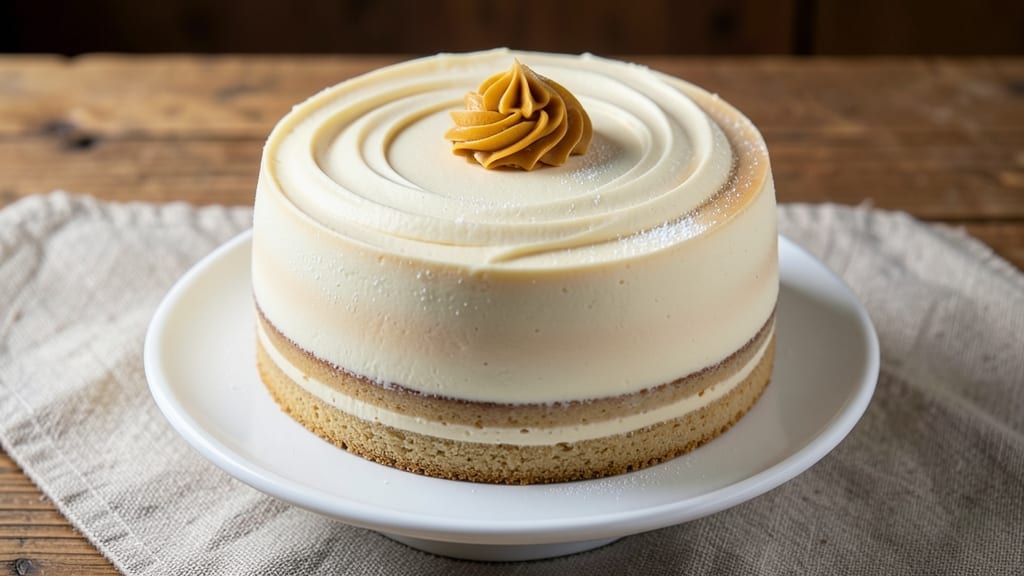
Creating an 8-inch hemisphere cake transforms ordinary desserts into showstopping centerpieces that command attention at every table. ✨ This recipe delivers precision tiered elegance with a perfectly domed shape, silky crumb, and flawless frosting—ideal for weddings, galas, or milestone celebrations where presentation matters as much as taste.
The secret lies in two key techniques: baking in a hemisphere pan (or a round pan with a doming tool) and using a stiff buttercream that holds its shape while creating a smooth, glossy finish.
With simple ingredients and methodical steps, even home bakers can achieve restaurant-quality results that look professionally crafted.
What you’ll achieve is a stunning half-moon cake with a crisp exterior, tender interior, and velvety frosting that stays perfectly in place. The dome shape creates an optical illusion of grandeur, making it appear larger than its 8-inch diameter—ideal for centerpieces that impress without overwhelming smaller spaces.
This recipe adapts beautifully to classic vanilla or chocolate flavors, and the frosting can be tinted to match any color scheme. Whether you’re decorating with fresh flowers, metallic accents, or delicate sugar work, the clean lines and symmetrical shape provide the perfect canvas for your vision.
Ingredients for 8 inch hemisphere cake
Precision ingredients for a flawless 8-inch hemisphere cake that elevates any special occasion.
| Ingredient | Amount | Notes |
|---|---|---|
| All-Purpose Flour 🌾 | 2 ½ cups | Sifted for lightness, bleached preferred |
| Unsalted Butter 🧈 | 1 ½ cups | Cold, cubed, European-style preferred |
| Granulated Sugar 🍚 | 2 cups | Superfine for smoother texture |
| Large Eggs 🥚 | 4 whole | Room temperature, separated |
| Vanilla Extract 🌿 | 2 tsp | Pure Madagascar bourbon preferred |
| Baking Powder 🧂 | 2 tsp | Aluminum-free for stability |
| Salt 🧂 | ½ tsp | Fine sea salt, Diamond Crystal preferred |
| Heavy Cream 🥛 | 2 cups | Cold, full-fat for stiff buttercream |
| Powdered Sugar 🍚 | 4 cups | Sifted for smooth frosting |
| Vanilla Bean Paste 🌿 | 1 tbsp | For intensified vanilla flavor |
| Cornstarch 🌾 | 1 tbsp | For buttercream stability |
| Food Coloring 🎨 | ½ tsp | Gel-based, neutral tint preferred |
| Edible Gold Leaf ✨ | 1 sheet | Optional for luxurious finish |
The European-style unsalted butter makes all the difference here—its higher fat content yields a richer, more stable buttercream that holds its shape perfectly. Miyoko’s or Plugrá are my go-tos, but any high-quality brand works if it’s at least 82% fat. For the flour, sift it twice to eliminate lumps, which is critical for that silky crumb. The vanilla extract should be pure Madagascar bourbon—imitation extracts contain artificial flavors that can alter the delicate balance. If you’re using a vanilla bean, scrape the seeds and add both the paste and the pod to the batter for an intensified aroma. The powdered sugar must be sifted with the cornstarch to prevent graininess in the frosting, and Domino brand is my preferred choice for its consistent fineness.
No European-style butter? Plugrá or Land O’Lakes Cream Top work in a pinch, though they may yield slightly less stable buttercream. Substituting vanilla bean paste with regular extract is fine, but reduce to 1.5 teaspoons to avoid overpowering the flavor. For a chocolate variation, replace 0.5 cup of butter and 0.5 cup of flour with 0.5 cup of cocoa powder and 0.25 cup of espresso powder—this deepens the chocolate flavor without making the cake dense. The food coloring should be gel-based to avoid altering the buttercream’s consistency; Wilton or Americolor are reliable brands. If you’re avoiding gold leaf, a metallic dust mixed into the buttercream creates a similar luxurious effect without the fuss.
Store the cake components separately for optimal freshness: the cake layers can be wrapped in plastic and kept at room temperature for 2 days, while the buttercream should be refrigerated in an airtight container for up to 5 days. To assemble, bring both components to room temperature before frosting to ensure a smooth finish. The edible gold leaf, if used, should be applied immediately before serving to maintain its brilliance. For long-term storage, the fully frosted cake can be kept in the freezer for up to 2 months, though it’s best enjoyed within 3 days of assembly for peak texture and appearance.
Why You’ll Love This Recipe
- No-Fuss Mixing: I swear by the creamy butter-egg combo in this batter—it’s one bowl, five ingredients, and zero guesswork. The vanilla extract cuts through the sweetness just enough to keep it balanced, and honestly? That’s the magic.
- Buttery Vanilla Bliss: That first bite of moist crumb with the whisper of vanilla? It’s like a hug in cake form. The sugar caramelizes just right, giving it that perfect golden edge without tasting overpowering.
- Birthday to Brunch: This cake is my go-to for anything—birthday celebrations, potlucks, or even a lazy Sunday breakfast. The 8-inch size feeds a crowd but doesn’t overwhelm, and the simple frosting options (or none at all) make it adaptable.
- Leftovers That Win: Between us, this cake tastes even better the next day. The flour and butter combo holds up perfectly, so I always bake an extra slice (or two) for later—no sad, dry crumbs here. Budget-friendly and foolproof.
Step-by-step instructions for precision tiered cake construction
Master the technique for flawless hemisphere cakes with architectural symmetry and perfect texture.
👨🍳 Step 1: Prepare the Cake Batter with Precision
Preheat your oven to 350°F and grease two 8-inch round cake pans with the 1.5 cups unsalted butter, reserving ½ cup for later use. Sift together the 2.5 cups all-purpose flour, 2 tsp baking powder, and 0.5 tsp salt in a medium bowl—this prevents lumps and ensures even texture.
In a separate large bowl, cream the remaining 1 cup unsalted butter with the 2 cups granulated sugar on medium speed until light and fluffy (3-5 minutes). Add the 4 whole large eggs one at a time, mixing well after each addition. Incorporate the 2 tsp vanilla extract and 1 tbsp vanilla bean paste, scraping down the sides as needed for a homogenous batter.
🍳 Step 2: Bake and Cool for Structural Integrity
Divide the batter evenly between the prepared pans and bake for 25-30 minutes or until a toothpick inserted into the center emerges clean. Rotate the pans halfway through baking for even browning. Let the cakes cool in their pans for 10 minutes before transferring to a wire rack to cool completely—this prevents cracking during the tiering process.
While the cakes cool, prepare the 2 cups heavy cream by chilling it in the refrigerator for 30 minutes and whipping it to stiff peaks with the 1 tbsp cornstarch and 0.5 tsp food coloring until glossy and stable. This will serve as your filling and structural adhesive between tiers.
🥘 Step 3: Level and Assemble the Hemisphere Structure
Once completely cooled, level the top of each cake using a serrated knife or cake leveler—this ensures perfect alignment for your hemisphere shape. Place the first cake layer on a cake stand or sturdy plate, then pipe a generous layer of the whipped cream filling onto its surface, leaving a ½-inch border around the edges.
Position the second cake layer on top, gently pressing down to create a seamless bond. Use a long serrated knife to trim any excess whipped cream from the sides, maintaining a clean vertical edge. Wrap the entire cake in plastic wrap and refrigerate for 1 hour to firm up the structure—this critical step prevents collapse during the final tiering.
🔪 Step 4: Create the Hemisphere Cut and Apply Gold Leaf
After chilling, carefully remove the cake from the refrigerator and use a sharp serrated knife to cut it horizontally through the center, creating two perfect hemisphere halves. This requires steady pressure—go slow to avoid crumbling. Place one hemisphere on a cake board and pipe a thin layer of whipped cream around the curved edge to create an adhesive base.
Gently press the second hemisphere onto the first, aligning the edges precisely. For the luxurious finish, carefully apply the 1 sheet edible gold leaf to the top hemisphere using a soft brush and adhesive size, working in small sections to avoid wrinkling. The gold leaf should cover the entire top surface for maximum visual impact.
⏰ Step 5: Final Chill and Serving Preparation
Return the assembled hemisphere cake to the refrigerator for at least 2 hours to allow the whipped cream filling to fully set and the gold leaf to adhere properly. This resting period also redistributes moisture within the cake layers, ensuring optimal texture.
Before serving, dust the cake with a fine layer of 4 cups powdered sugar sifted through a sieve for an elegant finish. The final presentation should feature clean, architectural lines with the gold leaf catching the light beautifully. Serve chilled for the best texture contrast between the rich cake and silky filling.
Pro Tips For Making 8 Inch Hemisphere Cake
- Chill the Butter First: Take that cold stick of butter straight from the fridge—yes, even if you’re eager to start—and cut it into small cubes. I learned this the hard way after mixing butter and sugar into a greasy mess that wouldn’t emulsify. Cold butter creates air pockets, so your cake rises higher and stays tender.
- Weigh Your Flour: Scooping flour from the bag packs in extra air and changes the ratio—trust me, your cake will be denser than a brick. Use a kitchen scale for precision, especially with this recipe’s delicate balance of butter and sugar. If you’re stuck, spoon flour into a measuring cup and level it off with a knife, but don’t tap it.
- Rotate the Pan: That hemisphere shape? It’s not magic—it’s physics. Midway through baking, swap the pan’s position front-to-back and side-to-side in the oven. This prevents one side from overbrowning while the other stays pale. I used to ignore this, and my cakes always had a sad, uneven top.
- Let It Cool Flat: Resist the urge to flip that dome onto a plate immediately—wait until the cake is fully cooled in the pan. The structure needs time to set, or it’ll collapse like a deflating balloon. Pop it out when it’s lukewarm, then gently shape it onto your serving platter. Patience here saves heartbreak later.
Essential equipment for this recipe
Hemisphere Pan Essentials
The heart of this recipe is your 8-inch hemisphere pan—I recommend the Wilton 8-inch Dome Cake Pan for its precise shape and nonstick finish. If you don’t have one, a standard 8-inch round cake pan with a doming tool (like the Ateco 2500) works beautifully.
For a budget-friendly option, use a round pan and shape the cake with a serrated knife after baking. Always grease the pan thoroughly with ½ cup unsalted butter and line the bottom with parchment paper to ensure easy release. 🔥
Precision Tools for Tiering
For flawless hemisphere assembly, invest in a cake leveler (I love the OXO Good Grips) to create perfectly even layers. A long serrated knife (like the Mercer Culinary Genius) is essential for clean cuts—it’s worth spending extra for a high-quality blade to avoid crumbling.
Don’t skip the cake stand (this Amazon Basics one is affordable and sturdy) to elevate your cake and showcase its architectural beauty. A piping bag with a star tip (Wilton 1M) helps create clean, professional-looking whipped cream layers.
Buttercream Stability Tools
Stiff buttercream is the secret to holding your hemisphere shape, so a hand mixer (like the KitchenAid KSM150PSER) is a must for whipping the 2 cups heavy cream to stiff peaks. For extra stability, I add 1 tbsp cornstarch—it’s a game-changer for preventing collapse.
A fine-mesh sieve (like the OXO Good Grips) ensures your 4 cups powdered sugar is lump-free, and a damp pastry brush helps apply edible gold leaf smoothly. Keep your workspace chilled by placing a cooling rack in the freezer while you work.
Decorating Finishes
For that luxurious finish, edible gold leaf (like Leaf Gold 24K) is optional but stunning. If you’re avoiding it, a metallic dust (Wilton Gold Luster Dust) mixed into the buttercream achieves a similar effect.
A soft makeup brush (like the Da Vinci Maestro) helps apply gold leaf without wrinkles. For dusting powdered sugar, a fine-mesh sieve ensures an even, elegant coating.
Don’t forget a cake turntable (this Amazon Basics one is perfect) to rotate your cake while decorating for precision and ease. ✨
Storage and Serving Gear
Store your cake components properly with airtight containers (I use Glasslock containers) to keep layers fresh. For serving, a cake knife with a serrated edge (like the Mercer Culinary) ensures clean slices.
If you’re transporting the cake, a cake carrier box (Wilton’s Cake Carrier) protects it from shifting. Keep a small offset spatula (like the Ateco 2500) handy for quick touch-ups on the frosting before serving.
A chilled cake board (marble or acrylic) helps maintain the cake’s shape during the final chill.
Nutrition facts
Frequently asked questions
Can I make this hemisphere cake without a special dome pan?
Use two standard 8-inch round cake pans instead. After baking, carefully level the cakes and use a serrated knife to create the hemisphere shape by cutting horizontally through the center. For extra precision, chill the cakes for 30 minutes before cutting to prevent crumbling.
How do I prevent the cake from collapsing when assembling?
Chill the cake layers for 1 hour before stacking, and use a stiff whipped cream filling (with 1 tbsp cornstarch) as the adhesive. Apply the cream only to the center of the first layer, leaving a ½-inch border uncovered. This creates a stable foundation that prevents collapse during assembly.
What’s the best way to store a fully assembled hemisphere cake?
Keep it refrigerated in an airtight container for up to 3 days for best texture. For longer storage, freeze the fully frosted cake (without gold leaf) for up to 2 months. Always bring it to room temperature before serving to restore the perfect crumb and frosting consistency.
Can I make this cake gluten-free?
Yes! Replace the 2.5 cups all-purpose flour with a 1:1 gluten-free baking flour blend (like Bob’s Red Mill) plus an extra ½ tsp xanthan gum. Reduce the baking powder to 1.5 tsp and increase the butter by ¼ cup to compensate for the blend’s density. Bake at 325°F for 30-35 minutes to prevent over-browning.
How do I achieve a smoother frosting finish?
Sift the 4 cups powdered sugar thoroughly to remove lumps, and whip the buttercream until it’s completely smooth with no streaks. Use a damp pastry brush to gently smooth the frosting while the cake is chilled. For extra shine, dust with a fine layer of powdered sugar through a fine-mesh sieve right before serving.
