
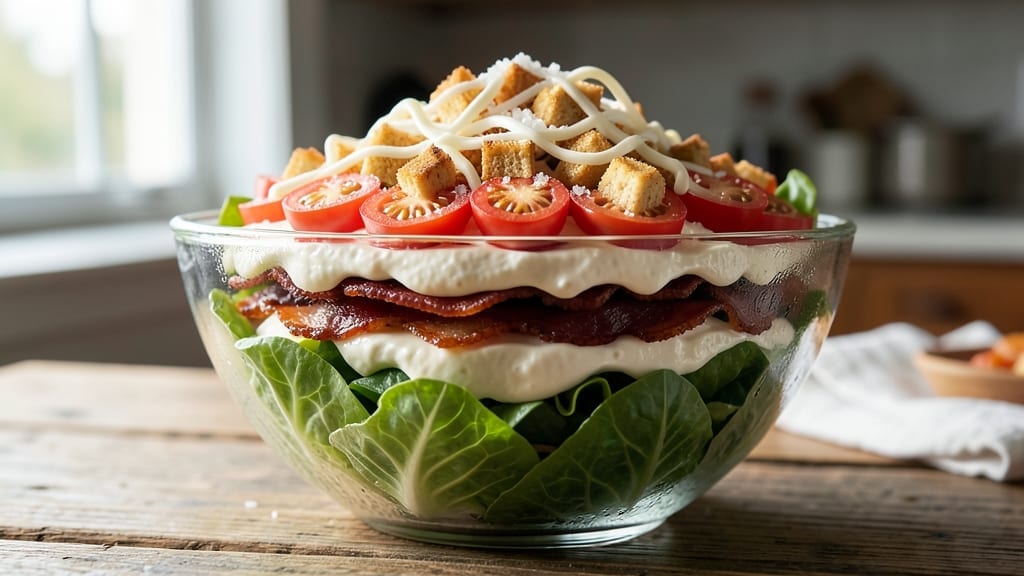
An 8-layer salad transforms a simple bowl into a showstopping dish that’s creamy, crunchy, and packed with color—perfect for gatherings or a restaurant-worthy meal at home. The secret lies in layering ingredients strategically: crisp lettuce at the base, creamy cheese and protein in the middle, and crunchy toppings to finish.
I’ve perfected this technique over years of hosting, ensuring every bite delivers texture and flavor without sacrificing balance.
What sets this salad apart is its foolproof assembly method, where each layer builds on the last—starting with sturdy greens to hold up to toppings and ending with a drizzle of creamy dressing that ties everything together.
The layers include fresh spinach, tangy bacon, creamy cheese, crispy croutons, juicy tomatoes, and more, all arranged for maximum visual appeal and taste. Prep ahead to save time, and customize with your favorite proteins or veggies.
By the time you’re done, you’ll have a salad that’s as impressive as it is delicious—creamy, crunchy, and colorful in every forkful. The layers create a satisfying mix of textures, from tender greens to crispy toppings, while the dressing binds it all into a cohesive, flavorful bite.
This is the kind of salad that makes guests ask for the recipe and leaves your table looking as good as it tastes.
Pair it with a crisp white wine or a refreshing cocktail to elevate the experience further. Whether you’re feeding a crowd or treating yourself to a special meal, this 8-layer salad delivers restaurant-quality results with minimal effort. Let’s build it layer by layer.
Ingredients for 8 layer salad
Eight layers of crunch, cream, and color—all you need for showstopping salad magic.
| Ingredient | Amount | Notes |
|---|---|---|
| Romaine Lettuce 🥬 | 2 whole | Hearts separated for sturdy base |
| Cream Cheese 🧀 | 8 oz | Full-fat for creamy texture |
| Crispy Bacon 🥓 | 6 oz | Cooked until extra crispy |
| Red Bell Pepper 🌶️ | 1 whole | Thinly sliced for crunch |
| Cherry Tomatoes 🍅 | 1 ½ cups | Halved for juicy burst |
| Croutons 🍞 | 2 cups | Buttery, toasted variety |
| Blue Cheese Crumbles 🧀 | 1 cup | Aged for tangy flavor |
| Green Onions 🧅 | ¼ cup | Sliced thin for garnish |
| Ranch Dressing 🥄 | 1 cup | Homemade or store-bought |
| Salt 🧂 | 1 tsp | Kosher or sea salt |
| Black Pepper 🌶️ | ½ tsp | Freshly ground preferred |
| Olive Oil 🫒 | 2 tbsp | For drizzling between layers |
| Toothpicks 🔨 | 16 whole | For securing layers |
Romaine is your foundation—look for crisp, vibrant leaves with no brown edges. Trader Joe’s or Whole Foods usually carry the best quality hearts, but any sturdy romaine works. The cream cheese? Full-fat is non-negotiable—it’s what makes those layers hold together beautifully. For the bacon, thick-cut is best—it crisps up perfectly and adds that smoky depth. I always cook a big batch and store it in the freezer for quick salad assembly later. The blue cheese should be crumbly and aged—no wax coating means better flavor.
No ranch dressing? Greek yogurt + lemon juice + herbs works perfectly. Short on croutons? Toasted bread cubes with garlic powder save the day. Cherry tomatoes too expensive? Grape tomatoes halved give the same juicy pop. The green onions can be swapped for chives if you prefer—just slice them thin. For extra crunch, add crispy fried shallots at the top. And trust me on the olive oil—drizzle between every layer to keep things from getting soggy. The toothpicks are optional but worth it for crowd-pleasing presentation.
Assemble this salad up to 4 hours ahead—the flavors meld beautifully. Store layers separately in the fridge, then stack when ready to serve. The croutons stay crispy for 2 days if kept in an airtight container, but bacon and tomatoes are best used within 1 day. For a make-ahead hack, freeze the assembled salad (without dressing) for up to 1 month. Just thaw overnight and dress right before serving.
Why You’ll Love This Recipe
- Stacks Like Magic: I swear, the layers go together faster than you can say “salad.” Just slice, layer, and chill—no fancy techniques, no stress. That creamy cheese layer actually holds everything in place like a dream.
- Bacon-Cream Cheese Obsession: Honestly, the combo of smoky bacon and velvety cream cheese is ridiculously good. The sweet cherry tomatoes and crisp bell pepper just make it even better—like a party in your mouth.
- Potluck or Picnic Hero: Between us, this is my go-to for gatherings. It travels well, stays fresh, and looks impressive without effort. Plus, it’s the one dish that even my picky uncle won’t complain about.
- Leftovers That Don’t Suck: I make a giant bowl on Sunday, and it’s still perfect by Thursday. The bacon stays crispy, the lettuce holds up, and the cream cheese keeps it rich—no sad, wilted mess here.
Step-by-step instructions for 8 layer salad
Here’s how to build this showstopper layer by layer—creamy, crunchy, and packed with flavor.
Prepare the Cream Cheese Base
In a medium bowl, combine the 8 oz cream cheese with the 1 cup ranch dressing until completely smooth. This creamy mixture will be the glue that holds your salad together. I like to use a hand mixer for this step—it ensures no lumps remain and gives you a perfectly silky texture. Spread this mixture evenly over the bottom of each of your 8 serving dishes (about 2 tablespoons per dish). The cream cheese should be about ¼-inch thick—this ensures each layer will stay in place without sliding.
Here’s the thing—don’t skip this step. The cream cheese layer prevents sogginess and gives your salad that signature creamy foundation. If you’re worried about the salad being too rich, remember that the crispy bacon and crunchy vegetables will balance it out beautifully. Let the cream cheese layer sit for 5 minutes at room temperature while you prepare the remaining ingredients. This brief rest helps it firm up slightly for easier layering.
Assemble the Core Layers
Start with the sturdiest ingredients to build your foundation. First, separate the 2 whole romaine lettuce hearts and arrange them upright in each dish, pressing them gently into the cream cheese. The romaine should stand tall enough to reach about 2 inches up the side of your dish—this creates the perfect vertical structure. Next, sprinkle ½ teaspoon salt and ¼ teaspoon black pepper evenly over the romaine. This seasoning will penetrate through the layers as you build.
Now add the 6 oz crispy bacon in an even layer over the romaine. I like to break it into slightly smaller pieces for easier distribution. Follow this with the 1 whole red bell pepper, thinly sliced into strips. The bell pepper should cover the bacon completely—this adds a satisfying crunch and vibrant color. Finally, add the 1.5 cups halved cherry tomatoes in a single layer. The juicy tomatoes will add moisture that prevents the salad from drying out as it sits.
Add the Crunchy and Tangy Layers
Sprinkle the 2 cups croutons evenly over the cherry tomatoes. These buttery croutons will add texture contrast and help stabilize the upper layers. Next, add the 1 cup blue cheese crumbles in an even layer. The blue cheese should be distributed evenly—this ensures each bite has that tangy punch. Finally, add the 0.25 cup sliced green onions in a single layer on top. The green onions add freshness and a pop of color that makes your salad visually stunning.
Here’s where it gets fun—gently press down on each layer with the back of a spoon. This helps everything stick together and prevents the salad from collapsing when you slice it. I press down firmly but not so hard that you mash the ingredients. You want them to stay intact but still retain their individual textures. This is especially important for the romaine—you want it to stay crisp rather than wilted.
Secure and Chill for Perfect Texture
Drizzle 1 tablespoon olive oil evenly over each salad. This helps bind the layers together and adds a subtle richness. Now for the magic touch—insert 2 toothpicks into each salad at a slight angle, pressing them through all layers to secure everything. The toothpicks should go in at about a 45-degree angle from the top edge to the bottom. This keeps the salad intact when you slice it later.
Cover each salad with plastic wrap and refrigerate for at least 4 hours, or preferably overnight. This chilling time is crucial—it allows all the flavors to meld together and ensures the cream cheese sets properly. The longer it chills, the better the texture will be when you slice it. I like to make these ahead of time so they’re ready to impress when guests arrive. If you’re short on time, at least 2 hours in the fridge will work, but you’ll sacrifice some of that perfect texture.
Slice and Serve with Confidence
When you’re ready to serve, carefully remove one toothpick from each salad. Using a sharp chef’s knife, cut each salad into 8 equal wedges by making vertical slices from the top to the bottom. The toothpicks make this easy—they create clean lines where the knife can glide through. Serve immediately so guests can enjoy the perfect balance of creamy, crunchy, and tangy flavors in every bite.
Here’s the secret to serving success: present the wedges on a large platter with the creamy base showing. The contrast of the rich cream cheese against the colorful layers makes this salad look like a work of art. Each bite should deliver a satisfying combination of textures—crisp romaine, creamy cheese, crunchy bacon, and tangy blue cheese. Don’t forget to have extra toothpicks on hand for guests who want to pick up their own wedges!
Pro Tips For Making 8 Layer Salad
- CHILL THE CREAM CHEESE: Spread the cream cheese layer on a plate and pop it in the fridge for 15 minutes before assembling. Cold cream cheese holds its shape better—no melty, sad layers sliding everywhere when you cut into it.
- DRY THE LETTUCE WELL: Toss the romaine in a salad spinner (or wring it out in a towel) until it’s bone-dry. Wet leaves make the whole salad soggy, especially when stacked with the juicy tomatoes and bacon.
- COOK BACON LOW AND SLOW: I learned this the hard way—crispy bacon in an 8-layer salad should be cooked at 275°F (135°C) for 20-25 minutes. High heat makes it burn before it crisps, and you’ll end up with chewy, greasy strips instead of perfect crunch.
- HALVE THE TOMATOES: Cut the cherry tomatoes in half before layering. Whole ones leak juice, which turns your crispy bacon layer into a mushy, waterlogged mess by the time you serve it. (Yes, even if they look pretty whole.)
Perfect pairings for these flavors
Creamy Dressing Pairings
This salad’s rich, creamy foundation pairs beautifully with dressings that cut through the richness while complementing its flavors.
A light lemon-garlic vinaigrette (mix 3 tbsp olive oil, 1 tbsp lemon juice, 1 minced garlic clove, and ½ tsp Dijon mustard) adds brightness—drizzle just before serving to maintain crispness.
For extra tang, try a spicy honey mustard (whisk 2 tbsp mayo, 1 tbsp Dijon, 1 tsp honey, and ½ tsp cayenne). Both options enhance the salad’s layers without overwhelming them. 🍋
Crispy Topping Upgrades
Swap out croutons for toasted pita chips or crispy fried shallots to add a gourmet touch. For a smoky twist, top with crumbled blue cheese and crispy prosciutto instead of bacon. If you love heat, sprinkle ½ tsp smoked paprika over the croutons before baking.
These upgrades keep the salad’s crunch while adding depth. I especially love the prosciutto—it adds a salty, savory punch that elevates every bite. 🥓
Protein Swaps
Need a vegetarian option? Replace bacon with marinated grilled halloumi or crispy chickpeas (toss 1 cup cooked chickpeas with 1 tbsp olive oil and ½ tsp smoked paprika, then bake at 400°F for 20 minutes).
For seafood lovers, add crispy fried shrimp or smoked salmon to the top layer. These proteins keep the salad’s texture contrast while offering fresh flavors. The halloumi, in particular, melts slightly when sliced, adding a creamy element that pairs perfectly with the ranch dressing. 🦐
Beverage Pairings
A crisp Sauvignon Blanc or Pinot Grigio cuts through the salad’s richness with their bright acidity.
For a non-alcoholic option, try a sparkling lemonade (mix 1 cup sparkling water, ½ cup fresh lemon juice, and 1 tbsp honey) or an iced hibiscus tea for a floral, tangy contrast.
If you’re serving this at a BBQ, a light lager like Corona or Heineken balances the smoky bacon and creamy cheese beautifully. 🍷
Sweet Contrasts
Balance the savory layers with a sweet element—drizzle 1 tbsp honey or balsamic glaze over the top before serving. For a fruity twist, add sliced fresh figs or mandarin orange segments to the green onion layer.
These sweet notes create a delightful contrast that makes each bite more dynamic. I love the figs—they add a jammy sweetness that pairs surprisingly well with the blue cheese. 🍇
Make-Ahead Tips
Assemble the salad up to 4 hours ahead and refrigerate uncovered to let flavors meld. Just before serving, drizzle with dressing and garnish with fresh herbs like cilantro or parsley**. If making ahead for a party, store layers separately in airtight containers and assemble just before slicing.
This keeps everything crisp and prevents sogginess. Trust me, the extra time is worth it—the salad tastes even better after resting. ✨
Nutrition facts
Frequently asked questions
Can I make this layered salad without cream cheese?
For a lighter option, replace the cream cheese with 1 cup Greek yogurt mixed with 2 tablespoons ranch dressing. This keeps the creamy texture while cutting calories. Another great swap is 1 cup mashed avocado—it adds healthy fats and a rich base. Just remember to chill the salad longer (at least 6 hours) to help the layers set properly without cream cheese’s binding power.
How do I keep the layers from falling apart when slicing?
The toothpicks are key—insert them at a 45-degree angle through all layers to create clean slicing lines. For extra stability, chill the salad for the full 4 hours before serving. If you’re short on time, let it sit at room temperature for 30 minutes after assembly to help the layers firm up slightly. Also, use a sharp chef’s knife and slice straight down without wiggling the blade.
What’s the best way to serve this salad for a crowd?
Build the salad in a large 9×13-inch baking dish instead of individual servings for easy sharing. Arrange all layers in one big stack, then chill and slice into 1-inch wedges using a serrated knife. Serve on a platter with extra toothpicks for guests to pick up their own pieces. For presentation, garnish with fresh herbs and place the platter on a bed of ice to keep everything crisp.
Can I make this salad ahead of time?
Yes! Assemble the salad up to 4 hours ahead and refrigerate uncovered. The uncovered top helps prevent sogginess. For parties, store each layer separately in airtight containers and assemble just before serving. If freezing, build the salad without dressing (except the cream cheese base), wrap tightly, and freeze for up to 1 month. Thaw overnight in the fridge before slicing.
What if I don’t have blue cheese?
No problem! Swap it for 1 cup crumbled feta (more mild) or ½ cup grated Parmesan mixed with ½ cup shredded mozzarella for a cheesy alternative. For extra tang, add 2 tablespoons chopped capers to the blue cheese layer. The key is maintaining that tangy contrast—any of these options will work beautifully.

- 12 Bean Chili Recipe: Hearty Slow-Cooked Depth With 12 Legumes - October 17, 2026
- 5 Seed Bread Recipe: Nutty Crunch and Artisan Flavor in One Loaf - October 17, 2026
- 1 Lb Macaroni Salad Recipe: Bold, Crunchy, and Crowd-Pleasing - October 17, 2026