
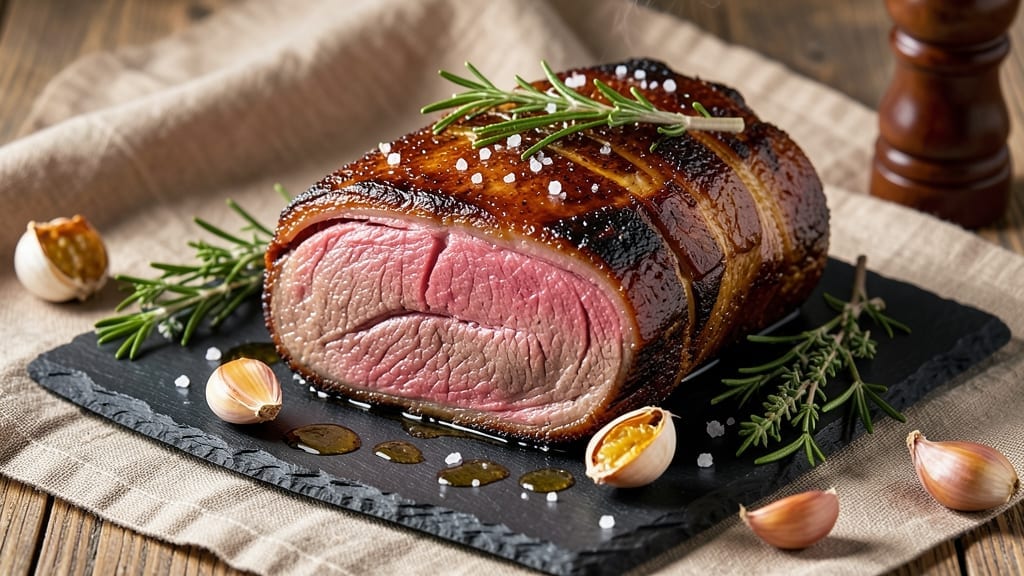
An 8 lb ribeye roast cooked to perfection delivers a showstopping centerpiece for any gathering—juicy pink centers and a crispy crust that locks in every ounce of flavor. 🔥 The secret lies in reverse searing: slow oven cooking to even temperature, then a high-heat sear for that coveted crust.
I’ve perfected this method over years of holiday feasts, ensuring no dry meat or uneven doneness.
This recipe transforms a tough cut into melt-in-your-mouth tenderness by controlling internal temperatures precisely. Start with a medium-rare finish (125°F) for maximum juiciness, then sear to create that golden-brown exterior.
The key is patience—rushing the process guarantees a tough, dry roast. With proper resting and slicing techniques, you’ll achieve restaurant-quality results at home.
What you’ll end up with is a juicy pink core that practically falls apart, surrounded by a crispy crust that adds texture and depth. The aroma alone will have guests gathering at the table before the first slice is served.
This method works equally well for holiday dinners or casual Sunday suppers, scaling beautifully for crowds.
Pair with classic sides like roasted garlic mashed potatoes and grilled asparagus, or elevate with a bold red wine reduction. The roast’s rich beefy flavor stands up to both simple and sophisticated accompaniments. Let’s get started on creating your most impressive roast yet.
Ingredients for 8 lb ribeye roast
Juicy pink centers and a crispy crust start with these premium ingredients.
| Ingredient | Amount | Notes |
|---|---|---|
| Ribeye Roast 🥩 | 8 lb | Bone-in, center-cut preferred |
| Kosher Salt 🧂 | 2 tbsp | Diamond Crystal preferred, coarse grain |
| Freshly Ground Black Pepper 🌶️ | 1 ½ tbsp | Freshly cracked for maximum flavor |
| Garlic Cloves 🧄 | 12 cloves | Smashed, skin-on for infusion |
| Fresh Thyme Sprigs 🌿 | 6 whole | Stems intact for easy removal |
| Fresh Rosemary Sprigs 🌿 | 4 whole | Woody stems removed, leaves only |
| Unsalted Butter 🧈 | ½ cup | Cold, cubed for searing |
| Extra-Virgin Olive Oil 🫒 | 2 tbsp | High smoke point preferred |
| Red Wine 🍷 | 1 cup | Bold Cabernet Sauvignon or Merlot |
| Beef Tallow or Duck Fat 🧈 | 2 tbsp | For basting, optional but recommended |
| Cornstarch 🌾 | 1 tbsp | For crust enhancement |
| Bacon-Wrapped Onions 🧅 | 4 whole | Medium yellow onions, wrapped in bacon |
The ribeye roast is non-negotiable—center-cut, bone-in delivers the best marbling and flavor. Costco or Whole Foods carry excellent pre-trimmed roasts, but if you’re buying whole, ask your butcher to leave the bone in for even cooking. Look for vibrant red color with good white marbling—this is your quality indicator. The garlic and herbs are freshness critical: Trader Joe’s or local farmers markets have the best selection. Freshly cracked pepper and coarse kosher salt elevate every bite, so don’t skip grinding your own. For the sear, use European-style butter (like Plugrá) that has higher fat content for better crust development.
No ribeye? Tri-tip roast or New York strip works in a pinch, but the fat content won’t be as rich. Fresh herbs wilt fast—dried thyme and rosemary at half the amount can substitute, though fresh is ideal. Running short on red wine? Beef broth with a splash of balsamic mimics the depth. The bacon-wrapped onions can be made ahead—wrap them in foil and refrigerate for up to 3 days before roasting. For extra crispiness on the crust, mix the cornstarch with 1 tbsp cold water before brushing on during the final sear. The tallow or duck fat is optional but adds incredible richness to the basting process.
Prep everything the night before—pat the roast dry with paper towels and let it sit at room temperature for 2 hours before cooking. The herbs and garlic can be prepped and stored in a sealed container for 2 days in the fridge. For serving, slice against the grain at a 1/2-inch thickness for maximum tenderness. Leftovers keep for 4 days in the fridge, though they’re best enjoyed fresh. The roast reheats beautifully—wrap tightly in foil and warm in a 300°F oven for 20 minutes to maintain moisture. Portion into individual servings before reheating for perfect slices every time.
Why You’ll Love This Recipe
- One-Pan Magic: I swear by this—just salt, pepper, garlic, and thyme on a hunk of ribeye, then let the oven do the work. No chopping, no flipping, no stress. That’s it.
- Crispy-Creamy Payoff: The crust? Chef’s kiss. The inside stays juicy while the edges get that perfect caramelized bite—all from just those few ingredients. Honestly, it’s the kind of flavor that makes you slow down mid-bite.
- Leftovers That Win: This roast feeds a crowd but gives you actual leftovers you’ll actually want. Slice it thin for sandwiches, dice it for tacos, or just reheat it straight up—it’s that good. (Yes, even on a Tuesday night.)
- Budget-Friendly Feast: An 8 lb roast stretches further than you’d think, especially when you’re not paying for fancy marinades or pre-cut sides. Fresh thyme and garlic? Worth every penny for the flavor boost. My wallet thanks me.
Step-by-step instructions for reverse-seared ribeye roast
Here’s how to transform that massive ribeye into a showstopper with perfect pink centers and crackling crust.
👨🍳 Step 1: Prep the Roast with Herbed Rub
Remove the ribeye roast from the refrigerator and pat it dry completely with paper towels. I mean REALLY dry—any moisture will prevent that crispy crust we’re after. Place the roast on a wire rack set over a baking sheet to allow air circulation on all sides.
In a small bowl, combine the 2 tbsp kosher salt and 1.5 tbsp freshly ground black pepper. Rub this mixture ALL over the roast, including the fat cap, pressing firmly so the seasoning adheres. Then, crush the 12 garlic cloves (leave skins on) and distribute them evenly over the meat. Tuck the 6 thyme sprigs and 4 rosemary sprigs under the fat cap and around the edges.
Let the seasoned roast sit at room temperature for 1 hour while you prepare everything else. This equalizes the internal temperature, ensuring even cooking. Don’t skip this step—it makes a noticeable difference in the final result.
🔥 Step 2: Low-Temperature Oven Cook (Reverse Sear)
Preheat your oven to 250°F. Place the seasoned roast on the wire rack and insert a meat thermometer into the thickest part of the roast (not touching bone). Roast for 2.5 to 3 hours, rotating the roast 180 degrees every 45 minutes for even cooking.
You’re aiming for an internal temperature of 115-120°F—this is where the magic happens. The meat will look pale and unappetizing, but trust the thermometer. The low temperature gently cooks the center while keeping it juicy, and the fat renders slowly for maximum flavor infusion.
Here’s the thing—if your oven runs hot, you might need to reduce to 225°F. I’ve found most home ovens need this adjustment for consistent results. The key is patience; this is where the reverse sear earns its name.
🥘 Step 3: Prepare the Searing Station
While the roast cooks, prepare your searing station. In a large oven-safe skillet (I use cast iron), melt the 0.5 cup unsalted butter with the 2 tbsp extra-virgin olive oil over medium heat. Add the 4 bacon-wrapped onions and cook for 10 minutes until the bacon is crispy and onions are caramelized.
Remove the onions and set aside. Increase heat to medium-high and add the 2 tbsp beef tallow or duck fat. This extra fat creates an insulating layer that helps build that perfect crust. Mix the 1 tbsp cornstarch with ¼ cup red wine in a small bowl—this will create a glossy, flavorful crust.
🔥 Step 4: High-Heat Sear for Crispy Crust
When the roast reaches 115-120°F, remove it from the oven and let it rest for 5 minutes. This brief rest prevents the juices from surging out during searing. Meanwhile, wipe the roast with paper towels to remove any moisture that may have formed during cooking.
Place the roast fat-side down in the hot skillet. Pour the cornstarch-wine mixture over the top and immediately baste the roast with the melted butter mixture using a spoon or baster. Sear for 3 minutes per side, basting continuously. You’ll see the surface transform from pale to deep mahogany brown—that’s your crispy crust forming.
For the final touch, transfer the skillet to a 450°F oven and roast for 5-7 minutes until the crust reaches 145°F internally. This final boost ensures a perfect medium-rare center with that coveted crust.
⏰ Step 5: Rest and Slice for Maximum Juiciness
Remove the roast from the oven and transfer it to a cutting board. Tent loosely with foil and let it rest for 15-20 minutes. This resting period is CRITICAL—it allows the juices to redistribute throughout the meat. If you skip this, you’ll end up with dry slices.
Slice the roast against the grain into ½-inch thick portions. The meat should be juicy pink in the center with a deep brown crust on the outside. Serve immediately with the crispy bacon-wrapped onions and any pan juices reduced by half for a glossy sauce. Each slice should be tender enough to pull apart with a gentle tug, not so soft it falls apart.
Pro Tips For Making 8 Lb Ribeye Roast
- Sear First, Then Salt: After searing the roast on all sides (yes, even if it’s thick), let it cool for 5 minutes before adding the final salt and thyme. I used to salt right after searing, and the crust would turn soggy—this way, the seasoning sticks like glue and the thyme clings instead of floating away.
- Crush Those Garlic Cloves: Don’t just slice the garlic—smash each clove with the flat side of your knife first. This releases more flavor into the pan when you sear them alongside the roast. I was skeptical until I tried it, and now I swear by it for any roast with garlic.
- Skip the Crowding Pan: If you’re using a Dutch oven or heavy skillet, resist the urge to add all the thyme sprigs at once. Toss in half the thyme during searing, then add the rest later—this prevents steam buildup, which weakens the crust. Trust me, your roast will thank you.
- Start Hot, Finish Low: Sear the roast over high heat until it’s deep brown (about 4-5 minutes per side), then drop the oven to 300°F for the rest of the cook. I learned this the hard way—rushing the sear leads to uneven doneness, and low-and-slow finishes it without drying it out.
Serving suggestions for leftovers
Classic Side Dishes
For a traditional spread, creamy garlic mashed potatoes are a must—their buttery richness complements the roast perfectly.
I like to make them with roasted garlic and a splash of whole milk for extra depth. Grilled asparagus with lemon zest adds freshness, while crusty sourdough bread soaks up every last drop of pan sauce. 🥔
Bold Wine Pairings
A bold Cabernet Sauvignon from Napa Valley stands up to the rich beef flavors while enhancing the dish’s depth. For something lighter, try a Malbec from Argentina—its dark fruit notes harmonize beautifully with the roast.
If you prefer beer, a Belgian Dubbel with caramel and spice undertones creates an unexpected but delicious contrast. 🍷
Elevated Garnishes
Freshly cracked black pepper and chopped parsley add a pop of color and brightness to each plate. For extra flair, drizzle with reduced red wine sauce made from the pan drippings, or sprinkle with flaky sea salt for a gourmet touch.
A few crispy fried shallots scattered on top add crunch and visual appeal.
Make-Ahead Sides
Prep roasted root vegetables (carrots, parsnips, and beets) the day before—they reheat beautifully in the oven alongside the roast. Bacon-wrapped Brussels sprouts can be par-cooked and finished under the broiler just before serving.
Even homemade dinner rolls benefit from a 2-hour rise in the fridge before baking, ensuring they’re warm and fresh when the roast comes out. ⏰
Dessert Pairings
A dark chocolate dessert like chocolate lava cake or espresso tiramisu balances the richness of the roast. For something lighter, berry compote with vanilla bean ice cream offers a refreshing contrast.
If you want to keep it simple, crème brûlée with its caramelized sugar crust adds an elegant finish to the meal. 🍫
Presentation Tips
Slice the roast against the grain on a large wooden board for rustic appeal. Arrange the bacon-wrapped onions in a circular pattern around the roast, and drizzle the pan sauce artistically.
Garnish with fresh rosemary sprigs and edible flowers for a restaurant-worthy presentation. Serve family-style to encourage sharing and conversation. ✨
Nutrition facts
Frequently asked questions
Can I cook an 8 lb ribeye roast without a meat thermometer?
While challenging, you can use the finger test for medium-rare: Press your finger into the meat—if it feels like pressing your thumb against your index finger (about 125°F), it’s ready. For larger roasts, cut a small slice to check the center. Pro tip: The roast should feel slightly springy but yield to gentle pressure. If you’re unsure, err on the side of undercooking—beef continues cooking slightly after removal from heat.
How do I prevent my ribeye roast from drying out?
Use the reverse sear method to keep the center juicy—slow cooking to 115-120°F prevents moisture loss. Never skip the 15-20 minute rest after cooking (juices redistribute during this time). For extra insurance, wrap the roast in foil with a splash of beef broth during the low-temperature phase. Avoid overcrowding the pan during searing, and keep the heat high but controlled for that perfect crust.
What’s the best way to reheat leftover ribeye roast?
Wrap slices tightly in foil and reheat in a 300°F oven for 20 minutes—this maintains moisture better than microwave. For maximum tenderness, add a splash of beef broth to the foil packet. Never reheat above 300°F or the meat will dry out. For sandwiches, pan-sear cold slices in butter for 2-3 minutes per side to revive the crust.
Can I substitute another cut for ribeye?
Yes, but choose wisely: New York strip works best (similar fat content), while tri-tip or top sirloin need extra care to avoid dryness. For a leaner option, add 1 tbsp butter per pound during searing. Avoid chuck roast—it’s too tough for this method. Adjust cooking time by 10-15 minutes** for leaner cuts, checking with a thermometer.

- 12 Bean Chili Recipe: Hearty Slow-Cooked Depth With 12 Legumes - October 17, 2026
- 5 Seed Bread Recipe: Nutty Crunch and Artisan Flavor in One Loaf - October 17, 2026
- 1 Lb Macaroni Salad Recipe: Bold, Crunchy, and Crowd-Pleasing - October 17, 2026