
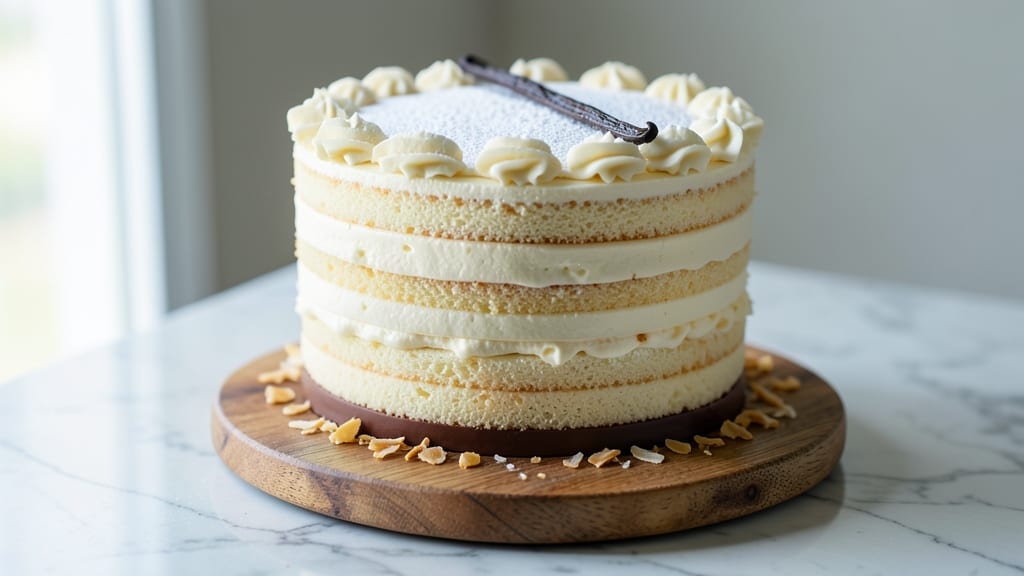
This 8-layer vanilla cake recipe delivers the kind of ethereal, light-as-air texture that makes every slice feel like a celebration. 💛 The secret lies in precise technique—whipping egg whites to stiff peaks and folding them into the batter at just the right moment—creating layers so tender they practically melt on your tongue.
I’ve perfected this method over years of baking, and it never fails to impress, whether for birthdays, weddings, or just because you deserve something extraordinary.
The magic happens in the vanilla bean swirls—intensely fragrant and rich, they transform ordinary vanilla cake into something truly special. No artificial extracts here; we’re using real vanilla beans scraped fresh for maximum flavor impact.
This isn’t just cake—it’s a masterpiece of texture and aroma that will have everyone asking for seconds. The cake rises high, bakes evenly, and stays moist for days when stored properly.
What makes this recipe truly versatile is how it adapts to different occasions. You can keep it classic with simple buttercream, or elevate it with a mirror glaze and fresh berries for a restaurant-worthy finish.
The layers are delicate yet sturdy enough to slice cleanly, making it perfect for both professional bakers and home cooks looking to impress. Each bite delivers that perfect balance of sweetness and vanilla essence that defines a truly exceptional dessert.
Ready to create a cake that looks as beautiful as it tastes? The process is straightforward once you understand the key techniques, and the results are worth every minute of effort. Let’s get started on crafting your perfect vanilla cake masterpiece—one light, airy layer at a time.
Ingredients for 8 vanilla cake
Ethereal layers, vanilla swirls, and professional secrets—here’s your dream cake ingredient lineup.
| Ingredient | Amount | Notes |
|---|---|---|
| All-Purpose Flour 🌾 | 3 cups | Sifted for fluffiness (plus 1 tbsp extra for dusting) |
| Granulated Sugar 🍚 | 2 ½ cups | Superfine preferred for smooth texture |
| Unsalted Butter 🧈 | 2 cups | Room temperature, full-fat for richness |
| Large Egg Whites 🥚 | 8 whole | Room temperature, aged 24 hours for stability |
| Vanilla Beans 🌿 | 2 whole | Madagascar or Tahitian, seeds scraped |
| Pure Vanilla Extract 💧 | 1 tbsp | Bourbon-based for depth of flavor |
| Baking Powder 🧂 | 1 tsp | Aluminum-free for tender crumb |
| Salt 🧂 | ½ tsp | Fine sea salt for balance |
| Whole Milk 🥛 | 1 cup | Room temperature, 2% works too |
| Vanilla Bean Seeds 🌿 | 2 tsp | From scraped vanilla beans (save pods) |
| Powdered Sugar 🍚 | 2 cups | For buttercream (plus extra for dusting) |
| Heavy Whipping Cream 🥛 | 1 cup | Cold for buttercream stability |
| Fresh Vanilla Extract 💧 | 1 tsp | Extra for buttercream infusion |
| Unflavored Gelatin 🍬 | 1 tsp | Bloomed in 2 tbsp cold water |
| Lemon Juice 🍋 | 1 tbsp | Freshly squeezed for mirror glaze |
The vanilla beans are non-negotiable. Madagascar or Tahitian deliver that signature floral depth—Trader Joe’s or Williams Sonoma carry excellent options. Scrape the seeds and save the pods for infusing sugar or milk later. For the butter, Plugrá or Land O’Lakes unsalted melt beautifully. Room temperature is key—press a finger into the butter; if it leaves a slight indent, it’s ready. The egg whites? Aged 24 hours whip up fluffier, but fresh works in a pinch. Sift that flour twice—King Arthur or Gold Medal brands are my go-tos for cake baking.
No vanilla beans? Double the vanilla extract plus 1 tsp almond extract mimics the depth. Superfine sugar unavailable? Pulse granulated sugar in a food processor for 30 seconds. For the buttercream, European-style butter (like Miyoko’s) gives extra richness. The gelatin in the mirror glaze might seem weird, but it’s what creates that stunning, wobbly finish. If you’re avoiding gelatin, agar-agar at half the amount works too. And that extra powdered sugar? Sift it—clumps ruin the smoothness.
This cake stays fresh for 4 days at room temperature, wrapped tightly in parchment. For longer storage, 2 weeks in the fridge or 3 months frozen (wrap each layer individually). The buttercream? Room temperature for 30 minutes before piping. Pro tip: Dust the cake with powdered sugar right after baking while still warm—it sets beautifully and adds that professional touch. And save those used vanilla bean pods—they’re perfect for infusing simple syrup or cocktails later.
Why You’ll Love This Recipe
- No Mixer Needed: I’ll admit, I don’t own a stand mixer—and this cake doesn’t miss it. Whisking egg whites until stiff peaks form just takes elbow grease (and maybe a good arm workout), but the result? That signature vanilla cloud of a crumb. No fancy equipment, just you and a bowl.
- Vanilla Bomb: Between us, store-bought vanilla extract can’t compete with the real deal here. Splitting those vanilla beans down the middle and scraping out the seeds? That deep, floral aroma and lingering sweetness make every bite feel like a little celebration. Honestly, it’s the one ingredient that turns “cake” into “showstopper.”
- Layer Magic: This recipe’s a blank canvas—drench it in coffee syrup for breakfast, stack it with whipped cream for dessert, or frost it with chocolate ganache for a fancy moment. (Yes, even on a Tuesday night.) The egg whites keep it light enough to layer without collapsing, so you can go wild with fillings.
- Budget-Friendly Luxury: Butter and vanilla beans might sound fancy, but this cake uses them just right—no waste, no over-the-top costs. A single vanilla bean lasts for three cakes, and the butter’s used in a way that makes the whole batch taste indulgent. Leftovers? They’ll disappear faster than you can say “second slice.”
Step-by-step instructions for light-as-air vanilla cake layers
Here’s the secret to those ethereal vanilla cake layers with professional swirls—every detail matters.
👨🍳 Step 1: Prepare the Vanilla Bean Swirl Filling
In a small saucepan, combine the 1 cup whole milk with the scraped seeds from the 2 whole vanilla beans and 1 tbsp pure vanilla extract. Heat over medium-low heat until steaming but not boiling (160°F). Remove from heat and let steep for 10 minutes to infuse maximum flavor.
While warm, whisk in the 1 tsp unflavored gelatin that’s been bloomed in 2 tbsp cold water until fully dissolved. Let this mixture cool to room temperature—it should thicken slightly but remain pourable. This will be our luxurious vanilla swirl that makes the cake extraordinary.
🍳 Step 2: Whip Egg Whites to Stiff Peaks
In a separate, spotless bowl, beat the 8 whole large egg whites with 0.5 tsp salt using an electric mixer on high speed until soft peaks form. Gradually add the 2.5 cups granulated sugar while mixing on high for 5-7 minutes until stiff, glossy peaks form that hold their shape when the whisk is lifted.
Here’s the thing—don’t rush this step. You’ll know they’re ready when you lift the whisk and the peaks stand straight up like little mountains. These egg whites are the secret to that signature light-as-air texture. If you see any liquid pooling at the bottom, whip for another minute.
👨🍳 Step 3: Combine Dry Ingredients and Wet Mixture
In a large mixing bowl, sift together the 3 cups all-purpose flour and 1 tsp baking powder. In another bowl, cream the 2 cups unsalted butter until light and fluffy (3-4 minutes on medium speed). Gradually add the dry ingredients while mixing on low speed, then alternate with the 1 cup vanilla-infused milk in 3 additions.
Fold in 2 tsp vanilla bean seeds and mix just until combined. Gently fold in ⅓ of the whipped egg whites to lighten the batter, then carefully fold in the remaining egg whites using a spatula in large, sweeping motions. This prevents deflating those precious air bubbles we just created.
🥘 Step 4: Assemble and Bake the Layers
Preheat oven to 350°F. Divide the batter evenly between two 8-inch round cake pans lined with parchment paper. Bake for 25-30 minutes or until a toothpick inserted comes out clean. Let cakes cool in pans for 10 minutes, then transfer to a wire rack to cool completely.
While cakes cool, prepare the buttercream by beating the 1 cup heavy whipping cream to stiff peaks, then gradually add the 2 cups powdered sugar and 1 tsp fresh vanilla extract until smooth. For the mirror glaze, whisk 1 cup powdered sugar with 1 tbsp lemon juice until silky smooth.
🍽️ Step 5: Create the Signature Swirl Layers
Level the cooled cake layers and place one on a cake stand. Spread a thin layer of vanilla swirl filling, then pipe a generous layer of buttercream. Place the second layer on top and repeat the process. Pipe buttercream around the edges for a clean finish.
Use a skewer to poke holes in the top layer and gently pour the remaining vanilla swirl filling through. Let it settle for 30 minutes in the fridge before applying the mirror glaze. This creates those stunning marbled swirls that make this cake truly special. Dust with extra powdered sugar for that bakery-fresh finish.
Pro Tips For Making 8 Vanilla Cake
- Whip Egg Whites Cold: Grab your bowl and place it in the freezer for 5 minutes before whipping the egg whites—this keeps them from overheating and gives you stiffer peaks. I learned this the hard way when my cake collapsed like a sad soufflé because the whites got too warm mid-whip.
- Scrape the Vanilla: Don’t just scrape the seeds—use the whole bean by slicing it lengthwise and scraping the pulp too. That extra vanilla flavor is worth the 30-second effort, and you’ll notice it in every bite. (Yes, even if you’re impatient like me.)
- Butter at Room Temp: Cut the butter into tablespoons and let it sit in warm water for 10 minutes before creaming—this ensures it’s soft but not greasy. I used to melt it by accident, and the cake turned out dense and greasy. Trust the process.
- Check Doneness with a Toothpick: Insert a toothpick into the center—if it comes out clean but moist (not wet), the cake’s done. Overbaking dries it out, and underbaking leaves it gummy. Sounds simple, but I’ve ruined cakes by guessing both times.
Make-ahead tips for this recipe
Pre-Bake Prep
Start your cake prep the night before for perfect results. Whip your egg whites and store them in the fridge overnight—they’ll whip up even fluffier. Measure and sift all your dry ingredients into airtight containers, and refrigerate the butter and milk together.
This head start prevents morning chaos and ensures everything is room temperature when you need it. 💫
Layer Assembly
Assemble your cake layers up to 24 hours ahead and store them in the fridge. Place parchment paper between layers and wrap the whole cake tightly in plastic wrap.
This prevents drying and makes for easy transport if needed. I always assemble mine the morning of an event—it gives the flavors time to meld beautifully. 📅
Filling Prep
Make your vanilla bean swirl filling and buttercream one day ahead—they keep perfectly in the fridge for 48 hours. Store them in separate airtight containers with parchment paper pressed against the surface to prevent skin formation.
The gelatin in the swirl filling might thicken further in the fridge, so whisk it briefly before using to restore smoothness. 🥄
Final Touches
Apply your mirror glaze just before serving for the most dramatic presentation. It sets quickly at room temperature, so work efficiently. If you’re making the cake ahead, store it without the glaze and apply it 2-3 hours before serving.
Keep extra powdered sugar on hand to dust the cake right before slicing—it adds that professional bakery finish. ✨
Storage Secrets
For long-term storage, wrap each individual layer in plastic wrap and place them in a freezer bag. They’ll keep for 3 months this way. To serve, thaw overnight in the fridge and assemble with fresh buttercream.
The texture remains perfect—just as light and moist as when first baked. This method saves you from last-minute baking stress! ❄️
Make-Ahead Menu
Here’s my foolproof timeline: Bake layers 2 days ahead, assemble 1 day ahead, and decorate 4-6 hours before serving. This schedule ensures everything is fresh and vibrant when your guests arrive. Pro tip: Label all your containers with dates so you don’t lose track of when things were made. 📆
Nutrition facts
Frequently asked questions
Why does this vanilla cake turn out so light and airy?
The secret lies in whipping 8 egg whites to stiff peaks and folding them into the batter at the last moment. This creates thousands of tiny air pockets that give the cake its signature ethereal texture. The vanilla bean swirl filling also adds moisture without heaviness, keeping each slice tender.
Can I substitute vanilla extract for vanilla beans?
Yes, but you’ll lose that signature depth of flavor. Use double the vanilla extract (2 tbsp) plus 1 tsp almond extract to mimic the complexity. For best results, split open a vanilla bean, scrape the seeds, and save the pod for future infusions. The difference is noticeable but not deal-breaking!
How do I prevent my cake layers from cracking?
Cracking usually happens from uneven cooling or overmixing. Let cakes cool in pans for 10 minutes before transferring to a rack, and avoid opening the oven door during baking. Also, don’t overmix the batter after folding in egg whites—just combine until no streaks remain. Patience is key!
What’s the best way to store leftover cake?
Wrap the entire cake tightly in plastic wrap and store at room temperature for 3-4 days. For longer storage, freeze layers individually for up to 3 months. Thaw overnight in the fridge before reassembling. The buttercream stays fresh too—just cover it well and refrigerate for 5 days.
Can I make this cake gluten-free?
Replace the 3 cups all-purpose flour with a 1:1 gluten-free flour blend (like Bob’s Red Mill) plus 1 tsp xanthan gum. You may need to add 1 extra tbsp milk since gluten-free batters tend to be drier. Bake at 325°F instead of 350°F for 5-7 minutes longer to prevent over-browning.

- Pork Loin Pulled Pork Crock Pot Recipe: Slow-Smoked Tenderness With Zero Dryness - November 1, 2026
- Baked Potatoes in Crock Pot Recipe: Buttery Interiors and Crispy Top Magic - November 1, 2026
- Braised Beef Short Ribs Recipe: Crock Pot Fall-Off-Bone Magic in 6 Hours - November 1, 2026