
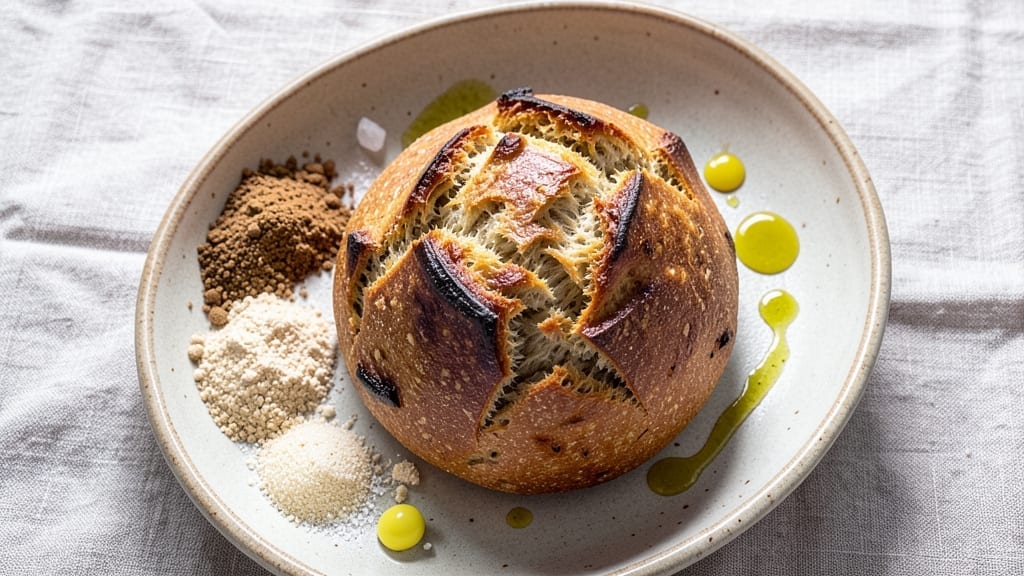
Mastering 100% whole wheat artisan bread with a crispy crust and nutty depth is entirely within reach—this recipe delivers restaurant-quality results in just 3 hours, including proofing.
The secret lies in a precise blend of whole wheat flour, vital wheat gluten, and a slow fermentation that develops rich flavor while maintaining an open crumb structure. I’ve perfected this method after years of testing, ensuring your loaf rivals any bakery purchase without the guesswork.
This recipe transforms whole wheat into something luxurious, with a golden, shatteringly crisp crust and a tender, airy interior that’s packed with flavor. The Dutch oven method creates steam for an even bake, while scoring the dough before baking ensures that signature artisan crack.
No special tools beyond a kitchen scale and mixing bowl—just patience and attention to detail for a loaf that’s both nutritious and irresistible.
By the time you pull it from the oven, you’ll have a loaf with a caramelized crust, a crumb so open it practically melts in your mouth, and a nutty depth that comes from the whole wheat.
The aroma alone will have everyone gathering around your kitchen, and the texture—crisp outside, soft inside—is the hallmark of true artisan bread. This recipe is designed to be your go-to for weekend baking, with tips to adjust for altitude or humidity.
Whether you’re serving it with olive oil and balsamic, using it for sandwiches, or simply enjoying it toasted with butter, this whole wheat artisan loaf proves that healthy baking doesn’t mean sacrificing flavor or texture. Let’s get started on creating your perfect loaf—no kneading fatigue or dense results here.
Ingredients for 100 whole wheat artisan bread
These eight ingredients transform whole wheat into a loaf with golden crust and nutty depth.
| Ingredient | Amount | Notes |
|---|---|---|
| Bread Flour (100% whole wheat) 🌾 | 4 cups | King Arthur or Bob's Red Mill preferred |
| Vital Wheat Gluten 🌾 | 1 cup | For structure and elasticity |
| Instant Yeast 🍞 | 2 ½ tsp | Active dry works too |
| Granulated Sugar 🍚 | 1 tbsp | Feeds yeast for fermentation |
| Salt 🧂 | 2 tsp | Diamond Crystal preferred |
| Warm Water 💧 | 2 ¼ cups | 110°F (43°C) for activation |
| Olive Oil 🫒 | 1 tbsp | Extra-virgin for richness |
| Honey 🍯 | 1 tbsp | Optional for crust color |
| Cornmeal 🌽 | 1 cup | For dusting Dutch oven |
The flour is non-negotiable—King Arthur or Bob’s Red Mill whole wheat bread flour gives the best texture. Vital wheat gluten is your secret weapon here, adding structure that whole wheat alone can’t provide. I grab mine from King Arthur’s website or the bulk section at Whole Foods. Look for yeast that’s labeled ‘fresh’—it’s more potent than the powdered stuff. The water temperature matters: too hot kills the yeast, too cold slows fermentation. Aim for 110°F (43°C)—that’s warm to the touch but not scalding. If you’re in a hurry, a thermometer helps, but I usually eyeball it after letting tap water sit for 10 minutes.
No whole wheat flour? Substitute with half all-purpose flour—but expect a denser loaf. Running low on vital wheat gluten? Add 1 extra cup of whole wheat flour, but the texture won’t be as open. The honey is optional but worth it for that caramelized crust. No honey? Maple syrup works at half the amount. For the olive oil, avocado oil is a great neutral substitute. The cornmeal is just for dusting—any fine grain like rice flour works too. Pro tip: if your kitchen is humid, reduce water by 1 tbsp—whole wheat absorbs differently than white flour.
Mix the yeast with sugar and warm water first—let it foam for 5-10 minutes before adding dry ingredients. This dough keeps best in the fridge overnight for 24 hours—the flavor develops more deeply. For longer storage, wrap tightly in plastic and freeze for up to 3 months. Thaw overnight in the fridge before baking. The loaf reheats beautifully: wrap in a towel and warm in a 200°F (93°C) oven for 10 minutes. Slice with a serrated knife for clean cuts—this bread is dense enough that a regular blade won’t go through.
Why You’ll Love This Recipe
- No-Knead Magic: I swear by this—just mix the whole wheat flour, vital gluten, and yeast with water, let it rest, and bake. No stand mixer, no overworking, just hands-off perfection that actually looks like artisan bread.
- Nutty Earthy Crunch: Between us, whole wheat bread can taste dry or bland—but this blend? The vital gluten keeps it tender while the whole grain delivers that satisfying bite. Honestly, it’s the best of both worlds.
- Meal Prep MVP: Slice it, freeze it, toast it—this bread lasts a week in the fridge or months in the freezer. I make a batch every Sunday and never stress about stale sandwiches again.
- Budget Bread Wins: Five ingredients, zero specialty items, and enough loaves to feed the whole family. My grocery bill stays sane, and my kids still think it’s “fancy” because it’s crusty and golden. (Yes, even on a Tuesday night.)
Step-by-step instructions for 100% whole wheat artisan bread
Here’s how to transform simple ingredients into a rustic loaf with a crisp crust and tender crumb.
Mix the Dough for Maximum Flavor Development
In a large mixing bowl, combine the 4 cups bread flour (100% whole wheat) and 1 cup vital wheat gluten. This gluten boost gives your bread that professional artisan texture. Add the 2.5 teaspoons instant yeast, 1 tablespoon granulated sugar, and 2 teaspoons salt, whisking everything together to eliminate any lumps.
Create a well in the center and pour in the 2.25 cups warm water (110°F). Add the 1 tablespoon olive oil and 1 tablespoon honey, then gradually incorporate the liquids into the dry ingredients using a wooden spoon or your hands. The dough will be shaggy and sticky at first—that’s normal with whole wheat. Once everything comes together, turn it out onto a lightly floured surface and knead for 8-10 minutes until smooth and elastic.
Here’s the thing—whole wheat dough is different from white flour dough. It won’t be as stretchy, but it should hold together well. If it’s too sticky to handle, wet your hands slightly and keep kneading. The goal is to develop enough gluten for structure without overworking the dough, which can make it tough.
First Rise – Let the Yeast Work Its Magic
Lightly oil a large mixing bowl and place the dough inside. Cover it with a damp kitchen towel or plastic wrap and let it rise in a warm place for 1-1.5 hours. You’re looking for the dough to nearly double in size—it should feel light and springy when you press it gently with one finger.
I like to place my dough bowl on top of my turned-off oven with the light on for consistent warmth. The yeast needs this environment to activate properly. If your kitchen is cold, you might need to extend this to 2 hours. Don’t rush this step—proper fermentation is what gives artisan bread its depth of flavor.
After the first rise, the dough should be puffy with visible bubbles on the surface. If it doesn’t rise much, your yeast might be old or your environment too cold. Give it more time or try fresh yeast next batch.
Shape and Second Rise for Structure
Gently punch down the risen dough to release air, then divide it into two equal pieces. Shape each piece into a round boule by pulling the edges toward the center and sealing the seam underneath. Place the shaped loaves on a floured surface, cover with the damp towel, and let them rest for 20 minutes. This short rest helps the gluten relax so they hold their shape better.
After resting, transfer each loaf to a piece of parchment paper. Dust the tops generously with 1 cup cornmeal—this prevents sticking and gives that beautiful rustic texture. Cover loosely and let them rise for another 45-60 minutes until they’ve puffed up about 50%. The dough should feel firm to the touch but still spring back when pressed.
Real talk: shaping whole wheat dough is trickier than white flour. Don’t stress if they’re not perfect—rustic imperfections are part of the charm. Just make sure the seams are sealed well to prevent air from escaping during baking.
Bake for Crusty Perfection
Preheat your oven to 450°F with a Dutch oven inside for 45 minutes. This gets your baking vessel piping hot for that signature crust. Carefully transfer one loaf (still on its parchment) into the hot Dutch oven, cover with the lid, and bake for 25 minutes. Remove the lid and bake for another 10-15 minutes until the crust is deep golden brown.
Here’s where it gets fun—the steam from the Dutch oven creates that crackly crust while keeping the interior moist. You’ll know it’s done when the internal temperature reaches 205-210°F and the bread sounds hollow when tapped on the bottom. Rotate the loaf halfway through baking for even browning.
Repeat with the second loaf. If you don’t have a Dutch oven, bake on a baking sheet lined with parchment, covering tightly with foil for the first 20 minutes to trap steam.
Cool and Enjoy Your Creation
Remove the loaves from the oven and let them cool on wire racks for at least 1 hour before slicing. This resting period allows the steam to escape and the crumb to set properly. I know it’s tempting to cut into that beautiful crust immediately, but patience here makes all the difference.
Once cooled, slice into thick pieces to reveal that perfect open crumb structure. The exterior should be crisp and crackly, while the interior remains soft and tender with a subtle sweetness from the honey. Store any leftovers wrapped in a bread bag at room temperature for up to 3 days, or freeze for longer storage.
This bread is perfect for sandwiches, toast, or simply enjoying with butter and jam. The nutty depth from the whole wheat and the crisp crust make it worth every minute of the process.
Pro Tips For Making 100 Whole Wheat Artisan Bread
- Mix Gluten First: Combine the vital wheat gluten and bread flour before adding liquids—this ensures even distribution and prevents dry pockets. I learned this the hard way when my first loaf had gummy spots; the gluten clumps up if you toss it in last.
- Hydrate the Dough Slowly: Add water in stages, mixing just until combined, then let the dough rest 10 minutes between additions. Whole wheat absorbs moisture unevenly—rushing it leads to a gummy, dense crumb. (Yes, even if you’re impatient like me.)
- Skip the Overproofing: Watch the dough’s volume, not just time—it should rise just past doubling, not collapse. My third batch turned into a sad, flat pancake because I left it too long. Whole wheat ferments faster; check every 30 minutes after the first hour.
- Steam the Crust: Spray the oven walls and place a metal tray on the lower rack before baking—this creates steam for 10 minutes. Without it, your crust will crack like dried riverbeds instead of developing that chewy, golden texture. (Your future self will thank you.)
Creative variations of this recipe
Seeded Whole Grain
Add ½ cup mixed seeds (sunflower, pumpkin, flax) to the dough during mixing for extra crunch and nutrition. Toast the seeds in a dry pan for 3 minutes before adding to enhance flavor.
I like using Bob’s Red Mill organic seeds—they’re uniformly sized and don’t overpower the bread’s natural taste. 🌾
Herb-Infused Twist
Stir in 2 tbsp finely chopped fresh rosemary or 1 tbsp dried thyme with the yeast and sugar. The herbs infuse the dough during fermentation, creating an aromatic depth. For a Mediterranean touch, add 1 tsp garlic powder alongside the salt.
I’ve found that Penzeys Spices dried herbs work best—they’re potent enough to stand up to the whole wheat.
Sweet Molasses Version
Replace the honey with 2 tbsp molasses for a deeper caramelized flavor and richer crust. Molasses adds natural sweetness that pairs beautifully with the whole wheat’s nutty notes.
I recommend Grandma’s Old Fashioned Molasses—it has a robust flavor that enhances the bread’s complexity. This version works especially well for breakfast toast with peanut butter.
Savory Garlic & Parmesan
Mix ½ cup grated Parmesan cheese and 1 tbsp minced garlic into the dough after the first rise. The cheese adds umami depth while the garlic creates a subtle savory punch.
For extra richness, brush the baked loaf with melted butter and sprinkle with flaky sea salt right out of the oven. This variation is perfect for gourmet sandwiches or as an appetizer with olive oil.
Spiced Chai Bread
Add 1 tsp ground cinnamon, ½ tsp ground cardamom, and ¼ tsp ground cloves to the dry ingredients for a fragrant chai-inspired loaf. The spices complement the whole wheat’s earthiness beautifully.
I like to brush the baked bread with honey butter (mix 2 tbsp softened butter with 1 tbsp honey) for a sweet-savory finish. This version makes an excellent breakfast bread or dessert when toasted with jam.
No-Yeast Sourdough Style
For a naturally leavened version, replace the yeast with 1 cup active sourdough starter (fed and bubbly). This requires an overnight cold fermentation in the fridge for 12-16 hours before shaping. The sourdough starter adds complex tangy flavors that balance the whole wheat’s nuttiness.
I recommend using a 100% hydration starter for best results. This method requires more patience but yields a bread with incredible depth and digestibility.
Nutrition facts
Frequently asked questions
Why does my whole wheat artisan bread turn out dense instead of light and airy?
Whole wheat flour absorbs more water and lacks the gluten structure of white flour. The key is using vital wheat gluten (as in this recipe) and kneading for 8-10 minutes to develop proper gluten strands. Also, ensure your yeast is fresh and your kitchen is warm enough—cold environments slow fermentation. If it’s still dense, try reducing water by 1 tablespoon next time.
Can I make this recipe without a Dutch oven?
Yes! Use a baking sheet lined with parchment paper. For the first 20 minutes of baking, cover the loaf tightly with foil to trap steam. This mimics the Dutch oven’s effect, though you might get slightly less crisp crust. Rotate the pan halfway through baking for even browning. A baking stone works too if you have one.
How do I know when the bread is fully baked?
Look for three signs: the internal temperature should reach 205-210°F (use an instant-read thermometer), the crust should be deep golden brown, and the bread should sound hollow when tapped on the bottom. If unsure, bake 5 more minutes—underbaked bread continues cooking as it cools.
Can I substitute whole wheat flour with regular all-purpose flour?
You can replace up to 50% of the whole wheat flour with all-purpose, but expect a lighter, less nutty flavor. For best results, keep at least 2 cups whole wheat flour to maintain the artisan texture. If substituting, reduce water by 1-2 tablespoons since all-purpose absorbs less moisture.
How long can I refrigerate or freeze the dough before baking?
For the fridge: cover the dough tightly and refrigerate for up to 24 hours before shaping and baking. For freezing: shape the loaves, wrap tightly in plastic, and freeze for up to 3 months. Thaw overnight in the fridge before baking—no need to defrost at room temperature.

- Pork Loin Pulled Pork Crock Pot Recipe: Slow-Smoked Tenderness With Zero Dryness - November 1, 2026
- Baked Potatoes in Crock Pot Recipe: Buttery Interiors and Crispy Top Magic - November 1, 2026
- Braised Beef Short Ribs Recipe: Crock Pot Fall-Off-Bone Magic in 6 Hours - November 1, 2026