
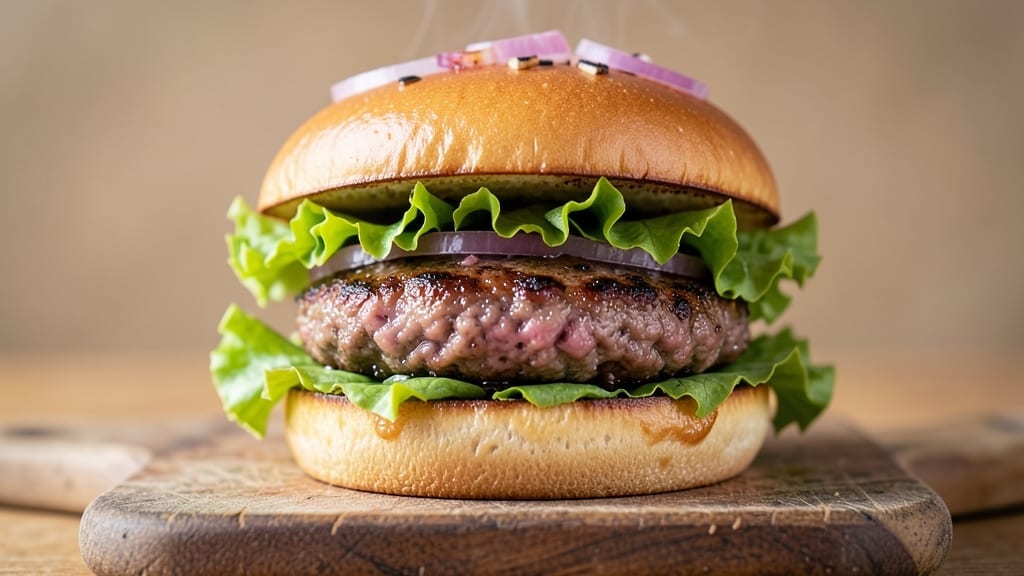
This 80/20 ground beef burger recipe delivers the perfect balance of smoky grill marks and juicy pink centers—every bite is tender, flavorful, and packed with that classic beefy satisfaction. The secret lies in using the right fat-to-lean ratio (80% lean, 20% fat) and avoiding overhandling the meat, which keeps those juices locked in. I’ve tested this recipe countless times, and it never fails to impress, whether you’re grilling for a crowd or treating yourself to a solo indulgence.
The key to a restaurant-quality burger starts with proper seasoning—just salt and pepper, but with precision. Forming the patties gently and creating a dimple in the center prevents bulging while cooking, ensuring even browning.
Whether you’re searing on a cast-iron skillet, firing up the grill, or broiling in the oven, the technique remains the same: high heat, minimal movement, and patience. The result? A burger with a crispy crust outside and a melt-in-your-mouth interior that’s still slightly pink—just the way it should be.
What you’ll end up with is a burger that’s rich, savory, and bursting with flavor, ready to be dressed up with your favorite toppings—think crisp lettuce, juicy tomatoes, tangy pickles, and a smear of your go-to condiment.
The smoky grill marks add visual appeal, while the juicy interior ensures every bite is satisfying. This isn’t just a burger; it’s a foolproof, restaurant-quality experience you can recreate at home.
Serve these burgers on toasted buns with all the classic fixings, or keep it simple with just cheese and a sprinkle of salt. The possibilities are endless, but the technique remains the same: respect the meat, control the heat, and let the burger do the work. Let’s get cooking!
Ingredients for 80/20 ground beef burger
Eight essential ingredients for juicy, smoky burgers that taste like a restaurant favorite.
| Ingredient | Amount | Notes |
|---|---|---|
| 80/20 Ground Beef 🥩 | 1 ¼ lb | Chilled, not pre-formed patties |
| Kosher Salt 🧂 | 1 ½ tsp | Freshly ground preferred |
| Freshly Ground Black Pepper 🌶️ | 1 tsp | Cracked peppercorns preferred |
| Burger Buns 🍞 | 4 whole | Toasted, sesame or potato buns |
| Butter or Neutral Oil 🧈 | 2 tbsp | For cooking patties |
| Fresh Lettuce 🥬 | 4 large | Iceberg or romaine, chopped |
| Tomatoes 🍅 | 2 medium | Sliced, seedless preferred |
| Pickles 🥒 | 4 slices | Dill or bread-and-butter |
| Yellow Mustard 🥬 | 2 tbsp | Or mayo for richer flavor |
| American Cheese Slices 🧀 | 4 slices | Optional for classic burger |
| Mayonnaise 🥬 | 2 tbsp | For additional spread |
The beef is everything—80/20 ground chuck from the meat counter (not pre-packaged) has the perfect fat-to-lean ratio. Costco or Whole Foods usually have the best quality, but any grocery store’s fresh ground beef works. Look for bright red color and good marbling—no grayish chunks. Keep it cold until ready to shape. The kosher salt matters too: Diamond Crystal dissolves better than Morton’s, so you won’t get grainy texture. Freshly cracked peppercorns give more flavor than pre-ground, but if you’re short on time, a quick pulse in a spice grinder works.
No sesame buns? Potato buns or brioche work just as well—just toast them first. Lettuce and tomato can be swapped for spinach and avocado if you’re feeling fancy. Pickles are non-negotiable for that tangy crunch though. Make your own quick pickles by slicing cucumbers thin and soaking in vinegar, sugar, and salt for 30 minutes. The cheese? American slices melt best—skip the pre-shredded stuff. For extra richness, mix mayo with a dash of Dijon mustard and spread that on the buns instead of plain mayo.
Keep the beef cold until you’re ready to form patties—it’s more manageable that way. Use within 2 days of grinding for best flavor. Store lettuce and tomatoes in separate containers to keep them crisp. The buns stay fresh for 3-4 days in a sealed bag, but toast them fresh for maximum flavor. If making ahead, form patties and refrigerate (don’t cook yet)—they’ll keep for 1 day before cooking. Freeze uncooked patties for 3 months by wrapping tightly in plastic.
Why You’ll Love This Recipe
- Here’s what sold me: the 20% fat in that 80/20 mix keeps it ridiculously juicy while the crust gets that perfect sear. Salt and pepper? That’s all you need—trust the beef to shine.
- Two-Handed Prep: I swear by this—no shaping, no fuss. Just break the 80/20 beef into loose patties, let them rest while I butter the pan, and flip once. That’s it. Even my toddler could handle it.
- Juicy Magic: Here’s what sold me: the 20% fat in that 80/20 mix keeps it ridiculously juicy while the crust gets that perfect sear. Salt and pepper? That’s all you need—trust the beef to shine.
- Leftover Hero: Between us, these burgers taste better the next day. I freeze extras on a tray, then toss them in a skillet with a splash of water—no dryness, just pure satisfaction. (Yes, even on a Tuesday night.)
Step-by-step instructions for juicy 80/20 ground beef burgers
Here’s how to craft burgers with perfect texture and bold flavor every time.
Handle the Ground Beef Gently
Remove the 1.25 lb 80/20 ground beef from the refrigerator and let it sit for 10 minutes at room temperature. This ensures even cooking. Place the beef in a medium bowl and gently break it apart with your hands—don’t overwork it or the burgers will be dense. The 80/20 fat ratio is key here; it keeps the patties juicy while giving that classic beefy flavor.
Add the 1.5 tsp kosher salt and 1 tsp freshly ground black pepper directly to the bowl. Using your hands, work the seasoning evenly throughout the meat until fully incorporated. I like to press the mixture gently with my fingers to ensure no dry spots remain. This step is crucial—uneven seasoning leads to bland bites.
Form the Patties with Precision
Divide the beef mixture into 4 equal portions (about 5 ounces each). I use a food scale for accuracy, but you can eyeball it if you’re comfortable. Gently shape each portion into a ¾-inch thick patty—don’t press too hard or you’ll squeeze out the fat and moisture. The slight dome shape helps prevent bulging during cooking.
Create a shallow dimple in the center of each patty with your thumb. This prevents the burgers from puffing up in the middle while cooking. Place the patties on a plate and let them rest for 10 minutes before cooking. This resting period helps the patties hold their shape when they hit the hot surface.
Cook the Patties to Juicy Perfection
Heat a grill or large skillet over medium-high heat until very hot. Add 2 tbsp butter or neutral oil and let it get hot enough to sizzle when the patties touch. Place the patties on the grill, spacing them about 2 inches apart. Cook for 3-4 minutes per side for medium-rare (internal temperature 130-135°F), or until you see deep brown grill marks and the edges begin to crisp.
For that classic smoky flavor, I like to press down gently on the patties during the first minute of cooking—this prevents curling and ensures even contact with the surface. Don’t press too hard or you’ll squeeze out the juices. If you’re adding american cheese slices, place them on the patties during the last 30 seconds of cooking on the second side. The cheese should melt completely and create a gooey center.
Assemble the Burgers with Confidence
Toast the 4 whole burger buns lightly on the grill or in a dry skillet for 30 seconds per side until golden brown. This adds texture and prevents sogginess. Spread 2 tbsp yellow mustard on the bottom half of each bun, then layer with 1 large fresh lettuce, ½ medium sliced tomato, and 1 slice pickle. Place a cooked patty on top, then add any remaining toppings to the top bun.
Press the buns together gently but firmly. I like to add an extra 1 tbsp mayonnaise to the inside of the top bun for that classic juicy burger experience. Serve immediately while the patties are still warm and the cheese is melty. The 80/20 fat ratio ensures each bite stays juicy and flavorful, even at the center.
Pro Tips For Making 80/20 Ground Beef Burger
- Preheat Cast Iron: Slap that skillet on high for 5 minutes before adding oil—no, really, wait until it’s smoking hot. I used to rush this, and my burgers would just sit there, steaming instead of searing. The first 30 seconds of contact should be aggressive; that’s when you lock in flavor and texture.
- Handle the Fat: Break the beef into chunks first, then rough up the surface with your fingers. The 20% fat in 80/20 isn’t just for flavor—it’s what keeps your burger juicy. If you overwork it, you’ll squeeze out moisture and end up with a dense, dry patty.
- Skip the Pressing: Resist the urge to press down on the burger with a spatula—even if it looks flat. You’re crushing out all the juices you just worked so hard to preserve. Let it cook undisturbed for 2-3 minutes per side, and trust that it’ll puff up on its own.
- Butter the Buns Last: Toast the buns over the same skillet after cooking the burgers—just a quick 30 seconds per side. Then, butter them right before assembling. Cold butter melts into the warm bun, making every bite richer. (Yes, I’ve tried buttering them early. Don’t.)
Wine and beer pairings for these flavors
Classic American Beer
A crisp, light-bodied American lager like Bud Light or Coors Banquet is my go-to pairing for these burgers. The clean, refreshing carbonation cuts through the richness of the beef while enhancing the smoky grill marks.
I like to chill mine to 38-40°F—just cold enough to refresh your palate between bites. For a local twist, try a regional craft lager like New Belgium Fat Tire if you’re in the Midwest. 🍺
Malty Amber Ales
If you prefer something with a little more body, an amber ale like Fat Head’s Amber Ale or Sierra Nevada Pale Ale adds a caramel sweetness that complements the beef’s savory notes.
The subtle hop bitterness balances the fat in the 80/20 patties beautifully. I recommend serving these beers at 45-50°F to let their malt-forward flavors shine without overwhelming the burger.
Bold Red Wine Option
For a non-beer lover, a medium-bodied red wine like Cabernet Sauvignon or Zinfandel works surprisingly well. The tannins in the wine cut through the fat, while the fruitiness enhances the beef’s natural flavors.
I prefer mine slightly chilled at 55-60°F—just enough to soften the wine’s structure without muting its character. A California Zinfandel with its jammy notes pairs especially well with the charred edges of the patty.
Smoky IPA Contrast
If you love hoppy beers, try a West Coast IPA like Stone IPA or Alaska Amber Ale for a bold contrast. The citrusy hops cleanse your palate between bites, while the beer’s bitterness balances the burger’s richness.
Serve these at 40-45°F to preserve their bright, hoppy characteristics. The carbonation also helps cut through the grease, making each bite feel lighter.
Craft Stout for Cheese Lovers
Adding American cheese slices? Then a dark stout like Guinness or Founders Kentucky Breakfast Stout creates a perfect match. The coffee and chocolate notes in the stout enhance the melted cheese, while the creamy mouthfeel mirrors the burger’s texture.
I like to serve stouts at 45-50°F—just cold enough to enjoy without losing their depth of flavor.
Non-Alcoholic Pairings
For a refreshing non-alcoholic option, try a sparkling cider like Martinelli’s Apple Cider or a ginger beer like Brew Dr. Brown’s. The effervescence cleanses your palate, while the fruity or spicy notes complement the burger’s smoky flavors.
Serve these chilled at 38-40°F for the best experience. A cucumber-mint infused water with a squeeze of lime also works beautifully for a lighter option. ✨
Nutrition facts
Frequently asked questions
Why does 80/20 ground beef make better burgers?
The 20% fat in 80/20 ground beef creates juiciness and flavor that leaner cuts can’t match. The fat melts during cooking, keeping the meat moist while adding rich, savory depth. Plus, the fat helps create those perfect crispy edges when seared.
How do I prevent my burgers from sticking to the grill?
Use medium-high heat and add 2 tbsp butter or oil to the grill before cooking. Let it get hot enough to sizzle when you place the patties down. Also, avoid moving them too soon—wait until you see those beautiful grill marks form before flipping.
Should I press down on the burgers while cooking?
Only press gently during the first minute to prevent curling. After that, leave them alone—pressing too hard squeezes out juices and makes the burgers dense. The fat in 80/20 beef needs room to render naturally for that perfect texture.
What’s the best way to tell when burgers are done?
For medium-rare (recommended), cook until internal temp reaches 130-135°F or when edges are crispy and juices run clear. The dimple in the center helps prevent puffing. Never rely on time alone—always use a meat thermometer for accuracy.
Can I make these burgers ahead of time?
Form the patties and refrigerate (uncooked) for up to 1 day or freeze for 3 months. Cook them fresh for best results, but you can assemble the buns ahead and toast them just before serving. The secret to juicy burgers is cooking them fresh from the fridge.

- 5 Star Red Velvet Cupcakes Recipe: Moist Layers With Cream Cheese Frosting Bliss - September 25, 2026
- 4 Ingredient Pignoli Cookie Recipe: Almond Joy Crunch in 15 Minutes - September 25, 2026
- 4-Ingredient Meatloaf Recipe No Bread: Moist and Savory Without a Single Crumb - September 25, 2026