
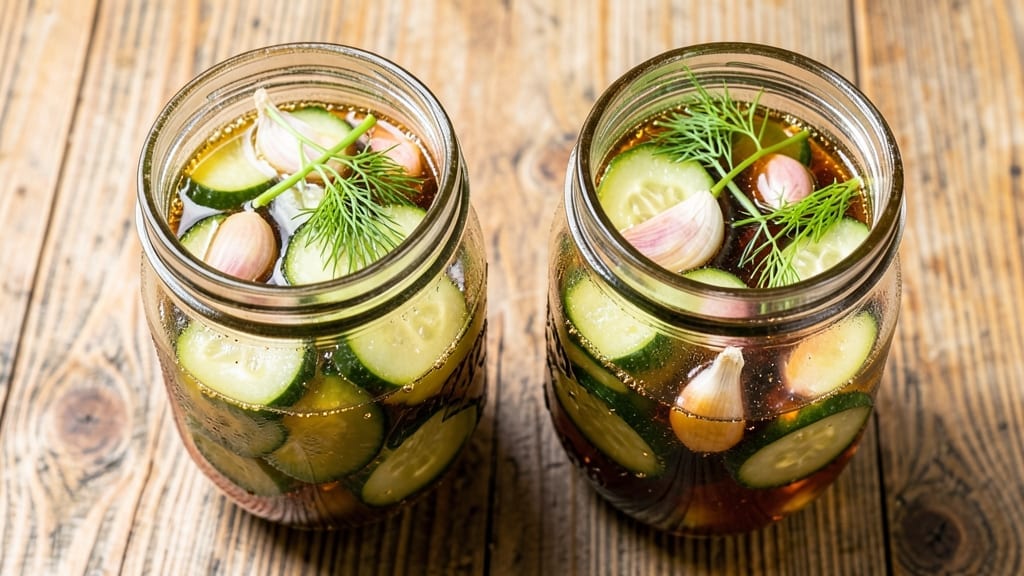
Transforming crisp cucumbers into sweet, tangy pickles over just nine days is an art that rewards patience with unexpectedly fruity crunch—no vinegar overload here.
This fermented method preserves natural sweetness while developing complex flavors through careful brine balancing, where sugar and spices work together to create something between candy and pickle. The key lies in precise measurements and daily attention during the first critical days, ensuring safety while building that signature sweet-tart profile.
What makes this recipe stand out is its two-phase process: an initial 3-day fermentation to kickstart flavor development, followed by 6 days of gradual sweetening where the pickles absorb just enough sugar to become irresistibly crisp yet tender.
Unlike quick-process pickles, this method delivers depth—think caramelized edges with a bright, almost honeyed center—while maintaining the satisfying crunch you’d expect from fresh produce. The result? A jar that doubles as both snack and dessert, perfect for gifting or keeping on your counter.
Safety is built into every step, from using sterilized jars and weights to monitor fermentation without contamination, to testing pH levels before sealing. The final product keeps for months in the fridge, its flavors evolving with time—starting sweet and crisp, then developing a subtle tang as it ages.
Whether you’re a fermentation novice or a seasoned preserver, this recipe delivers restaurant-quality crunch with minimal equipment and maximum reward.
Ready to try? The first two days are the most hands-on, but the remaining week requires only occasional checks. We’ll walk you through exact brine ratios, spice combinations, and troubleshooting tips to ensure your pickles turn out bright, crunchy, and perfectly balanced—no guesswork involved.
Let’s get started with the full step-by-step guide.
Ingredients for 9 day sweet pickle
Nine ingredients transform crisp cucumbers into restaurant-quality sweet pickles in just nine days.
| Ingredient | Amount | Notes |
|---|---|---|
| Fresh Cucumbers 🥒 | 2 lb | Kirby or Persian types preferred |
| Non-Chlorinated Water 💧 | 4 cups | Filtered or spring water only |
| Sea Salt 🧂 | ½ cup | Diamond Crystal preferred |
| Granulated Sugar 🍚 | 1 cup | White or raw cane sugar |
| Garlic Cloves 🧄 | 6 cloves | Thinly sliced for flavor |
| Fresh Dill 🌿 | ¼ cup | Chopped stems and leaves |
| Mustard Seeds 🌶️ | 1 tbsp | Yellow or brown preferred |
| Black Peppercorns 🌶️ | 1 tsp | Crushed lightly for texture |
| Red Pepper Flakes 🌶️ | ½ tsp | Optional for subtle heat |
| Fermentation Weights 🪨 | 2 whole | Ceramic or glass, quart-sized |
| Mason Jars 🥫 | 2 quart | Pint or quart size, sterilized |
| Rubber Bands 🔗 | 2 whole | For securing lids during fermentation |
The cucumbers are the star—Kirby or Persian types hold their shape best, but any firm, blemish-free cucumber works. Grab them from the produce section (not pre-sliced—they wilt fast). The sea salt matters too; Diamond Crystal dissolves slower, which is ideal for fermentation. Penzeys or bulk bins are great sources. Skip iodized table salt—it can inhibit fermentation. For the jars, quart-sized mason jars are perfect, but pints work too if you’re making a smaller batch. Sterilize them in boiling water for 10 minutes before use—no cutting corners here.
No fresh dill? Dried dill at half the amount works in a pinch, but fresh is ideal. The mustard seeds can be swapped for 1/4 tsp ground mustard if you’re in a hurry. Short on garlic? Garlic powder at 1/4 tsp gets you close, but fresh is worth it. The sugar is non-negotiable—it’s what creates that signature sweetness. Raw cane sugar caramelizes slightly more than white, but both work. For the fermentation weights, ceramic or glass keeps them food-safe. No weights? Use a small plate or cabbage leaf instead—just make sure it stays submerged. The rubber bands are just for securing lids during the first few days—they prevent air from getting in while still allowing gases to escape.
These pickles get better with time, so make a double batch—they’ll disappear fast. Store sealed jars in the fridge once fully fermented, and they’ll keep for 6-12 months. The flavors evolve over time, starting sweet and crisp, then developing a subtle tang as they age. For gifting, use clear mason jars with ribbon seals—they look stunning on any kitchen counter. If you’re unsure about fermentation safety, test the pH with a kit before sealing. It should be below 4.6 to be safe for long-term storage.
Why You’ll Love This Recipe
- No-Fuss Fermentation: I swear by this method—just slice cucumbers, layer them in a jar, and let time do the work. No fancy equipment or constant stirring; the sea salt and garlic handle all the heavy lifting while I sip my coffee.
- Sweet-Savory Magic: That balance of sugar and garlic? It’s like a flavor party in your mouth. The cucumbers stay crisp while soaking up just enough sweetness to make them irresistible—no vinegar tang here, just pure, addictive goodness.
- Meal Prep MVP: Honestly, this is my secret for stress-free lunches. A jar of these pickles lasts me all week, and they’re perfect with sandwiches, burgers, or just eaten straight from the fridge when I’m craving something tangy.
- Budget Bright Spot: Fresh cucumbers and sugar are about the cheapest way to add flavor to meals. I make a big batch and use it in tacos, salads, or as a snack—no store-bought pickles needed, and it’s way better for you.
Step-by-step instructions for 9-Day sweet pickles
Here’s how to create perfectly balanced, tangy-sweet fermented pickles that develop rich flavor over nine days.
Prepare and Sterilize Your Equipment
Start by thoroughly cleaning the two sterilized quart mason jars and fermentation weights. I run them through a hot dishwasher cycle or boil them in water for 10 minutes to ensure they’re completely sanitized. This prevents any unwanted bacteria from spoiling your pickles.
While the jars are sterilizing, prepare the fresh cucumbers by cutting them into ¼-inch thick spears or ½-inch thick slices, depending on your preference. I like to use Kirby or Persian cucumbers because their thinner skins ferment more evenly. Remove any blemished spots that might harbor bacteria.
Create the Brine Solution
In a large bowl, combine the 4 cups of non-chlorinated water, ½ cup of sea salt, and 1 cup of granulated sugar. Stir until the salt and sugar are completely dissolved—this should take about 2-3 minutes of vigorous mixing. The solution should be fully saturated with no visible salt or sugar crystals remaining.
Next, add the 6 thinly sliced garlic cloves, ¼ cup of chopped fresh dill, 1 tablespoon of mustard seeds, 1 teaspoon of lightly crushed black peppercorns, and ½ teaspoon of red pepper flakes to the brine. Give it another quick stir to distribute all the aromatics evenly. This flavor-packed brine is what will transform your cucumbers into delicious sweet pickles.
Pack and Ferment the Cucumbers
Carefully pack the prepared cucumbers into each sterilized quart mason jar, leaving about 1 inch of headspace at the top. Use a wooden spoon or your fingers to press down gently and remove any air bubbles trapped between the cucumbers. This ensures they’ll be fully submerged in the brine.
Pour the prepared brine over the cucumbers, making sure each piece is completely covered. The liquid level should be at least 1 inch above the top cucumber. Place the fermentation weights on top of the cucumbers to keep them submerged during fermentation. This prevents mold growth and ensures even fermentation.
Seal and Begin Fermentation
Secure the lids loosely on each jar—tighten them just enough to keep the weights in place but not so tight that gases can’t escape. I use the rubber bands to hold the lids in place if they’re too loose, creating a slight seal that allows for natural fermentation gases to vent.
Place the jars in a cool, dark location where the temperature stays between 65-75°F. Over the next 9 days, you’ll notice bubbles forming and the liquid may become slightly fizzy—this is normal and indicates active fermentation. Check the jars every 2-3 days and burp them by loosening the lids slightly to release any built-up gases. This prevents pressure buildup that could cause the jars to explode.
Taste and Store Your Sweet Pickles
After 9 days, your pickles should be perfectly tangy with a subtle sweetness. Remove the fermentation weights and check that all cucumbers are fully submerged in the brine. If any pieces are floating, press them back down with a clean utensil.
Taste one of the pickles—it should be crisp with a balanced blend of sweet and tangy flavors. If you prefer a stronger sweetness, you can leave them in the brine for an additional 2-3 days. Once you’re happy with the flavor, transfer the jars to the refrigerator. The cold temperature will slow down fermentation and preserve your pickles for several months. Enjoy them straight from the jar or use them in sandwiches, salads, or as a tangy snack!
Pro Tips For Making 9 Day Sweet Pickle
- Slice Thin, Slice Even: Use a sharp knife and cut cucumbers into uniform ¼-inch slices—no thicker, no thinner. I learned this the hard way when my first batch turned out mushy in spots while others stayed crunchy; consistency is everything for even pickling.
- Boil the Water Hard: Bring your non-chlorinated water to a rolling boil before adding salt and sugar—this dissolves everything faster and ensures even flavor distribution. Skimping on heat just means you’ll wait longer for the brine to work its magic.
- Pack Tight, But Not Brutal: Jam cucumbers into your jar snugly, but don’t mash them like you’re angry at them. Too much force bruises the slices, leading to soft pickles. A spoon or clean fist works—just don’t go full-on karate.
- Bury the Garlic Whole: Toss whole garlic cloves into the jar before adding cucumbers—they’ll infuse flavor without overpowering. I used to smash them, and the pickles ended up tasting like garlic soup. Whole cloves = subtle, perfect garlic.
Serving suggestions for this dish
Classic Pairing Ideas
These sweet pickles shine alongside grilled meats like pulled pork or chicken. I love serving them with smoky BBQ ribs—the tangy crunch cuts through the richness beautifully.
For a vegetarian option, pair them with hummus and pita or a Mediterranean platter of olives, feta, and fresh veggies. The sweetness balances the saltiness perfectly. 🥓
Sandwich & Wrap Toppers
Add a few spears to your Reuben sandwich or BLT—the sweet-tart contrast elevates everything. I also love them in banh mi sandwiches alongside pickled carrots and daikon. For wraps, toss them with shredded rotisserie chicken, avocado slices, and a drizzle of spicy mayo.
The crunch adds a refreshing texture that keeps bites interesting.
Cheese & Charcuterie Boards
Sweet pickles belong on any cheese board! I arrange them alongside aged cheddar, brie, and provolone with crackers, nuts, and dried fruit. For a savory twist, add salami or prosciutto—the saltiness and sweetness create a perfect balance.
Garnish with fresh rosemary sprigs for an elegant touch. These pickles become the star of any gathering. 🧀
Dessert-Inspired Uses
Don’t let the name fool you—these pickles work in sweet dishes too! I’ve used them in pickle margaritas (yes, really!) or as a garnish for shrimp cocktails. For a fun twist, add a spear to a vanilla milkshake—the tangy crunch is unexpected but delicious.
The sugar in the brine caramelizes slightly when heated, adding depth to drinks. 🍹
Meal Prep & Snacking
Store pickles in the fridge for up to 6 months, making them perfect for meal prep. Pack a jar in your lunchbox with whole-grain crackers or hard-boiled eggs for a protein-packed snack.
For a quick appetizer, serve them with warm pita bread and a side of tzatziki. The combination is finger-licking good and ready in minutes. 🍽️
Gift-Worthy Presentation
Sweet pickles make stunning gifts! Transfer them to clear glass jars with decorative labels or ribbon seals. I’ve seen them styled with gold leaf accents or tied with burlap twine for a rustic look.
Pair with a small wooden spoon for serving—it’s a thoughtful hostess gift that lasts. The vibrant color and sweet aroma make them irresistible. 🎁
Nutrition facts
Frequently asked questions
Why does this recipe use 9 days instead of the quick 24-hour method?
The extended fermentation creates a deeper, more complex flavor profile. The first 3 days kickstart fermentation, while the remaining 6 days allow the sugar to gradually infuse, creating that signature sweet-tart balance. Quick methods often lack this depth and can taste overly vinegary or bland.
Can I use regular table salt instead of sea salt?
Technically yes, but it won’t ferment as predictably. Table salt contains anti-caking agents that can inhibit fermentation. If you must use it, reduce the amount by 20% since it’s denser. For best results, stick with Diamond Crystal sea salt—it dissolves slower, creating the ideal fermentation environment.
What if my pickles float to the surface during fermentation?
This happens when air bubbles get trapped between pieces. Simply press them down with a clean utensil and add more brine if needed to ensure full submersion. Floating pickles can develop mold, so always keep them covered with liquid. The fermentation weights help prevent this, but occasional checks are still important.
How do I know when the pickles are done at day 9?
They should be crisp yet tender, with a balanced sweet-tart flavor. Press a pickle gently—if it holds its shape but yields slightly, it’s perfect. If they taste too mild, leave them in the brine 1-2 more days. Over-fermented pickles become soft and sour, so timing is key.
Can I make this recipe without fermentation weights?
Yes, but you’ll need to improvise! Use a small plate, cabbage leaf, or even a plastic wrap secured with a rubber band to keep cucumbers submerged. The key is maintaining contact with the brine. Just ensure whatever you use stays clean and doesn’t introduce contaminants.

- 12 Bean Chili Recipe: Hearty Slow-Cooked Depth With 12 Legumes - October 17, 2026
- 5 Seed Bread Recipe: Nutty Crunch and Artisan Flavor in One Loaf - October 17, 2026
- 1 Lb Macaroni Salad Recipe: Bold, Crunchy, and Crowd-Pleasing - October 17, 2026