
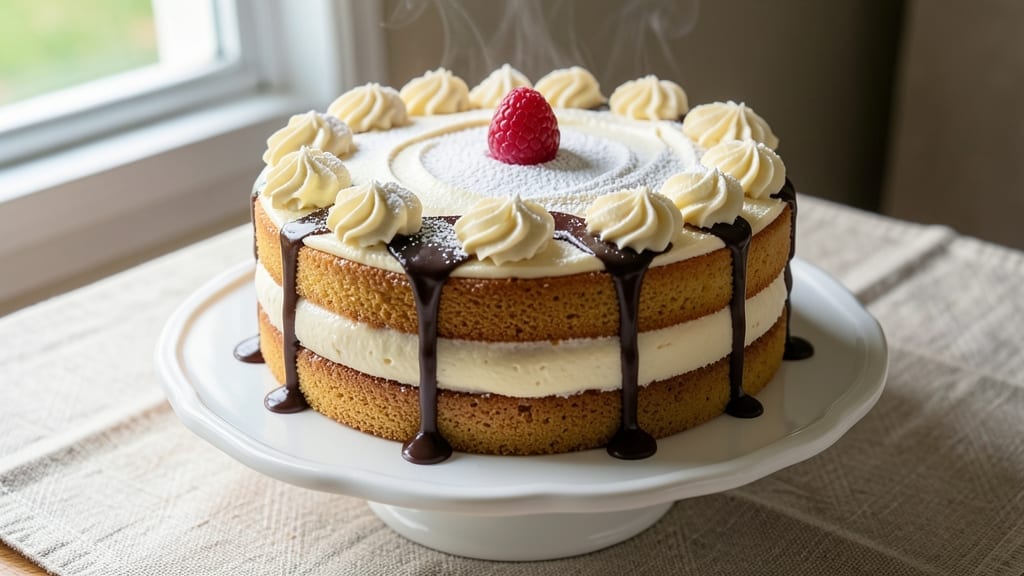
An 8-inch round cake with layers of tender vanilla sponge and velvety buttercream frosting is the perfect centerpiece for celebrations—whether it’s a birthday, anniversary, or just because. 💛 The secret to this recipe lies in precise measurements and gentle folding to create a light, airy crumb that holds up beautifully to each slice.
What makes this cake truly special is its foolproof technique, designed to deliver consistent results every time, even for home bakers.
This recipe yields a cake that’s rich with vanilla flavor but never overpowering, thanks to a balanced mix of butter, sugar, and eggs. The layers are baked just until golden, ensuring they stay moist without becoming dense.
Once cooled, they’re filled and frosted with a smooth buttercream that’s easy to spread and adds that classic cake aesthetic. The frosting isn’t just decorative—it enhances the cake’s flavor, creating a harmonious bite every time.
By following this method, you’ll achieve a cake with perfectly even layers, a tender crumb, and a frosting that’s neither too sweet nor too heavy. The result is a dessert that looks impressive yet remains approachable for any occasion.
Whether you’re serving it at a party or treating yourself, this cake delivers restaurant-quality results with a homemade touch.
The beauty of this recipe is its versatility—customize it with fillings like jam, cream cheese frosting, or even a layer of fresh berries for added freshness. The instructions are clear and designed to minimize stress, ensuring you can focus on enjoying the process.
Let’s get started on creating your perfect 8-inch round cake!
Ingredients for 8 round cake
Twelve essential ingredients for an 8-inch cake with restaurant-quality layers and velvety frosting.
| Ingredient | Amount | Notes |
|---|---|---|
| All-Purpose Flour 🌾 | 2 ½ cups | Sifted for lightness |
| Unsalted Butter 🧈 | 1 cup | Room temperature, full-fat |
| Granulated Sugar 🍚 | 2 cups | Superfine preferred |
| Large Eggs 🥚 | 4 whole | Room temperature |
| Pure Vanilla Extract 🌿 | 2 tsp | High-quality, not imitation |
| Baking Powder 🧂 | 2 tsp | Diamond Crystal preferred |
| Salt 🧂 | ½ tsp | Fine sea salt |
| Whole Milk 🥛 | 1 cup | Room temperature |
| Powdered Sugar 🍚 | 4 cups | For buttercream |
| Heavy Whipping Cream 🥛 | 1 cup | Cold, full-fat |
| Vanilla Bean Paste 🌿 | 1 tbsp | For enhanced flavor |
| Unflavored Gelatin 🧂 | 1 ½ tsp | Bloomed in 3 tbsp water |
The butter and sugar are the foundation here—use European-style butter if possible, like Plugrá or Land O’Lakes Signature. For the vanilla, Madagascar bourbon vanilla extract adds depth, but any high-quality brand works. Sift the flour and baking powder together to avoid lumps in your batter. The milk should be room temperature to ensure even mixing, and whole milk gives the best texture. If you’re short on time, Walmart’s Great Value brand is a reliable budget option for all-purpose flour, though it’s worth splurging on the butter for better flavor.
No vanilla bean paste? Double the pure vanilla extract and add a pinch of ground vanilla bean seeds if you have any. Swap powdered sugar for superfine sugar plus 1 tbsp cornstarch if needed, but the texture won’t be as smooth. For a lighter frosting, replace half the heavy cream with whipped cream, though it won’t hold as well. If you’re avoiding gelatin, agar-agar at 1 tsp per 1 cup liquid works as a substitute, though it has a slightly different set. The buttercream can be made a day ahead—just store it in the fridge and re-whip before using.
Store cake layers wrapped in plastic wrap at room temperature for up to 2 days or refrigerate for 5 days. The buttercream keeps for 3 days in the fridge, covered tightly. For longer storage, freeze the unfrosted layers for up to 3 months. Thaw overnight in the fridge before assembling. If transporting, place the cake on a sturdy board and cover loosely with plastic wrap to prevent condensation.
Why You’ll Love This Recipe
- No Mixer Needed: I swear by this—just cream butter and sugar by hand until it’s light and airy. No fancy equipment, no stress. The eggs fold in like a dream, and the vanilla? It’s the secret to that just-baked warmth without overpowering.
- Buttery Vanilla Bliss: That first bite—soft, tender crumb with layers of butter melting into your mouth? It’s the kind of cake that disappears faster than I can say “second slice.” The sugar caramelizes just enough to give it a subtle depth, but it’s still sweet enough to satisfy a kid’s birthday cake cravings.
- Party in a Pan: Eight perfect rounds mean you can serve them as cupcakes, layer them for a tower, or even stack them for a rustic charcuterie board. I’ve used them for everything from potlucks to my own “emergency dessert” stash—because let’s be real, cake always saves the day.
- Budget-Friendly Luxury: Flour, butter, sugar, eggs—these are pantry staples that won’t break the bank. A single batch stretches into leftovers that stay fresh for days (if they last that long). Honestly, it’s the kind of recipe that makes me feel like I’m baking something fancy, even when I’m just using what I already have.
Step-by-step instructions for layered vanilla cake
Here’s how to bake a perfectly moist 8-round cake with flawless layers and buttery frosting.
🍳 Step 1: Prepare the Cake Batter
Preheat your oven to 350°F and grease three 8-inch round cake pans, then line the bottoms with parchment paper. In a medium bowl, whisk together the 2.5 cups All-Purpose Flour, 2 tsp Baking Powder, and 0.5 tsp Salt. Sift the mixture to remove any lumps—this ensures a light, airy texture.
In a separate large bowl, cream the 1 cup Unsalted Butter and 2 cups Granulated Sugar on medium speed until light and fluffy, about 3-4 minutes. Add the 4 whole Large Eggs one at a time, mixing well after each addition. Stir in the 2 tsp Pure Vanilla Extract and 1 tbsp Vanilla Bean Paste for depth of flavor. Gradually add the dry ingredients to the wet, mixing just until combined. Pour in the 1 cup Whole Milk and mix until smooth.
🔥 Step 2: Bake the Layers Evenly
Divide the batter evenly among the three prepared pans, filling each about ⅔ full. Bake for 25-30 minutes or until a toothpick inserted into the center comes out clean. The cakes should be golden brown on top and spring back gently when pressed. Let them cool in the pans for 10 minutes before transferring to a wire rack to cool completely.
I press down gently on the centers of the cakes while they cool—this prevents doming and ensures flat, even layers. Cooling completely is crucial; warm layers will make the frosting melt and slide off.
🥘 Step 3: Make the Buttercream Frosting
In a medium saucepan, combine 1 cup Heavy Whipping Cream and 1.5 tsp Unflavored Gelatin that’s been bloomed in 3 tbsp water. Heat over medium heat until the gelatin dissolves completely, then remove from heat. Stir in 4 cups Powdered Sugar and 1 tbsp Vanilla Bean Paste until smooth.
Let the mixture cool slightly, then beat with a mixer on high speed until it thickens and holds its shape. The frosting should be smooth and pipeable—if it’s too soft, chill for 10 minutes before proceeding. This buttercream is rich and stable, perfect for piping clean edges.
👨🍳 Step 4: Assemble and Frost the Cake
Level the tops of the cooled cake layers with a serrated knife if needed. Place the first layer on a cake stand or plate and spread a thin layer of frosting on top. Repeat with the second and third layers. For clean sides, I use a bench scraper to smooth the frosting between layers.
Once all layers are stacked, cover the entire cake with a thin crumb coat of frosting. Chill for 15 minutes to set, then apply the final layer of frosting. Use an offset spatula to create smooth sides and a domed top. For extra shine, brush the surface with a little milk after frosting—this makes the cake look bakery-perfect.
⏰ Step 5: Chill and Serve
Refrigerate the cake for at least 2 hours before slicing. This allows the frosting to set completely and prevents crumbs. When ready to serve, use a sharp knife dipped in hot water and wiped dry for clean cuts. The cake should have moist, tender layers with a rich, velvety frosting that melts in your mouth.
For best results, serve at room temperature. The vanilla flavor will be most pronounced after the cake has rested, and the layers will hold their shape beautifully.
Pro Tips For Making 8 Round Cake
- Cream Butter Slowly: Beat the butter and sugar until it’s light and fluffy—about 3-5 minutes—before adding eggs. I used to rush this, and the cake turned dense. Take your time; the air in that butter-sugar mix is what makes the crumb tender.
- Sift That Flour: Sift the flour twice before folding it in. The first sift removes lumps, but the second ensures no hidden pockets of dry flour sink to the bottom later. (Yes, even if you’re impatient like me.)
- Room-Temp Eggs Matter: Let your eggs sit in warm water for 5 minutes before cracking them into the butter mixture. Cold eggs can shock the batter, leading to uneven texture. Trust me, the cake’s structure improves—no one notices the 5-minute wait.
- Don’t Overmix the Batter: Stop folding in the flour the second it’s just combined—no streaks, no overworking. Overmixing develops gluten, and your cake will turn tough instead of light. A spatula swipe is all it takes.
Dietary considerations for this recipe
Gluten-Free Adaptation
Replace the 2.5 cups All-Purpose Flour with a high-quality gluten-free blend like King Arthur Measure for Measure. Use 1:1 ratio and add ½ tsp xanthan gum to mimic gluten’s binding properties.
For extra moisture, increase the milk to 1 cup plus 2 tbsp. Bake at 325°F instead of 350°F to prevent over-browning. 🌾
Dairy-Free Options
Swap the 1 cup Unsalted Butter for 1 cup dairy-free margarine like Miyoko’s. Replace 1 cup Whole Milk with 1 cup unsweetened almond milk or oat milk.
For the frosting, use 1 cup coconut cream instead of heavy cream, and ensure your powdered sugar is dairy-free. Chill the frosting longer to achieve stability.
Egg-Free Substitutes
Replace the 4 Large Eggs with 4 tbsp ground flaxseed mixed with 12 tbsp water (let sit for 5 minutes to thicken). For the frosting, use 1 extra tbsp gelatin to compensate for reduced structure.
Test the cake’s density after baking—if it’s too dry, add 1 tbsp extra milk to the batter. 🥚
Lower Sugar Version
Reduce the 2 cups Granulated Sugar to 1.5 cups and use ½ cup monk fruit sweetener (like Lakanto) for the remaining sugar. Replace 1 cup Powdered Sugar in the frosting with ½ cup erythritol or ½ cup coconut sugar.
The cake will still be sweet but with fewer calories and a lower glycemic impact.
Nut-Free Considerations
Check all ingredients for hidden nuts—some brands of vanilla extract or powdered sugar may contain traces. Use sunflower seed butter instead of nut butters if adding a filling.
For frosting stability, add ½ tsp cornstarch to the powdered sugar mixture. Always verify labels on store-bought items like Walmart’s Great Value flour for cross-contamination warnings.
Nutrition facts
Frequently asked questions
Can I bake this 8-inch cake in a different-sized pan?
Yes, but adjust the baking time and batter quantity. For a 9-inch pan, reduce batter by 15% and bake 5-10 minutes less (check at 20 minutes). For a 6-inch pan, increase batter by 20% and bake 5-10 minutes more. Always use a toothpick test to confirm doneness.
Why does my cake sink in the middle after baking?
This usually happens from overmixing the batter or opening the oven too soon. Mix just until combined (no streaks of flour) and avoid peeking at the cake while baking. Let it cool in the pan for 10 minutes before removing—this helps maintain structure. If it sinks slightly, frosting can still save it!
How do I make this cake single-layer instead of three layers?
Use just one 8-inch pan and bake the entire batter for 35-40 minutes. For a taller cake, bake in a 6-inch pan for 40-45 minutes with the same batter. Double the frosting recipe to cover the sides. The texture will be denser but still delicious!
Can I substitute buttercream with cream cheese frosting?
Replace the buttercream with 8 oz cream cheese, ½ cup butter, 3 cups powdered sugar, and 1 tsp vanilla. Whip until smooth. This frosting is tangier and works beautifully with vanilla cake. Chill for 30 minutes before frosting to prevent melting.
How do I store leftovers without drying them out?
Wrap each slice tightly in plastic wrap and store at room temperature for 2 days. For longer storage, refrigerate for up to 5 days (bring to room temp before serving). Freeze slices individually for 2 months—thaw overnight in the fridge. Never freeze the whole cake to prevent frosting separation.
