
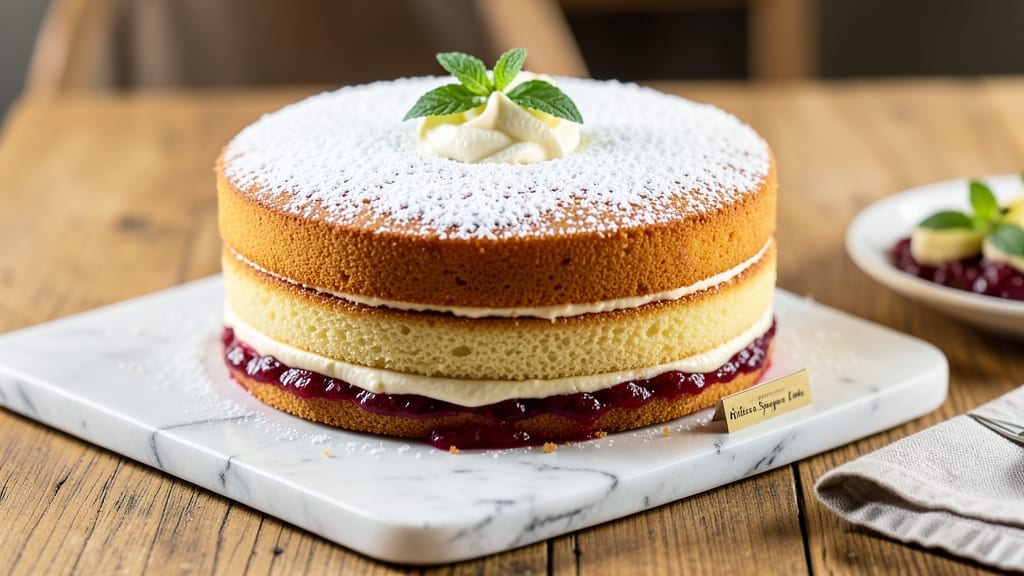
This 9-inch Victoria sponge cake recipe delivers the perfect balance of tender layers, jam-soaked richness, and cloud-like whipped cream—all without a single dense bite. 💛 The secret lies in properly whipped egg whites and a precise baking technique that ensures lightness, making it the ideal cake for tea time or celebrations.
What sets this apart is the foolproof method that guarantees consistent results every time, whether you’re a beginner or a seasoned baker.
The cake’s magic begins with a simple batter of flour, sugar, and eggs, whisked to airy perfection before folding in butter for a delicate crumb. Between the layers, a generous spread of jam and fluffy whipped cream creates that signature British sponge cake experience.
The key to success is baking at the right temperature and time—350°F for 20-25 minutes—to achieve a golden, springy texture that holds up beautifully when sliced.
By the time you’re done, you’ll have a restaurant-quality cake with layers that separate cleanly and a filling that’s neither too wet nor too dry. The aroma of vanilla and butter will fill your kitchen, while the visual appeal of dusted powdered sugar makes it perfect for serving.
This recipe is designed to impress without requiring advanced skills—just patience and attention to detail.
Serve it warm with a cup of Earl Grey tea or enjoy it chilled for a refreshing dessert. The versatility of this cake means you can customize it with different jams, fruits, or even a dusting of cocoa powder for a decadent twist.
Let’s get started on creating your perfect Victoria sponge.
Ingredients for 9 inch victoria sponge cake
These simple yet magical ingredients transform into a restaurant-quality Victoria sponge cake—light, moist layers with jam and whipped cream perfection!
| Ingredient | Amount | Notes |
|---|---|---|
| All-Purpose Flour 🌾 | 2 ¼ cups | Sifted for light texture |
| Unsalted Butter 🧈 | 1 cup | Cold, cubed, European-style preferred |
| Granulated Sugar 🍚 | 1 ½ cups | White or light brown |
| Large Eggs 🥚 | 4 whole | Room temperature, separated |
| Vanilla Extract 🌿 | 1 tbsp | Pure, high-quality preferred |
| Baking Powder 🧂 | 1 ½ tsp | Aluminum-free for tender crumb |
| Salt 🧂 | ½ tsp | Fine sea salt |
| Jam 🍓 | ¾ cup | Raspberry or strawberry preferred |
| Heavy Whipping Cream 🥛 | 1 ½ cups | Cold, full-fat for stability |
| Powdered Sugar 🍚 | 1 cup | Sifted for dusting |
| Lemon Juice 🍋 | 1 tsp | Freshly squeezed |
| Raspberry Preserves 🍓 | ½ cup | Optional extra filling layer |
The butter and eggs are non-negotiable here. European-style butter like Plugrá or President gives that rich, tender crumb—don’t skimp on quality. Room-temperature eggs whip up fluffier, so take them out 30 minutes before baking. For flour, King Arthur or Gold Medal brands are my go-to—they’re sifted and consistent. The vanilla extract should smell vibrant; cheap stuff tastes like perfume. Pro tip: measure your dry ingredients by spooning into the cup and leveling—no scooping from the bag or you’ll end up with a dense cake.
No raspberry jam? Strawberry, apricot, or even blackberry work beautifully—just make sure it’s seedless for clean layers. Running short on heavy cream? Whipped coconut cream is a great vegan alternative, though it won’t be quite as stable. The powdered sugar for dusting should be sifted through a fine-mesh sieve to avoid clumps—trust me, it makes all the difference. For the lemon juice, fresh is best, but bottled works in a pinch. If you’re feeling fancy, add a teaspoon of Earl Grey tea leaves to the batter for a subtle floral note—it pairs perfectly with the jam.
This cake tastes even better the next day once the flavors meld, so bake it ahead if you can. Store leftovers covered at room temperature for 2 days or refrigerated for up to 5 days. The layers separate beautifully when chilled, so pop it in the fridge for 30 minutes before slicing. For freezing, wrap each layer individually in plastic wrap—up to 3 months. The whipped cream should be made fresh before serving, but you can prep the cake layers a day ahead and assemble when ready. Dust with powdered sugar right before serving for that classic British touch.
Why You’ll Love This Recipe
- The secret’s in the ratio: equal parts butter and sugar, whipped until fluffy. That’s what gives it that melt-in-your-mouth richness—no heavy frosting needed. Honestly, the first bite is why I keep making it.
- No-Fuss Layers: This cake comes together in two bowls—no mixer required. Cream butter and sugar until light, fold in eggs one at a time, then gently whisk in the flour. That’s it. No overmixing, no stress, just a tender crumb that’s supposed to look effortless.
- Butter-Sugar Magic: The secret’s in the ratio: equal parts butter and sugar, whipped until fluffy. That’s what gives it that melt-in-your-mouth richness—no heavy frosting needed. Honestly, the first bite is why I keep making it.
- Tea Time Hero: Slice it thin, serve with jam and clotted cream, and suddenly you’ve got the perfect afternoon pick-me-up. It’s my go-to for book club meetings, lazy Sundays, or when I need to impress someone without cooking dinner.
Step-by-step instructions for Victoria sponge cake layers
Here’s how to bake perfectly light sponge layers that crumble just enough for jam to soak in beautifully.
👨🍳 Step 1: Whisk Dry Ingredients and Cream Butter and Sugar
Preheat your oven to 350°F and grease two 9-inch round cake pans with butter, then line the bottoms with parchment paper. In a medium bowl, whisk together the 2.25 cups all-purpose flour, 1.5 teaspoons baking powder, and 0.5 teaspoon salt. Set aside.
In a separate large bowl, beat the 1 cup cold unsalted butter and 1.5 cups granulated sugar together on medium speed with a hand mixer until light and fluffy—about 3-4 minutes. This step is crucial; you’re incorporating air that will make your cake rise beautifully. Scrape down the sides of the bowl once to ensure even mixing.
🍳 Step 2: Add Eggs and Vanilla for a Fluffy Base
Add the 4 whole large eggs, one at a time, beating well after each addition. Then mix in the 1 tablespoon vanilla extract until fully combined. The mixture should be thick and pale yellow—almost like a pale ribbon when the beaters are lifted. This is your base batter, and getting it right ensures a tender crumb.
With the mixer running on low speed, gradually add about ⅓ of the flour mixture to the wet ingredients. This prevents overmixing, which can make the cake dense. After it’s incorporated, stop the mixer and gently fold in the remaining flour using a spatula until just combined. The batter will be thick but pourable—don’t overmix or you’ll develop gluten and end up with a tough cake.
🔥 Step 3: Bake Two Perfectly Light Layers
Divide the batter evenly between the prepared cake pans—you should have about 1½ cups per pan. Tap each pan gently on the counter to remove any air bubbles. Bake for 25-30 minutes or until a toothpick inserted into the center comes out clean. The edges should be golden brown, but the tops should still look slightly pale—they’ll firm up as they cool.
I know it’s tempting to open the oven early to check, but resist! Every time you open the oven, you lose heat and steam, which can cause the cakes to sink. Let them bake undisturbed. Once done, remove from the oven and let them cool in the pans for 10 minutes, then transfer to a wire rack to cool completely. This cooling step is essential for level slicing later.
🥘 Step 4: Assemble with Jam and Whipped Cream
While the cakes cool, whip the 1.5 cups heavy whipping cream with the 1 cup powdered sugar and 1 teaspoon lemon juice until soft peaks form. The lemon juice brightens the flavor and helps stabilize the whipped cream. Fold in the 0.5 cup raspberry preserves (if using) for extra fruity flavor—this is optional but adds a lovely burst of color and taste.
Once the cakes are completely cool, level the tops if needed. Place one cake layer on a serving plate, then spread about ½ of the jam evenly over the top. Top with the second cake layer, then spread the remaining jam over the top of the second layer. Finally, spread the whipped cream evenly over the entire cake, covering the sides and top completely. The whipped cream should create a smooth, glossy finish that seals in all those beautiful flavors.
Pro Tips For Making 9 Inch Victoria Sponge Cake
- CREAM BUTTER AT ROOM TEMP: Mix the butter and sugar until the bowl feels warm to the touch—about 3-4 minutes. Cold butter makes for a dense cake, and you’ll know it’s ready when the mixture lightens in color and loses its grainy texture. (Yes, even if you’re impatient like me, resist the urge to rush this.)
- WHISK EGGS UNTIL TRIPLE VOLUME: Beat the eggs on their own first—room temperature, no yolk cracks—until they’re pale, thick, and ribbon-like when you lift the whisk. Folding them into the butter-sugar mix later keeps the cake airy; if they’re under-whisked, you’ll end up with a brick.
- DON’T OVERMIX THE DRY INGREDIENTS: Sift the flour, baking powder, and salt together once, then fold them into the wet mix just until combined. Overmixing develops the gluten, and your Victoria sponge will turn out tough instead of tender. Stop when there are no more flour streaks—no need to stir like you’re kneading dough.
- BAKE UNTIL GOLDEN, NOT JUST SET: Check for doneness at 25-30 minutes, but pull it out when the top springs back slowly to gentle pressure and has a deep golden hue—not pale or just set. Overbaking dries it out; underbaking leaves it gummy. A toothpick should come out with a few moist crumbs, not wet batter.
Creative variations of 9 inch victoria sponge cake
Classic British Twist
For an authentic British experience, swap the raspberry jam for strawberry preserves and add a layer of clotted cream between the sponge and whipped cream. This royal treatment is a staple at British tea parties—just use 1 cup of clotted cream instead of half the whipped cream.
Serve with a pot of Earl Grey tea for the full experience. 🍓
Citrus Zest Version
Brighten the cake with 1 tablespoon of lemon zest folded into the batter and ½ cup of orange marmalade instead of jam. The citrus pairs beautifully with the vanilla, and the marmalade adds a lovely tang. Dust with powdered sugar and garnish with orange slices for a stunning presentation. 🍊
Chocolate Lover’s Upgrade
Replace the jam with ½ cup of salted caramel sauce and fold 2 ounces of dark chocolate, melted, into the whipped cream. Top with chocolate shavings and a sprinkle of flaky sea salt for a decadent twist.
This version is perfect for chocolate enthusiasts who want to keep the classic structure but add rich, indulgent flavors. 🍫
Seasonal Berry Adaptation
In summer, use fresh raspberries instead of jam—simmer them with 1 tablespoon of honey and 1 teaspoon of lemon juice to make a quick compote. For winter, try blackberry jam and add a pinch of cinnamon to the batter for warmth.
Seasonal fruits keep the cake fresh and exciting year-round. 🍇
Gluten-Free Option
Substitute the all-purpose flour with 2 cups of gluten-free 1:1 baking flour (like Bob’s Red Mill) and add ½ teaspoon of xanthan gum to the dry ingredients. The texture will be slightly denser but still tender.
Use the same baking time, but check for doneness at 22 minutes—gluten-free cakes can dry out faster. 🌾
Vegan-Friendly Swap
Replace the butter with 1 cup of vegan butter (like Miyoko’s) and the eggs with 4 flax eggs (mix 4 tablespoons ground flaxseed with 10 tablespoons water, let sit for 5 minutes).
Use coconut cream for the whipped topping—chill it overnight for best results. The cake will still be light, just with a slightly denser crumb. 🥥
Nutrition facts
Frequently asked questions
Why does my Victoria sponge cake turn out dense instead of light?
Overmixing the batter develops too much gluten, making the cake dense. Use a spatula to gently fold in the flour after adding the first third to the wet ingredients. Also, make sure your butter and eggs are at room temperature—they should be soft but not warm to the touch.
Can I make this cake in a different size pan?
Yes, but adjust the baking time. For an 8-inch pan, bake for 20-25 minutes at 350°F, and for a 10-inch pan, increase to 30-35 minutes. The thickness matters more than the diameter—aim for about 1.5 inches of batter depth for even baking.
How do I prevent the layers from separating when slicing?
Let the cake rest for 30 minutes at room temperature before slicing. Chilling it first makes the layers too firm. Also, use a sharp serrated knife, dip it in hot water, wipe dry, and slice cleanly—this prevents crumbling. Store leftovers in the fridge for up to 5 days to maintain structure.
What’s the best way to reheat sliced Victoria sponge cake?
For 1-2 slices, use the microwave for 10-15 seconds on medium power. For larger portions, wrap slices in foil and warm in a 350°F oven for 5-7 minutes. Avoid direct heat—it dries out the sponge. The cake is best served at room temperature, so let it sit for 5 minutes after reheating.
Can I make this cake ahead of time?
Bake the layers 1 day ahead and store them wrapped in plastic at room temperature. Assemble the cake 4 hours before serving to let the filling set. For longer storage, freeze the assembled cake (without whipped cream) for up to 3 months. Thaw overnight in the fridge before adding fresh whipped cream.

- 12 Bean Chili Recipe: Hearty Slow-Cooked Depth With 12 Legumes - October 17, 2026
- 5 Seed Bread Recipe: Nutty Crunch and Artisan Flavor in One Loaf - October 17, 2026
- 1 Lb Macaroni Salad Recipe: Bold, Crunchy, and Crowd-Pleasing - October 17, 2026