
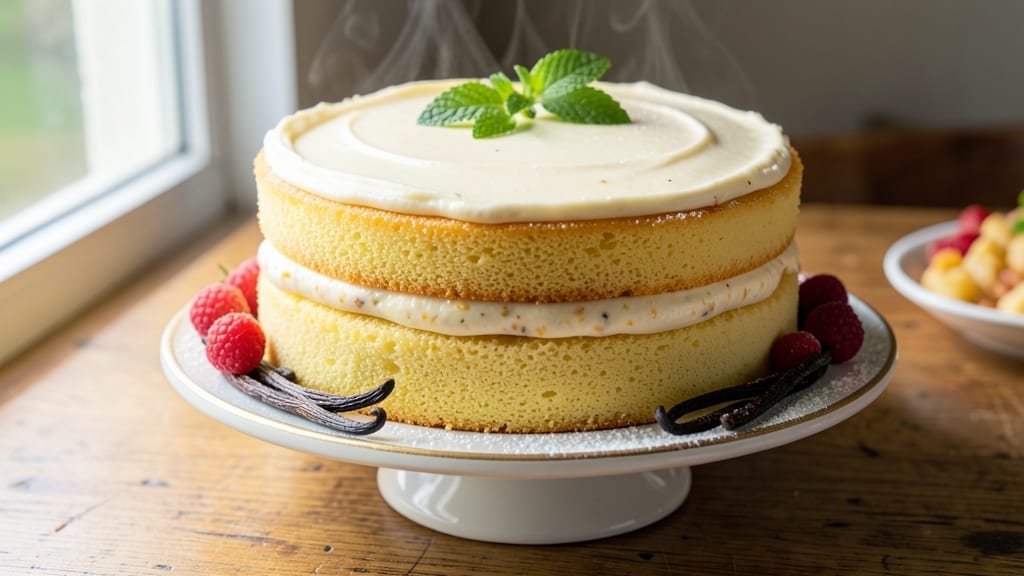
This 9-inch yellow cake recipe delivers the perfect balance of tender crumb and rich vanilla flavor—ideal for birthdays, celebrations, or anytime you crave classic homemade cake. 💛 The secret lies in precise measurements and gentle folding, which creates that signature moist texture without a dense center.
I’ve baked this recipe dozens of times, and it consistently yields a cake that’s light enough to slice easily but sturdy enough to hold layers of frosting beautifully.
What sets this recipe apart is the vanilla bean swirls that run through the batter, adding natural sweetness and visual appeal without overpowering the vanilla cake base. The buttery frosting layers not only enhance the flavor but also create that classic layered look that makes any cake feel special.
This recipe uses standard pantry ingredients—all-purpose flour, granulated sugar, eggs, and butter—so you won’t need to hunt for anything unusual.
By the time you pull this cake from the oven, you’ll have a golden-domed masterpiece with a tender crumb that’s just firm enough to hold slices without crumbling. The frosting, made with softened butter and powdered sugar, is rich and spreadable, perfect for creating clean, professional-looking layers.
Cooling the cake properly ensures even slices every time, and the vanilla bean swirls add a touch of elegance that makes it feel like a bakery creation.
Whether you’re baking for a special occasion or just treating yourself, this recipe delivers consistent results with minimal fuss. The instructions are designed to guide you through each step—from mixing the batter to layering the frosting—so you can achieve restaurant-quality cake in your own kitchen. Let’s get started!
Ingredients for 9 inch yellow cake
Pantry staples plus two special touches—vanilla beans and gentle folding—transform simple ingredients into bakery-quality cake.
| Ingredient | Amount | Notes |
|---|---|---|
| All-Purpose Flour 🌾 | 2 ½ cups | Sifted for light texture |
| Granulated Sugar 🍚 | 2 cups | Divided for batter and swirls |
| Unsalted Butter 🧈 | 1 cup | Softened to room temperature |
| Large Eggs 🥚 | 4 whole | Room temperature preferred |
| Vanilla Extract 🌿 | 2 tsp | Pure vanilla preferred |
| Vanilla Beans 🌸 | 2 whole | Split lengthwise for swirls |
| Baking Powder 🍞 | 2 tsp | Ensures proper rise |
| Salt 🧂 | ½ tsp | Kosher or sea salt |
| Milk 🥛 | 1 cup | Room temperature |
| Powdered Sugar 🍚 | 3 cups | For buttery frosting |
| Vanilla Extract 🌿 | 1 tsp | For frosting flavor |
| Heavy Whipping Cream 🥛 | ½ cup | Chilled for frosting |
The vanilla beans are worth the splurge here. Look for plump, moist beans at specialty stores or the baking aisle—Trader Joe’s carries good ones. Split them lengthwise, scrape out the seeds, and save the pods for the batter swirls. The flour? King Arthur or Gold Medal brands are my go-to for consistent results. Sift it first—this isn’t optional, trust me. And while we’re talking butter, Plugrá or Land O’Lakes unsalted work perfectly, but make sure it’s fully softened before mixing. Room temperature eggs and milk are non-negotiable for that tender crumb.
No vanilla beans? Double the vanilla extract and add a pinch of almond extract for depth. Running short on powdered sugar? Confectioners’ sugar from the store works fine—just sift it with the flour to avoid lumps. The heavy cream can be swapped for Greek yogurt or sour cream in a pinch, but it’ll change the frosting texture slightly. For the frosting, if you’re feeling fancy, add a splash of heavy cream to make it extra fluffy. And if you’re prepping ahead, make the frosting first—it can sit at room temp while you bake.
This cake keeps beautifully—3 days at room temp covered loosely, or 1 week refrigerated in layers with parchment between them. The frosting? 3 days max—it starts to weep if left too long. I always bake mine in the morning and frost in the afternoon so everything sets properly. For make-ahead bakers, assemble the cake un-frosted, wrap tightly, and freeze for up to 1 month. Thaw overnight before frosting.
Why You’ll Love This Recipe
- No-Fuss Mixing: I swear by the creamy butter-and-sugar combo here—they blend into a dreamy batter with just a hand mixer. No stand mixer? No problem. The eggs and vanilla fold right in without fighting you, and the flour comes together like a whisper.
- Classic Crowd-Pleaser: That buttery richness with vanilla’s warmth? It’s the kind of cake that disappears at birthday parties, potlucks, or even a quiet Sunday brunch. Honestly, it’s the base I trust for frosting, filling, or even naked—no judgment.
- Leftovers That Last: A 9-inch pan means perfect portions—slice it for breakfast toast, crumble it into oatmeal, or stash it for emergency snacks. Between us, this cake keeps better than most store-bought, and the sugar-butter ratio makes every slice feel special.
- Pantry Staple Magic: You’re already using ingredients you own: flour, sugar, butter, eggs. No specialty items, no last-minute grocery runs. I’ll be real: this is my go-to when I’m too tired to bake anything fancy but still crave something sweet.
Step-by-step instructions for vanilla bean swirl cake
Here’s how to create a luscious yellow cake with signature vanilla bean swirls and velvety buttercream.
👨🍳 Step 1: Prepare the Batter with Vanilla Infusion
Preheat your oven to 350°F and grease a 9-inch round cake pan, then line the bottom with parchment paper. In a medium bowl, whisk together the 2.5 cups all-purpose flour, 2 tsp baking powder, and 0.5 tsp salt. Set aside.
In a large mixing bowl, cream together the 1 cup softened unsalted butter and 1 cup granulated sugar on medium speed until light and fluffy, about 3-4 minutes. Add the 4 whole large eggs, one at a time, mixing well after each addition. The mixture should nearly double in volume and turn pale.
Split the 2 whole vanilla beans lengthwise and scrape out the seeds. Add the seeds and 2 tsp vanilla extract to the butter mixture, mixing until combined. Gradually add the dry ingredients in 3 parts, alternating with the 1 cup milk in 3 parts, beginning and ending with the dry ingredients. Mix on low speed just until combined—don’t overmix.
🍳 Step 2: Create the Vanilla Swirls and Bake
Divide the batter evenly between two medium bowls. In one bowl, reserve ½ cup granulated sugar and mix it in thoroughly. This will create a sweeter layer for the swirls. Pour half of the plain batter into the prepared cake pan, spreading it evenly.
Drop spoonfuls of the sweeter batter on top of the first layer, spacing them about 2 inches apart. Using a butter knife, gently swirl the sweeter batter into the plain batter in a circular motion, creating marbled patterns. Pour the remaining plain batter over the swirls and spread it evenly with a spatula.
Bake in the preheated oven for 30-35 minutes, or until a toothpick inserted into the center comes out clean. Let the cake cool in the pan for 10 minutes, then transfer it to a wire rack to cool completely before frosting.
🥘 Step 3: Make the Buttery Vanilla Frosting
In a medium bowl, beat the 0.5 cup chilled heavy whipping cream with an electric mixer until soft peaks form. Gradually add the 3 cups powdered sugar and 1 tsp vanilla extract, mixing on low speed until just combined. Increase the speed to medium and beat until the frosting is light and fluffy, about 2-3 minutes.
Once the cake has cooled completely, spread a thin layer of frosting over the top and sides to create a crumb coat. Chill the cake in the refrigerator for 15 minutes to set the crumb coat. Remove the cake and apply the remaining frosting, spreading it evenly over the top and sides with a spatula. Use a bench scraper to smooth the sides for a polished finish.
Pro Tips For Making 9 Inch Yellow Cake
- MELT BUTTER SLOWLY: If you’re dumping cold butter straight into the hot batter, you’re setting yourself up for lumps. Instead, melt the butter first—just until it’s liquid but not browned—then let it cool to room temperature before mixing. I learned this the hard way after scraping butter chunks out of my mixer for the third time.
- SIFT THE FLOUR FIRST: Skimping on this step means uneven texture. Sift the flour before measuring it into the bowl—especially if your recipe calls for more than 2 cups. This aerates it, prevents dense layers, and saves you from overmixing later. (Yes, even if you’re impatient like me.)
- TEST DONENESS WITH A TOOTHPICK: The cake’s edges might look set, but that toothpick test is non-negotiable. Insert it in the center—if it comes out with moist crumbs (not wet batter), it’s done. Overbaking dries out the crumb, and underbaking leaves it gummy. Trust the toothpick, not the timer.
- USE ROOM-TEMP EGG WHITES: Cold egg whites can curdle when mixed with butter, leaving streaks in your batter. Let them sit in warm water for 5 minutes before cracking them in. It’s a tiny effort that makes a real difference in a smooth, velvety texture—no one wants to see streaks in their yellow cake.
Troubleshooting perfect results
Cracked Cake Crisis
Cracks usually mean your cake baked too fast or your oven was too hot. To fix this, place a metal tray on the middle rack 10 minutes before baking—this creates steam that slows the rise.
I also recommend baking at 325°F instead of 350°F for a more even bake. If cracks appear while baking, immediately lower the oven temperature to 275°F and bake until done. 🌡️
Dense or Gummy Texture
Overmixing or underbaking are the usual culprits. For the batter, mix just until combined—no need for smooth perfection. If your cake feels dense, check the oven temperature with an oven thermometer (many ovens run hot).
Bake until a toothpick comes out with a few moist crumbs, not wet batter. Let it cool completely before frosting to avoid a soggy mess.
Sunken Center
A sunken center happens when the cake collapses during cooling. This often means your leavening agents (baking powder) are old or expired. Always check the expiration date on your baking powder—replace it if it’s over 6 months old.
Also, don’t overfill the pan—fill it only ⅔ full to allow room for rising. If it still sinks, try adding 1 extra tablespoon of baking powder to the recipe.
Frosting Too Thin
If your frosting isn’t holding its shape, it might be too warm or not whipped enough. Always chill your mixing bowl and beaters before whipping the cream. For extra stability, add 1 extra tablespoon of powdered sugar or 1 teaspoon of corn syrup to the frosting.
If it’s still too runny, try re-whipping it with a splash of cold heavy cream to bring it back to fluffy perfection. ✨
Batter Too Thin
A runny batter usually means too much liquid. Double-check your measurements—1 cup milk should be 8 fluid ounces, not heaping. If it’s still too thin, add 1-2 extra tablespoons of flour to thicken it.
For extra insurance, let your batter rest for 10 minutes before baking—this helps the flour absorb more liquid. Pro tip: Use a digital kitchen scale for precise measurements if you’re unsure.
Uneven Baking
Hot spots in your oven can cause uneven baking. Rotate your cake pan halfway through baking (after 15-17 minutes) for even heat distribution. If one side is browning faster, try placing a piece of aluminum foil over the darker side.
For future bakes, consider using two 9-inch pans instead of one—this helps distribute heat more evenly. 🔥
Nutrition facts
Frequently asked questions
Can I use this recipe for a sheet cake instead of a round cake?
Yes, but you’ll need to adjust the baking time and pan size. For a 9×13-inch sheet cake, spread the batter evenly in a greased pan and bake at 350°F for 25-30 minutes. The vanilla swirls will still work—just spread spoonfuls of the sweeter batter across the top before adding the remaining batter.
What’s the best way to store leftover cake?
Wrap the frosted cake tightly in plastic wrap and store at room temperature for 2-3 days. For longer storage, refrigerate for up to 1 week or freeze for 1 month. To reheat, place slices in a 300°F oven for 5-10 minutes to soften the frosting.
Can I make this cake gluten-free?
You can substitute the all-purpose flour with a 1:1 gluten-free baking flour blend (like Bob’s Red Mill or King Arthur). Use the same measurements, but add ½ teaspoon xanthan gum to improve texture. The cake may be slightly denser, so reduce baking time by 2-3 minutes.
Why does my cake have a dense center even after baking fully?
This usually happens from overmixing the batter or using old baking powder. Mix only until combined, and check your baking powder’s expiration date—it should be fresh (6 months or less). Also, ensure your oven is properly calibrated with an oven thermometer.
How can I make this cake ahead of time?
Bake the cake 1 day in advance and store it unfrosted at room temperature. Frost just before serving. For 2 days ahead, wrap the frosted cake tightly and refrigerate. Bring to room temperature before serving for the best texture.

- Pea Soup Instant Pot Recipe: Velvety Green Smoothness in 20 Minutes - November 1, 2026
- Pork Loin Pulled Pork Crock Pot Recipe: Slow-Smoked Tenderness With Zero Dryness - November 1, 2026
- Baked Potatoes in Crock Pot Recipe: Buttery Interiors and Crispy Top Magic - November 1, 2026