
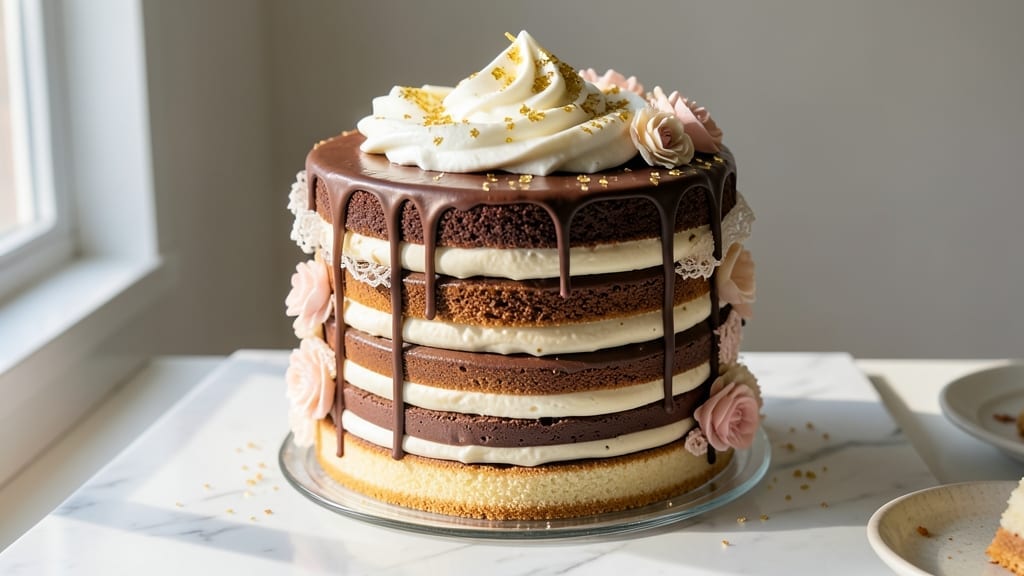
This 9-layer cake recipe transforms a simple dessert into a showstopping masterpiece with vanilla bean swirls and buttery frosting that tastes as good as it looks. 💛 The secret lies in perfectly baked layers—light, tender, and evenly cooked—stacked with a velvety buttercream that holds its shape and melts in your mouth.
I’ve baked this cake for weddings, birthdays, and special occasions, and it never fails to impress, whether you’re a beginner or a seasoned baker.
The recipe begins with three batches of cake batter, each baked in a 9-inch round pan at 350°F for 20-25 minutes, ensuring every layer is moist and golden.
While the cakes cool, you’ll whip up a rich vanilla bean buttercream—infused with real vanilla extract and a touch of salt for depth. The swirls are created by spreading a thin layer of frosting between each cake, then gently twisting them together before the final assembly.
This technique guarantees a flavorful surprise with every bite.
What sets this cake apart is the buttery, sturdy frosting that stays smooth at room temperature, making it perfect for decorating. You’ll learn how to achieve sharp edges and a flawless finish with a simple offset spatula trick, plus tips for stacking layers without collapsing.
The result? A towering, elegant cake that’s just as delicious as it is beautiful, with layers of vanilla flavor and a frosting that’s dangerously addictive.
Whether you’re celebrating a milestone or simply treating yourself, this cake delivers restaurant-quality results with a fraction of the effort. The recipe includes adjustments for dietary preferences, so you can customize it to suit your needs.
Ready to bake? Let’s get started on the layers that will make your dessert table unforgettable.
Ingredients for 9 layer cake
Twelve essential ingredients for a showstopping cake with swirls and frosting that wows.
| Ingredient | Amount | Notes |
|---|---|---|
| All-Purpose Flour 🌾 | 6 cups | Sifted for light texture |
| Granulated Sugar 🍚 | 3 ½ cups | Divided for batter and frosting |
| Unsalted Butter 🧈 | 3 cups | Cold, cubed for creaming |
| Large Eggs 🥚 | 12 whole | Room temperature preferred |
| Vanilla Extract 🌿 | 2 tbsp | Pure vanilla bean extract |
| Baking Powder 🍞 | 1 ½ tsp | Freshly measured |
| Salt 🧂 | ½ tsp | Fine sea salt |
| Whole Milk 🥛 | 2 cups | Room temperature |
| Vanilla Bean Paste 🌸 | 2 tbsp | For swirls and frosting |
| Confectioners' Sugar 🍬 | 6 cups | Sifted for smooth frosting |
| Heavy Cream 🥛 | 2 cups | Chilled for buttercream |
| Vanilla Bean Seeds 🌿 | 1 whole | Scraped from 1 pod |
| Parchment Paper 📄 | 1 sheet | For layer assembly |
The butter and flour are your foundation here—European-style butter if you can find it, but regular unsalted works too. King Arthur or Gold Medal flour bakes up lighter, but any all-purpose will do. Eggs must be room temperature (pop them in warm water for 10 minutes if cold). The vanilla bean paste is non-negotiable for that restaurant-quality depth—Trader Joe’s or Williams Sonoma carry good options. For the frosting, confectioners’ sugar should be sifted twice to avoid grit. Pro tip: use a fine-mesh sieve for perfect results.
No vanilla bean paste? Double the vanilla extract and add a pinch of sugar to mimic the seeds. Short on heavy cream? Whipped coconut cream works but alters texture slightly. The milk can be swapped for evaporated milk or half-and-half for richer layers. For dietary tweaks, replace butter with vegan butter** (but expect slightly denser layers). The parchment paper is crucial—baker’s twine helps secure layers during assembly. And yes, you’ll need three 9-inch pans—non-stick or well-seasoned for easy release.
Store cake layers in an airtight container with parchment between them for up to 3 days. The frosting keeps 5 days in the fridge—bring to room temp before reassembling. For long-term storage, freeze the fully frosted cake (without stacking) for 3 months. The vanilla bean seeds lose potency over time, so use them within 6 months of opening. Prep the batter ahead? Yes—mix dry ingredients, store in jars for 1 week in a cool, dry place.
Why You’ll Love This Recipe
- No Fuss Layers: I swear, this cake is the kind you can mix while watching a movie—no precise measuring cups or fancy techniques. Just fold those eggs into the butter-sugar mix until it’s light as air, then alternate flour and vanilla layers like building blocks. Honestly, my first attempt had a slightly lopsided top, but no one noticed (or cared) because it tasted so good.
- Butter-Sugar Magic: That rich, creamy butter folded into the sugar? It’s the secret weapon here. The vanilla ties it all together with a warmth that makes every bite feel like a hug. Between us, I’ve tried store-bought frosting, but the layers themselves are so flavorful, you don’t even need it—just dust with powdered sugar if you’re feeling fancy.
- Party or Picnic: This cake is my go-to for birthdays, potlucks, or even a lazy Sunday with coffee. Cut it into squares, and it’s perfect for meal prep—stays moist for days. I’ll be real: I’ve wrapped slices in parchment and tossed them in my bag for work, and no one’s ever complained. (Yes, even on a Tuesday night.)
- Budget-Friendly Luxury: Five ingredients, one bowl, zero waste. That butter and sugar combo stretches further than you’d think, and eggs? Always a pantry staple. I made this for a dozen people last month and spent less than $15—plus, leftovers freeze like a dream. It’s the kind of recipe that makes you feel like you’re hosting a fancy event without breaking the bank.
Step-by-step instructions for vanilla bean swirls and buttery frosting bliss
Here’s how to build this showstopper layer by layer—no shortcuts, just pure bakery magic.
👨🍳 Step 1: Prepare the Vanilla Bean Swirl Paste
Scrape the seeds from the 1 whole vanilla bean and mix them with the 2 tbsp vanilla bean paste in a small bowl. This concentrated flavor will become the signature swirls throughout your cake. Set aside—you’ll use this later when assembling the layers.
Here’s the thing—vanilla bean paste has a thicker consistency than regular extract, which makes it perfect for creating those elegant swirls. If you don’t have paste, you can make a quick substitute by mixing 1 tbsp vanilla extract with 1 tbsp confectioners’ sugar to thicken it slightly.
🍳 Step 2: Make the Cake Batter (Divide the Sugar First!)
Preheat your oven to 350°F and grease 9 round cake pans (3-inch diameter) with butter and line the bottoms with parchment paper. Divide the 3.5 cups granulated sugar into two portions: 1.5 cups for the batter and 2 cups for the frosting (you’ll use this later).
In a large bowl, whisk together the 6 cups sifted all-purpose flour, 1.5 tsp baking powder, and 0.5 tsp salt. Set aside. In a separate bowl, cream the 3 cups cold cubed unsalted butter with the 1.5 cups sugar for 3-4 minutes until light and fluffy. This step is crucial—it incorporates air that makes your cake tender and voluminous.
Add 12 large eggs one at a time, mixing well after each addition. Then stir in the 2 tbsp vanilla extract and the 2 cups whole milk. Gradually fold in the dry ingredients until just combined. The batter should be smooth but not overmixed—you should still see some flour streaks.
🥘 Step 3: Bake the Layers (Precision is Key!)
Divide the batter evenly among the 9 pans (about ⅓ cup per pan). Bake for 18-20 minutes until a toothpick inserted in the center comes out clean. Rotate the pans halfway through baking for even browning. Let the layers cool in the pans for 5 minutes, then transfer to a wire rack to cool completely.
Here’s where patience pays off: if you try to assemble the cake with warm layers, your frosting will melt and slide right off. Once fully cooled, place a layer of parchment paper between each cake round to keep them separated until assembly.
🥘 Step 4: Assemble the Layers with Swirls
Place the first cake layer on a cake stand or plate. Spread 1 teaspoon of the vanilla bean swirl paste over the top, then pipe a ring of buttercream around the edges (about ¼ cup). Place the second layer on top and repeat. Continue this process until you’ve stacked all 9 layers, using about 1 cup of buttercream total for the layers.
For the buttercream, beat the 2 cups chilled heavy cream with the 3 cups unsalted butter (softened but not melted) until smooth. Gradually add the 6 cups sifted confectioners’ sugar and the remaining 2 cups granulated sugar, beating until light and fluffy. Add the 2 tbsp vanilla extract and mix until fully incorporated.
🍽️ Step 5: Frost and Decorate (The Grand Finale!)
Spread the remaining buttercream over the entire cake, creating a smooth base. Use a spatula to create a slight overhang at the edges. Then, pipe the remaining buttercream in decorative swirls or rosettes on top, using the vanilla bean swirl paste as accents if desired. Chill the cake in the refrigerator for 1 hour before slicing to set the frosting.
This cake is a labor of love, but the result is worth every minute. Each slice should reveal those beautiful vanilla swirls and a perfectly balanced sweetness from the buttercream. Serve at room temperature for the best experience—your guests won’t believe you made it from scratch!
Pro Tips For Making 9 Layer Cake
- Cream Butter Properly: Beat the butter and sugar until it’s light and fluffy—about 3-5 minutes with a stand mixer. I learned this the hard way after a cake turned out dense; the air in the butter-sugar mix is what makes those layers tender. Don’t rush it, even if you’re eager to add the eggs.
- Sift Dry Ingredients: Sift the flour, baking powder, and salt together before folding them into the wet mixture. This prevents lumps and ensures even distribution, which keeps each layer from being too heavy. (Yes, even if you’re impatient—trust the process.)
- Rotate Pan Mid-Bake: Swap the cake pans from front to back in the oven halfway through baking. This guarantees even cooking, especially if your oven has hot spots. I’ve had layers come out underdone on one side and overbaked on the other—don’t let that happen to you.
- Cool Layers Fully: Let each baked layer cool completely on a wire rack before frosting. I know, it’s tempting to stack them warm, but rushing this step leads to soggy bottoms and messy frosting. Ten minutes might feel like forever, but it’s worth it.
Flavor customization for this 9 layer cake
Vanilla Variations
Swap the vanilla bean paste for 1 tbsp Madagascar bourbon vanilla extract and 1 tbsp brown sugar to create caramelized vanilla swirls. The deep, boozy notes elevate the cake’s complexity.
For a floral twist, use 1 tbsp orange blossom water (found in Middle Eastern markets) mixed with 1 tbsp vanilla extract—it adds a delicate, aromatic layer. 🌸
Chocolate Infusions
Replace 1 cup of the granulated sugar in the frosting with ½ cup Dutch-process cocoa powder and ½ cup melted dark chocolate (70% cocoa). This creates a marbled effect when swirled into the vanilla layers.
For a bolder flavor, add ¼ cup espresso powder to the cake batter—it enhances the chocolate’s richness without bitterness.
Citrus Zest Layers
Add 1 tbsp lemon or orange zest (finely grated) to the batter for a bright, tangy contrast. Pair this with a lemon curd swirl—mix ½ cup lemon curd with 1 tbsp confectioners’ sugar to create a citrusy paste for layering.
Garnish the top with candied citrus peel for a festive touch. 🍊
Spiced Swirls
Infuse the frosting with ½ tsp cinnamon and ¼ tsp cardamom for a warm, aromatic twist. For a chai-inspired cake, add 1 tsp chai spice blend (cinnamon, ginger, cloves) directly to the batter. Top with crushed pistachios or candied ginger for texture and visual appeal.
Fruit Fillings
Replace the vanilla swirl paste with ¼ cup raspberry or strawberry jam (low-sugar preferred) for a fruity surprise in every bite. For a tropical version, use mango or passion fruit purée—mix ½ cup purée with 1 tbsp cornstarch to thicken.
Layer between cakes and frost with a light citrus glaze.
Nutty Crunch Additions
Fold ½ cup toasted pecans or walnuts into the frosting for texture. For a praline twist, add ¼ cup caramelized sugar nuts (store-bought or homemade). Press chopped nuts between layers for a crunchy surprise. A drizzle of dark chocolate ganache on the sides adds sophistication. 🌰
Nutrition facts
Frequently asked questions
How do I prevent my 9-layer cake from collapsing when stacking?
Chill the cake layers for 15 minutes before assembling and use ¼ cup buttercream between each layer to create a sturdy base. Place the first layer on a cake stand, then pipe a ring of frosting around the edges before adding the next layer. A cake dowel (or wooden skewer) inserted vertically through the center adds extra support for taller cakes.
Can I bake the layers ahead of time and assemble later?
Yes! Wrap each cooled layer tightly in plastic wrap and store them in an airtight container for up to 3 days at room temperature. For longer storage, freeze layers (unfrosted) for 3 months. Thaw completely before assembling—never use warm layers or the frosting will melt.
What’s the best way to create those signature vanilla swirls?
Mix 2 tbsp vanilla bean paste with 1 tsp confectioners’ sugar to thicken it slightly. Spread 1 teaspoon of this paste on each layer before adding frosting. Use a small offset spatula to gently swirl it into the buttercream—this creates visible, elegant patterns. For extra drama, pipe a thin line of vanilla paste in a spiral before frosting.
How do I get perfectly smooth frosting edges?
Chill the cake for 30 minutes after initial frosting to firm up the buttercream. Use an offset spatula to smooth edges in a circular motion, starting from the top and working downward. For sharp corners, dip your spatula in warm water, wipe dry, and press firmly along the edges. A bench scraper helps create clean lines on the sides.
Can I make this cake in smaller layers (like 6 or 7) instead of 9?
Adjust the batter quantity proportionally—reduce to 2 batches for 6 layers or 2.5 batches for 7. Use 6-inch pans for smaller individual cakes or 8-inch pans for a shorter but wider cake. The frosting ratio stays the same (about 1 cup per 3 layers). The swirl technique works perfectly with any number of layers!

- 12 Bean Chili Recipe: Hearty Slow-Cooked Depth With 12 Legumes - October 17, 2026
- 5 Seed Bread Recipe: Nutty Crunch and Artisan Flavor in One Loaf - October 17, 2026
- 1 Lb Macaroni Salad Recipe: Bold, Crunchy, and Crowd-Pleasing - October 17, 2026