
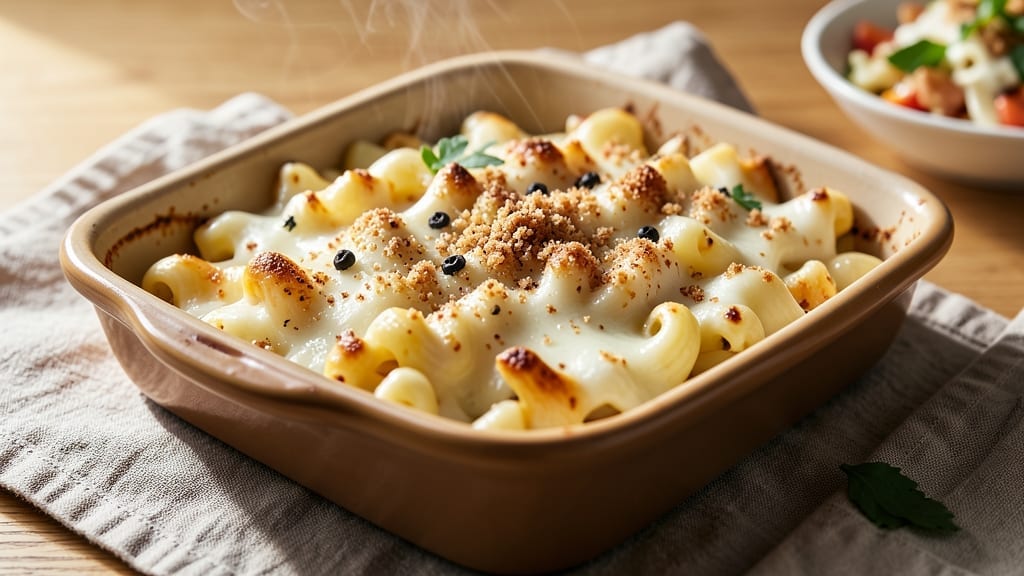
This 9×13 mac and cheese recipe delivers the perfect balance of creamy, bubbly cheese and a golden, crispy top that everyone will rave about. The secret lies in the right cheese blend and a foolproof baking technique that ensures every bite is rich, tender, and satisfying. Whether you’re feeding a crowd or prepping for meal prep, this recipe is designed to impress without the fuss.
What sets this mac and cheese apart is the combination of sharp cheddar, Gruyère, and cream cheese, which creates a velvety sauce that clings to the noodles perfectly. The breadcrumb topping adds a delightful crunch, while the slow bake ensures the cheese stays creamy and the pasta al dente.
With just a few simple ingredients and a 30-minute bake time, you’ll have a crowd-pleasing dish that’s restaurant-quality at home.
The result is a bubbly, golden-topped casserole that’s impossible to resist—creamy in the center, crispy on top, and packed with cheesy goodness. The best part? It’s easy to customize with add-ins like bacon, broccoli, or extra herbs to suit your taste.
This recipe is your go-to for comfort food that’s always a hit.
Perfect for holidays, potlucks, or a cozy weeknight dinner, this mac and cheese is designed to be your new favorite. Let’s get started on creating a dish that’s as delicious as it is satisfying.
Ingredients for 9 x 13 mac and cheese
Pantry staples plus three cheeses that create that legendary bubbly, golden-top magic.
| Ingredient | Amount | Notes |
|---|---|---|
| Elbow Macaroni 🍝 | 2 lbs | Uncooked, medium or jumbo size |
| Sharp White Cheddar Cheese 🧀 | 2 cups | Shredded, block preferred |
| Gruyère Cheese 🧀 | 1 cup | Shredded, aged for nutty flavor |
| Cream Cheese 🧈 | 8 oz | Full-fat, room temperature |
| Heavy Whipping Cream 🥛 | 1 cup | Full-fat for richness |
| Unsalted Butter 🧈 | ½ cup | Melted, unsalted preferred |
| All-Purpose Flour 🌾 | ¼ cup | For roux, all-purpose works |
| Whole Milk 🥛 | 1 ½ cups | Warm for smooth sauce |
| Panko Breadcrumbs 🍞 | 1 ½ cups | For crispy topping |
| Dried Mustard 🌶️ | 1 tsp | For subtle tang |
| Diamond Crystal Kosher Salt 🧂 | 1 ½ tsp | Adjust to taste |
| Freshly Ground Black Pepper 🌶️ | ½ tsp | Freshly cracked preferred |
| Garlic Powder 🧄 | ½ tsp | For depth of flavor |
| Extra-Virgin Olive Oil 🫒 | 1 tbsp | For breadcrumb crispiness |
The cheese trio is non-negotiable here. Sharp white cheddar brings the tang, Gruyère adds nutty depth, and cream cheese keeps everything velvety. Grab a block of each—pre-shredded gets clumpy and lacks flavor. Whole Foods or specialty cheese shops carry better-quality shredded options, but if you’re shredding yourself, use a box grater for the finest texture. The Gruyère should have visible crystals—those mean good aging. For the cream cheese, Philadelphia brand is my go-to, but any full-fat works. Pro tip: let your cheeses sit out for 30 minutes before shredding so they’re easier to grate.
No sharp cheddar? Extra-sharp or pepper jack works in a pinch, but the flavor will be different. Substituting Gruyère? Comté or Emmental are close seconds, but Gruyère’s melt is unmatched. Cream cheese shortage? Sour cream at half the amount adds tang but less creaminess. The panko topping can’t be skipped—it’s what creates that golden, crispy crust. Trader Joe’s sells it in bulk for cheap, and it keeps forever. For extra crunch, toast the breadcrumbs in a dry pan for 2 minutes before adding to the top. The olive oil in the breadcrumbs is what makes them crispy, so don’t skip it—just a light drizzle does the trick.
This mac and cheese tastes even better the next day—honestly, it’s a must for meal prep. Store leftovers covered in the fridge for up to 5 days, but reheat gently to avoid a dry top. For freezing, assemble the casserole, cover tightly with foil, and freeze for up to 3 months. Thaw overnight in the fridge before reheating. The breadcrumb topping will soften slightly when reheated, but that’s okay—it’s still delicious. If you’re making ahead for a party, assemble the casserole in the baking dish, cover, and refrigerate for up to 24 hours before baking. The flavors meld beautifully overnight.
Why You’ll Love This Recipe
- One-Pot Magic: I swear by this—no boiling pasta separately, no messy transfers. Just toss the elbows in the pan with everything else, bake, and boom, done. The creaminess soaks right into the pasta while it cooks, so you’re not left with dry, sad noodles.
- Cheese Love Bomb: That combo of sharp white cheddar, nutty Gruyère, and cream cheese? It’s a flavor explosion in every bite. The cheddar gives it that tangy kick, the Gruyère adds depth, and the cream cheese ties it all together with that velvety richness. Honestly, I’ve never met a mac and cheese I liked more.
- Meal Prep MVP: This bakes up into a giant, shareable casserole that reheats like a dream. Pack it for lunches, serve it at potlucks, or freeze half for lazy days. Between us, I’ve had it cold the next day and it was still ridiculously good—proof it’s a crowd-pleaser no matter how you serve it.
- Budget Buster: Sharp cheddar and Gruyère stretch further than you’d think, and heavy cream + cream cheese make it feel fancy without breaking the bank. I’ve fed six people for under $15 with this—leftovers? Even better. My kids beg for it, and my wallet thanks me. Win-win.
Step-by-step instructions for 9×13 mac and cheese
Here’s how to create the ultimate baked mac and cheese with a bubbly, golden crust and creamy center.
🍳 Step 1: Cook the Elbow Macaroni to Al Dente Perfection
Bring a large pot of water to a rolling boil and add 2 lbs elbow macaroni. Cook until 1 minute shy of package directions for al dente texture—the pasta will finish cooking in the oven. Drain the pasta in a colander and rinse briefly with cool water to stop the cooking process. Shake off any excess water and return the pasta to the pot.
I like to add 1 tablespoon of the melted butter and 1 tablespoon of the heavy whipping cream to the drained pasta while it’s still warm. This helps prevent the sauce from becoming too thick later and adds a subtle richness. Toss gently to coat the pasta evenly.
🍳 Step 2: Prepare the Creamy Cheese Sauce
In a separate large bowl, combine the 2 cups sharp white cheddar cheese, 1 cup gruyère cheese, 8 oz cream cheese, 1 cup heavy whipping cream, and 1.5 cups whole milk. Mix until smooth, using a whisk or your hands to break up any large cheese clumps. The mixture should be creamy and well combined—this is the base of your sauce.
In a separate saucepan, melt 0.5 cup unsalted butter over medium heat. Whisk in 0.25 cup all-purpose flour to create a roux. Cook for 1-2 minutes until the mixture thickens slightly. Slowly pour in the warm milk while whisking continuously to prevent lumps from forming. Bring to a gentle simmer and cook for 3-4 minutes until slightly thickened.
🥘 Step 3: Combine Pasta and Sauce
Pour the cheese mixture over the warm pasta in the pot and stir until fully coated. The sauce should be thick enough to cling to the pasta but still have a creamy consistency. If it’s too thick, add a splash of warm milk to loosen it. Season with 1.5 tsp kosher salt, 0.5 tsp black pepper, 0.5 tsp garlic powder, and 1 tsp dried mustard. Taste and adjust seasoning as needed—this is where the magic happens.
Transfer the macaroni mixture to a 9×13-inch baking dish, spreading it evenly. Press down gently to compact the pasta and ensure even baking. This step helps create a smooth, even surface for that perfect golden crust.
🔥 Step 4: Prepare the Crispy Topping
In a small bowl, combine 1.5 cups panko breadcrumbs, 1 tbsp extra-virgin olive oil, 0.5 tsp garlic powder, and 0.25 tsp kosher salt. Mix until the breadcrumbs are evenly coated and slightly clumped. This mixture will create the irresistible crispy topping that makes this mac and cheese truly special.
Sprinkle the breadcrumb mixture evenly over the top of the macaroni, pressing down lightly with the back of a spoon. This ensures good contact with the sauce and creates that beautiful golden crust. Bake uncovered at 375°F for 25-30 minutes until the top is golden brown and bubbly.
⏰ Step 5: Rest and Serve
Remove the mac and cheese from the oven and let it rest for 10-15 minutes before serving. This resting period allows the sauce to set slightly and makes it easier to slice. The internal temperature should reach 165°F for food safety, but the resting time ensures the perfect texture.
Cut into squares and serve immediately. The top should be crispy and golden, while the inside remains creamy and rich. This mac and cheese is perfect for feeding a crowd—every bite delivers that perfect balance of cheesy goodness with a satisfying crunch.
Pro Tips For Making 9 X 13 Mac And Cheese
- Cook pasta al dente: DESCRIPTION: Elbows should have a slight bite—test one at 2 minutes under the package’s suggested time. Overcooked pasta turns mushy in the sauce, and no one wants that sad, gluey texture. Drain immediately and rinse with cold water only if the sauce is extremely rich (which it will be here).
- Shred cheese aggressively: DESCRIPTION: Use a box grater or food processor for the cheddar and Gruyère—hand-ripping leaves uneven chunks that melt unevenly. My grandmother swore by this, and she was right: the finer the shreds, the smoother the sauce. No one likes clumpy cheese in their mac and cheese.
- Temper the cream: DESCRIPTION: Warm the heavy cream and cream cheese together over low heat until just melted—no higher than 160°F (70°C). Dumping cold cream into hot cheese makes a skin form, and no one wants to scrape gunk off the bottom of their pan. Stir constantly until it’s silky.
- Bake covered, then uncovered: DESCRIPTION: Start baking the mac and cheese covered with foil for 20 minutes to let the cheese melt evenly. Then, uncover and broil for 2–3 minutes—just until the top turns golden. This two-step method guarantees a creamy interior and a crispy top without burning the cheese.
Troubleshooting perfect results
Sauce Too Thick?
If your cheese sauce feels like glue, don’t panic! The fix is simple: add warm milk or heavy cream, 1 tablespoon at a time, while stirring constantly. I’ve found that ¼ cup usually does the trick, but taste as you go.
Overmixing can break the cheese, so keep it gentle. The key is to heat the liquid slightly—cold milk can make the sauce seize up. 🥛
Cheese Not Melting Properly
If your cheese clumps or doesn’t melt smoothly, it’s likely because the sauce isn’t hot enough. Always warm your milk to body temperature (about 110°F) before mixing with cheese. For stubborn clumps, use a hand mixer on low speed to blend until silky.
Pro tip: Gruyère and cream cheese need extra love—mix them separately with warm milk first, then combine with the rest. 🧀
Pasta Overcooked or Mushy
This happens when pasta finishes cooking in the oven. To prevent it, undercook by 1 minute before draining, and rinse briefly with cool water to stop cooking. For extra insurance, toss the drained pasta with 1 tbsp melted butter and 1 tbsp cream while warm—this creates a protective barrier.
If it’s still mushy after baking, your oven runs hot. Lower the temp to 350°F next time. 🍝
Top Not Crispy Enough
A soggy topping usually means the breadcrumbs didn’t get enough oven time. First, toast the panko in a dry pan for 2 minutes before adding olive oil. Press it firmly onto the sauce, and bake 5 minutes longer at 400°F for extra crispiness.
For next-level crunch, sprinkle ½ cup extra panko on top right before baking—it’ll toast beautifully. 🍞
Sauce Too Runny After Baking
This often happens if the pasta wasn’t pressed down firmly in the dish. Before baking, press the mac and cheese into an even layer with a spatula. If it’s still too loose, chill the dish for 15 minutes before baking—this helps the sauce set.
For extra insurance, add 1 extra tablespoon of flour to the roux. The goal is a thick but creamy sauce that holds its shape. 🧈
Add-Ins Getting Watery
Broccoli, bacon, or other mix-ins can make your mac and cheese watery. Drain and pat them dry thoroughly before adding. For veggies, blanch in boiling water for 2 minutes first to remove excess moisture.
If using bacon, crisp it separately and layer it on top instead of mixing in. This keeps the texture perfect while adding flavor. 🥦
Nutrition facts
Frequently asked questions
Can I make this mac and cheese in a different-sized baking dish?
Yes! For a 8×8-inch dish, reduce ingredients by about 50% (use 1 lb pasta, 1 cup cheddar, ½ cup Gruyère, etc.). For a 11×17-inch pan, double the recipe but increase baking time by 10-15 minutes. Always adjust oven temp to 375°F and press the pasta firmly into the dish for even baking.
What’s the best way to reheat leftovers?
Reheat in 10-second bursts in the microwave, stirring between each, until warm. For oven reheating, cover with foil and bake at 350°F for 15-20 minutes. To revive the crispy top, broil for 2-3 minutes at the end. Avoid high heat—it dries out the sauce. Leftovers taste best within 3-4 days.
Can I use pre-shredded cheese?
Pre-shredded cheese works, but it often contains anti-caking agents that make the sauce grainy. For the creamiest texture, use block cheese and shred it yourself. If you must use pre-shredded, opt for high-quality brands like Kraft Natural or Sargento, and mix in 1 extra tablespoon of heavy cream to compensate for dryness.
How do I make this mac and cheese vegetarian?
This recipe is already vegetarian! For a vegan version, swap the cream cheese for vegan cream cheese, use butter substitutes, and replace milk with unsweetened almond or oat milk. The Gruyère can be replaced with vegan cheddar, though the flavor will differ. Test the sauce consistency carefully—plant-based milks often require 1 extra tablespoon of flour in the roux.
Why does my mac and cheese separate when reheating?
Separation usually happens when the sauce cools too quickly or isn’t heated gently. To fix it, stir in 1-2 tablespoons of warm milk or cream while reheating. For prevention, store leftovers in an airtight container and reheat covered at low heat. If the cheese clumps, blend with an immersion blender for a silky texture. Always reheat slowly!

- 12 Bean Chili Recipe: Hearty Slow-Cooked Depth With 12 Legumes - October 17, 2026
- 5 Seed Bread Recipe: Nutty Crunch and Artisan Flavor in One Loaf - October 17, 2026
- 1 Lb Macaroni Salad Recipe: Bold, Crunchy, and Crowd-Pleasing - October 17, 2026