
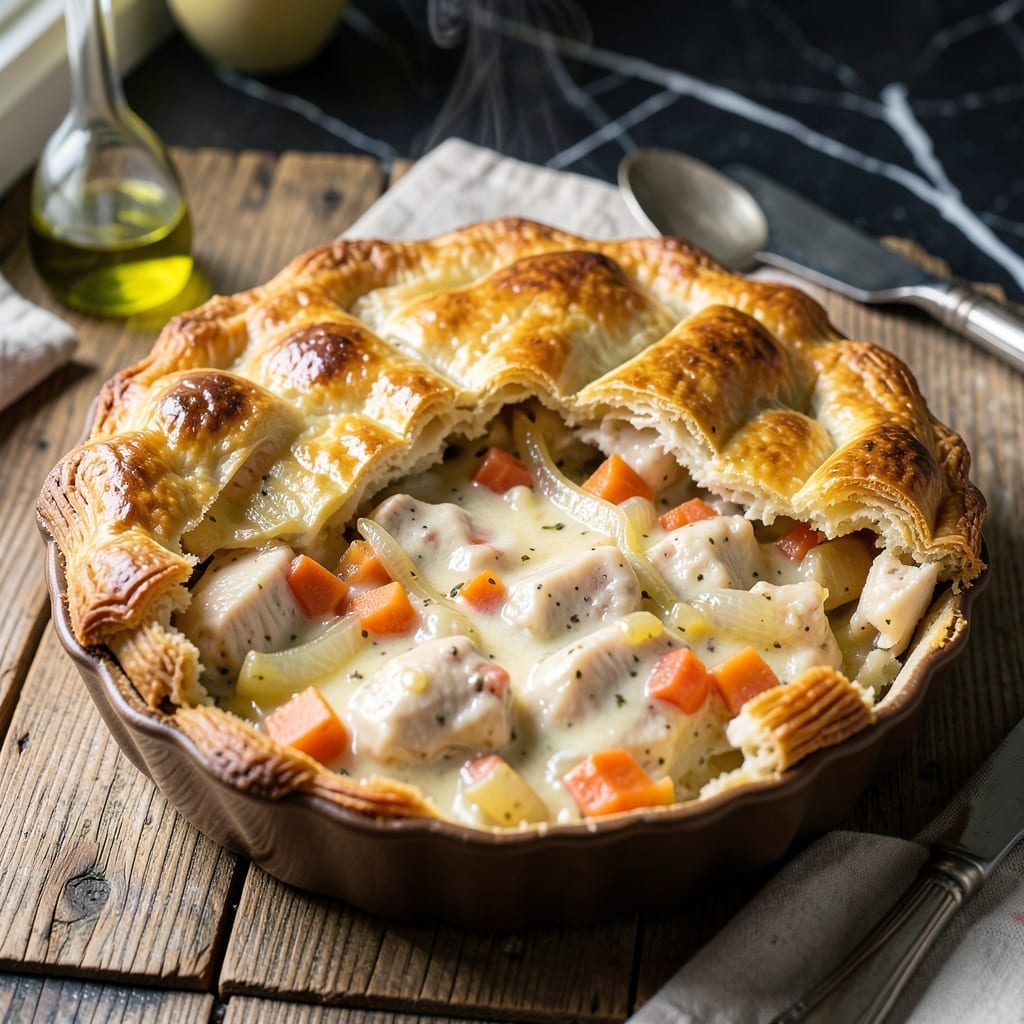
This Vermont-inspired chicken pot pie captures the essence of New England comfort food with its flaky golden crust and rich, creamy filling.
I developed this recipe to showcase local farm-fresh ingredients, using tender chicken, seasonal vegetables, and a from-scratch crust that shatters with every bite. The filling is thickened to perfection, ensuring it holds its shape when sliced.
The secret lies in the technique: a hot oven for the initial bake creates that coveted flaky texture, while a final brush of egg wash gives the crust its signature sheen.
Warm, hearty, and undeniably satisfying, this dish brings a taste of Vermont’s countryside to your dinner table with every savory mouthful.
Ingredients for Baked in Vermont Chicken Pot Pie
Flaky crust meets farm-fresh filling with these Vermont-inspired ingredients for a satisfying main dish.
| Ingredient | Amount | Notes |
|---|---|---|
| All-Purpose Flour 🌾 | 3 cups | Divided for crust and filling |
| Unsalted Butter 🧈 | 1 ½ cups | Cold, cubed for flaky crust |
| Ice Water 💧 | ½ cup | For pie dough hydration |
| Salt 🧂 | 1 ½ tsp | Divided for dough and filling |
| Boneless Skinless Chicken Breasts 🍗 | 1 ½ lb | Diced into 1-inch pieces |
| Yellow Onion 🧅 | 1 whole | Medium, finely diced |
| Carrots 🥕 | 2 whole | Peeled and sliced into rounds |
| Celery Stalks 🌿 | 2 whole | Diced, leaves included |
| Russet Potatoes 🥔 | 2 whole | Peeled and cubed |
| Fresh Thyme 🌿 | 2 tbsp | Leaves stripped from stems |
| Fresh Rosemary 🌿 | 1 tbsp | Finely chopped |
| Garlic Cloves 🧄 | 3 cloves | Minced for depth of flavor |
| Chicken Stock 🥣 | 2 ½ cups | Low-sodium preferred |
| Heavy Cream 🥛 | 1 cup | Full-fat for richness |
| Large Egg 🥚 | 1 whole | Beaten for egg wash |
For the crust, King Arthur Flour is the gold standard in New England (their all-purpose has the perfect protein content for flakiness). Use European-style butter like Plugrá or Vermont Creamery—higher fat content means better layers. The chicken should be local, free-range if possible; seek out farm stands or Whole Foods for the freshest options. Look for carrots and celery with bright, unblemished skins and firm texture.
Short on time? Pre-made pie crust works in a pinch (just brush with egg wash for that Vermont shine). No fresh thyme or rosemary? Dried herbs at one-third the amount will do—just bloom them in the hot stock. For a vegetarian twist, swap chicken for mushrooms or chickpeas, and use vegetable stock. The potatoes can be Yukon Gold if you prefer a creamier texture.
Assemble and bake immediately for the best texture—dough toughens if left to rest too long. Leftovers keep 3-4 days in the fridge (reheat covered at 350°F for 15 minutes). Freezes beautifully for up to 3 months; thaw overnight before reheating.
Why You’ll Love This Recipe
- One Bowl Wonder: I mix the flour, butter, and ice water right in the same bowl I’ll bake in—no extra dishes, just a flaky crust waiting to happen.
- Buttery Vermont Comfort: That unsalted butter in the crust? It bakes into golden layers that shatter with every bite, hugging the tender chicken inside.
- Feeds and Freezes: I make two at once—one for dinner, one for the freezer. Honestly, it reheats like it’s fresh from the oven.
- Pantry Staples Only: All-purpose flour, butter, salt, and chicken breasts—nothing fancy, just what’s already in my kitchen doing the heavy lifting.
Step-by-Step Instructions for Baked Chicken Pot Pie
Master the technique for a golden, flaky crust and rich, creamy filling with Vermont farmhouse quality.
Step 1: Prepare the Pie Dough for Maximum Flakiness
In a food processor, pulse 3 cups all-purpose flour with ½ tsp salt to combine. Add 1.5 cups unsalted butter, cubed and ice-cold, and pulse until the mixture resembles coarse crumbs with pea-sized butter pieces visible. This visible fat creates the flaky layers that define a proper crust.
With the processor running, drizzle in 0.5 cup ice water through the feed tube until the dough just begins to come together. It should look shaggy, not smooth—overworking develops gluten, which makes the crust tough. Turn the dough out onto a lightly floured surface, divide it into two equal portions, and shape each into a disk. Wrap in plastic and refrigerate for 1 hour; this resting period allows the gluten to relax and the butter to firm up.
Step 2: Cook the Chicken and Vegetable Filling
In a large pot, combine 1.5 lb boneless skinless chicken breasts, diced into 1-inch pieces, with 1 whole yellow onion, finely diced, 2 whole carrots, peeled and sliced, 2 whole celery stalks, diced, and 2 whole russet potatoes, peeled and cubed. Season with the remaining 1 tsp salt, 2 tbsp fresh thyme, and 1 tbsp fresh rosemary. Add 3 cloves garlic cloves, minced, and sauté over medium heat for 8-10 minutes until the chicken is cooked through and the vegetables soften.
Pour in 2.5 cups chicken stock and bring to a gentle simmer. Cook for 10-12 minutes until the potatoes are tender and the liquid has reduced slightly. Stir in 1 cup heavy cream and simmer for an additional 3-4 minutes until the filling thickens enough to coat the back of a spoon. Remove from heat and set aside to cool slightly while you roll out the dough.
Step 3: Assemble and Crimp the Pot Pie
On a lightly floured surface, roll out one dough disk to a 12-inch round, about ⅛-inch thick. Transfer this to a 9-inch pie dish, pressing it gently into the bottom and up the sides without stretching. Trim the edges, leaving a ½-inch overhang. Spoon the filling into the crust, mounding it slightly in the center.
Roll out the second dough disk to the same size and place it over the filling. Trim the edges, then fold the bottom crust’s overhang over the top crust. Crimp the edges with your fingers or a fork to seal, ensuring no gaps where filling could bubble out. Cut 4-5 slits in the top crust to allow steam to escape; this prevents a soggy bottom crust.
Step 4: Bake to Golden Perfection
Preheat your oven to 375°F. Brush the top crust with the 1 whole large egg, beaten, to create a glossy, golden finish. Place the pie on a baking sheet to catch any drips and bake on the middle rack for 45-50 minutes.
You’ll know it’s done when the crust is deep golden brown and the filling is bubbling actively through the vents. If the edges begin to brown too quickly, tent them loosely with foil. Let the pie rest for 10-15 minutes after baking; this allows the filling to set slightly, making it easier to slice and serve. The crust should be crisp and flaky, with a rich, velvety filling beneath.
Pro Tips For Making Baked In Vermont Chicken Pot Pie
- Chill the Dough: After mixing the flour, butter, and ice water, let the dough rest in the fridge for at least 30 minutes—this keeps the butter from melting into the flour, which is what gives you that flaky crust everyone expects from a Vermont pot pie.
- Poach the Chicken: Instead of boiling, poach the boneless breasts in barely simmering salted water for 12-15 minutes; it stays juicy and shreds cleanly without that rubbery texture I got when I used to boil it hard.
- Dry the Chicken: Pat the cooked chicken completely dry with paper towels before mixing it into the filling, or the extra moisture will turn your pie’s inside into a soggy mess.
- Use Ice Water: Stick to ice-cold water when making the crust—warm water softens the butter, and I learned this the hard way after ending up with a tough, flat crust my first three tries.
Troubleshooting Perfect Results
Soggy Bottom Crust
This usually happens when the filling is too wet or the crust isn’t properly sealed. To prevent it, ensure your filling thickens to coat the back of a spoon before assembling. I also recommend blind-baking the bottom crust for 10 minutes before adding the filling. 💡
Filling Won’t Thicken
If your filling remains runny, it likely needs more cooking time. After adding 1 cup heavy cream, let it simmer uncovered for 5-7 minutes. For quicker results, mix 1 tbsp cornstarch with 2 tbsp cold water and stir into the filling.
Crust Burning
Vermont’s higher-altitude areas can cause quicker browning. If the edges darken too fast, tent them with aluminum foil halfway through baking. Also, avoid over-brushing with egg wash—1 thin coat is enough for that golden sheen.
Dry Filling
This often occurs when using pre-cooked chicken. To fix, add ¼ cup extra chicken stock to the filling. For future batches, use raw chicken and let it poach in the liquid, which keeps the meat moist and flavors developed.
Crust Not Flaky
The key is keeping butter cold and not overworking the dough. Ensure your 1.5 cups unsalted butter is ice-cold when cutting it into the flour. If the kitchen is warm, chill the dough for 30 minutes between each handling. ✨
Filling Bubbles Over
Cutting proper steam vents is crucial. Make 4-5 slits in the top crust, each about 1 inch long. Also, don’t overfill—leave ½ inch space at the top of the pie dish for expansion during baking.
Nutrition Facts
Frequently Asked Questions
Can I use store-bought pie crust instead?
Yes, pre-made crust works fine for convenience. Just brush it with egg wash for that golden Vermont shine. For best results, still blind-bake the bottom crust for 10 minutes to prevent sogginess.
How do I keep the crust from getting soggy?
Blind-bake the bottom crust first, and ensure your filling is thick enough to coat a spoon. Also, let the pie rest for 10-15 minutes after baking to set the filling properly.
Can I make this ahead of time?
Assemble the pie and refrigerate for up to 24 hours before baking. Or freeze unbaked for up to 3 months. Bake from frozen, adding 10-15 minutes to the cooking time.

- 6 Oz Chocolate Chip Cookie Recipe: Perfectly Balanced Crispy Edges and Chewy Hearts - September 25, 2026
- 6-Inch Coffee Cake Recipe: Vanilla Bean Swirls and Buttery Streusel Topping - September 25, 2026
- 1 Hour Soup Recipe: Velvety Richness Without the Wait - September 25, 2026