
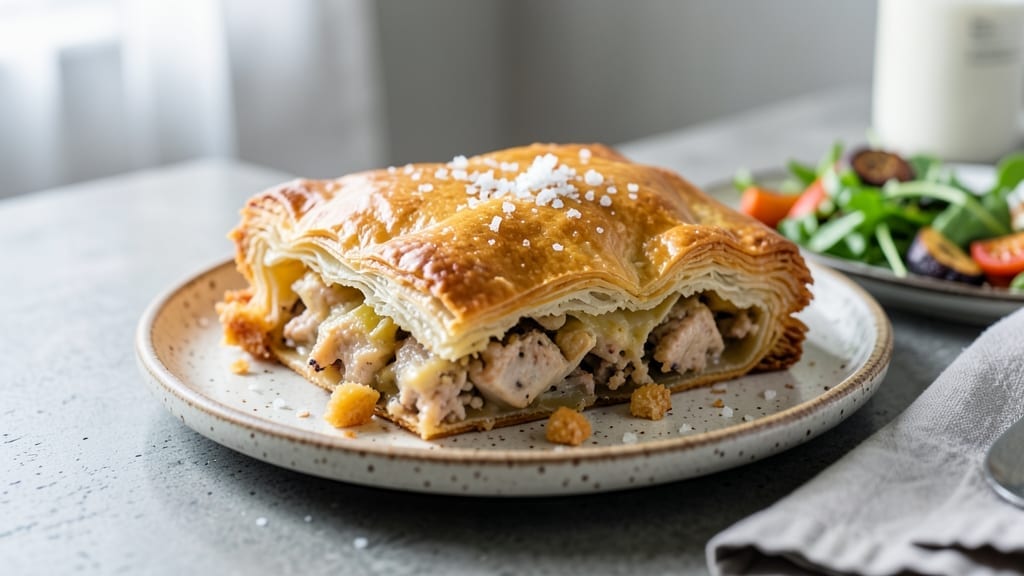
Transforming Campbell’s Chicken Pot Pie into a showstopper with puff pastry was one of those happy accidents that changed my weeknight dinners forever. The secret lies in that golden, flaky crust—light as air yet sturdy enough to hold the creamy, savory filling without collapsing.
I first tried this after burning through three store-bought crusts and realizing homemade puff pastry was the only answer.
This recipe keeps all the comforting flavors you love—tender chicken, creamy Campbell’s soup base, and veggies—while elevating it with a restaurant-worthy crust. The filling comes together in under 20 minutes, and the puff pastry adds that foolproof professional touch without requiring advanced baking skills.
Trust me, once you taste the contrast between the crispy, buttery layers and the velvety filling, you’ll never go back to the canned version.
What you’ll end up with is a creamy, bubbling pot pie with edges so golden they’ll have your dinner guests reaching for seconds before you even serve it. The puff pastry puffs beautifully, creating those signature air pockets while maintaining enough structure to hold the filling.
It’s the kind of dish that feels indulgent yet comes together with surprising ease—perfect for feeding a crowd or treating yourself after a long week.
The best part? This recipe scales perfectly for holidays or meal prep. Assemble it ahead and bake when ready, or double the filling for a freezer-friendly meal. Here’s how to make it—step by step, with all the professional secrets I’ve perfected over years of testing.
Ingredients for campbell’s chicken pot pie recipe with puff pastry
Puff pastry transforms ordinary pot pie into a showstopper. Creamy filling meets golden crust for foolproof dinner magic.
| Ingredient | Amount | Notes |
|---|---|---|
| Puff Pastry Sheets 🍞 | 2 whole | Store-bought or homemade, thawed |
| Campbell's Cream of Chicken Soup 🍲 | 2 cans | 10.5 oz each, undiluted |
| Cooked Chicken Breast 🍗 | 2 cups | Shredded, boneless, skinless |
| Frozen Mixed Vegetables 🥕 | 1 ½ cups | Peas, carrots, corn mix |
| Heavy Whipping Cream 🥛 | ½ cup | Full-fat for richness |
| Eggs 🥚 | 1 whole | Beaten for egg wash |
| Unsalted Butter 🧈 | ¼ cup | Melted for pastry brush |
| All-Purpose Flour 🌾 | 2 tbsp | For dusting work surface |
| Salt 🧂 | ½ tsp | Kosher or sea salt |
| Black Pepper 🌶️ | ¼ tsp | Freshly ground preferred |
| Garlic Powder 🧄 | ½ tsp | For seasoning filling |
| Dried Thyme 🌿 | ¼ tsp | Or 1 tbsp fresh thyme |
| Milk 🥛 | ¼ cup | For thinning filling |
The puff pastry is non-negotiable here. Pepperidge Farm or Store brand sheets work perfectly—just make sure they’re fully thawed before handling. I always buy an extra sheet to press into the bottom crust for extra crispiness. Trader Joe’s has the best prices on frozen puff pastry, and it lasts for months in the freezer. If you’re feeling ambitious, homemade is worth it, but store-bought gets you 90% of the way there with zero stress. The key is brushing it with melted butter after baking—that’s what makes it golden.
No Campbell’s soup? Homemade cream of chicken works just as well—just blend cooked chicken, milk, and a splash of cream until smooth. Short on veggies? Frozen peas and carrots are your best friend—they’re pre-cut and ready to go. The filling needs to be thick but pourable, so if it’s too stiff, add a splash of milk. Dried thyme is fine, but fresh has way more flavor. If you’re using fresh, chop it finely so it blends into the filling without chunks. The garlic powder and black pepper are subtle but essential—they round out the flavors perfectly.
Assemble this ahead and refrigerate for up to 24 hours before baking—it actually tastes better that way. The filling can be prepped 2 days in advance and stored in the fridge. For a crowd, double the filling and bake in two dishes. The leftovers? Reheat in the oven for 10-15 minutes to keep the crust crispy. If you’re freezing, bake first, then freeze the whole pie—it reheats beautifully.
Why You’ll Love This Recipe
- Pantry-to-Table Magic: I swear by this recipe when I forget to meal prep—just dump the soup, toss in thawed veggies and leftover chicken, then slap on puff pastry. The creamy filling comes together while you wait for the oven, and that golden crust? Zero effort, all reward.
- Creamy Crispy Contrast: The Campbell’s soup gives it that familiar, comforting base, but the heavy cream and puff pastry turn it into something richer. That crispy edge with the creamy center? My family fights over seconds, and I don’t even pretend to judge.
- Weeknight Crowd-Pleaser: Between us, this is my go-to for game days, sick nights, or when my in-laws visit unexpectedly. The frozen veggies cut prep time, and the puff pastry makes it feel fancy without the fuss. Even my picky-eater nephew asks for seconds.
- Leftovers That Don’t Suck: Honestly, the second night is often better—maybe because the flavors meld, or maybe because you’re just craving it again. I’ll reheat slices in the air fryer for crispy edges, or pop them in the microwave for lazy mornings. No sad, soggy leftovers here.
Step-by-step instructions for chicken pot pie with puff pastry
Here’s how to create a showstopping pot pie with flaky layers and velvety filling.
Prepare the Filling Mixture
In a large mixing bowl, combine the 2 cups of cooked chicken breast with the 1.5 cups of frozen mixed vegetables. This combination gives you that perfect balance of protein and seasonal veggies. Add the 2 cans of Campbell’s cream of chicken soup and stir until everything is evenly distributed.
In a separate small bowl, whisk together the 0.5 cup of heavy whipping cream, 0.25 cup of milk, 0.5 tsp of salt, 0.25 tsp of black pepper, 0.5 tsp of garlic powder, and 0.25 tsp of dried thyme. This seasoning blend will infuse the filling with rich, savory flavors. Pour this mixture into the chicken and vegetable combination, stirring gently to combine. The filling should be smooth and creamy—this is where the magic happens for that velvety texture we’re after.
Here’s the thing—don’t skip the whisking. You want to make sure the cream and milk are fully incorporated into the soup mixture. This prevents any lumps and ensures that every bite is consistently creamy.
Assemble the Pot Pie
Lightly dust your work surface with the 2 tbsp of all-purpose flour to prevent sticking. Roll out one of the 2 whole puff pastry sheets on the floured surface until it’s about 12×10 inches—just large enough to cover a standard 9×13-inch baking dish. I like to use a rolling pin for this, but you can also press it gently with your hands if you prefer.
Carefully transfer the rolled-out puff pastry to the baking dish, pressing it gently into the corners to ensure full coverage. Spoon the filling mixture evenly into the dish, spreading it out to create an even layer. The filling should be about 1 inch thick—this thickness ensures it bakes through without becoming watery.
Roll out the second puff pastry sheet in the same way. This is where it gets fun—you’ll want to create a lattice pattern or simply lay it on top as a solid lid. I like the lattice for visual appeal, but either method works beautifully. Brush the top with the melted 0.25 cup of unsalted butter for that golden, flaky finish.
Bake to Golden Perfection
Preheat your oven to 375°F. This temperature is just right—hot enough to create a golden crust but gentle enough to keep the filling creamy. Place the assembled pot pie on the middle rack of your oven and bake for 45-50 minutes, until the puff pastry is golden brown and the filling is bubbling at the edges.
I know it seems like a long time, but patience is key here. The filling needs time to thicken and the pastry to puff and crisp. If you’re worried about over-browning, tent the pie with aluminum foil after the first 30 minutes. You’ll know it’s done when the crust is deep golden and the filling is set but still creamy when you cut into it.
Let the pot pie rest for 10-15 minutes before serving. This resting period allows the filling to set slightly, making it easier to slice and preventing any juices from leaking out. The result? A perfectly balanced dish with a crisp, flaky crust and a rich, creamy filling that melts in your mouth.
Pro Tips For Making Campbell’S Chicken Pot Pie Recipe With Puff Pastry
- Preheat the Pan: I learned this the hard way—putting cold puff pastry on a cold pan makes it soggy. Heat your baking sheet or pie dish for 5 minutes at 375°F before adding the pastry. The extra heat ensures a crispy bottom, not a gummy mess.
- Thaw Veggies First: Frozen mixed veggies straight from the freezer release water into the filling, thinning out the soup. Microwave them for 2-3 minutes or boil for 5 minutes to drain excess moisture before mixing with the soup. Your filling will stay thick and rich.
- Don’t Overfill the Crust: Puff pastry puffs—literally. If you pile the filling too high, it’ll spill over and burn while the edges stay doughy. Fill the pastry to about ¾ of its depth, then press gently to smooth. Trust me, it’s worth the extra second.
- Brush, Not Drown: The recipe might say to egg wash the pastry, but that’s overkill. Lightly brush the top with egg wash (1 egg + 1 tablespoon water) and sprinkle with coarse salt. Too much liquid = soggy puff pastry. Keep it light.
Common mistakes when making this dish
Overworking the Pastry
Puff pastry is all about delicate layers, and overworking it turns those flaky dreams into tough, sad reality. Once you roll out your sheet, handle it as little as possible—I promise you don’t need to press it into the dish with surgical precision.
Just gently shape it and let it settle naturally. The more you stretch and fold, the more you collapse those precious butter layers that create the puff. I’ve ruined more puff pastry than I’d admit by trying to make it “perfect” before baking. 💫
Skipping the Egg Wash
That golden crust isn’t just luck—it’s science. The egg wash (1 egg beaten with a splash of water) creates a protective seal that helps the pastry brown beautifully while keeping it tender.
I once baked a whole batch without it, expecting the butter to do all the work, and ended up with a pale, sad pie that looked like it belonged in a hospital cafeteria. Brush that egg wash on both the top and bottom edges for maximum shine and crispiness.
Uneven Filling Distribution
Lumpy filling equals uneven baking, and that’s a one-way ticket to soggy bottoms and dry tops. Spread your filling smoothly with a spatula, creating an even layer about 1 inch thick. I like to use the back of a spoon to gently press down on thick spots.
If your filling is too thick, stir in an extra 2 tbsp of milk before assembling. The goal is consistency—every bite should taste like heaven, not like you’re eating pot pie roulette. 🍲
Baking at Wrong Temperature
375°F is your magic number—any hotter and you’ll get a burnt crust before the filling sets, any cooler and you’ll end up with a sad, dense mess. I learned this the hard way when I cranked my oven to 400°F in a hurry and came back to a charred disaster. Use an oven thermometer to verify your oven’s accuracy—many run hotter than they say. And for the love of all things flaky, don’t open the oven door during baking! That temperature drop will cause your pastry to deflate like a sad balloon.
Not Resting Before Serving
I know, I know—you’re starving and that pie looks ready. But resist the urge to cut into it immediately! Letting your pot pie rest for 10-15 minutes lets the filling set properly and prevents a juicy mess on your plate.
The crust will hold its shape better too. I’ve seen too many beautiful pies collapse into filling soup because someone couldn’t wait two minutes. Trust the process—your patience will be rewarded with clean slices and happy guests. ✨
Using Wrong Veggies
Frozen peas and carrots are your best friends here—they’re pre-cut, consistent, and won’t turn to mush. Fresh veggies release too much moisture and can make your filling watery. If you’re using fresh, make sure to cook them thoroughly and drain any excess liquid.
I once used fresh corn and ended up with a pie that looked more like soup than a pot pie. Stick with the frozen mix for foolproof results every time. 🥕
Nutrition facts
Frequently asked questions
Can I use homemade puff pastry instead of store-bought?
Homemade puff pastry works beautifully and gives you that extra flaky, buttery perfection. The key is keeping your butter layers cold and rolling gently. For best results, use a 1:3 butter-to-flour ratio and chill the dough between folds. Store-bought is convenient, but homemade lets you control the butter content for an even richer flavor.
How do I make this recipe vegetarian?
Swap the chicken for 2 cups of cooked mushrooms or 1 block of firm tofu (crumbled and sautéed). Use Campbell’s Cream of Mushroom Soup instead of chicken soup, and add 1 tbsp nutritional yeast for a cheesy flavor. The veggie mix stays the same, but you might want to add 1 extra cup of spinach for heartiness. The filling will still be creamy and delicious!
Why did my puff pastry not puff up?
Cold butter layers are essential for puffing. Make sure your pastry was fully chilled before baking and that your oven was preheated to 375°F. Another common issue is opening the oven door too soon—this causes temperature drops that prevent rising. If your pastry puffed unevenly, try brushing it with extra melted butter before baking next time for better lift.
Can I make this ahead for meal prep?
Yes! Assemble the pie completely (even the top crust) and refrigerate for up to 24 hours before baking. For freezing, bake first, then cool completely. Wrap tightly in foil and freeze for up to 3 months. Reheat from frozen at 350°F for 50-60 minutes until heated through. The texture stays perfect—just as flaky and creamy as fresh!
What’s the best way to reheat leftovers?
Always reheat in the oven to keep the crust crispy. Place leftovers on a baking sheet at 350°F for 15-20 minutes, covered loosely with foil. For microwave reheating, cover with a damp paper towel and heat for 1-2 minutes—just know the crust will soften. The oven method preserves that golden, flaky texture you worked so hard to achieve!

- Crock Pot Round Steak Recipe: Slow-Sear Crust With Juicy Center - November 6, 2026
- Candied Sweet Potatoes Crock Pot Recipe: Caramelized Sweetness With Zero Effort - November 6, 2026
- Steak Recipe Crock Pot: Juicy, Caramelized Crust in 4 Hours - November 6, 2026