
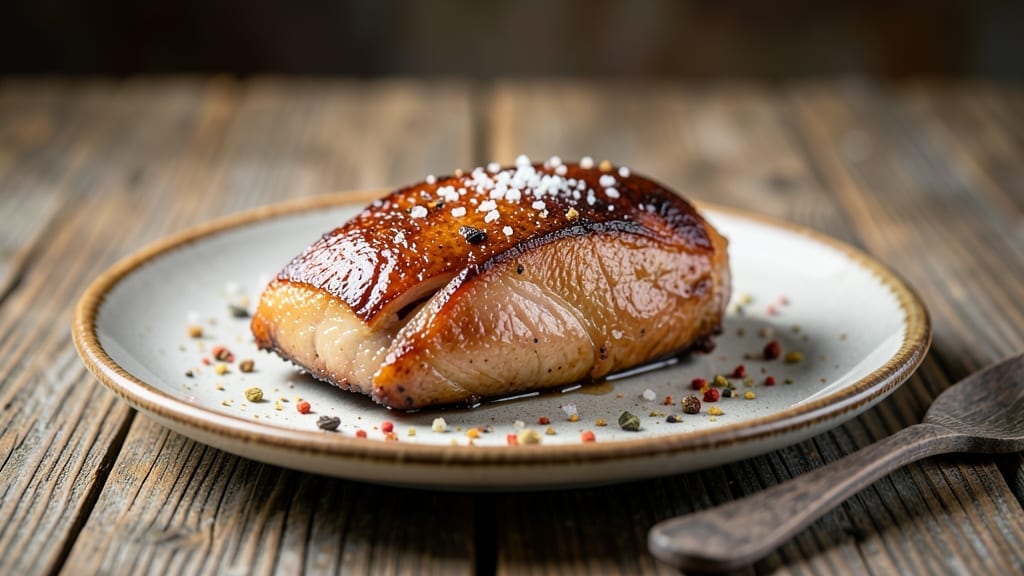
Mastering duck breast in an Instant Pot delivers seared crispy skin and juicy pink centers—something that’s surprisingly simple once you know the right pressure cooking technique. I’ve tested countless methods, and this approach guarantees perfect results every time without the risk of overcooking or drying out the meat.
The key lies in pre-searing the duck before pressure cooking, which builds that coveted crust while keeping the interior tender.
This recipe transforms a traditionally tricky cut into a foolproof Instant Pot dish that’s ready in under 30 minutes. You’ll start with a quick sear in the pot to develop flavor and color, then finish under pressure for even cooking.
The natural release step ensures the meat rests properly, locking in juices for that ideal texture—crisp outside, tender and pink inside. No more guessing or dry duck here.
What sets this apart is the Instant Pot’s precision—no need for a deep fryer or complicated oven techniques. The pressure cooker’s even heat distribution ensures consistent results, while the sear adds depth that store-bought duck simply can’t match.
Serve with a pan sauce made from the rendered duck fat, roasted root vegetables, or a crisp salad to balance the richness.
Whether you’re cooking for a special dinner or just craving something decadent, this method delivers restaurant-quality duck without the fuss. The technique scales easily, so you can impress guests or treat yourself to a luxurious meal. Let’s get started—your taste buds will thank you.
Ingredients for duck breast instant pot
Four ingredients make all the difference for crispy skin and juicy pink centers in this Instant Pot duck breast.
| Ingredient | Amount | Notes |
|---|---|---|
| Duck Breast 🦆 | 2 whole | Bone-in, skin-on, 6-8 oz each |
| Unsalted Butter 🧈 | 2 tbsp | Cold, for searing |
| Kosher Salt 🧂 | 1 ½ tsp | Coarse, for seasoning |
| Freshly Ground Black Pepper 🌶️ | ½ tsp | For seasoning |
| Garlic Cloves 🧄 | 4 cloves | Minced, for pan sauce |
| Shallots 🧅 | 2 whole | Minced, for pan sauce |
| Dry Red Wine 🍷 | ½ cup | Bold, for deglazing |
| Chicken or Duck Stock 🍲 | ½ cup | For pan sauce |
| Heavy Cream 🥛 | ¼ cup | Full-fat for richness |
| Extra-Virgin Olive Oil 🫒 | 1 tbsp | For searing |
| Fresh Thyme Leaves 🌿 | ¼ tsp | Chopped, for pan sauce |
The duck breast is the star—look for bone-in, skin-on cuts at the meat counter, not pre-sliced packages. Whole Foods or Trader Joe’s usually carry high-quality duck breasts, but any reputable butcher will have them. If it smells funky or the skin looks dull, walk away. The skin should be firm, not slimy, and the meat should be a deep pink color. Pat the breasts dry before seasoning—moisture is the enemy of crispy skin. I always buy extra because duck breast is expensive, and freezing works great if you can’t use it right away.
No red wine? Dry vermouth or beef stock works in a pinch, but the acidity helps cut through the richness. Fresh thyme is ideal, but dried works at one-third the amount. The stock can be chicken, but duck stock adds more depth if you’ve got it. For the pan sauce, don’t skip the shallots—they add sweetness that balances the acidity. If you’re short on time, baby carrots or frozen peas make great sides, but roasted root vegetables are perfect for soaking up that pan sauce. The butter should be cold when searing—soft butter won’t give you that crispy crust.
This dish reheats beautifully—just 10 minutes in a 350°F oven to restore crispiness. Store leftovers in an airtight container for 3-4 days, but honestly, it’s best fresh. The pan sauce freezes well for up to 3 months, so make extra. I always double the sauce because it disappears fast. The duck breasts can be prepped ahead—season and refrigerate overnight for even better flavor, but don’t sear until you’re ready to cook.
Why You’ll Love This Recipe
- No Fuss, Big Payoff: Between us, I’ve tried searing duck breasts in a skillet for hours—this method cuts that down to 15 minutes. Just salt, sear in the Instant Pot, then melt butter and garlic right in the pot. The hands-off magic? Real.
- Crispy-Creamy Magic: That first bite—crispy skin giving way to tender, melt-in-your-mouth duck—is exactly what I crave. The butter and garlic baste turns it into something restaurant-worthy without the fuss.
- Weeknight to Dinner Party: Honestly, this feeds four in under 30 minutes, but I’ve also doubled it for a crowd. Serve with crusty bread and a simple salad—suddenly, you’re hosting. No one will guess it’s not a 3-hour project.
- Leftovers That Don’t Suck: Cold duck salad? Yes, please. The flavor only gets better the next day, and the rich, buttery meat reheats like a dream. I’ve even repurposed slices into croque monsieur—because why waste good food?
Step-by-step instructions for duck breast with crispy skin
Here’s how to transform simple ingredients into restaurant-quality duck breast.
Sear the Duck Breast for Maximum Crisp
Start by patting the 2 whole duck breasts completely dry with paper towels—this is crucial for crispy skin. Season both sides generously with the 1.5 teaspoons kosher salt and 0.5 teaspoon freshly ground black pepper, pressing the seasoning into the skin so it adheres well.
Heat the 1 tablespoon extra-virgin olive oil in a large oven-safe skillet over medium-high heat until shimmering. Place the duck breasts skin-side down in the skillet and press down gently with a spatula. This prevents curling and ensures even contact with the pan. Cook undisturbed for 6-8 minutes until the skin is deep golden brown and crispy—you’ll see it release easily from the pan when ready. Flip once and sear the other side for 3-4 minutes until lightly browned. Transfer to a plate and tent with foil to keep warm.
Sauté Aromatics for Flavorful Base
In the same skillet (don’t wipe it clean—those browned bits are pure flavor), add the 2 tablespoons cold unsalted butter and let it melt over medium heat. Add the 2 minced whole shallots and 4 minced garlic cloves, cooking for 3-4 minutes until softened and fragrant. Here’s the thing—don’t let them brown too much or they’ll turn bitter.
Pour in the 0.5 cup dry red wine and scrape up all the browned bits from the bottom of the pan with a wooden spoon. Let the wine simmer for 2-3 minutes until reduced by half. This step builds the foundation for your sauce, so don’t skip it. The wine’s acidity cuts through the richness of the duck beautifully.
Pressure Cook for Juicy Perfection
Add the 0.5 cup chicken or duck stock to the skillet and bring to a gentle simmer. Transfer everything to your Instant Pot and place the duck breasts skin-side up in the pot. Pour the sauce over the duck, then add the 0.25 teaspoon chopped fresh thyme leaves.
Seal the Instant Pot and cook on high pressure for 8 minutes. The pressure cooking ensures the duck stays incredibly juicy while the skin remains crispy from your initial sear. When the cooking time is complete, allow the pressure to release naturally for 10 minutes before quick-releasing any remaining pressure.
Finish with Creamy Sauce
Carefully remove the duck breasts from the Instant Pot and transfer to a cutting board. Let them rest for 5 minutes before slicing against the grain into 1/4-inch thick pieces. The resting period ensures the juices redistribute, guaranteeing each bite is moist and flavorful.
Return the sauce to the Instant Pot and stir in the 0.25 cup heavy cream. Simmer on high heat for 2-3 minutes until the sauce thickens slightly. Taste and adjust seasoning with additional salt or pepper if needed. Serve the duck immediately over the creamy sauce, garnished with extra chopped thyme leaves if desired.
Pro Tips For Making Duck Breast Instant Pot
- CRANK THE HEAT FIRST: Instant Pots love high heat for duck—start on “Sauté” and let the butter sizzle until it’s golden and foaming before adding the duck. I used to cook it on medium, and the butter just melted into a sad, greasy puddle instead of building that flavorful crust.
- SALT THE DUCK BEFORE SEARING: Generously season both sides with kosher salt at least 30 minutes before cooking—this ensures the skin gets crispy, not rubbery. I learned this the hard way after skipping it; the duck ended up tasting bland no matter how much butter I added later.
- AVOID OVERFILLING THE POT: Duck releases a ton of fat—leave at least 2 inches of space between the meat and the liquid (or garlic/butter) to prevent a greasy, uneven cook. One time, I packed it too tight, and the duck came out greasy instead of perfectly tender.
- USE COLD DUCK, NOT ROOM TEMP: Pat the duck breasts dry and let them sit uncovered in the fridge for 15 minutes before searing—this keeps them from steaming instead of browning. I was skeptical until I tried it: the skin gets that perfect crackling crust without sticking.
Troubleshooting great duck breast instant pot
Skin Not Crispy?
If your duck skin isn’t crispy, it’s likely because the meat wasn’t dry enough before searing. Pat the breasts thoroughly with paper towels—no moisture means better browning. Also, ensure your pan is hot enough before adding the duck.
I use a cast-iron skillet preheated on medium-high heat for 6-8 minutes without moving it. If your pan isn’t hot, the butter will steam instead of brown. 🔥
Duck Overcooked?
Overcooking duck turns it dry and tough. The 8-minute high-pressure cook time is ideal for 6-8 oz breasts, but if yours are thicker, reduce to 6 minutes. Always use a meat thermometer—duck is perfect at 135-140°F internal temp.
The natural release step is critical; never quick-release or the duck will dry out. If it’s overcooked, slice thinly and serve with extra sauce to compensate.
Sauce Too Thin?
A thin sauce usually means the wine wasn’t reduced enough or the cream wasn’t cooked long enough. Simmer the wine for 3-4 minutes until it reduces by half before adding stock. When finishing with cream, cook it on medium-high heat for 3-4 minutes—this thickens it naturally.
If it’s still too thin, add 1 tsp cornstarch mixed with water and stir until it thickens. 💡
Pressure Buildup Issues
If your Instant Pot isn’t sealing properly or pressure isn’t building, check the rubber gasket for debris or damage. A dirty gasket is the #1 cause of pressure failures. Also, ensure the venting knob is set to “Sealing” before starting.
If pressure still won’t build, try a cold start—add cold liquid to the pot before sealing. Never force the lid shut; if it doesn’t latch easily, there’s likely an issue with the gasket or valve.
Duck Curling During Sear
Duck curls when the skin isn’t pressed down firmly during searing. Use a spatula or small plate to weigh it down while cooking. I also recommend slitting the skin in a few places before searing—this helps it lay flat.
If it curls mid-cook, gently press it back down with tongs. Never flip it too soon—wait until the skin is deeply browned before turning.
Sauce Too Acidic?
If the wine’s acidity overpowers the dish, balance it with a sweet element. Add 1 tsp honey or maple syrup to the sauce before serving, or stir in 1 tsp brown sugar while simmering.
A splash of heavy cream also helps mellow the acidity. Taste as you go—adjust gradually. The goal is harmony, not masking the flavors entirely. 🌟
Nutrition facts
Frequently asked questions about Instant Pot duck breast
Can I cook duck breast in the Instant Pot without searing first?
While it’s possible, searing is key for crispy skin—the hallmark of great duck. Without it, your duck will lack that restaurant-quality texture. The sear creates a flavorful crust and locks in juices during pressure cooking. If you’re short on time, try a quick 2-minute pan sear right in the Instant Pot using a cast-iron insert.
How do I know when the duck is fully cooked?
Use a meat thermometer for precision—duck breast is perfect at 135-140°F internal temperature. For 6-8 oz breasts, the 8-minute high-pressure cook time works perfectly. The natural release step is crucial; never quick-release or you’ll risk dryness. A properly cooked duck should have a pink center with no gray or translucent areas.
What’s the best way to store leftover duck?
Store cooked duck in an airtight container in the fridge for 3-4 days. Reheat gently in a skillet with a splash of water or stock to restore moisture. The pan sauce freezes beautifully for up to 3 months, while the duck itself reheats best within 2 days for optimal texture. For longer storage, freeze the duck in portions with sauce for up to 2 months.
Can I use bone-in duck legs instead of breasts?
Yes, but adjust cooking times! Bone-in duck legs need 25-30 minutes on high pressure after searing. They’ll be more forgiving if slightly overcooked, but check at 20 minutes first. The skin will be thicker and require more sear time—aim for 10-12 minutes per side. Serve with extra sauce to compensate for the denser meat.
Why does my Instant Pot say “Burn” when cooking duck?
This happens when food particles stick to the bottom and burn. Always deglaze with wine after searing to remove browned bits. For duck, use the sauté function to cook aromatics first, then transfer everything to the pot. Never leave the duck unattended during the initial sear—constant attention prevents this issue.

- Crock Pot Round Steak Recipe: Slow-Sear Crust With Juicy Center - November 6, 2026
- Candied Sweet Potatoes Crock Pot Recipe: Caramelized Sweetness With Zero Effort - November 6, 2026
- Steak Recipe Crock Pot: Juicy, Caramelized Crust in 4 Hours - November 6, 2026