
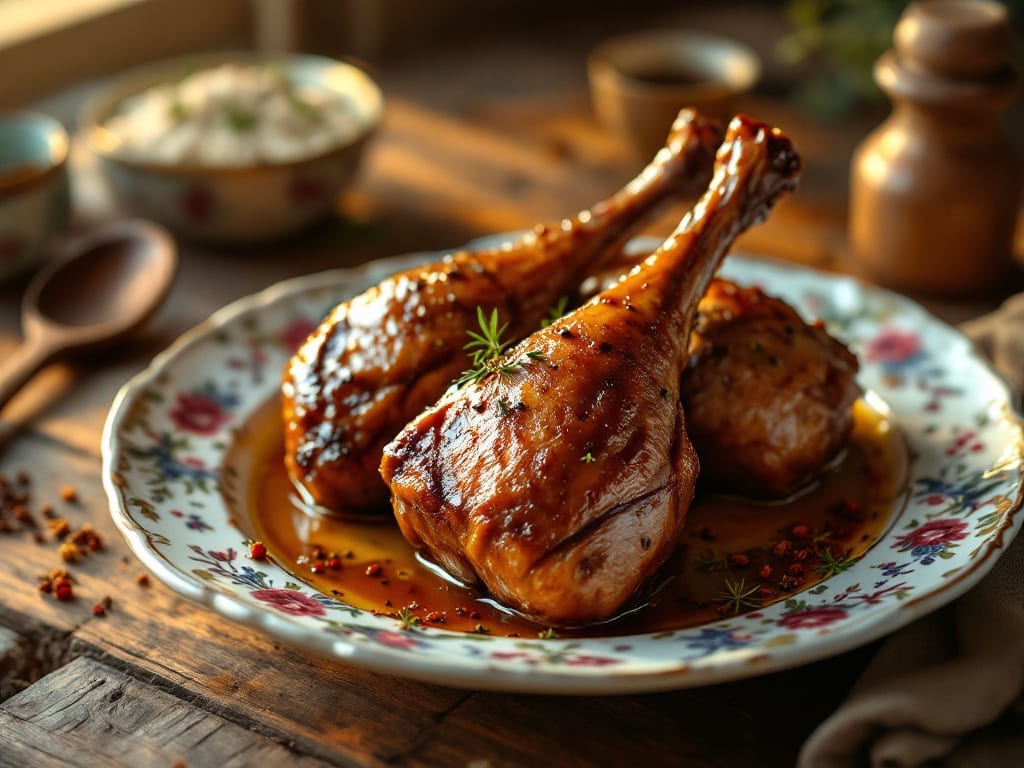
Slow-cooked duck legs in a crock pot deliver restaurant-quality richness with minimal effort, and the secret to crispy skin lies in a precise method that transforms tough cuts into melt-in-your-mouth perfection.
After years of perfecting this technique, I’ve found that the key is rendering the fat properly before slow cooking—this creates that coveted crispy texture while keeping the meat impossibly tender.
The result is a dish that’s elegant enough for a dinner party but simple enough for a weeknight, with a flavor profile that balances deep savory notes with just enough sweetness.
This recipe starts with whole duck legs, which develop incredible depth of flavor during the 6-hour slow cook on low heat. While the meat tenderizes, the fat slowly renders, creating a golden, crispy bark that’s impossible to resist.
The beauty of using a crock pot is that it handles the long cooking time effortlessly, allowing you to focus on other parts of your meal—like roasting potatoes or preparing a simple glaze to drizzle over the finished dish.
No need for complicated techniques; just set it and let the magic happen.
By the time you’re ready to serve, your duck legs will have crispy, caramelized skin that shatters with every bite, revealing juicy, fall-off-the-bone meat underneath. The slow cooking process infuses the meat with natural flavors, and the rendered fat adds a luxurious richness that’s hard to match.
Serve with a side of roasted vegetables or a bright salad to balance the richness, and you’ll have a main course that feels like a true indulgence—without the fuss.
The best part? This method works equally well for a single dinner or a crowd, and leftovers reheat beautifully for sandwiches or salads the next day. Whether you’re hosting guests or treating yourself to a special meal, this crock pot duck legs recipe delivers foolproof results every time.
Let’s get started on creating a dish that’s as impressive as it is easy.
Ingredients for duck legs crock pot
Four whole duck legs, a splash of wine, and six hours of hands-off magic.
| Ingredient | Amount | Notes |
|---|---|---|
| Whole Duck Legs 🦆 | 4 whole | Bone-in, skin-on preferred |
| Unsalted Butter 🧈 | ½ cup | Cold, cubed for crispy skin |
| Kosher Salt 🧂 | 1 ½ tbsp | Coarse grain preferred |
| Black Peppercorns 🌶️ | 1 ½ tsp | Freshly cracked for warmth |
| Garlic Cloves 🧄 | 6 cloves | Smashed for deeper flavor |
| Fresh Thyme Leaves 🌿 | ¼ cup | Or 1 tbsp dried thyme |
| Dry White Wine 🍷 | ½ cup | Sauvignon Blanc preferred |
| Chicken Broth 💧 | 1 cup | Low-sodium preferred |
| Honey 🍯 | 1 tbsp | For subtle sweetness |
| Fresh Rosemary 🌿 | ⅛ cup | Chopped sprigs for aroma |
| Olive Oil 🫒 | 1 tbsp | For pan searing |
| Balsamic Vinegar 🍶 | 1 tbsp | For finishing drizzle |
The duck legs are the star—bone-in, skin-on for maximum flavor and crispiness. Most grocery stores carry them in the meat counter, but Whole Foods or local butchers often have fresher options. Look for legs with good fat marbling, which ensures juiciness. I usually grab mine from Costco when I’m making a big batch, but single legs work perfectly for a weeknight dinner. Pat the skin dry before cooking—this helps the butter render into crispy gold. If you’re nervous about handling raw duck, gloves are a must.
No white wine? Chicken broth with a splash of apple cider vinegar works in a pinch. Fresh thyme and rosemary can be swapped for 1 tbsp each of dried herbs, but fresh is always better if you’ve got it. The honey adds just enough sweetness—maple syrup works too. For the butter, European-style with higher fat content (like Plugrá) gives the best crisp. Don’t skip the balsamic drizzle at the end—it adds a tangy finish that balances all the richness. And if you’re worried about the duck being too fatty, trust the process—the slow cook turns it into liquid gold.
The rendered fat is pure luxury—save it for future dishes or freeze it in ice cube trays for roasting potatoes later. Leftover duck reheats beautifully—just warm it gently in the crock pot with a splash of broth. Keeps for 4 days in the fridge or 3 months frozen. I always make extra because the flavor only gets better the next day. For serving, a simple arugula salad with lemon vinaigrette cuts through the richness perfectly.
Why You’ll Love This Recipe
- Rich Without the Fuss: That crispy skin? Pure magic from the butter and slow cook—crunchy on the outside, tender inside, with garlic seeping into every bite. Honestly, it’s the kind of flavor that makes you pause mid-bite.
- Weeknight to Weekend: Same recipe feeds my tired Tuesday crew or impresses guests on Saturday. The leftovers? Even better the next day—reheat and serve with crusty bread, or toss into a salad for a fancy lunch.
- Budget Luxury: Duck legs are cheaper than chicken thighs but taste like a restaurant dish. I’ll be real: my grocery budget thanks me for buying them in bulk, and the leftovers stretch into three meals without feeling repetitive.
Step-by-step instructions for slow-cooked duck legs with crispy skin
Here’s how to transform simple ingredients into fall-off-the-bone duck with perfectly crispy skin.
Prep and Sear the Duck Legs for Maximum Flavor
Pat the 4 whole duck legs completely dry with paper towels—this is crucial for crispy skin. Season both sides generously with the 1.5 tablespoons kosher salt and 1.5 teaspoons freshly cracked black peppercorns. Let them sit at room temperature for 30 minutes while you prepare the crock pot.
Heat the 1 tablespoon olive oil in a large skillet over medium-high heat until shimmering. Add the duck legs skin-side down and cook undisturbed for 6-8 minutes until the skin is golden brown and crispy. Flip once and cook another 2-3 minutes per side until browned. The reason for this initial sear is to lock in juices and create that coveted crispy texture we’re after.
Build the Crock Pot Base with Aromatics and Liquid
Transfer the seared duck legs to your crock pot. In the same skillet, add the 6 smashed garlic cloves and cook for 30 seconds until fragrant. Then add the 0.5 cup dry white wine, scraping up any browned bits from the bottom. Pour this wine mixture into the crock pot along with the 1 cup chicken broth, 1 tablespoon honey, 0.25 cup fresh thyme leaves, and 0.125 cup chopped fresh rosemary.
Here’s the thing—adding the wine and broth to the crock pot creates a flavorful braising liquid that will gently cook the duck while keeping it moist. The honey adds just enough sweetness to balance the rich duck flavor, while the herbs infuse their aromatic qualities into the meat. Don’t skip this step; it’s what transforms simple duck into something extraordinary.
Slow Cook Until Fork-Tender with Crispy Skin
Place the 0.5 cup cubed unsalted butter on top of the duck legs in the crock pot. This butter will melt during cooking and baste the meat continuously, creating that signature crispy skin while keeping the interior tender. Cover the crock pot and cook on low heat for 6-7 hours or until the duck is fork-tender.
Check for doneness by inserting a meat thermometer into the thickest part of the meat—it should read 165°F. The skin should be golden brown and crispy, while the meat should pull apart easily with two forks. If your crock pot runs hot, you might need to reduce the time slightly. The butter will create a golden, flavorful sauce that coats everything beautifully.
Finish with Balsamic Vinegar for Depth of Flavor
Once the duck is perfectly cooked, carefully remove it from the crock pot and transfer to a serving platter. Strain the cooking liquid through a fine-mesh sieve into a saucepan and skim off any excess fat. Return the liquid to medium heat and add the 1 tablespoon balsamic vinegar, simmering for 2-3 minutes until slightly reduced.
This final step adds a touch of acidity that cuts through the richness of the duck, creating a well-balanced sauce. The balsamic vinegar also enhances the overall depth of flavor, making each bite more complex. Serve the duck legs immediately, spooning the reduced sauce over the top and letting everyone enjoy that perfect combination of crispy skin and tender meat.
Pro Tips For Making Duck Legs Crock Pot
- CRANK THE HEAT FIRST: Duck legs need a head start on crispy skin—lock your crock pot on High for the first 30 minutes with the legs skin-side down. After that, drop to Low to finish cooking. I learned this the hard way: slow starts mean sad, soggy skin by the end.
- SALT THE SKIN LIKE IT’S 1950: Generously coat the duck skin with kosher salt (about 1½ teaspoons per leg) and let it sit uncovered for 15 minutes before cooking. This draws out moisture, ensuring a crackling crust. Skip this, and you’ll be left with greasy, limp skin—trust me, I’ve been there.
- SMASH THOSE GARLIC CLOVES: Don’t just toss whole garlic cloves into the crock pot—they’ll turn to mush and disappear. Instead, roughly chop them (or smash with the side of your knife) so their flavor infuses the butter and duck. Bonus: add a splash of water to the pot to keep the butter from seizing up.
- DON’T SKIP THE BUTTER BATH: After the legs are cooked, spoon that rendered duck fat and melted butter over the top of the legs in the crock pot. This bastes them in real time, adding richness and helping the skin crisp up even more. Yes, it’s extra effort, but it’s what separates “meh” from “wow.”
Storing and reheating this dish
Refrigerator Storage
Store cooked duck legs in an airtight container with any leftover sauce or pan juices to maintain moisture. Keep them refrigerated at 40°F or below for up to 4 days. The rendered fat solidifies slightly in the fridge, which actually preserves flavor better than at room temperature.
I always portion leftovers into single-serving containers for easy reheating later in the week. 🥬
Freezer Preservation
For longer storage, freeze cooked duck legs in freezer-safe bags with all excess air removed. They’ll keep for 3 months without significant texture loss. I recommend freezing individual portions—just wrap each leg tightly in plastic wrap before placing in a bag to prevent freezer burn.
Thaw overnight in the fridge before reheating for best results. 🧊
Reheating Methods
For stovetop reheating, place duck legs in a skillet over medium-low heat with a splash of water or broth. Cover and warm for 5-7 minutes, basting occasionally with the pan juices. This method helps restore crispiness to the skin. I avoid high heat—it can dry out the meat. 🔥
Oven Crisping Technique
To revive crispy skin, broil the reheated duck legs for 2-3 minutes under a preheated broiler. Watch closely—they go from perfect to burnt in seconds! This works best for leftovers that lost some crispness during storage.
I like to finish with a quick drizzle of balsamic glaze to refresh the flavors. ✨
Microwave Option
If you’re in a rush, microwave on medium power for 1-2 minutes covered with a damp paper towel. Add 1 tablespoon broth to prevent drying. While not as crispy, this method maintains tenderness perfectly for sandwiches or salads. The key is to avoid overcooking—duck reheats faster than it looks! 💡
Sauce Revival Tips
Strained cooking sauce can be reheated separately in a small saucepan over low heat until warmed through. For extra richness, whisk in 1 tablespoon butter or a splash of white wine before serving. I often make a double batch of sauce—it reheats beautifully and adds depth to any dish. 🍲
Nutrition facts
Frequently asked questions
Can I use duck thighs instead of legs for this recipe?
Duck thighs will work, but they’ll cook faster than legs due to less connective tissue. For best results, reduce the cooking time to 4-5 hours on low and check for doneness at 165°F. Thighs are leaner, so they may dry out more quickly—consider adding 1 extra tablespoon of butter to the crock pot for extra moisture.
Why does the skin turn rubbery instead of crispy?
Rubbery skin usually means the duck wasn’t properly dried before cooking or the butter wasn’t placed on top during slow cooking. First, pat the skin completely dry with paper towels before searing. Second, always add the cold cubed butter directly on top of the duck in the crock pot—this creates steam that bastes and crisps the skin as it cooks.
Can I make this recipe in a slow cooker with less liquid?
Yes! The wine and broth create a braising liquid, but you can reduce it by 25% if needed. Just add 0.375 cup wine and 0.75 cup broth instead. The butter on top will still create enough moisture for tender meat. For extra crispiness, add 1 extra tablespoon of olive oil when searing the duck initially.
What’s the best way to serve these duck legs?
Pair them with complementary sides to balance the richness: roasted root vegetables, a bright citrus salad, or creamy mashed potatoes. For a complete meal, drizzle with the reduced balsamic sauce and serve with crusty bread to soak up every last drop. The crispy skin pairs beautifully with tangy elements like pickled onions or a red wine reduction.
Can I prep the duck legs ahead of time for meal prep?
Sear the duck legs and store them in the fridge for up to 24 hours before slow cooking. For meal prep, cook the full recipe and store the duck legs in airtight containers for 4 days. Reheat using the stovetop method to restore crispiness. The sauce can be reheated separately and stored for 3 days in the fridge.

- Baked Potatoes in Crock Pot Recipe: Buttery Interiors and Crispy Top Magic - November 1, 2026
- Braised Beef Short Ribs Recipe: Crock Pot Fall-Off-Bone Magic in 6 Hours - November 1, 2026
- Crock Pot Cocoa Recipe: Velvety Warmth With Hidden Spice Magic - November 1, 2026