
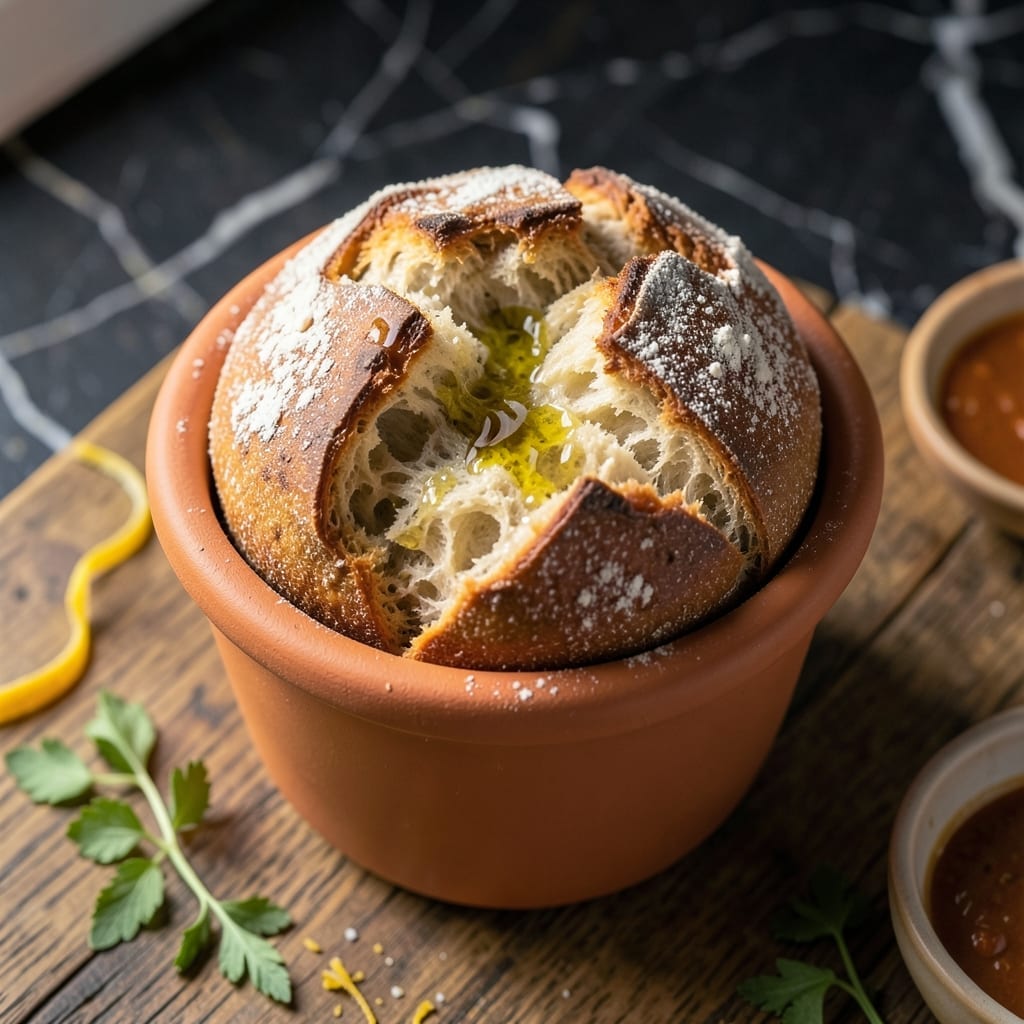
This unique bread transforms an ordinary terracotta pot into your secret baking weapon. The clay creates a rustic crust with a perfectly crisp exterior, while the steam trapped inside ensures a tender, moist crumb throughout.
I developed this method after discovering how well terracotta distributes heat. The herb-infused center adds aromatic depth that complements the bread’s natural earthy notes. No special equipment required—just a clean flower pot and basic pantry staples.
What emerges is a loaf with a golden crust and soft interior, scented with your choice of fresh herbs. The presentation is as impressive as the flavor, making it perfect for dinner parties or weekend baking projects.
The process takes about 2 hours from start to finish, with most of that time being hands-off rising. This is bread baking at its most straightforward and rewarding.
Ingredients for Flower Pot Bread
Pantry staples and fresh herbs create this rustic, aromatic loaf with ease.
| Ingredient | Amount | Notes |
|---|---|---|
| Bread Flour 🌾 | 4 cups | High protein for structure |
| Active Dry Yeast 🍞 | 2 ¼ tsp | One packet, proofed in warm water |
| Warm Water 💧 | 1 ½ cups | 110-115°F for yeast activation |
| Granulated Sugar 🍚 | 1 tbsp | Feeds the yeast |
| Kosher Salt 🧂 | 2 tsp | Diamond Crystal preferred |
| Extra-Virgin Olive Oil 🫒 | 2 tbsp | For dough and pot preparation |
| Fresh Rosemary 🌿 | 2 tbsp | Finely chopped for herb center |
| Fresh Thyme 🍃 | 2 tbsp | Leaves stripped from stems |
| Garlic Cloves 🧄 | 4 cloves | Minced for aromatic depth |
| Unsalted Butter 🧈 | 2 tbsp | Melted, for herb center |
| All-Purpose Flour 🌾 | ½ cup | For dusting work surface |
| Cornmeal 🌽 | 2 tbsp | For dusting terracotta pot |
The flour is critical here. King Arthur Bread Flour gives you that perfect chewy texture—all-purpose works in a pinch but the crust won’t be as sturdy. For the yeast, Fleischmann’s or Red Star are reliable and widely available at any grocery store. The terracotta pot needs to be food-safe and clean (never used for plants or chemicals). I grab mine from Home Depot for under five bucks.
No fresh herbs? Dried at one-third the amount works, but fresh really shines here. Swap rosemary and thyme for sage and oregano if that’s what’s growing in your garden. Out of cornmeal? Semolina or extra flour will prevent sticking just fine. The butter can be replaced with olive oil, but you’ll lose some richness in the herb center.
Store yeast in the freezer for 6-12 months of potency. Fresh herbs keep wrapped in damp paper towels for 5-7 days. The dough rises best in a warm, draft-free spot—my oven with the light on works perfectly. Baked loaf stays fresh for 2-3 days in an airtight container.
Why You’ll Love This Recipe
- One Bowl Wonder: I just dump the flour, yeast, sugar, and salt in a bowl, add warm water, and let it rise—no fancy tools required.
- Crispy Outside, Soft Inside: That first bite with the slightly crunchy crust giving way to the pillowy center? I make it just to justify eating half the loaf warm.
- Feeds a Crowd: I bake two pots for Sunday dinner and suddenly everyone’s fighting over the last slice.
- Pocket Change: Honestly, bread flour and yeast cost less than a coffee, and I get three meals out of it.
Step-by-Step Instructions for Flower Pot Bread
Here’s the method I use for perfect rustic bread with a fragrant herb center every time.
Step 1: Activate the Yeast and Prepare the Dough
In a large bowl, combine the 2.25 tsp Active Dry Yeast, 1 tbsp Granulated Sugar, and 1.5 cups Warm Water at 110-115°F. Let it sit for 5-10 minutes until the mixture becomes frothy and cloudy—this confirms the yeast is alive and active.
Stir in the 2 tbsp Extra-Virgin Olive Oil, 2 tsp Kosher Salt, and 4 cups Bread Flour until a shaggy dough forms. I find using a wooden spoon works best for this initial mixing. The dough will be sticky, but resist the urge to add more flour—this hydration level creates the perfect rustic texture.
Step 2: Knead and First Rise
Turn the dough onto a surface lightly dusted with 0.5 cup All-Purpose Flour. Knead for 8-10 minutes until smooth and elastic. You’ll notice the dough becomes more manageable as you work it, and it should spring back when poked lightly with a finger.
Place the dough in a lightly oiled bowl, cover with a damp towel, and let rise in a warm place for 1-2 hours or until doubled in size. I like to turn on my oven light to create the ideal environment. The dough is ready when it doesn’t spring back immediately after pressing with a finger.
Step 3: Prepare the Terracotta Pot and Herb Center
While the dough rises, prepare your terracotta pot by brushing the inside with 1 tbsp Extra-Virgin Olive Oil and dusting with 2 tbsp Cornmeal. This creates a non-stick surface and adds a subtle crunch to the crust.
For the herb center, melt the 2 tbsp Unsalted Butter and mix with finely chopped 2 tbsp Fresh Rosemary, stripped 2 tbsp Fresh Thyme leaves, and minced 4 cloves Garlic Cloves. The aroma alone will tell you this is going to be special.
Step 4: Shape, Fill, and Second Rise
Punch down the risen dough and divide it into two portions—one slightly larger than the other. Roll the larger portion into a round that fits your terracotta pot. Place it in the prepared pot and press down in the center to create a well.
Fill this well with your herb-butter mixture, then roll the smaller dough portion into a circle just large enough to cover the well. Press the edges to seal. Cover and let rise for 30-45 minutes until puffy—you’ll see the dough rising above the pot’s rim.
Step 5: Bake to Rustic Perfection
Preheat your oven to 400°F. Bake the bread for 35-40 minutes until the top is deep golden brown and sounds hollow when tapped. The cornmeal will create a beautiful, rustic crust that’s both crisp and tender.
Remove from the oven and let cool in the pot for 10 minutes, then transfer to a wire rack. The herb center will be fragrant and gooey—perfect for pulling apart. Serve warm for the ultimate experience, with the herb-infused butter oozing out with each tear.
Pro Tips For Making Flower Pot Bread
- Proof the Yeast: Always dissolve yeast in warm water (105-110°F) with a pinch of sugar first—I learned this the hard way after killing a batch with water that was too hot. Look for foamy bubbles within 5 minutes.
- Use Bread Flour: Skip all-purpose; bread flour’s higher protein content gives that chewy texture flower pot bread needs. My first loaf with AP flour was sad and dense.
- Salt Last: Add kosher salt after the yeast has foamed, or it can inhibit activation. I ruined a rise by mixing salt in too early—now I wait until the yeast is clearly alive.
- Preheat the Pot: Place your flower pot in the oven while it preheats to 450°F, then add the dough. This mimics a Dutch oven and guarantees a crisp crust—I was skeptical until I tried it.
Serving Suggestions for This flower pot bread
Warm Serving Style
Serve this bread straight from the oven while it’s still warm. The herb-infused center will be beautifully gooey, perfect for pulling apart. I love watching guests discover the fragrant rosemary and thyme surprise inside. 💛
Dipping Sauces
Offer a trio of dipping options: extra-virgin olive oil with balsamic vinegar, warm marinara sauce, or herb-infused butter. The bread’s crusty exterior holds up well to dipping without falling apart.
Soup Pairings
This rustic loaf pairs perfectly with hearty soups. Try it alongside minestrone, tomato basil, or creamy butternut squash. The bread soaks up broth beautifully while maintaining its structure.
Salad Accompaniment
For lighter meals, serve with a Caprese salad or arugula with lemon vinaigrette. The bread’s earthy notes complement fresh greens and tomatoes wonderfully. I often make this a summer lunch combo.
Cheese Board Addition
Add slices to a charcuterie board with aged cheddar, brie, and prosciutto. The herb center adds an unexpected flavor dimension that elevates the entire spread. 🌟
Breakfast Treat
Toast leftover slices and top with poached eggs or avocado. The herb butter melts into the warm bread, creating a gourmet breakfast with minimal effort. I make this for weekend brunches often.
Nutrition Facts
Frequently Asked Questions
Can I use an old terracotta pot with paint?
No, only use a clean, unused terracotta pot. Paint and chemical residues can be toxic. New pots cost under $5 at garden centers.
Why does my bread stick to the pot?
This usually means insufficient oil or cornmeal. Always brush the inside generously with oil and dust with 2 tbsp cornmeal before adding dough.
How can I tell when it’s done?
Look for a deep golden brown crust and a hollow sound when tapped. An internal temperature of 190-200°F confirms it’s fully baked.
Can I make this without herbs?
Yes, but the herb center adds signature flavor. Try substituting 1/2 cup grated Parmesan or caramelized onions instead.

- 6 Oz Chocolate Chip Cookie Recipe: Perfectly Balanced Crispy Edges and Chewy Hearts - September 25, 2026
- 6-Inch Coffee Cake Recipe: Vanilla Bean Swirls and Buttery Streusel Topping - September 25, 2026
- 1 Hour Soup Recipe: Velvety Richness Without the Wait - September 25, 2026