
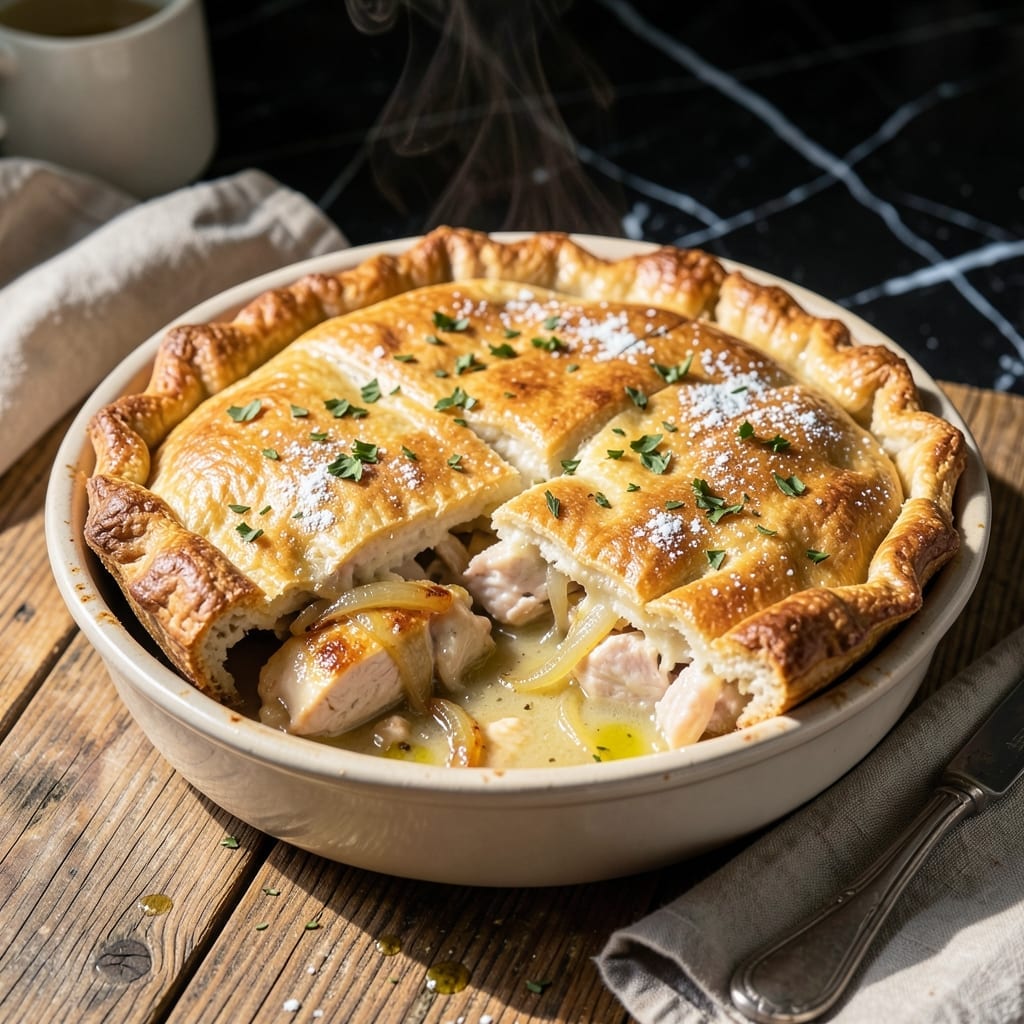
This pot pie delivers restaurant-quality comfort in a flaky, golden crust that shatters with every bite. I developed this version to capture the convenience of meal kits while elevating the final result with homemade precision.
The filling combines tender chicken, hearty vegetables, and a velvety sauce that thickens perfectly as it bakes. Each ingredient builds layers of flavor without overwhelming the delicate pastry shell.
What emerges from the oven is a dish with a crust so flaky it rivals any bakery, enclosing a creamy filling that bubbles enticingly. The contrast between crisp pastry and rich filling makes every bite satisfying.
Perfect for weeknight dinners or impressive enough for guests. Here’s how to make it.
Ingredients for Hello Fresh Pot Pie
Every ingredient here builds that restaurant-quality magic in a homemade package.
| Ingredient | Amount | Notes |
|---|---|---|
| Chicken Breast 🍗 | 1 ½ lb | Boneless, skinless, diced into bite-sized pieces |
| All-Purpose Flour 🌾 | ½ cup | For thickening the sauce |
| Unsalted Butter 🧈 | 6 tbsp | Divided for filling and crust |
| Chicken Stock 🥣 | 1 ½ cups | Low-sodium preferred for balance |
| Whole Milk 🥛 | ½ cup | For creamy sauce base |
| Yellow Onion 🧅 | 1 whole | Medium-sized, finely diced |
| Carrots 🥕 | 2 whole | Peeled and sliced into rounds |
| Celery Stalks 🌿 | 2 whole | Diced for aromatic base |
| Garlic Cloves 🧄 | 3 cloves | Minced for depth of flavor |
| Frozen Peas 🌱 | 1 cup | No need to thaw before adding |
| Fresh Thyme Leaves 🍃 | 1 tbsp | Stems removed, finely chopped |
| Salt 🧂 | 1 ½ tsp | Divided, Diamond Crystal kosher preferred |
| Black Pepper 🌶️ | ½ tsp | Freshly ground for best flavor |
| Puff Pastry 🥧 | 2 sheets | Store-bought, thawed but kept cold |
| Large Egg 🥚 | 1 whole | For egg wash on crust |
The puff pastry is non-negotiable for that flaky, bakery-style crust. Pepperidge Farm is my go-to—just thaw it overnight and keep it cold until rolling. For the chicken, boneless, skinless thighs work too (and stay juicier), but breasts are classic. Look for air-chilled if your Whole Foods carries it—better texture, no weird water retention. The thyme? Fresh makes a difference, but dried in a pinch (use one-third the amount).
Out of chicken stock? Vegetable stock plus a pinch of poultry seasoning gets you close. No fresh thyme? Dried rosemary adds a similar earthy note. Skip the peas? Sub in diced potatoes or corn—just par-cook them first. The milk can be swapped for half-and-half if you want extra richness (or whole milk if that’s what’s in the fridge). Don’t use pre-shredded carrots—they turn mushy.
Assemble the pot pie just before baking—no soggy crust. Leftovers? Reheat in the oven at 350°F for 15-20 minutes to crisp the pastry. Filling keeps 3-4 days in the fridge, but the crust is best fresh. Freeze unbaked pies for up to 2 months (add 5-10 minutes to bake time).
Why You’ll Love This Recipe
- One Pan Wonder: I love that everything cooks together—just toss the chicken, butter, and flour in one dish, pour in the stock and milk, and let the oven do the work.
- Rich Comfort: The buttery crust soaking up that creamy chicken and stock filling? Honestly, it’s the kind of meal that makes you sigh with the first bite.
- Feeds the Crew: Between us, this pot pie stretches easily for leftovers or a crowd—I’ve served it for Sunday dinner and weeknight meals with zero complaints.
- Budget Friendly: Chicken breast and pantry staples mean I can make this for under $10, and it still tastes like a restaurant-quality dish.
Step-by-Step Instructions for Chicken Pot Pie
Here’s the method that turns simple ingredients into a showstopping, flaky-crusted masterpiece.
Step 1: Sear the Chicken and Build the Aromatic Base
Heat 2 tablespoons of the unsalted butter in a large skillet over medium-high heat until it melts and foams. Add the 1.5 lb chicken breast pieces and sear for 4-5 minutes until lightly golden on all sides. You’re not cooking it through—just developing flavor. Remove the chicken to a plate and set aside.
In the same skillet, melt another 2 tablespoons of unsalted butter. Add the finely diced yellow onion, sliced carrots, and diced celery stalks. Cook for 5-6 minutes until the onion turns translucent and the vegetables begin to soften. Stir in the minced garlic cloves and fresh thyme leaves, cooking for another 30 seconds until fragrant.
Step 2: Create the Creamy Filling
Sprinkle the 0.5 cup all-purpose flour over the vegetables and stir to coat evenly. Cook for 1-2 minutes to remove the raw flour taste—this creates a roux that will thicken your filling beautifully. Gradually pour in the 1.5 cups chicken stock and 0.5 cup whole milk, whisking constantly to prevent lumps.
Bring the mixture to a simmer and cook for 3-4 minutes until it thickens to the consistency of heavy cream. Return the seared chicken to the skillet along with the 1 cup frozen peas. Season with 1.5 tsp salt and 0.5 tsp black pepper. Simmer for another 2-3 minutes until the chicken is cooked through and the peas are heated. Taste and adjust seasoning if needed.
Step 3: Assemble the Pot Pie with a Flaky Crust
Preheat your oven to 400°F. Unfold the 2 sheets puff pastry and use one to line a 9-inch pie dish or similar baking dish, pressing it gently into the bottom and up the sides. Trim any excess dough hanging over the edge. Spoon the chicken and vegetable filling into the pastry-lined dish, spreading it evenly.
Cut the second sheet of puff pastry into strips or use it whole to cover the top. If using a whole sheet, cut a few small slits to allow steam to escape. For a lattice effect, weave the strips over the filling. Press the edges to seal, then crimp with a fork. Whisk the large egg with 1 tablespoon water and brush it evenly over the top crust for a golden finish.
Step 4: Bake to Golden, Flaky Perfection
Place the assembled pot pie on a baking sheet to catch any drips. Bake for 25-30 minutes until the crust is deep golden brown and puffed, and the filling is bubbling hot beneath. If the top begins to brown too quickly, tent loosely with aluminum foil.
Let the pot pie rest for 10 minutes before serving. This allows the filling to set slightly, making it easier to slice. The crust should be crisp and flaky, with layers that separate beautifully. Serve warm, with each portion showcasing that perfect balance of creamy filling and buttery pastry.
Pro Tips For Making Hello Fresh Pot Pie
- Pre-Cook the Chicken: Poach the chicken breast in the chicken stock before shredding—it keeps the meat juicy and adds depth to the filling. I learned this the hard way after ending up with dry, stringy chicken in my first few attempts.
- Chill the Dough: Let the butter-flour crust rest in the fridge for at least 20 minutes before rolling it out. After burning a batch because the dough shrank, I finally figured out this step prevents a tough, uneven crust.
- Thicken the Filling: Cook the flour-butter roux for a full 2 minutes before adding the milk and stock. Sounds weird, but it works—this removes the raw flour taste and gives the filling a velvety texture.
- Vent the Pie: Cut a few small slits in the top crust before baking. My grandmother swore by this, and she was right: it lets steam escape so the filling doesn’t bubble over and make a mess.
Pro Cooking Tips for hello fresh pot pie
Roux Perfection
Cook your roux for 1-2 minutes after adding flour to the butter—this removes the raw taste and ensures a smooth, lump-free sauce. I use a flat wooden spoon to keep everything moving constantly. The mixture should turn a light golden color, not brown. 💡
Crust Temperature
Keep your puff pastry cold until the moment you use it. If it gets too warm, it won’t rise properly and you’ll lose that flaky texture. I chill my rolling pin too for extra insurance.
Steam Venting
Cut 3-4 small slits in the top crust to let steam escape. Without these, your pie might burst open in the oven. For lattice tops, leave small gaps between strips. This prevents soggy bottom crusts.
Egg Wash Trick
For extra shine, whisk your egg wash with 1 tbsp cold water instead of milk. I brush it on twice—once before baking and once halfway through. The result is a deeper golden color.
Oven Position
Bake on the lower-middle rack for even heat distribution. Place a baking sheet underneath to catch any filling that bubbles over. Rotate the pie 180° halfway through for uniform browning.
Resting Time
The 10-minute rest after baking is non-negotiable. This lets the filling thicken so it doesn’t run out when sliced. I set a timer to resist the urge to dive in too soon. 🔥
Nutrition Facts
Frequently Asked Questions
Can I use store-bought pie crust instead of puff pastry?
Yes, but the texture will differ. Puff pastry creates those flaky layers, while pie crust is more dense. For best results, use all-butter puff pastry and keep it cold.
How do I prevent the bottom crust from getting soggy?
Blind-bake the bottom crust for 10 minutes before adding filling. Also, ensure your filling is thick enough to avoid excess moisture. A baking sheet underneath helps too.
Can I make this ahead of time?
Assemble the pie but don’t bake it. Refrigerate for up to 24 hours or freeze for 2 months. Add 5-10 minutes to baking time if frozen.
What can I substitute for chicken?
Turkey, pork, or even mushrooms work well. For vegetarian, try chickpeas or tofu. Adjust cooking time for denser ingredients like root vegetables.

- 4C Bread Crumbs Meatballs Recipe: Crispy Crust and Juicy Centers - September 25, 2026
- 6 Oz Chocolate Chip Cookie Recipe: Perfectly Balanced Crispy Edges and Chewy Hearts - September 25, 2026
- 6-Inch Coffee Cake Recipe: Vanilla Bean Swirls and Buttery Streusel Topping - September 25, 2026