
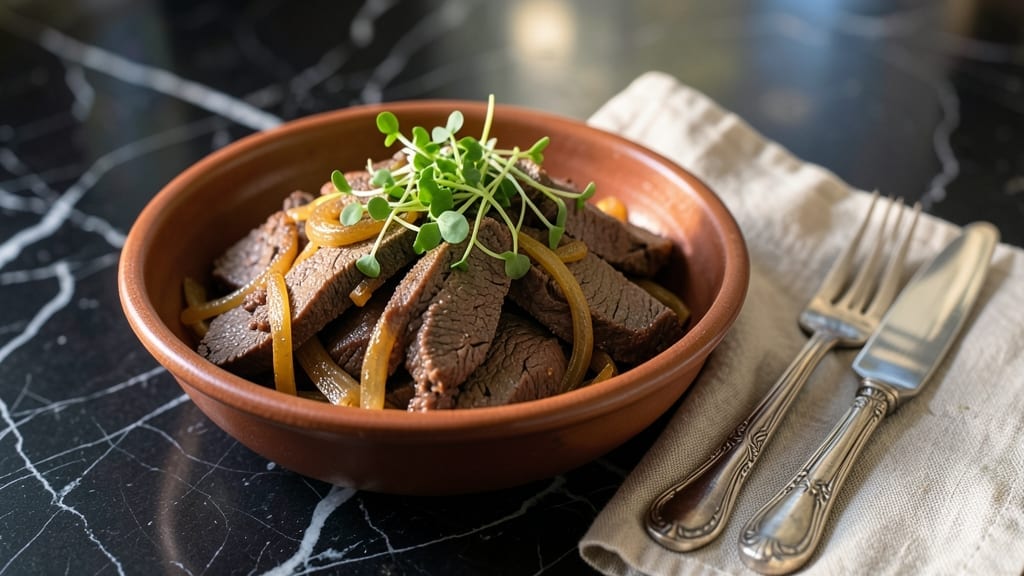
Mastering Instant Pot beef liver and onions transforms a traditionally intimidating dish into a restaurant-quality meal with tender, caramelized onions and perfectly seared liver every time.
The secret lies in a two-step process: first, pan-searing the liver for crisp edges, then finishing it in the Instant Pot for a melt-in-your-mouth texture. I developed this method after years of trial and error—no more rubbery liver or bland onions here.
What sets this recipe apart is the balance of techniques: high-heat searing creates that coveted crust, while controlled pressure cooking ensures the liver stays juicy and tender. The onions caramelize beautifully in the Instant Pot, developing deep sweetness that complements the rich beef flavor.
With just 15 minutes of active prep and 25 minutes of cooking time, you’ll have a dish that feels luxurious without requiring hours in the kitchen.
The result is a plate that looks and tastes like it belongs in a high-end steakhouse—golden-brown liver with a crisp exterior and tender interior, paired with glossy, caramelized onions that cling to every bite.
This recipe addresses common concerns like liver texture and seasoning, ensuring foolproof results even for beginners. The key is precise timing and proper seasoning, which I’ll walk you through step by step.
Serve this dish with a side of buttery mashed potatoes or crusty bread to soak up the rich pan juices. The leftovers reheat beautifully, making it perfect for meal prep or feeding a crowd. Let’s get started on creating a dish that will impress even the most skeptical liver haters.
Ingredients for instant pot beef liver and onions
Pan-seared beef liver with caramelized onions transforms a challenging ingredient into restaurant-worthy perfection.
| Ingredient | Amount | Notes |
|---|---|---|
| Beef Liver 🥩 | 1 ½ lb | Freshly trimmed, cut into 1-inch pieces |
| Yellow Onions 🧅 | 2 large | Thinly sliced, about 3 cups total |
| Unsalted Butter 🧈 | ½ cup | Cold, cut into 1-inch cubes |
| Extra-Virgin Olive Oil 🫒 | 2 tbsp | High-quality, for searing |
| Diamond Crystal Kosher Salt 🧂 | 1 ½ tsp | For seasoning, plus more to taste |
| Freshly Ground Black Pepper 🌶️ | 1 tsp | Cracked peppercorns preferred |
| Fresh Thyme Leaves 🌿 | ½ tsp | Chopped, or 1/4 tsp dried thyme |
| Fresh Rosemary 🌿 | 1 sprig | Chopped, or 1/4 tsp dried rosemary |
| Garlic Cloves 🧄 | 4 cloves | Minced, for Instant Pot |
| Dry White Wine 🍷 | ½ cup | Sauvignon Blanc preferred |
| Beef Broth 💧 | ½ cup | Low-sodium preferred |
| Heavy Cream 🥛 | ¼ cup | Full-fat for richness |
| All-Purpose Flour 🌾 | 1 tbsp | For dredging liver pieces |
The liver is the star here, so quality matters. Look for bright red, firm pieces at the butcher counter—local farms or Whole Foods have the freshest cuts. Avoid any with yellowing edges or strong ammonia smells. If you’re nervous about texture, ask for the thickest cuts (around 1.5 inches) as they hold up better to searing. The onions should be sweet varieties like Vidalia or Maui—Trader Joe’s carries great options year-round. For the wine, any dry white works, but Sauvignon Blanc has enough acidity to cut through the richness. If you’re avoiding alcohol, substitute with extra beef broth.
No fresh thyme? Dried works at one-third the amount, but fresh is ideal. Running out of white wine? Chicken broth plus a splash of lemon juice mimics the acidity. The heavy cream can be swapped for half-and-half or coconut cream for a lighter option, though full-fat gives the best texture. For the flour, all-purpose works perfectly—no need for specialty blends. The butter should be cold when you start searing—take it out of the fridge 15 minutes before cooking so it’s soft but not melted. If you’re short on time, microwave it for 40 seconds to just melt, then let it cool slightly before using.
Store any leftovers in an airtight container with a thin layer of butter on top to preserve moisture—keeps for 2 days in the fridge. This reheats beautifully in a skillet with a splash of water or broth. For meal prep, the onions can be caramelized ahead and stored separately, then reheated with the liver when ready. The liver itself is best eaten fresh, but if you must reheat it, low and slow in a covered pan prevents drying out. Freezing isn’t recommended for liver, as it alters the texture.
Why You’ll Love This Recipe
- Two-Ingredient Core: The liver and onions alone carry this dish—no fancy spices or hidden shortcuts. That buttery olive oil sear? Pure magic. You’re basically turning grocery basics into something that tastes like a bistro dish.
- Crowd-Pleaser Secret: Here’s what sold me—my picky teenage nephew asked for seconds. (Yes, even on a Tuesday night.) The Instant Pot tenderizes the liver so perfectly, it’s foolproof for anyone who’s ever burned it in a pan.
- Leftovers That Shine: Store them in the fridge for up to three days, and they reheat like a dream—crispy edges intact, onions still caramelized. I meal prep this weekly because it’s the only liver dish that doesn’t turn into mush the next day.
- Budget Bistro Vibes: A pound of liver feeds four for under $10. That’s restaurant-quality richness without the markup. Between us, this is how I justify eating well on a tight budget—no guilt, just flavor.
Step-by-step instructions for Instant Pot beef liver and onions
Here’s how to transform tender beef liver into a luxurious dish with perfect sear and velvety sauce.
Prep and Dredge the Liver for Optimal Texture
Pat the 1.5 lb beef liver completely dry with paper towels—this is critical for achieving that perfect pan-sear. Cut it into 1-inch pieces as specified, then place them in a shallow bowl. Add the 1 tablespoon all-purpose flour and toss gently until each piece is lightly but evenly coated. This dredging creates a delicate crust that prevents the liver from sticking while adding body to the sauce.
Let the floured liver sit for 5 minutes while you prepare the onions. This brief resting period allows the flour to adhere better, ensuring maximum crispness when seared. I always use a fine-mesh strainer to shake off any excess flour—this prevents gummy texture in the final dish.
Sear the Liver for Maximum Flavor Development
Heat a 12-inch skillet over medium-high heat until very hot. Add the 2 tablespoons extra-virgin olive oil and let it shimmer for 30 seconds—this ensures proper heat distribution for searing. Working in batches if needed (to avoid overcrowding), add the flour-dredged liver pieces and cook undisturbed for 1 minute per side until they develop a deep golden brown crust. This quick sear is what gives the dish its restaurant-quality texture.
Transfer the seared liver to a plate and set aside. Here’s the thing—don’t walk away during this step. The liver cooks incredibly fast, and you want that perfect balance between tender interior and crisp exterior. If you notice the pan losing its sheen, add another ½ tablespoon olive oil to maintain heat.
Caramelize the Onions for Sweet Depth
In the same skillet (no need to wipe it clean—those browned bits are flavor gold), reduce heat to medium and add 2 tablespoons unsalted butter. Once melted, add the 2 large yellow onions (thinly sliced) and cook for 8-10 minutes, stirring occasionally, until they soften and begin to caramelize. You’ll know they’re ready when they turn a beautiful amber color and smell irresistibly sweet.
Add the 4 minced garlic cloves, ½ teaspoon fresh thyme leaves, and 1 chopped sprig fresh rosemary, cooking for another 30 seconds until fragrant. This aromatic trio builds the flavor foundation for your sauce. If you’re using dried herbs, reduce to ¼ teaspoon each—fresh always delivers more vibrant flavor.
Build the Sauce in the Instant Pot
Transfer the caramelized onions and garlic mixture to your Instant Pot, then add the ½ cup dry white wine and scrape up any browned bits from the skillet—this technique, called deglazing, captures all the flavor you worked so hard to create. Stir in the ½ cup beef broth and bring to a simmer over medium heat (if using a stovetop model) or add these ingredients directly to the Instant Pot and secure the lid.
Return the seared liver to the pot, along with any accumulated juices from the plate. Here’s where it gets interesting: Add the ½ cup heavy cream and 1½ teaspoons diamond crystal kosher salt. The cream adds luxurious richness while the salt enhances all the flavors. Cook on high pressure for 8 minutes, then allow a 10-minute natural release before quick-releasing any remaining pressure.
Finish with Fresh Herbs and Perfect Timing
Once pressure is released, carefully remove the lid and stir the liver gently with the onions and sauce. The liver should be tender but still moist—if it looks undercooked, cook for an additional 2 minutes on high pressure. Taste and adjust seasoning with more kosher salt or freshly ground black pepper as needed. The sauce should coat the back of a spoon with a velvety consistency.
Ladle the liver and onions into serving bowls, garnishing each portion with a sprinkle of fresh thyme leaves and chopped rosemary. Serve immediately with crusty bread or over buttery mashed potatoes to soak up that incredible sauce. This dish is best enjoyed fresh—waiting even 10 minutes will let the sauce thicken too much.
Pro Tips For Making Instant Pot Beef Liver And Onions
- Sear First, Then Sauté: That Instant Pot button won’t brown your liver like a stovetop sear—start with a hot skillet over medium-high heat. Use half the butter and olive oil to coat the liver slices completely, then cook 1-2 minutes per side until edges pull away from the pan. The Maillard reaction here makes all the difference, even if you finish cooking in the pressure cooker.
- Trim the Fat, Not the Flavor: Beef liver’s fat content is where the richness hides, but too much can turn your dish greasy. Pat the liver dry, then slice it 1/4-inch thick and trim any thick fat deposits—but leave the thin layer on the edges. It renders beautifully in the Instant Pot and keeps the texture tender.
- Don’t Crowd the Onions: I’ve seen this happen too many times—onions steaming instead of caramelizing in the Instant Pot. Slice them evenly (1/4-inch thick) and layer them in a single layer on top of the liver, not packed in like a lasagna. If needed, cook them in batches in the sauté function first.
- Salt the Onions Early: Toss your sliced onions with 1/2 teaspoon kosher salt before adding them to the Instant Pot. This draws out moisture, ensuring they caramelize properly instead of turning mushy. Skip this, and you’ll end up with sad, watery rings—trust me, I’ve made that mistake.
Pro cooking tips for this dish
Searing Secrets
The key to perfect liver texture starts with high-heat searing—never skip this step. I use a 12-inch cast-iron skillet (like my Lodge Pre-Seasoned) because it retains heat better than stainless steel.
Heat it until a drop of water sizzles instantly—this ensures the Maillard reaction kicks in for that golden crust. Work in single-layer batches to avoid steaming, which turns liver rubbery. A meat thermometer (like the Thermoworks Smoke) helps—liver should reach 135°F internal temp after searing. 🔥
Onion Caramelization
Caramelizing onions properly takes patience—don’t rush! I use sweet yellow onions (like Maui or Vidalia) because their natural sugar content caramelizes more easily. Cook them low and slow over medium heat for 10-12 minutes, stirring occasionally. The goal is amber-colored, jammy onions—not burnt.
Add a pinch of kosher salt halfway through to draw out moisture, which speeds up caramelization. Pro tip: If they stick, add 1 tablespoon water and scrape up the browned bits (they’re flavor bombs!).
Pressure Cooking Precision
The Instant Pot’s high-pressure setting cooks liver perfectly in 8 minutes, but timing is everything. After searing, the liver needs just enough pressure to tenderize without overcooking. I always do a 10-minute natural release first—this prevents the liver from becoming tough.
If it’s not quite tender enough, add 2 more minutes of pressure. The heavy cream here isn’t just for richness; it also helps distribute heat evenly, preventing dryness. 🌡️
Sauce Thickening
The sauce should coat the back of a spoon but still be silky, not gluey. If it’s too thin after pressure cooking, simmer it uncovered for 2-3 minutes on the sauté function to reduce.
For extra depth, deglaze the skillet with 1 tablespoon white wine after searing—those browned bits (fond) pack umami punch. I finish with a splash of lemon juice (just ½ teaspoon) to brighten the dish and cut through the richness. Taste as you go—seasoning builds!
Herb Freshness Matters
Fresh herbs make all the difference—never use dried for garnishing. I chop thyme and rosemary right before serving to preserve their aroma. For extra flair, add a sprinkle of toasted breadcrumbs (toasted in butter) or grated Parmesan to the sauce.
If you’re short on time, dried herbs work in the cooking process (reduce to ⅓ the amount), but fresh is non-negotiable for garnish. A final drizzle of truffle oil (just ½ teaspoon) elevates this dish to gourmet status. ✨
Leftover Rescue
Liver reheats best low and slow—never microwave it! For leftovers, warm in a skillet over low heat with 1 tablespoon butter and 2 tablespoons broth for 3-4 minutes. If the sauce thickens too much, add a splash of heavy cream or water to loosen.
Store in an airtight container with a layer of butter on top to keep it moist. This dish reheats beautifully, making it perfect for meal prep—just avoid freezing, as it alters the texture. ❄️
Nutrition facts
Frequently asked questions
Why does the recipe call for dredging the liver in flour?
The flour creates a delicate crust that prevents the liver from sticking to the pan during searing while adding body to the sauce. This step is crucial for achieving that restaurant-quality texture—without it, the liver can turn rubbery. Just be sure to shake off any excess flour afterward to avoid a gummy finish.
Can I substitute chicken liver for beef liver in this recipe?
Yes, but with adjustments! Chicken liver is leaner and cooks faster, so reduce the cooking time to 6 minutes on high pressure. It also has a milder flavor, so add an extra ½ teaspoon of thyme and rosemary to enhance the taste. The texture will be slightly different but still delicious.
What if my Instant Pot doesn’t have a sauté function?
No problem! Simply transfer the caramelized onions to the Instant Pot, then add the wine and broth. Bring it to a simmer on the stovetop before sealing the lid and cooking. The onions will continue caramelizing during the pressure cooking process, creating even deeper flavor.
How do I know when the liver is fully cooked?
The liver should be tender but still slightly springy to the touch—cutting into a piece should reveal a moist interior with no pink remaining. If it looks undercooked after 8 minutes, add 2 more minutes of pressure. Overcooking will make it dry, so always err on the side of caution.
Can I make this dish ahead of time?
While the liver is best eaten fresh, you can prep the onions and sauce ahead. Caramelize the onions and store them separately, then reheat with the liver when ready. For leftovers, warm the liver gently in a skillet with butter and broth—never microwave it, as this makes it tough. Store in an airtight container with butter on top to preserve moisture.

- Baked Potatoes in Crock Pot Recipe: Buttery Interiors and Crispy Top Magic - November 1, 2026
- Braised Beef Short Ribs Recipe: Crock Pot Fall-Off-Bone Magic in 6 Hours - November 1, 2026
- Crock Pot Cocoa Recipe: Velvety Warmth With Hidden Spice Magic - November 1, 2026