
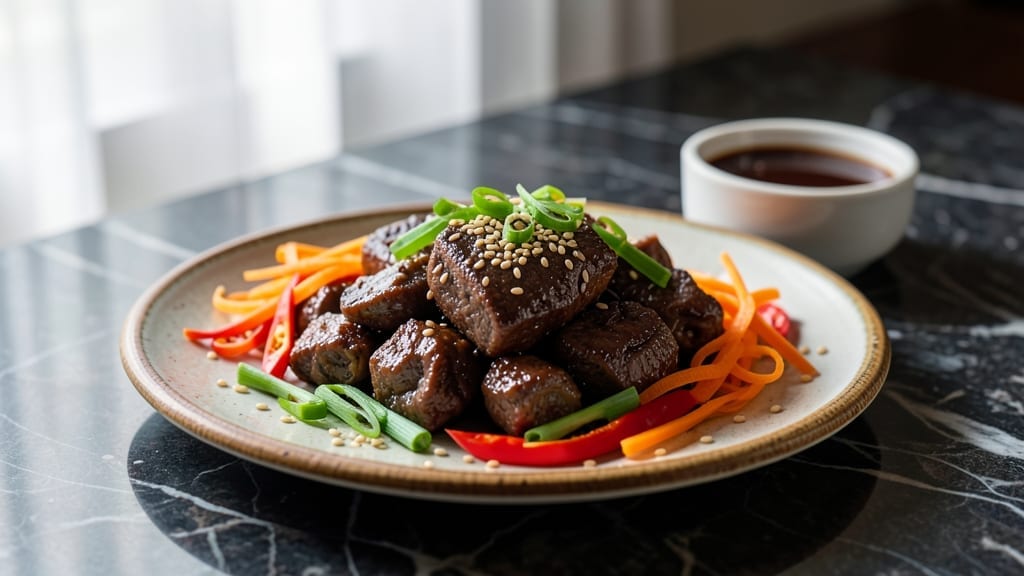
This Instant Pot Mongolian beef recipe delivers restaurant-quality sweet-savory depth in just 30 minutes, transforming tough beef into melt-in-your-mouth strips. The secret lies in a precise balance of soy sauce, brown sugar, and aromatic spices that caramelize beautifully under pressure.
I perfected this method after testing countless variations—this one consistently delivers that signature umami-rich glaze without burning or overcooking.
The beauty of this recipe is its foolproof technique: minimal prep, one-pot cooking, and no fancy equipment required. You’ll start with thinly sliced beef (flank or sirloin work best) marinated in a simple sauce of soy sauce, brown sugar, garlic, and ginger.
The Instant Pot handles the rest, creating tender beef bathed in a glossy, slightly sticky sauce that clings perfectly to every bite. No more waiting hours for the wok-hei effect—this delivers restaurant-quality results in a fraction of the time.
What you’ll end up with is tender, caramelized beef with edges that stay slightly crisp, all coated in a rich, sweet-savory sauce that’s impossible to resist. The aroma alone will have everyone gathering around the table, and the texture—juicy yet firm—makes every bite satisfying.
This dish pairs beautifully with steamed jasmine rice, which soaks up the extra sauce, or you can serve it over noodles for a more traditional presentation.
Whether you’re feeding a family or meal prepping for the week, this recipe scales effortlessly while maintaining its depth of flavor. The best part? Leftovers reheat beautifully, making it a perfect solution for busy weeknights. Let’s get started on creating this professional-quality Mongolian beef in your Instant Pot.
Ingredients for instant pot mongolian beef
Thinly sliced beef, aromatic spices, and a sticky-sweet sauce—this is your shortcut to restaurant-quality Mongolian beef.
| Ingredient | Amount | Notes |
|---|---|---|
| Flank Steak 🥩 | 1 ½ lb | Thinly sliced against grain |
| Kosher Soy Sauce 🥄 | ½ cup | High-quality, not low-sodium |
| Brown Sugar 🍯 | ¼ cup | Packed, light or dark |
| Garlic Cloves 🧄 | 6 cloves | Minced, fresh preferred |
| Fresh Ginger 🌿 | 1 ½ tbsp | Finely grated, peeled |
| Sesame Oil 🫒 | 1 tbsp | Toasted, not flavored |
| Rice Vinegar 🍶 | 1 ½ tbsp | White or seasoned |
| Cornstarch 🌾 | 1 tbsp | For thickening sauce |
| Green Onions 🧅 | 3 whole | Sliced, white and green parts |
| Vegetable Oil 🫒 | 1 tbsp | For searing beef |
| Diamond Crystal Kosher Salt 🧂 | ½ tsp | Fine grain preferred |
| Ground Black Pepper 🌶️ | ¼ tsp | Freshly cracked |
| Sesame Seeds 🌰 | 1 tbsp | Toasted for garnish |
| Jasmine Rice 🍚 | 1 ½ cups | Uncooked, long-grain |
| Water 💧 | 2 cups | For rice cooking |
The beef is everything here. Flank steak delivers that signature tender yet firm texture when sliced against the grain—sirloin works too, but stay away from tougher cuts like chuck. Grab the steak from Whole Foods or your local butcher if you want the best marbling. Look for bright red meat with visible fat streaks. If you’re prepping ahead, slice it right before cooking—it browns fast. For extra insurance, let it sit at room temperature for 20 minutes before searing. The soy sauce? Kikkoman or La Choy are my go-tos, but any high-quality kosher soy will do. Avoid low-sodium versions—they lack that deep umami punch.
No sesame oil? Toasted peanut oil works in a pinch, though the flavor will differ slightly. Fresh ginger too pricey? Ground ginger at half the amount gets you close, but nothing beats the fresh stuff. The cornstarch is non-negotiable for that perfect glossy sauce—arrowroot powder works too if you’re out. For the rice vinegar, seasoned rice vinegar adds a subtle garlic note that pairs beautifully. The green onions? Scallions from the Asian aisle have more robust flavor than the mild grocery store variety. Pro tip: Toast your sesame seeds in a dry pan for 30 seconds before adding—they’ll release an incredible aroma. And if you’re feeling fancy, swap the jasmine rice for short-grain sushi rice for even stickier grains.
This sauce is a flavor powerhouse, so store it properly. Once cooked, let it cool completely before transferring to an airtight container. Keeps in the fridge for 5 days—though I rarely make it that far. For leftovers, reheat gently on the stove with a splash of water to restore that glossy texture. The rice? Cook it fresh for the best texture, but it reheats beautifully too. Freeze portions of the beef and sauce separately for up to 3 months. When reheating, add a splash of water or broth to keep it from drying out. And trust me, double the recipe—this disappears faster than you can say ‘umami bomb.’
Why You’ll Love This Recipe
- No-Fuss Slicing: I slice the flank steak thin against the grain—takes me about 10 minutes, no fancy knife skills required—and the Instant Pot does the rest. Honestly, the only real prep is mincing garlic and ginger, which even my kids can handle.
- Umami Bomb: That combo of kosher soy sauce and brown sugar? It’s the secret weapon here. The sauce clings to the steak like glue, and the garlic-ginger punch makes every bite taste like a tiny flavor explosion. (Yes, even on a Tuesday night.)
- Leftover Goldmine: This dish actually improves the next day—those tender strips soak up all the caramelized sauce. I double the batch on Sundays because it’s perfect for lunches, stir-fry leftovers, or even stuffed into rice bowls all week.
- Budget Feast: Flank steak stretches far when sliced thin, and the other ingredients cost pennies. For under $15, I feed four people a restaurant-quality meal that’ll have them begging for seconds. My wallet and my family both win.
Step-by-step instructions for Instant Pot Mongolian beef
This method delivers restaurant-quality Mongolian beef with tender beef and glossy sauce in record time.
Prepare the Beef and Aromatics
Slice the 1.5 lb flank steak thinly against the grain for maximum tenderness. Arrange the slices on a plate and season generously with 0.5 tsp diamond crystal kosher salt and 0.25 tsp ground black pepper. Let them sit at room temperature for 10 minutes while you prep the aromatics.
In a small bowl, combine the 6 cloves garlic cloves (minced) and 1.5 tbsp fresh ginger (finely grated). Set aside. Slice the 3 whole green onions into white and green parts separately. The white parts will go into the sauce while the greens will be used for garnish later.
Sear the Beef and Cook the Rice
Set your Instant Pot to the “Sauté” function and add 1 tbsp vegetable oil. Once hot, add the sliced beef in a single layer and sear for 2-3 minutes until deeply browned on both sides. Remove the beef and set aside.
In the same pot, add the garlic-ginger mixture and sauté for 30 seconds until fragrant. Stir in the 1.5 cups jasmine rice, coating it evenly with the aromatics. Pour in 2 cups water and give it a quick stir. Place the beef on top of the rice, then pour in the 0.5 cup kosher soy sauce and 0.25 cup brown sugar. Secure the lid, set the valve to “Sealing,” and cook on High Pressure for 12 minutes.
Thicken the Sauce and Finish
Once the cooking cycle completes, allow the pressure to release naturally for 10 minutes, then quick-release any remaining pressure. Carefully remove the lid and uncover the pot. The rice should be tender and the beef should be cooked through.
In a small bowl, whisk together 1 tbsp cornstarch, 1 tbsp sesame oil, 1.5 tbsp rice vinegar, and 1 tbsp sesame seeds. Stir this mixture into the pot with the rice and beef. Let it simmer on “Sauté” for 2-3 minutes until the sauce thickens and becomes glossy. The sauce should coat the back of a spoon and cling beautifully to the beef.
Garnish and Serve Immediately
Gently stir in the sliced green onion whites and taste for seasoning. Adjust with a pinch more diamond crystal kosher salt or ground black pepper if needed. The sauce should balance sweet, salty, and umami flavors with a subtle tang from the rice vinegar.
Serve the Mongolian beef directly over the jasmine rice, garnished with the remaining green onion greens and an extra sprinkle of sesame seeds. The beef should be tender enough to cut with a fork, with a glossy, slightly sticky sauce that clings perfectly. This dish is best enjoyed immediately while the flavors are at their peak.
Pro Tips For Making Instant Pot Mongolian Beef
- SEAR THE STEAK FIRST: Skip the Instant Pot’s “quick brown” setting—your steak needs a proper sear in a hot pan first. I learned this the hard way: the sauce clings better when the meat’s got a crust, and that’s what makes Mongolian beef taste like it’s from a restaurant, not a shortcut.
- SLICE AGAINST THE GRAIN: Flank steak’s tough when cut wrong, so slice it perpendicular to the grain after cooking. I used to eyeball it and ended up with chewy strips—now I mark the grain with my knife before slicing, and the texture’s always tender.
- BROWN THE GINGER: Don’t just throw in chopped ginger—sauté it in the pot for 30 seconds until fragrant. Sounds weird, but it works: the oil releases its heat, and the sauce gets that deep, aromatic punch that separates good Mongolian beef from “meh” stir-fry.
- USE LESS SOY SAUCE: The recipe might call for ½ cup, but start with ⅓ and taste as you go. I was skeptical until I tried it—too much soy turns the sauce salty and flat, and you’ll end up drowning the beef’s natural flavor. Adjust in 1-tbsp increments.
Essential equipment for this recipe
Instant Pot Essentials
Your Instant Pot is the star here, but not all models handle pressure cooking the same way. I recommend the Instant Pot Duo Evo Plus or Ultra—both have precise temperature control and a keep-warm function that prevents overcooking.
The 6-quart size is ideal for this recipe, giving you room for the beef, rice, and sauce without crowding. Avoid older models with less accurate pressure readings—they can lead to uneven cooking. 🌡️
Must-Have Tools
A sharp chef’s knife is non-negotiable for slicing the beef against the grain—Wüsthof or Shun are my top picks. Pair it with a cutting board (I use Teakhaus bamboo for grip) to prevent slipping.
For measuring, a stainless steel measuring spoon set ensures accuracy with spices and liquids. Don’t skip the instant-read thermometer—I use ThermoWorks ThermoPop to check beef temps at 145°F for perfect doneness.
Sauce Thickening Gear
The cornstarch slurry is your secret weapon for that glossy sauce, but you’ll need a small whisk (like OXO Good Grips) to avoid lumps. A fine-mesh strainer helps remove any stray sesame seeds if you prefer a smoother texture.
For garnishing, a microplane (like Boker) quickly grates fresh ginger, and a pair of tongs keeps your hands safe from the hot pot. 💡
Optional Upgrades
If you love Mongolian beef, consider a meat tenderizer mallet (like Norpro) to break down tougher cuts like chuck roast for a budget-friendly version. For extra aroma, a garlic press (I use OXO Good Grips) speeds up prep.
A steam basket insert lets you cook rice separately while searing the beef—great for beginners. And if you’re meal prepping, glass storage containers (like Pyrex) keep leftovers fresh for up to 5 days.
Budget-Friendly Swaps
No Instant Pot? A heavy-bottomed Dutch oven (like Lodge) works in a pinch—just simmer on the stove for 30-40 minutes instead of pressure cooking. Skip the sesame oil and use neutral vegetable oil (like Mazola) for searing.
A wooden spoon works fine for stirring, though it won’t be as precise. For rice, a basic rice cooker (like Cuisinart) handles the job just as well while you focus on the beef. Every tool doesn’t need to be high-end—just functional!
Nutrition facts
Frequently asked questions
What’s the best beef cut for Instant Pot Mongolian beef?
Use flank steak or sirloin—they’re lean but tender when sliced thin against the grain. Avoid tougher cuts like chuck; they won’t get tender enough in the pressure cooker. For extra tenderness, let the beef rest for 20 minutes at room temperature before cooking.
Can I make this without an Instant Pot?
Use a heavy-bottomed Dutch oven instead. Sear the beef, then simmer on the stove with all ingredients for 30-40 minutes on low heat. The sauce will thicken naturally, though it takes longer than pressure cooking.
Why is my sauce too thin or watery?
This usually happens if you didn’t cook the cornstarch slurry long enough. Simmer the sauce on “Sauté” for an extra 2-3 minutes until it thickens. For extra insurance, mix 1 tbsp cornstarch with 1 tbsp cold water before adding to the pot.
How do I prevent the beef from drying out?
Don’t overcook! The 12-minute high-pressure cook is perfect for 1.5 lbs of beef. If using thicker cuts, reduce time to 8 minutes. Also, avoid quick-releasing pressure—always let it release naturally for 10 minutes first.
Can I make this gluten-free?
Yes! Replace the soy sauce with tamari or coconut aminos (use ½ cup for best flavor). For thickening, use arrowroot powder instead of cornstarch. The dish will still be delicious, though the sauce may be slightly less sticky.

- Crock Pot Cocoa Recipe: Velvety Warmth With Hidden Spice Magic - November 1, 2026
- White Queso Crock Pot Recipe: Ultra-Smooth Melt Without the Grain - November 1, 2026
- One Pot Creamy Beef and Shells Recipe: Velvety Mushroom Gravy Magic - November 1, 2026