
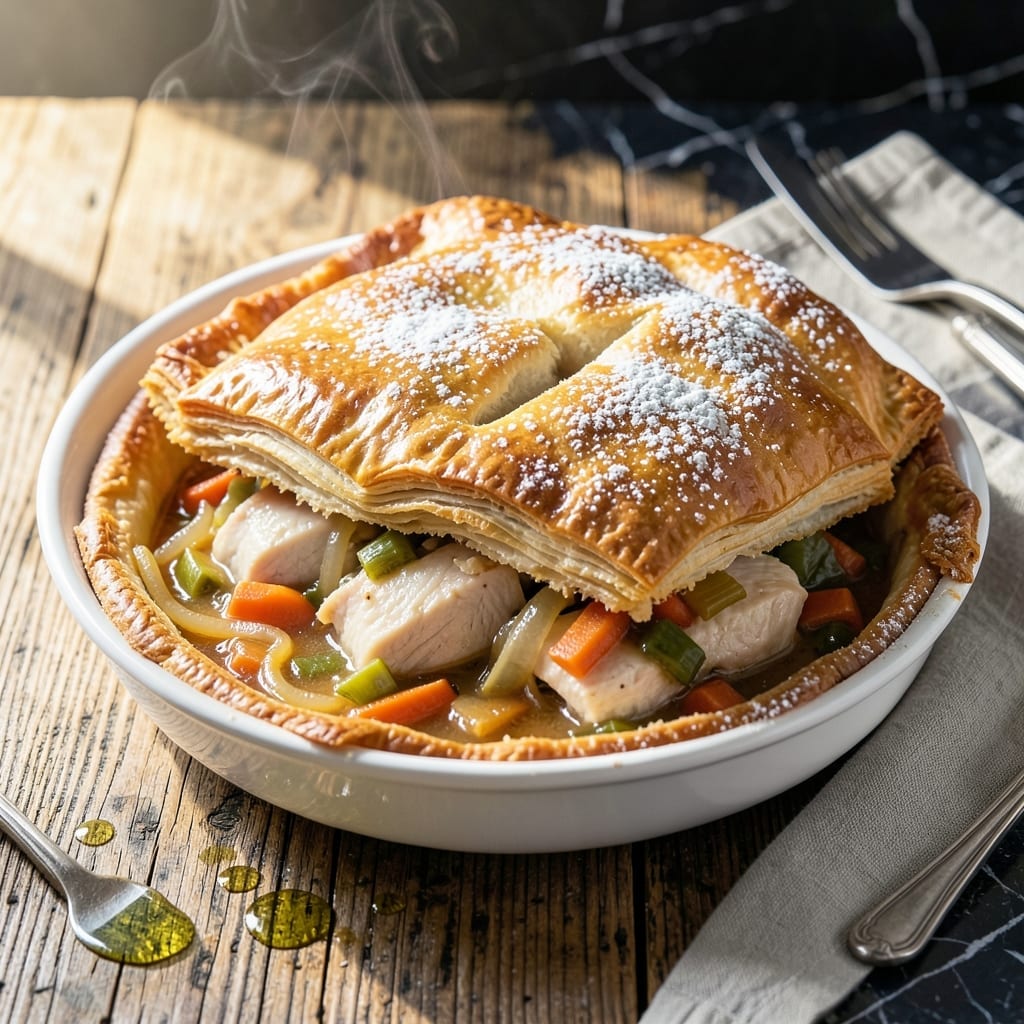
There’s something deeply satisfying about a pot pie with a golden puff pastry crust encasing a rich, savory filling. This method delivers professional results with layers of flaky pastry that bake to perfection every time.
The key is using store-bought puff pastry, which eliminates the guesswork while still providing that impressive, bakery-quality finish. A simple egg wash ensures the top turns deep golden brown and adds a subtle sheen that makes it irresistible.
Inside, the filling stays creamy and flavorful, perfectly balanced with the buttery, crisp pastry. The contrast between the tender filling and the crisp layers of crust is what makes this dish unforgettable.
This approach is straightforward yet yields results that taste like they came from a gourmet kitchen. The process is as rewarding as the final product.
Ingredients for Pot Pie Puff Pastry Crust
Store-bought puff pastry plus fresh vegetables and herbs create this impressive layered dish with minimal effort.
| Ingredient | Amount | Notes |
|---|---|---|
| Store-Bought Puff Pastry 🥧 | 2 sheets | Thawed in refrigerator overnight |
| Chicken Breast 🍗 | 1 ½ lb | Boneless, skinless, diced into 1-inch pieces |
| Carrots 🥕 | 2 whole | Peeled and diced |
| Celery Stalks 🌿 | 2 whole | Diced, leaves included |
| Yellow Onion 🧅 | 1 whole | Finely chopped |
| Garlic Cloves 🧄 | 3 cloves | Minced |
| Unsalted Butter 🧈 | ½ cup | Divided for cooking and roux |
| All-Purpose Flour 🌾 | ⅓ cup | For thickening roux |
| Chicken Broth 🥣 | 2 cups | Low-sodium preferred |
| Whole Milk 🥛 | ½ cup | For creamy filling |
| Frozen Peas 🌱 | 1 cup | No need to thaw |
| Fresh Thyme 🌿 | 1 tbsp | Chopped, stems discarded |
| Salt 🧂 | 1 tsp | Kosher or sea salt |
| Black Pepper 🌶️ | ½ tsp | Freshly ground preferred |
| Large Egg 🥚 | 1 whole | For egg wash |
For optimal results, use all-butter puff pastry—Dufour and Pepperidge Farm are reliable brands with excellent flakiness. Thaw the pastry in the refrigerator overnight (not at room temperature) to prevent sticking. The chicken breast should be boneless and skinless for even cooking, and look for pieces with consistent thickness. Fresh thyme adds depth, but Whole Foods or local farmers markets have the best quality herb bundles.
No fresh thyme? Dried thyme at one-third the amount works, though the flavor will be more concentrated. Substitute rotisserie chicken for a time-saving shortcut—shred about 3 cups. For a vegetarian version, swap chicken for cremini mushrooms (about 12 oz). The milk can be whole or 2%, but avoid skim as it lacks the richness needed for the filling. Frozen mixed vegetables can replace peas and carrots if preferred.
Assemble the pot pie just before baking for the crispiest crust. Leftovers keep in the fridge for 3-4 days and reheat beautifully in a 350°F oven for 15-20 minutes. The unbaked filling can be prepped a day ahead and stored separately, making this ideal for meal prep.
Why You’ll Love This Recipe
- No-Fuss Assembly: I just roll out the puff pastry, dump in the chicken and veggie filling, and fold—no pie crust stress here.
- Flaky, Creamy Heaven: That buttery puff pastry with the creamy chicken and carrot filling? I could eat the whole pan myself.
- Weeknight Hero: Between us, this is my Tuesday night lifesaver—ready before the kids start asking for snacks.
- Leftovers for Days: I make a double batch because the puff pastry stays crisp even when reheated.
Step-by-Step Instructions for Pot Pie Puff Pastry Crust
Master the technique for a flaky, golden crust that encases a rich, creamy filling.
Step 1: Prepare the Savory Chicken Filling
In a large skillet, melt 2 tablespoons of the unsalted butter over medium-high heat. Add the 1.5 lb chicken breast, diced into 1-inch pieces, and cook until lightly browned and no longer pink in the center, about 6-8 minutes.
Transfer the chicken to a plate and set aside. In the same skillet, add the remaining butter, then sauté the yellow onion, carrots, and celery stalks until softened, about 5 minutes. Stir in the garlic cloves and fresh thyme, cooking for an additional 30 seconds until fragrant.
Step 2: Create the Creamy Roux-Based Sauce
Sprinkle the 0.33 cup all-purpose flour over the vegetable mixture and stir to coat evenly. Cook for 1-2 minutes to remove the raw flour taste, ensuring the mixture doesn’t brown.
Gradually whisk in the 2 cups chicken broth and 0.5 cup whole milk until smooth. Bring to a simmer and cook for 3-4 minutes until the sauce thickens enough to coat the back of a spoon. Stir in the 1 cup frozen peas, 1 tsp salt, and 0.5 tsp black pepper, then return the chicken to the skillet and mix well.
Step 3: Assemble and Seal the Pot Pie
Transfer the filling to a 9-inch pie dish or similar baking dish, ensuring it’s evenly distributed. Unfold the 2 sheets store-bought puff pastry (thawed overnight) and use one sheet to cover the top of the dish, trimming any excess. Use the second sheet to create a lattice or decorative cutouts for a professional finish.
Press the edges of the pastry to seal it to the dish, then brush the top with an egg wash made from the large egg beaten with 1 tablespoon of water. This ensures a deep golden brown finish. Cut a few small slits in the top to allow steam to escape during baking.
Step 4: Bake to Golden Perfection
Preheat the oven to 400°F. Place the assembled pot pie on a baking sheet to catch any spills. Bake for 25-30 minutes until the puff pastry is golden brown and puffed, and the filling is bubbling beneath the crust.
If the pastry begins to brown too quickly, tent the dish loosely with aluminum foil. Let the pot pie rest for 10 minutes after baking to allow the filling to set and make serving easier. This step is crucial to avoid a runny filling when sliced.
Pro Tips For Making Pot Pie Puff Pastry Crust
- Chill the Pastry: Keep the puff pastry cold until the last minute—I learned this the hard way after my first few pot pies turned into flat, sad discs. Work quickly when placing it over the filling to avoid the butter melting prematurely.
- Dice Evenly: Cut the carrots, celery, and onion into uniform, small pieces, about 1/4-inch. Sounds tedious, but it actually changes the outcome, ensuring everything cooks at the same rate and each bite has a little of everything.
- Vent the Top: Slash a few small cuts in the center of the puff pastry lid before baking. After burning one batch, I finally figured out this prevents steam from building up and turning your crust into a soggy mess.
- Use Day-Old Pastry: If time allows, thaw the puff pastry in the fridge overnight instead of on the counter. My grandmother swore by this, and she was right: it rolls out smoother and puffs higher in the oven.
Storing and Reheating This Dish
Refrigerator Storage
Let your pot pie cool completely before storing to prevent soggy crust. I transfer leftovers to an airtight container and refrigerate at 40°F or below for up to 3-4 days. The pastry stays crisp longer if stored separately from the filling.
Freezer Storage
For longer storage, wrap individual portions tightly in plastic wrap and place in a freezer-safe bag. Properly stored, it keeps for 2-3 months without freezer burn. I recommend labeling with the date for easy tracking.
Oven Reheating
Preheat your oven to 350°F and place the pot pie on a baking sheet. Cover loosely with aluminum foil and heat for 15-20 minutes until warmed through. This method preserves the puff pastry’s flaky texture best. 🔥
Microwave Reheating
For quick meals, microwave individual servings on 70% power for 2-3 minutes. Add a splash of water to prevent drying out. The crust won’t be as crisp, but it’s the fastest option.
Crust Protection
To revive the pastry, pop reheated portions under the broiler for 1-2 minutes until golden. Watch closely to avoid burning. This trick brings back that fresh-baked appearance and crunch. ✨
Nutrition Facts
Frequently Asked Questions
Can I use phyllo dough instead of puff pastry?
Phyllo works but creates a different texture. It bakes into crisp layers rather than flaky puffs. For best results, brush each sheet with melted butter and stack 6-8 layers for a sturdy top.
Why did my crust stay pale and flat?
This usually means the oven wasn’t hot enough. Ensure it’s fully preheated to 400°F before baking. Also, always use a full egg wash—not just the yolk—for maximum browning.
How do I prevent a soggy bottom crust?
Pre-bake the bottom pastry layer for 10 minutes before adding filling. Also, let the filling cool slightly before assembling to avoid excess steam.
Can I make this ahead and refrigerate?
Assemble the pie but don’t bake it. Refrigerate covered for up to 24 hours. Add 5-10 minutes to the baking time since it’ll start cold.

- 6 Oz Chocolate Chip Cookie Recipe: Perfectly Balanced Crispy Edges and Chewy Hearts - September 25, 2026
- 6-Inch Coffee Cake Recipe: Vanilla Bean Swirls and Buttery Streusel Topping - September 25, 2026
- 1 Hour Soup Recipe: Velvety Richness Without the Wait - September 25, 2026