
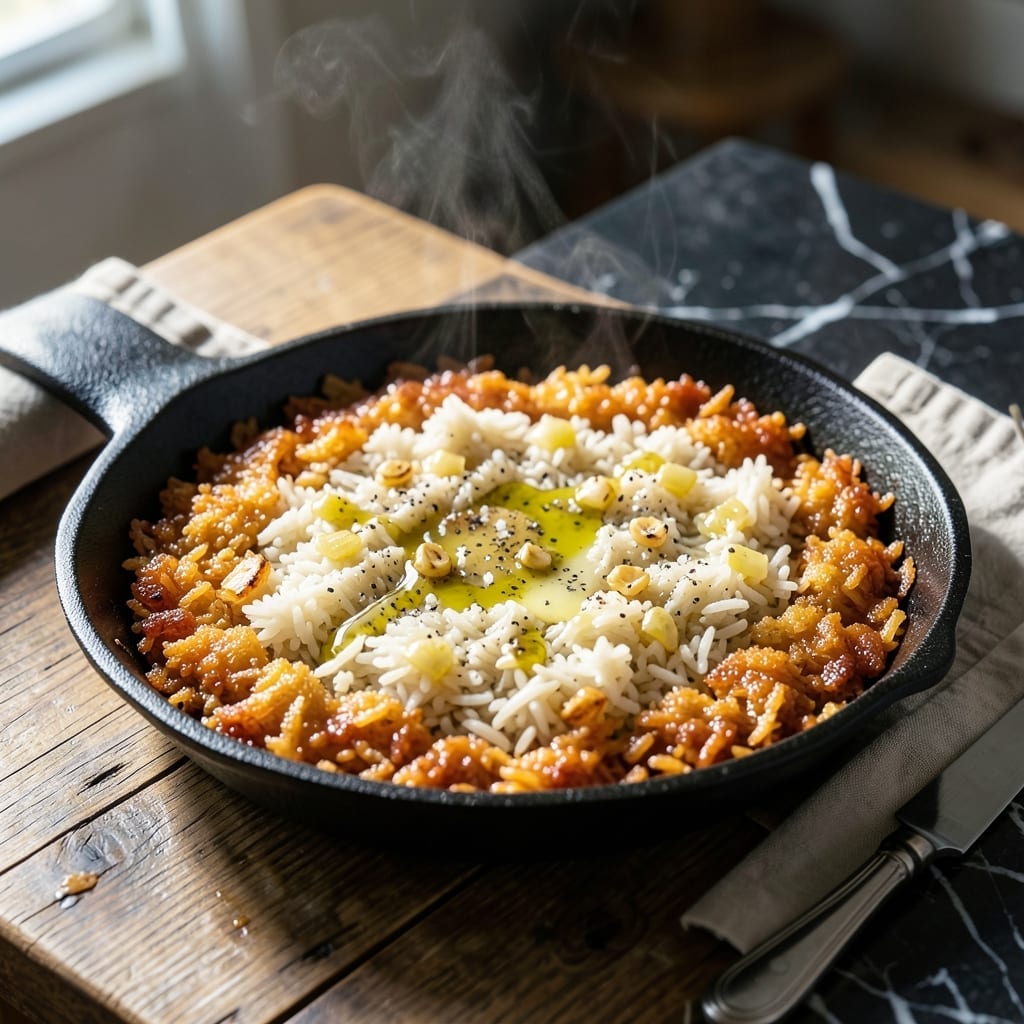
This pot rice recipe delivers what others promise but rarely achieve: a golden crispy crust with light, fluffy centers. The technique is simple yet precise, transforming basic ingredients into something extraordinary.
I developed this method after years of trial and error, learning exactly how much oil, heat, and timing creates that perfect crunch. The key is patience—letting the rice cook undisturbed until it forms that coveted crispy layer.
What emerges is a dish with contrasting textures: the bottom shatters at the touch, while the upper layers remain soft and tender. Every bite offers a satisfying crunch followed by the comforting familiarity of perfectly cooked rice.
Serve it as a side or main dish—this rice steals the show every time.
Ingredients for Pot Rice Crispy
Transform humble staples into a showstopping dish with contrasting textures and golden crust.
| Ingredient | Amount | Notes |
|---|---|---|
| Long-Grain White Rice 🍚 | 2 cups | Rinsed until water runs clear |
| Water 💧 | 3 ½ cups | Divided for cooking and steaming |
| Vegetable Oil 🫒 | ⅓ cup | High smoke point preferred |
| Unsalted Butter 🧈 | 3 tbsp | Melted for richness |
| Kosher Salt 🧂 | 1 ½ tsp | Diamond Crystal preferred |
| Garlic Cloves 🧄 | 4 cloves | Minced finely for even distribution |
| Yellow Onion 🧅 | 1 whole | Finely diced for texture |
| Ground Cumin 🌿 | ½ tsp | Toasted lightly for depth |
| Ground Turmeric 🌼 | ¼ tsp | For golden color and warmth |
| Bay Leaf 🍃 | 1 whole | Removed before serving |
| Fresh Cilantro 🌿 | ¼ cup | Chopped for garnish |
| Lemon Juice 🍋 | 1 tbsp | Freshly squeezed for brightness |
The rice selection is critical here. Long-grain white rice (jasmine or basmati) delivers the perfect balance of fluffiness and crisp potential. Rinsing thoroughly removes excess starch, which is essential for achieving that shatteringly crisp bottom layer. For the oil, choose something neutral with a high smoke point—avocado or grapeseed oil works as well as vegetable oil. I source my spices from Penzeys for maximum potency.
No long-grain white rice? Medium-grain works in a pinch but may not crisp as dramatically. For the turmeric, fresh grated at half the amount adds vibrancy. The butter can be swapped for ghee for a nuttier flavor. If you’re out of fresh cilantro, parsley makes an acceptable substitute. The bay leaf is optional but adds a subtle depth that’s worth including if you have it.
Store uncooked rice in an airtight container for up to 1 year. Cooked rice with crispy crust keeps in the fridge for 3-4 days (reheat in a dry skillet to revive the crunch). The dish reheats best when covered loosely with foil to prevent sogginess.
Why You’ll Love This Recipe
- One Pot Wonder: I just toss rice, water, oil, and butter in a pot and let it do its thing—no monitoring, no fuss.
- Crispy Golden Bites: That buttery, salty crust on the bottom? It’s the reason I double the batch every time.
- My Lunchbox Hero: I pack leftovers for work, and honestly, it tastes even better cold with a little extra salt.
- Pantry MVP: Five ingredients I always have on hand, and it still feels like a treat.
Step-by-Step Instructions for Pot Rice Crispy
Master the technique for achieving a golden crust with perfectly fluffy rice every time.
Step 1: Prepare the Rice Base
Begin by rinsing the 2 cups Long-Grain White Rice under cold water until the water runs clear. This removes excess starch that could make your dish gummy rather than crispy. Drain thoroughly in a fine-mesh strainer, shaking gently to remove all water.
In a heavy-bottomed pot with a tight-fitting lid, heat the 0.33 cup Vegetable Oil and 3 tbsp Unsalted Butter over medium-high heat until the butter melts and the mixture begins to shimmer. The high smoke point of the oil prevents burning during the extended cooking process.
Step 2: Build the Flavor Foundation
Add the 1 whole Yellow Onion, finely diced, to the hot oil mixture. Sauté for 4-5 minutes until the edges turn translucent and golden brown. Stir in the 4 cloves Garlic Cloves, minced, and cook for 30 seconds until fragrant but not browned.
Immediately add the drained rice, 1.5 tsp Kosher Salt, 0.5 tsp Ground Cumin, and 0.25 tsp Ground Turmeric. Stir continuously for 2-3 minutes to toast the rice lightly—this step is crucial for developing the nutty flavor and crispy texture. The rice should turn slightly opaque and smell aromatic.
Step 3: Add Liquids and Initial Cooking
Pour in 2.5 cups Water and add the 1 whole Bay Leaf. Stir once to distribute the rice evenly, then bring to a rolling boil over high heat. As soon as it boils, reduce the heat to low, cover tightly with the lid, and let it simmer undisturbed for 15 minutes.
After 15 minutes, remove the pot from heat but keep it covered. Let it sit for 5 minutes—this allows the rice to absorb any remaining moisture and begin forming the crispy bottom layer we’re after.
Step 4: Create the Crispy Crust
Return the pot to medium-low heat and add the remaining 1 cup Water. Drizzle it carefully around the edges of the pot to avoid disturbing the rice. Cover again and cook for an additional 20-25 minutes.
Resist the urge to peek during this time. The steam trapped inside is what helps create that coveted crispy crust at the bottom, known as tahdig in Persian cuisine. You’ll know it’s ready when you hear a faint sizzling sound and smell a nutty aroma.
Step 5: Finish and Serve
Turn off the heat and let the pot sit, covered, for 10 minutes. This final rest ensures the crust sets properly. Carefully remove the 1 whole Bay Leaf before serving.
To serve, place a large platter over the pot and invert it in one confident motion. The rice should release as a single, golden crust-topped cake. Garnish with 0.25 cup Fresh Cilantro, chopped, and a drizzle of 1 tbsp Lemon Juice for brightness. The contrast between the crispy bottom and fluffy interior will be perfection.
Pro Tips For Making Pot Rice Crispy
- Pre-Soak the Rice: Soak the long-grain white rice in cold water for 15-20 minutes before cooking—I learned this the hard way after my first few batches turned out gummy instead of crispy.
- Use Day-Old Rice: Cook the rice a day ahead and refrigerate it overnight; the dried-out grains crisp up far better in the pot than fresh rice ever could.
- Crank the Heat: Get your pot screaming hot before adding the oil and butter, then keep it at medium-high—after burning three batches, I finally figured out low heat just steams it.
- Press It Down: Once the rice is in the pot, press it firmly with a spatula into an even layer and resist the urge to stir; this guarantees maximum contact with the hot surface for that golden crust.
Common Mistakes When Making This Recipe
Skipping the Rinse
Never skip rinsing the 2 cups Long-Grain White Rice—the excess starch creates a gummy texture instead of that shatteringly crisp bottom. I once skipped this step and ended up with a sad, mushy layer. 💡
Peeking Too Soon
Resist lifting the lid during the 20-25 minute crisping phase. Every peek releases steam, lowering the temperature and disrupting the crust formation. The magic happens in the sealed environment.
Wrong Heat Level
Too high heat burns the crust before the rice cooks through. Too low, and you’ll get soggy rice. Maintain medium-low heat for even cooking and perfect crisping. I use a heavy-bottomed pot for consistent heat distribution.
Insufficient Oil
The ⅓ cup Vegetable Oil isn’t just for flavor—it’s essential for achieving that golden crust. Using less results in a pale, underwhelming bottom. Pair it with the 3 tbsp Unsalted Butter for richness.
Uneven Water Distribution
When adding the remaining 1 cup Water, pour it carefully around the pot’s edges. Dumping it in the center washes away the forming crust. This step preserves the crispy layer while ensuring the top rice cooks perfectly.
Rushing the Rest
The final 10-minute rest lets the crust set completely. Inverting too soon can break the crispy layer. I learned this the hard way—patience truly is the final secret ingredient. ✨
Nutrition Facts
Frequently Asked Questions
What type of rice works best?
Use long-grain white rice like jasmine or basmati for the crispest results. Medium-grain can work but won’t develop as dramatic a crust. Rinsing is essential to remove excess starch.
Why is my crust not crispy?
Lifting the lid too soon or using insufficient oil are common culprits. Keep the pot sealed during the 20-25 minute crisping phase and use the full ⅓ cup oil for best results.
Can I use a different pot?
A heavy-bottomed pot with a tight lid is ideal. Thin pots may burn the crust while undercooking the rice. Cast iron or enameled Dutch ovens work particularly well.
How do I store leftovers?
Store in the fridge for 3-4 days in an airtight container. Reheat in a dry skillet over medium heat to revive the crunch.

- 6 Oz Chocolate Chip Cookie Recipe: Perfectly Balanced Crispy Edges and Chewy Hearts - September 25, 2026
- 6-Inch Coffee Cake Recipe: Vanilla Bean Swirls and Buttery Streusel Topping - September 25, 2026
- 1 Hour Soup Recipe: Velvety Richness Without the Wait - September 25, 2026