
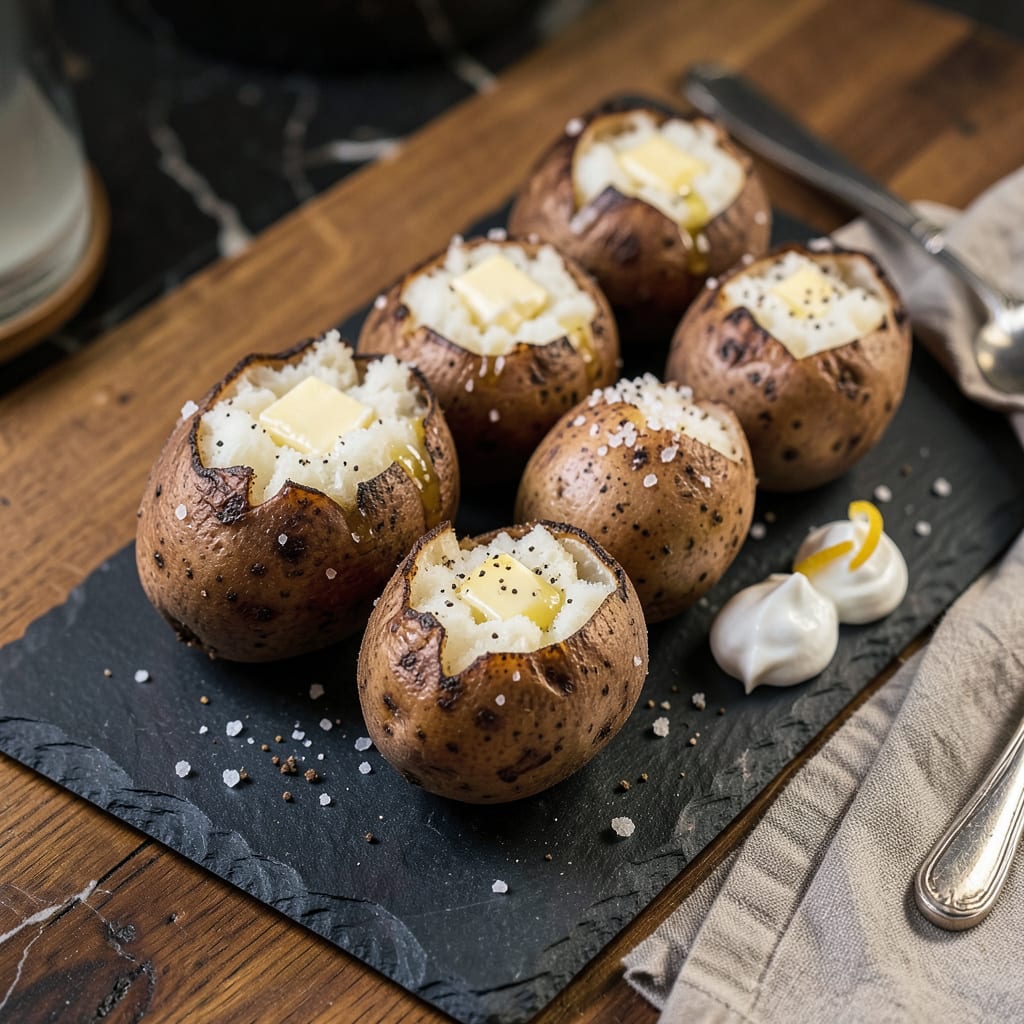
The perfect baked potato combines two essential textures: a crispy, salted skin and a light, fluffy interior. This method delivers both consistently, whether you’re serving a crowd or making a simple weeknight side. The secret lies in proper preparation and precise baking—no shortcuts needed.
After testing multiple approaches, I’ve found that high heat and a light oil coating create that coveted shatteringly crispy skin, while the steam trapped inside ensures the centers stay soft and airy. This technique works for russets, Yukon golds, or even sweet potatoes with minimal adjustments. Ready to bake the best potatoes of your life?
Ingredients for Recipe for Baking Potatoes
Optimal texture requires just these quality ingredients—crispy skins and fluffy centers guaranteed with proper technique.
| Ingredient | Amount | Notes |
|---|---|---|
| Russet Potatoes 🥔 | 4 whole | Uniform size, 8-10 oz each |
| Extra-Virgin Olive Oil 🫒 | 2 tbsp | Cold-pressed for optimal flavor |
| Diamond Crystal Kosher Salt 🧂 | 1 ½ tbsp | For crispy skin texture |
| Freshly Ground Black Pepper 🌶️ | 1 tsp | Medium-coarse grind preferred |
| Unsalted Butter 🧈 | 4 tbsp | For finishing (optional) |
| Sour Cream 🥛 | ½ cup | Full-fat for creaminess |
| Chopped Fresh Chives 🌿 | 2 tbsp | For garnish (optional) |
| Shredded Cheddar Cheese 🧀 | 1 cup | Sharp or medium variety |
| Crumbled Cooked Bacon Bits 🥓 | ½ cup | Vegetarian alternative available |
| Garlic Powder 🧄 | ½ tsp | For seasoning (optional) |
| Smoked Paprika 🌶️ | ¼ tsp | For depth of flavor |
[recipeingredientscaler]
The potatoes are paramount. Russet varieties yield the ideal starch-to-moisture ratio for fluffiness, while their thick skins crisp beautifully. Select uniform specimens weighing 8-10 oz each for even cooking. Diamond Crystal kosher salt is non-negotiable—its coarse texture and pure flavor create superior crust formation. For oil, extra-virgin olive oil provides both high smoke point and rich flavor. Professional kitchens standardize on these components for consistent results.
Dietary adaptations are straightforward. Omit bacon for strict vegetarian preparation, or substitute with smoked tempeh crumbles for comparable umami depth. Vegan butter alternatives (Miyoko’s or Earth Balance) perform identically to dairy butter for finishing. The cheese may be replaced with nutritional yeast at a 1:1 ratio for vegan compliance. Sour cream alternatives like Kite Hill almond-based maintain the intended creamy texture without compromising quality.
Storage optimization preserves texture. Baked potatoes maintain ideal quality for 3-4 days refrigerated in vented containers—microwave reheating compromises crispness. For longer storage, cool completely before freezing up to 2 months; reheat in a 375°F oven to restore skin texture. Prepared toppings should be stored separately and added post-reheating. The salt and spices retain potency indefinitely when kept in airtight containers away from direct light.
Why You’ll Love This Recipe
- 5-Minute Prep: I’m not kidding—scrub, poke, oil, salt, and into the oven. That’s it. No fancy techniques, no special tools, just a baking sheet and a fork.
- Crispy Skin, Cloud Center: Honestly, the contrast gets me every time: that shatter-crisp salted skin giving way to butter-soft insides. A pat of melted butter pooled in the middle? That’s the move.
- Dinner’s Sidekick: Between us, these work with everything—steak night, chili, or just a sad desk salad that needs saving. I’ve even served them solo with sour cream and chives when I couldn’t be bothered to cook anything else.
- Penny-Pincher’s Dream: A 5-pound bag of russets costs less than a coffee, and one potato stretches into two meals for me (hello, loaded baked potato soup the next day). No waste, no fuss, just solid, filling food.
Step-by-Step Instructions for Baking Potatoes
This method delivers perfectly crispy skins and fluffy interiors with precise technique and timing.
Step 1: Prepare and Season the Potatoes
Begin by thoroughly scrubbing the russet potatoes under cold running water to remove any dirt. I recommend using a vegetable brush for this step to ensure complete cleanliness. Pat them completely dry with paper towels—any residual moisture will prevent the skin from achieving optimal crispiness.
Using a fork, pierce each potato 8-10 times on all sides. This allows steam to escape during baking, preventing potential bursting. Rub each potato with 2 tbsp extra-virgin olive oil, coating the skin evenly. The oil creates that coveted crispy exterior while helping the salt adhere.
Sprinkle the potatoes generously with 1.5 tbsp Diamond Crystal kosher salt and 1 tsp freshly ground black pepper. The coarse salt crystals draw out moisture from the skin, which then evaporates in the oven, creating that signature crispy texture. Place the seasoned potatoes directly on the oven rack for optimal air circulation.
Step 2: Bake at High Temperature
Preheat your oven to 425°F and position the rack in the center. The high temperature is crucial for achieving both crispy skin and fluffy interiors simultaneously. Place the prepared potatoes directly on the oven rack with a baking sheet positioned on the lower rack to catch any potential drips.
Bake the potatoes for 45-60 minutes, depending on their size. You’ll know they’re done when the internal temperature reaches 210°F and the skin appears crispy and golden. The potatoes should yield slightly when gently squeezed with oven mitts, indicating the flesh has become tender and fluffy.
For even cooking, I recommend rotating the potatoes halfway through the baking time. This ensures all sides receive equal heat exposure, particularly important in ovens with hot spots. Avoid opening the oven door frequently, as this causes temperature fluctuations that can affect the cooking process.
Step 3: Create the Fluffy Interior
Once baked, remove the potatoes from the oven and let them rest for 5 minutes. This brief resting period allows the steam inside to redistribute, preventing a gummy texture when you cut into them. Using a clean kitchen towel to protect your hands, gently press the sides of each potato to soften the flesh.
Make a lengthwise cut along the top of each potato, then gently push the ends toward the center to open them up. This technique creates the perfect pocket for toppings while maintaining structural integrity. Use a fork to fluff the interior, which creates that light, airy texture characteristic of properly baked potatoes.
The ideal baked potato should have a crispy, salty skin that provides textural contrast to the steamy, fluffy interior. The flesh should be completely tender throughout, with no hard or undercooked spots in the center. This is where the high baking temperature and proper timing really pay off.
Step 4: Add Finishing Touches
Immediately after opening the potatoes, add 4 tbsp unsalted butter to each, allowing it to melt into the hot flesh. This enriches the flavor and adds moisture to the fluffy interior. Follow with 0.5 cup sour cream, distributing it evenly among the potatoes.
Sprinkle each potato with 1 cup shredded cheddar cheese, 0.5 cup crumbled cooked bacon bits, 0.5 tsp garlic powder, and 0.25 tsp smoked paprika. The residual heat will melt the cheese perfectly while the smoked paprika adds depth to the overall flavor profile.
Finish with 2 tbsp chopped fresh chives for a bright, oniony contrast that cuts through the richness. Serve immediately while the cheese is still melted and the potato is at its peak temperature. The contrast between the crispy salted skin and the creamy, flavorful interior makes each bite satisfying.
Common Mistakes When Making Great recipe for baking potatoes
Skipping the Pricking
I know it’s tempting to skip this step, but piercing your potatoes 8-10 times with a fork is absolutely essential. Without these small vents, steam builds up inside and can cause your potatoes to explode in the oven. Trust me, I’ve cleaned baked potato debris from my oven walls more times than I’d like to admit. 💥
Using Low Heat
Baking at 350°F might seem safer, but it’s the fastest route to sad, soggy-skinned potatoes. The high heat of 425°F is what creates that magical crispy skin while keeping the inside fluffy. I’ve tested lower temps, and the results are always disappointing—pale skin and dense interiors.
Wrapping in Foil
While foil might seem like it would keep potatoes moist, it actually steams them instead of baking. This gives you soft skin instead of that satisfying crispy crust we’re after. The only time I use foil is for holding baked potatoes warm after cooking—never during the baking process itself.
Under-Salting the Skin
That 1.5 tbsp Diamond Crystal kosher salt might seem like a lot, but it’s the secret to amazing flavor. The coarse salt draws out moisture that then evaporates, creating crispiness. I used to be shy with salt, but now I go all in—it makes all the difference in that perfect crunch.
Cutting Too Soon
Give your potatoes that 5-minute rest after baking. Cutting into them immediately releases all the steam, leaving you with gummy instead of fluffy interiors. I learned this the hard way when my first few attempts had dense centers. Patience really pays off here.
Overcrowding the Oven
Potatoes need space for proper air circulation to crisp up evenly. I limit myself to 4 potatoes at a time in my standard oven. Crowding them leads to uneven cooking and steaming instead of baking. If you need to cook more, use multiple racks and rotate them halfway through. 🔥
Nutrition Facts
Frequently Asked Questions
Why do I need to prick the potatoes before baking?
Pricking creates tiny steam vents to prevent explosive pressure buildup. Without 8-10 fork piercings, trapped steam can cause potatoes to burst in the oven. This step takes seconds but saves you from cleaning potato shrapnel later!
Can I bake potatoes at a lower temperature for longer?
Lower temps produce steamed, not baked, results. 425°F is ideal for crispy skins and fluffy centers. At 350°F, you’ll get pale, soggy skins and dense interiors—tested and disappointing. Stick with high heat for best texture.
What’s the secret to extra-crispy skins?
Three things: olive oil, coarse salt, and direct rack placement. The oil helps salt adhere while drawing out moisture. Diamond Crystal kosher salt creates that signature crunch. Baking directly on the rack ensures even air circulation.
How do I know when they’re perfectly done?
Look for 210°F internal temp and skin that yields slightly when squeezed. The flesh should feel soft through the center. A fork should slide in effortlessly. Overbaking dries them out, so start checking at 45 minutes.
Can I make them ahead for a party?
Bake completely, then hold at 200°F in the oven for up to 2 hours. Or cool, refrigerate, and reheat at 375°F for 15-20 minutes. The skins stay crispy and centers remain fluffy with this method.

- 8 Bean Soup Recipe Crock Pot: Hearty Vegetable Medley in One Pot - September 25, 2026
- 4C Bread Crumbs Meatballs Recipe: Crispy Crust and Juicy Centers - September 25, 2026
- 6 Oz Chocolate Chip Cookie Recipe: Perfectly Balanced Crispy Edges and Chewy Hearts - September 25, 2026