
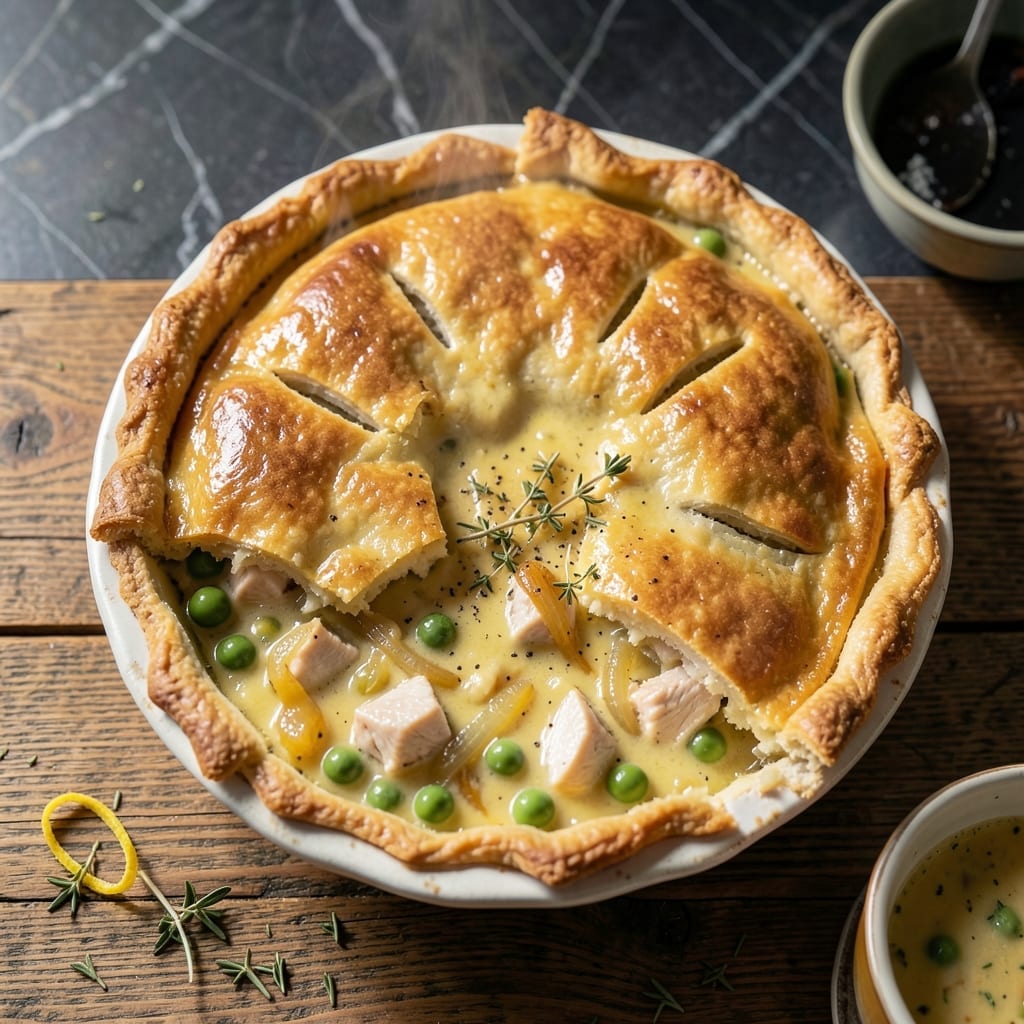
This single crust chicken pot pie elevates comfort food with its golden pastry and rich, herbed filling. The flaky top crust bakes to perfection, creating a beautiful contrast with the creamy interior.
I developed this recipe to streamline the process without sacrificing flavor. The filling comes together quickly with tender chicken, fresh vegetables, and a velvety sauce that thickens beautifully as it bakes.
What sets this version apart is the simplicity—no need for a bottom crust, yet it delivers all the satisfaction of a traditional pot pie. The herbs add depth while the pastry provides that essential buttery crunch.
Perfect for weeknight dinners or Sunday suppers. The result is a dish that looks impressive but requires minimal effort to achieve restaurant-quality taste at home.
Ingredients for Single Crust Chicken Pot Pie
Golden pastry meets herbed filling with tender chicken and fresh vegetables for restaurant-quality comfort.
| Ingredient | Amount | Notes |
|---|---|---|
| All-Purpose Flour 🌾 | 2 cups | Plus extra for dusting surface |
| Unsalted Butter 🧈 | ¾ cup | Cold, cubed for pastry |
| Ice Water 💧 | 6 tbsp | For pastry dough hydration |
| Salt 🧂 | ½ tsp | Divided for dough and filling |
| Boneless Skinless Chicken Breast 🍗 | 1 ½ lb | Diced into 1-inch pieces |
| Yellow Onion 🧅 | 1 whole | Medium-sized, finely diced |
| Carrots 🥕 | 2 whole | Peeled and sliced into rounds |
| Celery Stalks 🌿 | 2 whole | Finely diced for filling |
| Garlic Cloves 🧄 | 3 cloves | Minced for depth of flavor |
| Fresh Thyme Sprigs 🌿 | 2 tsp | Leaves stripped and chopped |
| Fresh Rosemary 🍃 | 1 tsp | Finely chopped for aroma |
| All-Purpose Flour 🌾 | ¼ cup | For thickening the sauce |
| Chicken Broth 🥣 | 1 ½ cups | Low-sodium preferred for control |
| Whole Milk 🥛 | ½ cup | For creamy sauce base |
| Frozen Peas 🌱 | ¾ cup | No need to thaw before adding |
| Black Pepper 🌶️ | ½ tsp | Freshly ground for best flavor |
The pastry demands cold, high-quality butter—Plugrá or European-style for superior flakiness. Use all-purpose flour with 10-12% protein content; King Arthur is a reliable brand. For the chicken, air-chilled boneless breasts from Whole Foods or a trusted butcher ensure tenderness. Fresh thyme and rosemary are non-negotiable for the herb profile—look for vibrant green sprigs without wilting.
No fresh herbs? Dried at one-third the amount, but fresh is ideal. Short on time? Pre-diced mirepoix from Trader Joe’s saves chopping. Chicken broth can be swapped with vegetable broth, though the flavor will be milder. For a richer sauce, half-and-half instead of milk works beautifully. Frozen mixed vegetables can replace the peas and carrots (use petite peas and diced carrots for best texture).
The unbaked pie keeps 1 day in the fridge (cover tightly). Baked pie stays fresh for 3-4 days—reheat individual portions in a 350°F oven for 15 minutes. The pastry dough can be frozen for up to 3 months (thaw overnight before using).
Why You’ll Love This Recipe
- I’ll be real: the flavors taste even better the next day, and it reheats like a dream.
- No-Fuss Crust: I love that the flaky all-purpose flour and butter crust comes together in minutes with just ice water and a pinch of salt.
- Rich Comfort: The tender chicken breast soaked in that creamy filling is pure comfort in every bite.
- Feeds the Family: Honestly, it’s my go-to for Sunday dinners, potlucks, or even a cozy weeknight meal.
Step-by-Step Instructions for Single Crust Chicken Pot Pie
Master the technique for a flaky crust and rich, creamy filling that defines this classic dish.
Step 1: Prepare the Single Crust Pastry
In a large bowl, combine the 2 cups All-Purpose Flour with 0.5 tsp Salt. Add the 0.75 cup Unsalted Butter, cubed and cold, and cut it into the flour using a pastry cutter or your fingertips until the mixture resembles coarse crumbs with pea-sized butter pieces visible.
Gradually add the 6 tbsp Ice Water, 1 tablespoon at a time, mixing gently with a fork until the dough just comes together. Overworking the dough will develop gluten, resulting in a tough crust. Form the dough into a disk, wrap in plastic, and refrigerate for 30 minutes.
Step 2: Cook the Chicken and Vegetables
In a large skillet over medium-high heat, cook the diced 1.5 lb Boneless Skinless Chicken Breast until no longer pink, about 5-6 minutes. Transfer to a plate and set aside. In the same skillet, add the finely diced 1 whole Yellow Onion, sliced 2 whole Carrots, and finely diced 2 whole Celery Stalks.
Cook until the vegetables soften, about 5 minutes. Add the minced 3 cloves Garlic Cloves, chopped 2 tsp Fresh Thyme Sprigs, and chopped 1 tsp Fresh Rosemary, cooking for an additional 1 minute until fragrant.
Step 3: Create the Creamy Filling
Sprinkle the 0.25 cup All-Purpose Flour over the vegetable mixture and stir to coat. Gradually pour in the 1.5 cups Chicken Broth and 0.5 cup Whole Milk, stirring constantly to prevent lumps. Bring to a simmer and cook for 3-4 minutes until the sauce thickens.
Return the chicken to the skillet along with the 0.75 cup Frozen Peas and 0.5 tsp Black Pepper. Stir to combine and remove from heat. The filling should be thick and creamy, coating the back of a spoon.
Step 4: Assemble and Bake the Pot Pie
Preheat your oven to 375°F. On a lightly floured surface, roll out the chilled dough to a 12-inch circle. Transfer the filling to a 9-inch pie dish and cover with the rolled-out dough, crimping the edges to seal. Cut several slits in the top to allow steam to escape.
Bake for 30-35 minutes until the crust is golden brown and the filling is bubbly. If the edges brown too quickly, cover them with foil. Let the pot pie rest for 10 minutes before serving to allow the filling to set.
Pro Tips For Making Single Crust Chicken Pot Pie
- Chill the Dough: Pop your crust dough in the fridge for at least 30 minutes before rolling—I learned this the hard way after my first three pies shrank like old sweaters.
- Poach the Chicken: Simmer the chicken breasts in salted water for 12-15 minutes until just cooked, then shred. This keeps them moist instead of the dry, rubbery disaster that comes from overcooking.
- Vent the Crust: Cut a few small slits in the top crust before baking, or steam will build up and turn your beautiful pie into a sad, soggy mess.
- Use Ice Water: When making the crust, use actual ice water—about 6-8 tablespoons—and keep everything cold. My grandmother swore by this, and she was right: it’s the difference between flaky and flat.
Perfect Pairings for This Dish
Simple Green Salad
A crisp mixed greens salad with a light lemon vinaigrette balances the richness perfectly. Toss 5 oz baby spinach with 1 tbsp olive oil, 1 tsp lemon juice, and a pinch of salt. The acidity cuts through the creamy filling beautifully. 🥗
Roasted Vegetables
Roasted Brussels sprouts or asparagus add a caramelized depth that pairs wonderfully. Toss 1 lb trimmed asparagus with 1 tbsp olive oil, salt, and pepper, then roast at 400°F for 12-15 minutes until tender.
Wine Pairings
A crisp Chardonnay with bright acidity complements the creamy filling. For red lovers, a light Pinot Noir offers earthy notes without overpowering. Both wines enhance the herbs in the dish. 🍷
Bread Options
Serve with warm crusty bread or dinner rolls to soak up every last bit of sauce. I love sourdough for its tangy contrast. Brush with garlic butter for extra indulgence.
Comforting Sides
Mashed potatoes or buttered egg noodles turn this into an ultimate comfort meal. For mashed potatoes, use 2 lbs Yukon Golds with ½ cup warm milk and 4 tbsp butter for creaminess.
Nutrition Facts
Frequently Asked Questions
Can I use pre-made pie crust?
Yes, a store-bought single crust works in a pinch. Just ensure it’s thawed if frozen and roll it to fit your dish. Homemade tastes better, but pre-made saves time without sacrificing too much quality.
How do I prevent a soggy crust?
Bake the pie on the lower oven rack and ensure the filling is bubbly before removing. Let it rest for 10 minutes after baking so the filling sets properly.
Can I make this ahead of time?
Assemble the pie and refrigerate unbaked for up to 1 day. Bake as directed, adding 5-10 minutes if cold. The filling thickens as it cools, so reheating works well too.
What if my filling is too thin?
Simmer the filling longer before baking to reduce it. If needed, mix 1 tbsp cornstarch with 1 tbsp water and stir into the filling until thickened.

- 6 Oz Chocolate Chip Cookie Recipe: Perfectly Balanced Crispy Edges and Chewy Hearts - September 25, 2026
- 6-Inch Coffee Cake Recipe: Vanilla Bean Swirls and Buttery Streusel Topping - September 25, 2026
- 1 Hour Soup Recipe: Velvety Richness Without the Wait - September 25, 2026