
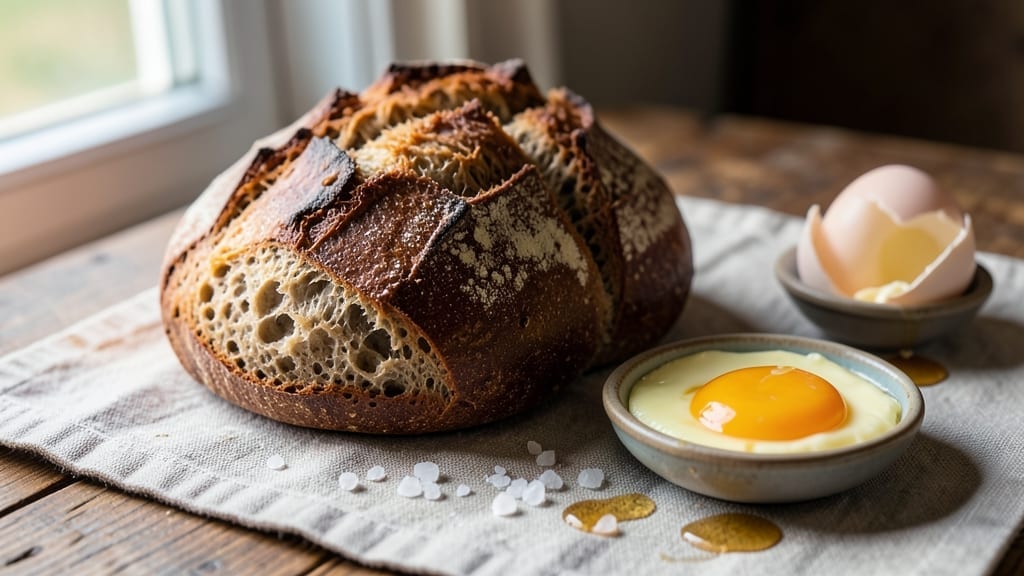
Mastering 00 flour sourdough bread transforms your kitchen into a bakery, delivering that signature crispy crust and open, airy crumb you crave. 🌟 The secret lies in the ultra-fine “00” flour—its low protein content creates a delicate structure while its silky texture ensures that perfect shatter when you tear into the loaf.
I’ve baked hundreds of loaves, and this method guarantees a result that rivals artisanal bakeries, even with a home oven.
The process begins with a lively starter, but don’t worry—it’s simpler than it sounds. We’ll focus on slow fermentation to develop deep flavor, followed by careful shaping and a steam bath during baking to lock in that coveted crust.
The key is patience; rushing this bread leads to dense, gummy results, but when done right, the aroma alone will have your neighbors knocking on the door. Every step builds on the last, creating a loaf that’s both visually stunning and irresistibly tender.
What you’ll end up with is a golden, crackling crust that gives way to a soft, open crumb studded with air pockets—each bite reveals layers of flavor developed through fermentation.
This isn’t just bread; it’s a centerpiece for your table, perfect for sandwiches, toast, or simply enjoyed with butter and jam. The “00” flour makes all the difference, ensuring a texture that’s light yet substantial, with a subtle sweetness that keeps you reaching for another slice.
Whether you’re a seasoned baker or just starting, this recipe breaks down the process into manageable steps—no intimidating jargon or guesswork. We’ll troubleshoot common pitfalls like dense bread or weak gluten structure, so you can achieve consistent results every time.
Let’s get started on your first loaf of restaurant-quality sourdough right from home.
Ingredients for 00 flour sourdough bread
The perfect blend of ultra-fine flour and active fermentation creates this restaurant-worthy sourdough.
| Ingredient | Amount | Notes |
|---|---|---|
| 00 Flour 🌾 | 4 ½ cups | Ultra-fine, low-protein for delicate crumb |
| Active Sourdough Starter 🍞 | 1 cup | 100% hydration, bubbly and active |
| Large Eggs 🥚 | 2 whole | Room temperature for even distribution |
| Granulated Sugar 🍚 | ½ tsp | Enhances crust browning and flavor |
| Salt 🧂 | 1 ½ tsp | Diamond Crystal preferred for purity |
| Water 💧 | 1 ½ cups | Room temperature, filtered preferred |
| Olive Oil 🫒 | 2 tbsp | Extra-virgin for richness in dough |
| Instant Yeast 🍄 | ¼ tsp | Optional for backup fermentation |
| Cornmeal 🌽 | ¼ cup | For dusting baking surface |
| Ice Cubes ❄️ | 1 cup | For steam bath during baking |
| Unsalted Butter 🧈 | 2 tbsp | For buttering loaf pan |
| Semolina Flour 🌾 | 1 tbsp | For dusting before baking |
The 00 flour is non-negotiable here—its 10-12% protein content (vs. all-purpose’s 11-13%) creates that signature shatter while maintaining an open crumb. Caputo or King Arthur 00 are the gold standards, but Amazon or Italian specialty stores carry reliable brands. If you can only find regular 00 flour, sift it extra times to mimic the ultra-fine texture. Your starter should be bubbly and active—if it’s sluggish, feed it 1:1:1 (starter:flour:water) 4-6 hours before using. The eggs and olive oil act as tenderizers, preventing that tough crust while adding subtle richness that complements the flour’s delicate sweetness.
No 00 flour? All-purpose flour plus 1 tbsp vital wheat gluten per cup gets you close, though the texture won’t be identical. Your starter weak? Add 0.25 tsp instant yeast to the dough as a backup. The ice cubes for steam bath can be substituted with a metal bowl of boiling water on the oven rack—just add them 5 minutes before baking. For the semolina, regular flour works in a pinch, but it won’t give that signature crisp. And if you’re wondering about the sugar—yes, it’s just 0.5 tsp, but it’s crucial for that Maillard reaction that gives the crust its golden depth. Trust me on this one.
Store your starter in the fridge between bakes—it’ll last weeks this way. The dough can be shaped and refrigerated overnight for even better flavor development (just add 10 minutes to your bake time). Once baked, let the loaf cool completely on a wire rack before slicing—this prevents that dreaded gummy crumb. The butter used for the pan? Save the leftover butter—it’s now infused with sourdough flavor and perfect for compound butter. Leftovers? Freeze slices in a bag for up to 3 months—toast straight from frozen for crispy results.
Why You’ll Love This Recipe
- Crispy Crust Magic: I swear by that golden, shatterable crust—00 flour’s fine texture traps air just right, and the egg wash locks in that perfect snap. No fancy tools, just a hot oven and patience (okay, maybe 10 minutes of staring at it).
- Sourdough Simplicity: Honestly, this starter does 90% of the work. Mix, shape, proof—no kneading, no fuss. The sugar and egg just lift the whole thing to ridiculously good without extra effort. Even my lazy Sundays thank me.
- Weeknight Wonder: Toss a loaf in the freezer for breakfast toast or sandwiches all week. The 00 flour keeps it soft for days, and the egg adds that buttery richness that makes even peanut butter taste fancy. (Yes, even on a Tuesday night.)
- Budget-Friendly Staple: A little starter goes far, and 00 flour stretches further than whole wheat. Salt and sugar are pantry basics, and eggs? Versatile as hell. You’ll bake this so often, you’ll forget to buy store bread—then realize you’re way ahead.
Step-by-step instructions for 00 flour sourdough bread
Here’s how to craft a delicate, ultra-crispy sourdough loaf with a signature crack and airy crumb.
👨🍳 Step 1: Mix the Dough with Precision
In a large mixing bowl, combine the 4.5 cups 00 flour with the 1 cup active sourdough starter, 1.5 tsp salt, and 0.5 tsp granulated sugar. Create a well in the center and add the 2 whole large eggs and 2 tbsp olive oil. The 0.25 tsp instant yeast is optional but ensures reliable fermentation.
Gradually incorporate the 1.5 cups water while mixing with a dough whisk or silicone spatula. You’ll notice the dough becomes shaggy and sticky—this is normal with 00 flour’s low protein content. Mix until no dry bits remain and the dough forms a rough, cohesive mass. The ultra-fine texture of 00 flour creates a more delicate crumb compared to standard bread flour.
🥘 Step 2: Develop the Dough Through Autolyse
Cover the bowl with a damp kitchen towel and let the dough rest for 30 minutes. This autolyse stage allows the flour to fully hydrate and develop gluten strands without overworking the delicate dough. You’ll see the dough gradually relax and become more pliable—this is your signal it’s ready for shaping.
After resting, perform a series of stretch-and-folds every 30 minutes for 2 hours total. Wet your hands and gently grasp one side of the dough, stretching it upward while folding it back over itself. Rotate the bowl and repeat this motion around the entire dough. This gentle manipulation builds structure without over-developing the gluten, which is crucial for achieving that signature sourdough crack and open crumb structure.
🔪 Step 3: Shape and Proof the Dough
After the final stretch-and-fold, transfer the dough to a lightly floured surface dusted with 1 tbsp semolina flour. Shape it into a tight boule by pulling the edges toward the center and tucking them underneath. The semolina creates a non-stick surface that prevents sticking during shaping. For a tighter shape, you can also form a batard by rolling the dough into a log shape.
Place the shaped dough seam-side up in a well-floured proofing basket or a bowl lined with a floured kitchen towel. Cover loosely and let it proof at room temperature for 4-6 hours until it has nearly doubled in size. The dough should spring back slowly when poked with a finger—this indicates it’s ready for baking. The low-protein 00 flour will give you a more delicate proof compared to standard bread flour.
🔥 Step 4: Prepare for Baking with Steam
Preheat your oven to 450°F with a Dutch oven inside for 45 minutes. The heavy cast iron will retain heat and create that perfect steam environment for baking. While the oven heats, transfer the proofed dough to a piece of parchment paper and score the top with a razor blade in a crosshatch pattern or simple slash. This helps control the oven spring and creates that beautiful crackly crust.
Carefully transfer the dough (with parchment) to the preheated Dutch oven. Add 1 cup ice cubes to the bottom of the oven to create a steam bath. Bake covered for 20 minutes, then remove the lid and bake for another 20-25 minutes until the crust is deep golden brown and the internal temperature reaches 205-210°F. The ice cubes create the steam needed for that signature sourdough oven spring and crisp crust.
⏰ Step 5: Finish and Rest for Maximum Flavor
Remove the bread from the Dutch oven and transfer it to a wire rack. Let it cool completely before slicing—this allows the crumb to set properly and prevents a gummy texture. The bread will continue to develop flavor as it cools, with that characteristic sourdough tang becoming more pronounced.
For an extra touch of richness, brush the warm loaf with melted 2 tbsp unsalted butter while still slightly warm. This adds a beautiful sheen and enhances the crust’s flavor. Store wrapped in a cotton towel at room temperature for up to 3 days or freeze for longer storage. The 00 flour creates a more delicate crumb that’s perfect for toast, sandwiches, or simply enjoying with butter and jam.
Pro Tips For Making 00 Flour Sourdough Bread
- WEIGH YOUR EGG: 00 flour is unforgiving with volume measurements—eggs especially. Use a kitchen scale for the eggs (aim for 50g each) instead of counting. I learned this after two batches where the dough either collapsed or rose too fast; consistency matters more than you’d think.
- STRETCH AND FOLD AT 75°F: The dough’s window for handling is narrow. If your kitchen’s below 75°F (24°C), warm the dough slightly before stretching and folding—just enough to make it pliable. Cold dough resists shaping, and you’ll end up overworking it. Sounds weird, but it works: a 5-minute rest in a slightly warm spot (like near the oven with it off) saves you frustration.
- SALT THE WATER FIRST: Skip adding salt directly to the dough. Instead, dissolve it in the water first—this ensures even distribution and prevents clumpy dough. I was skeptical until I tried it: the crumb turned out noticeably more uniform, and the flavor balanced better. (Yes, even if you’re impatient like me.)
- STEAM THE FIRST 10 MINUTES: 00 flour’s high protein content means it’s thirsty—it’ll dry out fast in the oven. Place a metal tray with boiling water on the lower rack when you bake, then remove it after 10 minutes. This gives you a crisp crust without burning the top. I skip this when I’m lazy, but the difference in texture is real.
Essential equipment for perfect results
Dutch Oven Essentials
The Dutch oven is your secret weapon for sourdough—its heavy cast iron retains heat perfectly, creating that ideal steam environment for an ultra-crispy crust and open crumb. I recommend the Lodge 5-Quart Dutch Oven—it’s the gold standard for home bakers, with a tight-fitting lid that locks in steam.
If you’re on a budget, the Amazon Basics Dutch Oven works well too, though it may need preheating for 10 extra minutes to reach the same temperature stability. 🔥
Proofing Basket Must-Haves
A proofing basket (or banneton) helps shape your loaf beautifully while allowing it to rise evenly. The Weston Banneton is my go-to—its bamboo construction is gentle on dough and easy to clean. For a budget-friendly option, try the Utopia Kitchen Silicone Proofing Basket, which folds flat for storage.
If you’re in a pinch, a floured bowl lined with a kitchen towel works too, though it won’t give the same tight shape. The key is light dusting with semolina or rice flour to prevent sticking.
Scoring Tools for Precision
Scoring your dough isn’t just decorative—it controls oven spring and creates that signature crack. A razor blade (like the X-Acto #10) gives the cleanest cuts, but a sharp serrated knife works in a pinch.
Hold it at a 45-degree angle for a deep slash or 90 degrees for a crosshatch pattern. For extra flair, try a lame (a traditional French scoring tool), which glides effortlessly through dough. Just be gentle—you’re not carving, you’re guiding the bread’s rise. ✨
Digital Thermometer for Accuracy
Baking sourdough to 205-210°F internal temperature ensures a perfectly baked loaf, but your oven’s dial isn’t always reliable. A Thermoworks Smoke or Meater Plus thermometer gives precise readings every time. Insert the probe into the center of the loaf—if it’s under 200°F, bake for another 5-10 minutes.
Pro tip: The crust should sound hollow when tapped, like a drum. Without a thermometer, bake until the crust is deep golden brown (about 20-25 minutes uncovered).
Steam Solutions Beyond Ice
No ice cubes? No problem. For steam, place a metal bowl of boiling water on the oven rack 5 minutes before baking, or spray the Dutch oven with water using a spray bottle.
I also love the Lodge Cast Iron Cover Handle Spray Bottle—it’s designed for this exact purpose. The steam mimics a professional bakery’s environment, giving you that shatteringly crisp crust without the guesswork. Just avoid overdoing it—too much steam can make the crust soggy.
Flour Alternatives for Dusting
Semolina is ideal for dusting, but rice flour, cornmeal, or even all-purpose flour work in a bind. The texture won’t be identical, but it’ll prevent sticking. For shaping, I keep a small bowl of semolina or rice flour nearby—just dip your fingers in it as you handle the dough.
If you’re using all-purpose flour, sift it extra fine to mimic the ultra-smooth texture of 00 flour. The goal is to create a non-stick surface that lets the dough slide effortlessly into the Dutch oven. 🌾
Nutrition facts
Frequently asked questions
Why does 00 flour create a different texture than regular bread flour?
The ultra-fine grind and 10-12% protein content of 00 flour create a more delicate, tender crumb with a signature shatter when torn. Unlike standard bread flour (11-13% protein), it develops less gluten during mixing, resulting in that signature open, airy crumb and crispy crust. Think of it as the difference between a fine silk scarf and a sturdy wool blanket—both can be beautiful, but they serve different purposes.
Can I make this recipe without a sourdough starter?
Yes, but your bread will taste different. For a backup, add 0.25 tsp instant yeast to the dough while keeping the starter. This creates a hybrid fermentation that still develops some tang but with faster rise times. If you want to build a starter, use 1 cup 00 flour + 1 cup water, feed daily for 5-7 days until bubbly and active. The starter adds complexity—without it, you’ll get more of a yeast-raised loaf than true sourdough.
How do I fix dough that’s too sticky to handle?
Wet your hands and work quickly—the 00 flour’s low protein makes the dough more elastic but stickier. Dust your work surface with semolina or rice flour (not all-purpose) and use a dough scraper to lift and fold. If it’s extremely sticky, add 1-2 tbsp more 00 flour gradually. Remember, this dough should be pliable, not dry. The stickiness is normal with 00 flour’s fine texture—it’s what gives that signature tender crumb!
What’s the best way to store leftover 00 flour sourdough?
Wrap the cooled loaf in a cotton towel (not plastic) and store at room temperature for 2-3 days to maintain freshness. For longer storage, freeze slices in a ziplock bag for up to 3 months. Toast straight from frozen—no thawing needed! The 00 flour’s delicate crumb stays fresh longer than standard sourdough when stored properly. Pro tip: Keep a small piece in the freezer as a “starter” for future toast sessions.
Why did my crust turn out pale instead of golden brown?
This usually means insufficient steam or underbaking. For next time: Add ice cubes to the oven bottom (or boiling water) and bake 5 minutes longer uncovered. Also ensure your Dutch oven is properly preheated—450°F for 45 minutes is ideal. The 0.5 tsp sugar in the recipe helps with browning, but if your oven runs hot, reduce to 425°F. A pale crust often means the bread needs more time in the oven.

- Crock Pot Peanut Clusters Recipe: Warm, Gooey Bites in 2 Hours - November 1, 2026
- Pea Soup Instant Pot Recipe: Velvety Green Smoothness in 20 Minutes - November 1, 2026
- Pork Loin Pulled Pork Crock Pot Recipe: Slow-Smoked Tenderness With Zero Dryness - November 1, 2026