
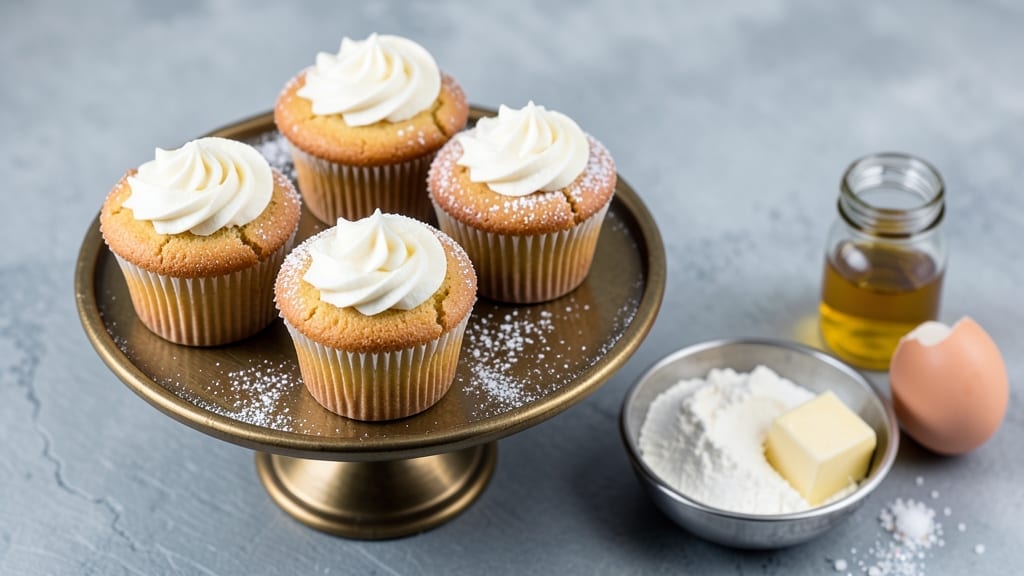
This 1-egg vanilla cupcake recipe delivers fluffy, light-as-air bites with a delicate vanilla bean swirl—perfect for beginners or those watching their egg count. The secret lies in precise mixing techniques and a touch of baking powder for lift, ensuring every cupcake rises high with tender crumbs.
What makes this recipe special is its simplicity: just five core ingredients, a single egg, and minimal effort for maximum results.
What sets these cupcakes apart is their airy texture, achieved through proper folding and gentle baking. The vanilla bean swirl adds a professional touch without complicating the process, while the light golden crust signals perfect doneness. This recipe is foolproof, even for first-time bakers—no special equipment or advanced skills required.
By the time you pull them from the oven, you’ll have tender, moist cupcakes with a subtle vanilla aroma that fills your kitchen. The swirl adds visual appeal, making them ideal for breakfast, brunch, or a light dessert.
They’re also versatile—top with whipped cream, a dusting of powdered sugar, or a dollop of lemon curd for extra flair.
Best of all, these cupcakes scale effortlessly for parties or meal prep. The recipe’s efficiency means you can bake a full batch in under 30 minutes, with minimal cleanup. Whether you’re feeding a crowd or treating yourself, this 1-egg vanilla cupcake recipe delivers restaurant-quality results at home.
Ingredients for 1 egg vanilla cupcake
Five core ingredients plus a few magic touches—these cupcakes are lighter than air!
| Ingredient | Amount | Notes |
|---|---|---|
| All-Purpose Flour 🌾 | 1 ½ cups | Sifted for light texture |
| Granulated Sugar 🍚 | ¾ cup | White or light brown |
| Baking Powder 🧂 | 1 ½ tsp | Freshly opened package |
| Salt 🧂 | ¼ tsp | Fine sea salt preferred |
| Large Egg 🥚 | 1 whole | Room temperature for best mix |
| Unsalted Butter 🧈 | ½ cup | Cold, cubed for creaming |
| Pure Vanilla Extract 🌿 | 1 tbsp | High-quality for best flavor |
| Vanilla Bean Paste 🌿 | 1 tbsp | For swirl and extra flavor |
| Milk 🥛 | ½ cup | Whole milk for richness |
| Powdered Sugar 🍚 | 1 cup | For frosting or dusting |
| Vanilla Bean Seeds 🌿 | 1 tsp | Scraped from 1 vanilla bean |
| Cream Cheese 🧀 | 4 oz | Softened for swirl mix |
The vanilla bean is non-negotiable here—skip the imitation! Trader Joe’s sells great ones, or grab a whole bean from Whole Foods and scrape the seeds yourself. That extra flavor makes all the difference. For the butter, Land O’Lakes unsalted is my go-to, but any good brand works. The key is keeping it cold for that perfect creaming texture—no melting! The baking powder should be fresh, so check the expiration date. Bob’s Red Mill is reliable if you’re buying in bulk.
No vanilla bean? Double the pure vanilla extract—it’s not the same, but it’ll work in a pinch. Swapping milk? Oat or almond milk works, but the texture might be slightly denser. The cream cheese for the swirl can be Neufchatel if you want extra richness. For the frosting, powdered sugar is a must—it dissolves smoothly. If you’re feeling fancy, add a splash of milk to thin it out. And hey, no vanilla bean seeds? Pure vanilla extract will still give you that classic vanilla aroma.
Store these cupcakes at room temperature in an airtight container for up to 2 days—they’re best fresh! For the swirl mix, keep it refrigerated in a small jar for up to 1 week. Freeze the batter in portions for up to 3 months—just bake straight from frozen, adding a few extra minutes. The frosting can be made ahead and stored in the fridge for 5 days, just rewhip before using. These cupcakes reheat beautifully—microwave for 10 seconds to soften the frosting if needed.
Why You’ll Love This Recipe
- No-Fuss Baking: I swear by this for days I’m too tired to measure. Just crack that egg, whisk it with sugar until it’s pale and thick—no mixer needed—and fold in the dry stuff. The batter’s so simple, even my roommate made them without burning the kitchen down.
- Vanilla Magic: That single egg and sugar combo creates this unfairly tender crumb, while the vanilla—just a teaspoon, but oh—infuses every bite like a cozy hug. Honestly, the flavor punches way above its ingredient list.
- Crowd-Pleaser Basics: These disappear at picnics, potlucks, or when I need to feed a houseful of people without stress. Bake a dozen, frost with store-bought glaze, and suddenly you’re the hero. (Yes, even on a Tuesday night.)
- Pantry Staple: I make these when I’m out of eggs or sugar—just adjust slightly—and they’re still perfect. Cheap, minimal waste, and they keep for days in the fridge. My go-to when I’m broke but refuse to eat sad leftovers.
Step-by-step instructions for light-as-air vanilla cupcakes
Here’s how to bake cupcakes that are fluffy, tender, and packed with vanilla flavor—no heavy frosting required!
Cream Butter and Sugar for Maximum Lightness
In a stand mixer fitted with the paddle attachment, beat the 0.5 cup unsalted butter (cold and cubed) and 0.75 cup granulated sugar on medium speed for 3-4 minutes. You’re looking for a pale, fluffy mixture that nearly doubles in volume—this incorporates air that makes the cupcakes light and tender.
Here’s the thing—don’t rush this step. The butter should be completely creamed and look almost like whipped cream. If you skip this, your cupcakes will be dense. I like to scrape down the sides of the bowl every minute to ensure even mixing and proper aeration.
Add Egg, Vanilla, and Dry Ingredients
Add the 1 whole large egg (room temperature) and mix on low speed for 30 seconds until fully incorporated. Then add the 1 tbsp pure vanilla extract and 1 tbsp vanilla bean paste, mixing for another 30 seconds until combined. This is where the magic flavor happens—don’t skip the vanilla bean paste for that extra depth.
In a separate bowl, whisk together the 1.5 cups all-purpose flour (sifted), 1.5 tsp baking powder, and 0.25 tsp salt. With the mixer on low speed, gradually add the dry ingredients to the wet mixture, mixing just until combined—you should still see small streaks of flour. Overmixing develops gluten, which makes cupcakes tough. Stop as soon as everything comes together.
Incorporate Milk and Prepare Batter
Add the 0.5 cup milk and mix on low speed for 10-15 seconds until the batter is smooth. The batter will be thick but pourable. Here’s a pro tip: If the batter looks too thick after adding the milk, add 1-2 tablespoons more milk to reach a consistency similar to heavy cream. This ensures your cupcakes rise properly.
Divide the batter evenly among 12 lined cupcake pans (fill each liner about ⅔ full). Gently tap the pans on the counter to release any air bubbles. For the signature swirl, pipe a small dollop of the vanilla bean paste mixture onto each cupcake and swirl it gently with a toothpick before baking.
Bake Until Golden and Springy
Preheat your oven to 350°F and bake the cupcakes for 18-20 minutes, or until a toothpick inserted into the center comes out clean and the tops are golden brown. The cupcakes should spring back slightly when touched—they’ll continue to set as they cool.
I know it’s tempting to open the oven early, but resist! Opening the oven too soon can cause the cupcakes to sink. Let them bake undisturbed until they pass the toothpick test. Once done, transfer them to a wire rack to cool completely before frosting.
Create the Cream Cheese Frosting
In a medium bowl, beat the 4 oz softened cream cheese and 1 cup powdered sugar with an electric mixer on medium speed until smooth and creamy. Add the 1 tsp vanilla bean seeds and mix for another 30 seconds to incorporate. This frosting is the perfect balance of sweet and tangy—don’t skip the vanilla bean seeds for that extra pop of flavor.
Spread the frosting over the cooled cupcakes and dust the tops with a little extra powdered sugar for a beautiful finish. The frosting should be thick enough to hold its shape but still spreadable. If it’s too thick, add 1-2 teaspoons of milk to loosen it. Serve immediately or store in an airtight container for up to 3 days—if they last that long!
Pro Tips For Making 1 Egg Vanilla Cupcake
- Whisk the egg first: Crack the egg into a separate bowl, whisk it like you mean it—no streaks, no lumps—before mixing it into the dry ingredients. I learned this the hard way after ending up with dense, flat cupcakes from unevenly blended batter. A fully emulsified egg keeps your cupcakes light and airy, especially when you’re working with just one.
- Sift the flour twice: Don’t just eyeball the flour—sift it into the bowl first, then sift it again right before mixing. That second sift breaks up any clumps from the baking powder or salt hiding in there, and it aerates the batter for a smoother texture. (Yes, it’s extra work, but your cupcakes will rise better.)
- Fill cups halfway: Stop when your cupcake liners are only half full—overpacking them leads to overflowing, messy tops or cupcakes that spread like pancakes. Trust me, the batter doubles in volume, and you’ll regret that crowded pan when you’re scraping batter off the tray.
- Add vanilla extract last: Mix everything else—flour, sugar, baking powder, salt, egg—then stir in the vanilla right before pouring the batter. If you add it early, the flavor can get lost in the dry ingredients, and you’ll end up with a cupcake that tastes more like flour than vanilla. A little goes a long way, so don’t skimp.
Common mistakes when making great 1 egg vanilla cupcake
Overmixing the Batter
This is the #1 mistake I see with beginner cupcakes. Once you add the dry ingredients, mix just until combined—about 10-15 seconds total. Overmixing develops gluten, which creates tough, dense cupcakes instead of tender, light ones.
I know it’s tempting to make sure everything’s perfectly smooth, but trust the process. The batter should have small flour streaks remaining. 💫
Skipping Room-Temp Egg
Using a cold egg straight from the fridge can cause your batter to curdle or create dense cupcakes. Let your egg sit at room temperature for 30 minutes before using.
I usually set it on the counter while I preheat the oven. The warm egg blends more smoothly and helps create that perfect airy texture.
Incorrect Oven Temperature
Your oven might not actually be at 350°F even if that’s what you set it to. Invest in an oven thermometer—they’re cheap and make all the difference. If your oven runs hot, reduce the temperature by 25°F to prevent overbaking.
Underbaked cupcakes are gummy, while overbaked ones are dry. The toothpick test is your best friend here!
Overfilling Cupcake Liners
Filling liners more than ⅔ full leads to overflow and uneven baking. Use a ¼ cup measuring cup to portion your batter accurately. I like to tap the pans gently on the counter after filling to release any air bubbles that could cause uneven rising.
This ensures consistent results every time.
Ignoring the Swirl Technique
The vanilla bean swirl isn’t just decorative—it adds extra flavor and visual appeal. Use a toothpick to gently swirl the paste mixture in a figure-8 pattern. Don’t overdo it or the swirl will break apart during baking.
I find it helps to pipe a small dollop in the center before swirling to create a more defined pattern.
Baking Without Liners
Always use cupcake liners! They prevent cupcakes from sticking to the pan and help create that perfect dome shape. If you’re in a pinch, grease the pan well and dust with confectioners’ sugar, but liners are the foolproof solution.
I recommend Wilton non-stick liners—they’re my go-to for perfect cupcakes every time. 🧁
Nutrition facts
Frequently asked questions
Can I make these cupcakes without a stand mixer?
Use a hand mixer or even a whisk for the butter and sugar—just beat vigorously for 5-7 minutes until light and fluffy. For the dry ingredients, gently fold them in with a spatula until just combined. The key is patience—keep mixing until the butter is fully incorporated and the batter is smooth.
How do I substitute the vanilla bean paste?
Double the pure vanilla extract to 2 tbsp for the same flavor impact, though the swirl effect will be lost. For a stronger vanilla taste, add ½ tsp vanilla sugar (available at specialty stores) to the dry ingredients. The texture won’t change, but the aroma will be richer.
Why did my cupcakes turn out dense?
Dense cupcakes usually mean overmixing, underbaking, or skipping the creaming step. Double-check you creamed the butter and sugar until pale and fluffy, mixed dry ingredients just until combined, and baked until a toothpick comes out clean. Cold egg or expired baking powder can also cause this.
Can I make these gluten-free?
Yes! Replace the all-purpose flour with a 1:1 gluten-free baking flour blend (like Bob’s Red Mill) and add ½ tsp xanthan gum if your blend doesn’t include it. You may need to adjust the milk to ⅓ cup for proper consistency. The texture will be slightly different but still delicious.
How do I store leftover cupcakes?
Keep them in an airtight container at room temperature for up to 2 days. For longer storage, freeze the unfrosted cupcakes for 1 month—thaw at room temperature before frosting. The frosting can be stored separately in the fridge for 5 days. Refrigerated cupcakes may dry out slightly, so bring them to room temperature before serving.

- 77 Texas BBQ Taco Sauce Recipe: Smoky Chipotle Heat With Caramelized Depth - October 19, 2026
- 1930’s Chocolate Cake Recipe: Vintage Richness With Vanilla Bean Swirls - October 19, 2026
- 6 Ingredient Bread Recipe: No-Knead Wonder With Pantry Staples - October 19, 2026