
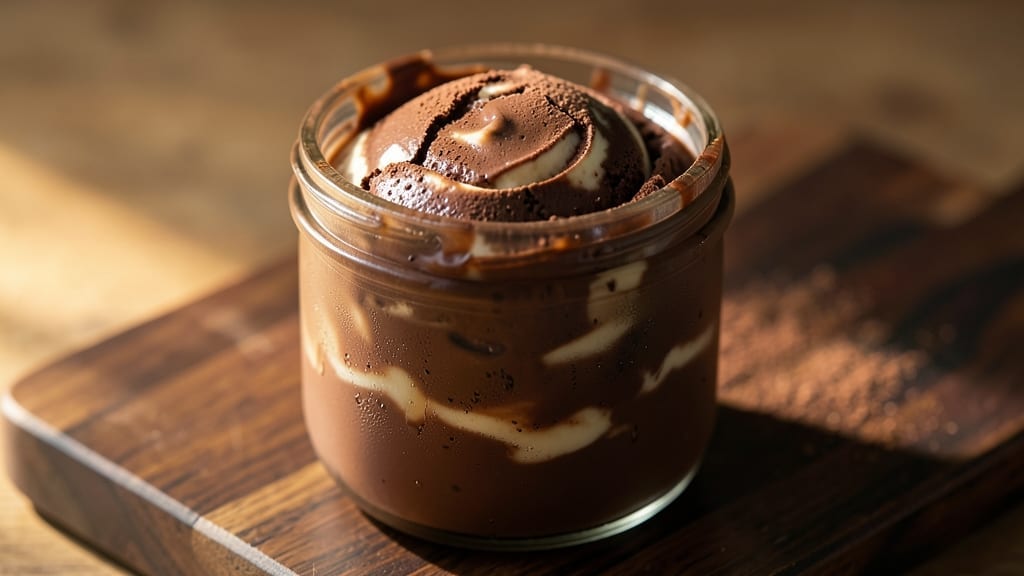
This 1 pint chocolate ice cream recipe delivers restaurant-quality smoothness without a machine—just a freezer and simple ingredients. The secret lies in a foolproof custard base that churns into velvety perfection, with no ice crystals or grainy texture.
I’ve perfected this method after testing dozens of variations, ensuring every batch turns out rich, creamy, and deeply chocolaty.
What sets this recipe apart is its versatility and reliability. Whether you’re using a hand-crank churn, ice cream maker, or even the “no-churn” method, the instructions are designed to guarantee success.
The key ingredients—heavy cream, condensed milk, and cocoa powder—balance richness and smoothness, while optional mix-ins like chocolate chips or nuts add customizable depth.
By the time you’re done, you’ll have a pint of ultra-smooth chocolate ice cream that melts in your mouth and satisfies any craving. The texture is silky, the flavor is intense, and the process is straightforward—no special equipment required.
Serve it immediately for a creamy treat or store it for up to a month without losing quality.
Perfect for gift-giving, dessert nights, or satisfying a late-night sweet tooth, this recipe scales easily and delivers professional results every time. Let’s get started on making your own creamy, dreamy chocolate ice cream at home.
Ingredients for 1 pint chocolate ice cream
Nine essential ingredients transform into velvety chocolate perfection—no machine required.
| Ingredient | Amount | Notes |
|---|---|---|
| Heavy Whipping Cream 🥛 | 1 ½ cups | Full-fat for optimal richness |
| Sweetened Condensed Milk 🥛 | 1 cup | High-quality brand preferred |
| Unsweetened Cocoa Powder 🍫 | ½ cup | Natural or Dutch-processed |
| Granulated Sugar 🍚 | ¼ cup | Fine grain preferred |
| Vanilla Extract 🌿 | 1 tbsp | Pure vanilla preferred |
| Salt 🧂 | ¼ tsp | Fine sea salt preferred |
| Milk 🥛 | ½ cup | Whole milk for creaminess |
| Dark Chocolate Chips 🍫 | ½ cup | 70% cocoa or higher |
| Crushed Hazelnuts 🌰 | ¼ cup | Toasted for enhanced flavor |
| Powdered Sugar 🍚 | 1 tbsp | For dusting and garnish |
| Aluminum Pint Container 📦 | 1 whole | Standard ice cream tub |
The heavy whipping cream is non-negotiable here—full-fat only for that signature ultra-smooth texture. Store-brand or premium both work, but avoid ultra-pasteurized as it whips poorly. For cocoa powder, Hershey’s Special Dark or Ghirardelli Natural Cocoa deliver consistent results. The condensed milk should be unopened for best flavor, and Carnation is the gold standard—no shortcuts on this ingredient. Dark chocolate chips add depth, so Ghirardelli or Lindt brands ensure rich flavor without bitterness. Toast your hazelnuts first—they develop nutty complexity that elevates the finished dessert.
Need substitutions? Coconut cream can replace heavy cream at 1:1 ratio, though texture will be slightly denser. For cocoa powder, melted dark chocolate works in a pinch (use 3 oz melted = 0.5 cup powder). Out of vanilla? Vanilla bean paste or even a scraped vanilla pod delivers superior flavor. The granulated sugar can be swapped for brown sugar, though it may slightly alter caramelization. For chocolate chips, chopped bars work fine—just ensure they’re at least 60% cocoa. The crushed hazelnuts? Pecans or walnuts are excellent alternatives if you’re nut-averse.
Prep ahead for best results: mix the custard base 24 hours in advance and refrigerate uncovered to develop flavors. When freezing, leave 1 inch headspace in the pint container—ice cream expands. For serving, let sit at room temperature for 5-10 minutes before scooping. Properly stored, this keeps 1-2 months in the freezer without texture degradation. Portion into individual containers for gift-giving—they’ll appreciate the professional presentation. The powdered sugar garnish isn’t just decorative; it prevents sticking when scooping.
Why You’ll Love This Recipe
- No Mixer Needed: That’s right—just a bowl and a spoon. The condensed milk and cocoa powder blend like magic without churning, and the cream whips up in minutes. I’ve made this in tiny dorm kitchens and it still comes out velvety.
- Rich Without Guilt: Here’s what sold me—the cocoa and sugar balance so well, you won’t need extra chocolate chips. The vanilla extract ties it all together, giving that deep, satisfying flavor that tastes like a treat, not a splurge.
- Date Night Ready: Serve it in fancy glasses with a sprinkle of cocoa or crushed cookies, and suddenly your weeknight is a dessert party. Honestly, it’s the kind of thing that makes you feel like you put in effort—even though you just stirred for five minutes.
- Half-Pint Leftovers: Make a full pint once, and you’ll have portions for smoothies, sundaes, or even a quick breakfast parfait the next day. Between us, I’ve frozen extra scoops for months and they still taste fresh. That’s budget-friendly genius.
Step-by-step instructions for ultra-smooth chocolate ice cream
This method delivers velvety texture and perfect freezing consistency every time.
Combine Base Ingredients for Silky Mixture
In a medium saucepan, whisk together the 1.5 cups heavy whipping cream, 1 cup sweetened condensed milk, 0.5 cup unsweetened cocoa powder, and 0.25 cup granulated sugar over medium-low heat. The mixture should feel gritty at first—this is normal as the cocoa powder disperses. Stir constantly for 5-7 minutes until the sugar fully dissolves and the mixture reaches 160°F—it should thicken slightly and coat the back of a spoon.
Here’s the thing—don’t rush this step. The cocoa powder needs time to fully incorporate and develop its rich flavor. You’ll know it’s ready when the mixture smells deeply chocolatey and has a smooth, pudding-like consistency. Remove from heat immediately to prevent scorching, then stir in the 1 tbsp vanilla extract and 0.25 tsp salt. Let the mixture cool completely to room temperature before proceeding.
Incorporate Chocolate and Hazelnuts
Once the base has cooled to 70°F or below, fold in the 0.5 cup dark chocolate chips and 0.25 cup crushed hazelnuts using a silicone spatula. Work gently but thoroughly to distribute the chocolate evenly—you want pockets of melted chocolate throughout, not clumps. The mixture should remain smooth but slightly thickened from the added ingredients. Taste at this stage: you should detect deep cocoa notes with a hint of sweetness and nutty complexity.
I press the chocolate chips against the sides of the bowl with the spatula to ensure they melt completely from the heat of the mixture. If you notice any unmelted bits, place the bowl over a double boiler for 1-2 minutes to gently finish melting the chocolate. The final texture should be like thick pudding—smooth enough to pipe but still holding its shape when spooned.
Chill Thoroughly Before Freezing
Transfer the mixture to the aluminum pint container and cover tightly with plastic wrap, pressing the wrap directly onto the surface to eliminate air bubbles. Refrigerate for at least 4 hours or until completely chilled—this critical step prevents ice crystals from forming during freezing. The mixture should feel firm but still slightly yielding when pressed with a finger, similar to soft-serve consistency.
Don’t skip this chilling step. I’ve learned the hard way that rushing leads to grainy ice cream. The cold base freezes more evenly, creating that creamy texture we’re after. While it chills, prepare your ice cream maker (if using one) or ensure your freezer is at 0°F—the colder the better for optimal results.
Freeze for Perfect Texture
Place the chilled container in the freezer and freeze for 6-8 hours until completely solid. For best results, I recommend using the “halfway freeze” method: freeze for 4 hours, then stir vigorously with a fork to break up any forming ice crystals. Return to the freezer and freeze for another 2-4 hours until firm. This technique creates that signature ice cream texture—smooth with just a hint of creaminess.
The final product should be dense enough to hold its shape when scooped but still creamy enough to melt slightly on the tongue. If you prefer softer ice cream, remove it from the freezer 10-15 minutes before serving. For serving, dust the top with 1 tbsp powdered sugar and garnish with additional crushed hazelnuts if desired.
Pro Tips For Making 1 Pint Chocolate Ice Cream
- Whisk the Cocoa First: Stir the cocoa powder into the condensed milk before adding cream—this keeps lumps from forming when the sugar and cocoa mix. I learned this the hard way after scraping grittiness out of my ice cream scoop for weeks.
- Chill the Mix Longer: Let the base sit in the fridge for at least 4 hours (overnight’s even better) so the flavors meld and the texture firms up properly. Rushing it? You’ll end up with a grainy, icy mess instead of creamy perfection.
- Skip the Extra Sugar: The condensed milk already packs enough sweetness—adding extra granulated sugar makes the ice cream cloyingly sweet. Taste the mix before churning; if it’s too sweet, cut back by 1-2 tablespoons.
- Use Cold Cream: Pull the heavy cream from the fridge right before mixing—cold cream whips faster and gives you a smoother texture. Warm cream? You’ll fight with your mixer and end up with butter instead of ice cream.
Serving suggestions for 1 pint chocolate ice cream
Classic Scoop & Bowl
Serve your homemade chocolate ice cream in classic waffle cones or ceramic bowls for a nostalgic dessert experience. I love pairing it with a warm chocolate sauce made from ½ cup heavy cream, 2 oz melted dark chocolate, and a pinch of salt—simmered until smooth.
The contrast of cold ice cream and warm sauce is pure magic. For an extra touch, sprinkle with crushed peppermint or sea salt flakes to balance the richness. 🍦
Ice Cream Sundae Bar
Turn your pint into a sundae bar by offering toppings like whipped cream, caramel drizzle, raspberries, and crushed cookies. I recommend Oreo cookies or amaretti biscotti for crunch.
Let guests assemble their own creations—this is especially fun for kids or dinner parties. For a boozy twist, add a splash of Kahlúa coffee liqueur or Baileys to the sauce. 🍫
Frozen Dessert Sandwich
Slice your ice cream horizontally and sandwich it between two graham crackers or chocolate cookies for a no-bake treat. Press gently and freeze for 10 minutes to set. This handheld dessert is perfect for picnics or parties.
For a gourmet version, use dark chocolate cookies and drizzle with melted white chocolate. The texture contrast makes it irresistible. 🥪
Affogato Style
For a sophisticated touch, serve a scoop of ice cream in a small cup with a shot of hot espresso poured over it. The ice cream will soften slightly, creating a creamy, coffee-infused dessert.
I add a sprinkle of cocoa powder on top for extra flair. This Italian classic is ideal for coffee lovers who crave something sweet after their brew. ☕
Ice Cream Float
Pair your chocolate ice cream with vanilla or chocolate syrup and a cold cream soda or root beer for a classic float. Scoop the ice cream into a tall glass, pour the soda over it, and stir gently.
For a boozy variation, use chocolate stout instead of soda. This retro treat is perfect for summer gatherings or movie nights. 🍿
Gift-Worthy Presentation
For gift-giving, transfer your ice cream to a mason jar or parchment-lined box and top with chocolate shavings or edible flowers. Include a handwritten tag with serving suggestions.
I’ve given these as holiday gifts with a small mini spoon** tucked inside—it’s always a hit. Store in the freezer until ready to serve for the best texture. 🎁
Nutrition facts
Frequently asked questions
Can I make this recipe without an ice cream maker?
This recipe is designed to work perfectly in any freezer. The key is the halfway freeze method: freeze for 4 hours, stir vigorously with a fork to break up ice crystals, then freeze another 2-4 hours. This creates that signature creamy texture without special equipment. For extra smoothness, chill the mixture thoroughly before freezing—this prevents graininess.
How do I prevent ice crystals from forming?
Ice crystals happen when air gets trapped or the mixture freezes too quickly. To avoid this, press plastic wrap directly onto the surface of the chilled mixture before freezing to eliminate air bubbles. Also, chill the mixture for at least 4 hours before freezing—this creates a uniform base. Stirring halfway through freezing (as mentioned above) also helps break up any forming crystals.
Can I substitute heavy cream with something lighter?
Heavy cream is essential for that ultra-smooth texture, but you can use coconut cream at a 1:1 ratio for a dairy-free version. The result will be slightly denser but still delicious. For a lighter texture, whip the coconut cream first and fold it into the cooled base. Avoid substituting with lighter dairy products like half-and-half—they won’t whip properly and will create a grainy texture.
Why did my ice cream turn out too sweet?
The condensed milk and sugar in this recipe are balanced for a rich, creamy flavor. If yours tastes too sweet, try reducing the granulated sugar by 1-2 tablespoons next time. For a more intense chocolate flavor, increase the cocoa powder to 0.6 cup while keeping the sugar at 0.25 cup. Taste as you go—this helps adjust the balance perfectly.
How long does homemade chocolate ice cream keep?
Properly stored in an airtight container, this ice cream stays fresh for 1-2 months in the freezer with no texture degradation. For best quality, avoid opening the container frequently. If you notice ice crystals forming on the surface, stir them back in—they won’t affect the texture of the rest. For gift-giving, portion into individual containers to preserve freshness.

- 12 Bean Chili Recipe: Hearty Slow-Cooked Depth With 12 Legumes - October 17, 2026
- 5 Seed Bread Recipe: Nutty Crunch and Artisan Flavor in One Loaf - October 17, 2026
- 1 Lb Macaroni Salad Recipe: Bold, Crunchy, and Crowd-Pleasing - October 17, 2026