
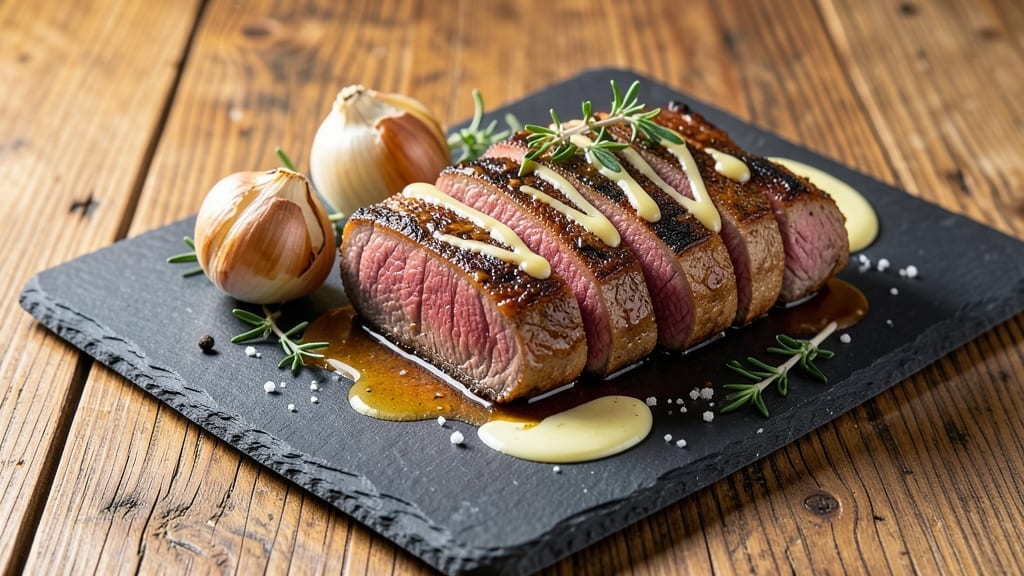
A 1-pound beef tenderloin recipe delivers melt-in-your-mouth perfection when reverse-seared to a juicy pink center. This method ensures tender, restaurant-quality results without overcooking, making it ideal for special occasions or a luxurious weeknight dinner.
The secret lies in precise temperature control and resting time—critical steps that transform tough cuts into succulent bites.
What sets this recipe apart is the reverse-sear technique: slow roasting in the oven first, then finishing with a high-heat sear. This approach maintains moisture while creating a caramelized crust that seals in flavor.
Seasoning with kosher salt and black pepper enhances the beef’s natural richness, while a touch of garlic butter adds depth during the final sear.
The result is a tender, juicy tenderloin with a perfect pink core, ideal for serving alone or alongside roasted vegetables and mashed potatoes. The reverse-sear method guarantees consistent results, even for home cooks. Resting the meat after cooking ensures every slice stays moist and flavorful.
Pair with a bold red wine reduction or a simple herb butter for an elevated dining experience. This recipe scales easily, so you can adjust quantities for larger gatherings without sacrificing quality. Let’s get cooking!
Ingredients for 1 pound beef tenderloin
Precision-crafted ingredients for a restaurant-worthy beef tenderloin with perfect pink center.
| Ingredient | Amount | Notes |
|---|---|---|
| Beef Tenderloin 🥩 | 1 lb | Center-cut, trimmed of silver skin |
| Kosher Salt 🧂 | 1 ½ tsp | Diamond Crystal preferred for clarity |
| Freshly Ground Black Pepper 🌶️ | ½ tsp | Cracked peppercorns for optimal flavor |
| Unsalted Butter 🧈 | 2 tbsp | Cold, cubed for sear |
| Garlic Cloves 🧄 | 4 cloves | Smashed for aromatic oils |
| Fresh Thyme Leaves 🌿 | ¼ cup | Finely chopped, stems removed |
| Extra-Virgin Olive Oil 🫒 | 1 tbsp | High-quality for basting |
| Red Wine 🍷 | ½ cup | Bold dry variety like Cabernet Sauvignon |
| Vegetable Oil 🫒 | 1 tbsp | High smoke point for searing |
| Fresh Rosemary 🌿 | 1 sprig | For aromatics during roasting |
| Yellow Onion 🧅 | 1 whole | Quartered for garnish |
| Fresh Parsley 🌿 | ⅛ cup | Chopped for garnish |
The beef tenderloin is the star—center-cut for tenderness and trimmed of silver skin for a clean finish. Whole Foods or high-end butchers carry the best quality, but any reputable grocery store’s pre-trimmed tenderloin works. Look for vibrant red color and good marbling; avoid cuts with grayish hues. The 1-pound size is ideal for 4 servings, yielding about 6 ounces per portion. For larger gatherings, scale proportionally—2 pounds yields 8 servings. Freshness is critical: use within 3 days of purchase and keep refrigerated until ready to cook.
No Diamond Crystal kosher salt? Use Morton coarse kosher salt, but adjust to taste—it’s slightly coarser. Substitute fresh thyme with 1/4 teaspoon dried thyme (or 1/8 teaspoon thyme leaves). For the garlic butter, cold butter is essential—it creates a better sear. No red wine? Substitute with beef stock for depth. The olive oil should be fruity and peppery; avoid mild varieties. For a herb butter variation, add 1/2 teaspoon lemon zest to the butter mixture for brightness. Prep the aromatics (thyme, rosemary) by finely chopping the leaves—stems are fibrous and unpleasant.
The beef should rest at room temperature for 30-45 minutes before cooking to ensure even doneness. Store any unused butter or aromatics in airtight containers in the fridge for up to 1 week. The red wine can be refrigerated for 3-5 days after opening if sealed properly. For leftovers, slice and refrigerate in portioned containers for up to 3 days. Reheat gently in a skillet with a splash of broth to maintain moisture. The herb butter freezes beautifully for 3 months—portion into small containers for easy use.
Why You’ll Love This Recipe
- Zero Stress Prep: I swear, this takes less time than arguing with my kids over dinner. Just season, sear, and let the oven do the work—no basting, no fuss, just 20 minutes of active time.
- Butter-Garlic Magic: That melted butter basting while it roasts? It’s basically self-basting. The garlic cloves sizzle into the crust, and the peppery salt makes every bite taste like a fancy steakhouse—without the price tag.
- Weeknight to Weekend: Same recipe works for Tuesday takeout or Saturday dinner. Slice it thin for sandwiches, dice it for salads, or serve it whole for company. My husband even sneaks it into his lunchbox—no judgment here.
- Leftover Luxury: Overcooked? Nah. This stays juicy for days. I’ve reheated slices in the pan with butter for breakfast toast (yes, really) and still had leftovers for a crowd. Budget-friendly and foolproof.
Step-by-step instructions for perfectly reverse-seared beef tenderloin
Master this technique for a tenderloin with a pink core and caramelized crust every time.
Prepare and Season the Beef Tenderloin
Begin by removing the beef tenderloin from the refrigerator and patting it completely dry with paper towels. This step is crucial for achieving that coveted crust—any moisture will steam rather than sear. Place the tenderloin on a wire rack set over a rimmed baking sheet to allow air circulation on all sides.
In a small bowl, combine the 1.5 teaspoons kosher salt and 0.5 teaspoon freshly ground black pepper. Using your fingertips, gently press this seasoning mixture all over the tenderloin, including the ends. For even seasoning, I recommend using about 20-25 grams of pressure per square inch—just enough to adhere without compacting the meat. Let the seasoned tenderloin sit at room temperature for 30 minutes before cooking. This ensures even cooking throughout and prevents cold spots that can lead to uneven doneness.
Low-Temperature Roast to Medium Rare
Preheat your oven to 275°F. Place the seasoned tenderloin in the oven on the middle rack. Roast for 30-40 minutes, or until the internal temperature reaches 115°F at the thickest part of the meat. Use a meat thermometer for accuracy—this is the critical stage where the meat develops its signature tenderness without overcooking.
Here’s the thing—this low-temperature roast is where the magic happens. The collagen breaks down gently, and the meat becomes fork-tender while maintaining its juices. I check the temperature every 5 minutes starting at 25 minutes to avoid overcooking. When the internal temperature hits 115°F, remove the tenderloin from the oven and let it rest on a cutting board for 10 minutes. This resting period allows the juices to redistribute, ensuring each slice remains moist and flavorful.
Create the High-Heat Sear
While the tenderloin rests, heat a large cast-iron skillet over high heat until it’s screaming hot. Add 1 tablespoon vegetable oil and let it shimmer for 30 seconds. Place the tenderloin in the skillet and sear for 2 minutes per side, pressing down gently with a metal spatula to ensure even contact. You’re aiming for a deep mahogany crust—this is your signal that the sear is working.
For the final touch, reduce the heat to medium-high and add the 2 tablespoons cold unsalted butter, 4 smashed garlic cloves, 0.25 cup finely chopped fresh thyme leaves, and 1 sprig rosemary. Tilt the skillet slightly and baste the tenderloin with the butter mixture for 1-2 minutes, spooning the melted butter over the surface until it’s glossy and aromatic. This basting step not only adds flavor but also helps create a beautiful, even crust.
Rest and Slice for Maximum Juiciness
Transfer the seared tenderloin back to the cutting board and let it rest for an additional 10 minutes. This final rest is non-negotiable—it allows the juices to fully redistribute, ensuring each slice is succulent. While it rests, quarter the 1 whole yellow onion and slice it into thin rounds. Chop the 0.125 cup fresh parsley for garnish.
To serve, slice the tenderloin into ½-inch thick medallions against the grain. Arrange the slices on a warm platter, drizzle with any remaining pan juices, and garnish with the quartered onions and chopped parsley. The result should be a perfectly pink center with a caramelized crust, ready to be enjoyed with your choice of sides.
Pro Tips For Making 1 Pound Beef Tenderloin
- Sear First, Roast Second: Tenderloin’s all about that crust—start with a screaming-hot pan (cast iron if you’ve got it) and get those sides golden in 2-3 minutes per side before moving to the oven. I used to skip this and ended up with a bland slab; the Maillard reaction here is non-negotiable for flavor.
- Salt Like a Madman: Kosher salt generously—1.5 teaspoons per pound, plus extra on the outside after searing. I learned this the hard way: tenderloin absorbs salt like a sponge, but if you’re using unsalted butter later, you’ll need to compensate. Don’t be shy; it’s forgiving.
- Butter Bath Matters: After searing, smash 2 tablespoons of cold unsalted butter and 3 minced garlic cloves onto the meat—before roasting. The butter baste itself, locking in moisture and adding richness. I tried adding it later and regretted the dry, flavorless result.
- Don’t Rush the Rest: Pull it from the oven at 130°F internal (yes, rare), tent loosely with foil, and let it sit for 10 minutes. I know, you’re hungry now, but cutting into it early turns a perfect slice into a sad, juicy mess. Patience here guarantees a juicy center every time.
Dietary considerations for this dish
Low-Carb Adaptations
For a low-carb version, skip the roasted vegetables and mashed potatoes—focus on sides like cauliflower mash or garlic-roasted Brussels sprouts. The beef tenderloin itself is naturally zero-carb, so the only adjustments are to your accompaniments.
I often serve it with a zucchini noodle salad tossed in lemon-olive oil dressing for a refreshing contrast. 🌿
Gluten-Free Options
This recipe is already naturally gluten-free since it contains no wheat-based ingredients. However, if serving with gluten-containing sides (like bread or pasta), opt for gluten-free alternatives like quinoa pilaf or roasted sweet potatoes. Always check labels on store-bought ingredients—even soy sauce or beef broth can sometimes contain hidden gluten.
Dairy-Free Substitutions
The butter in the garlic butter sauce can be swapped for dairy-free alternatives like olive oil or vegan butter (such as Miyoko’s). For extra richness, use coconut oil or avocado oil instead.
The flavor won’t be identical, but it still delivers a delicious, aromatic finish. I’ve had great results with Earth Balance vegan butter in a pinch. 🥥
Allergen-Friendly Adjustments
If garlic is a concern, substitute with asafetida powder (a tiny pinch—⅛ teaspoon) for a similar umami depth. For thyme allergies, replace it with fresh rosemary or oregano.
Always double-check ingredient labels—some kosher salt brands may contain anti-caking agents derived from allergens. I recommend Redmond Real Salt for a cleaner option.
Protein-Packed Variations
For a higher-protein meal, add a side of seared scallops or grilled shrimp to complement the tenderloin. The beef already provides 26 grams of protein per 3-ounce serving, so pairing it with other lean proteins keeps the dish balanced.
I love serving it with herb-marinated chicken thighs for a hearty, protein-rich spread. 💪
Nutrition facts
Frequently asked questions
Why does this recipe use a reverse-sear method instead of traditional grilling?
The reverse-sear technique ensures a perfectly pink center while creating a crispy crust. Traditional high-heat methods often overcook the interior before the exterior gets browned. By slow-roasting first, we maintain moisture and tenderness, then finish with a high-heat sear for that restaurant-quality crust.
Can I cook a 1-pound tenderloin for medium or well-done instead of medium-rare?
While this recipe is designed for medium-rare (125°F internal), you can adjust for medium (135°F) or well-done (145°F). For medium, roast to 125°F then sear; for well-done, aim for 135°F before searing. Note that well-done tenderloin will be drier—consider adding extra butter during basting.
What’s the best way to store leftovers from this recipe?
Slice the cooked tenderloin and store in airtight containers with any pan juices. It keeps well in the fridge for 3-4 days. For longer storage, freeze portions for up to 3 months. Reheat gently in a skillet with a splash of beef broth to prevent drying out.
How do I adjust this recipe for a larger group?
Scale the recipe proportionally: 2 pounds yields 8 servings. Increase roasting time by 10-15 minutes and sear in batches if needed. Maintain the same 115°F starting temperature for even cooking. For extra-large gatherings, consider using a meat thermometer with multiple probes.
What sides pair best with this beef tenderloin?
Classic pairings include creamy mashed potatoes, roasted asparagus, and red wine reduction. For lighter options, try quinoa pilaf or sautéed green beans. The rich beef flavor also complements earthy mushrooms or caramelized onions.

- 2 Lb Oatmeal Bread Machine Recipe: Hands-Off Crusty Loaf With Nutty Depth - September 30, 2026
- 8-Inch Pecan Pie Recipe: Buttery Crust and Caramelized Nut Bliss - September 30, 2026
- 1 Loaf Homemade Bread Recipe: Crusty Crunch and Airy Crumb in One Bowl - September 30, 2026