
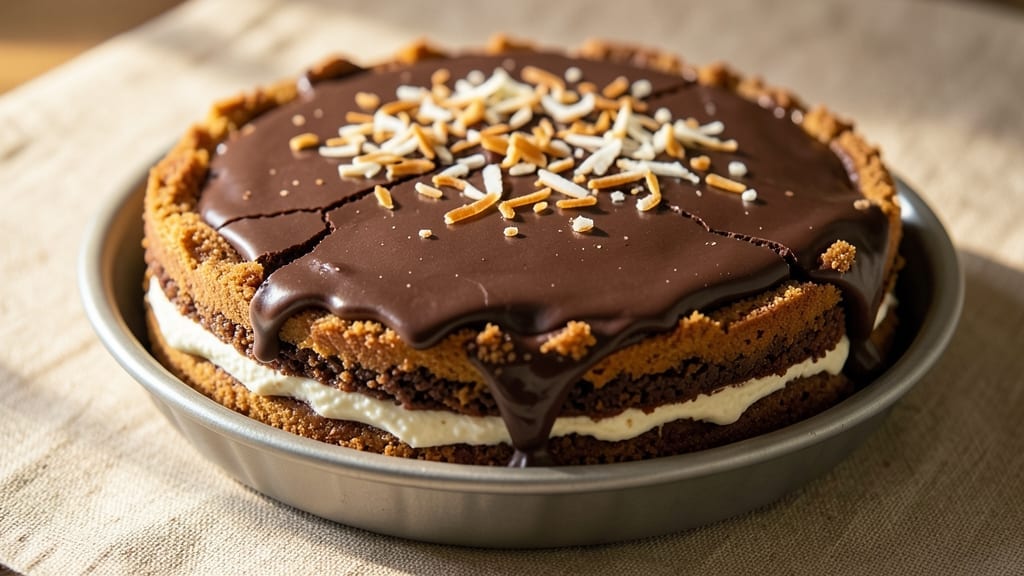
A 10-inch chocolate cheesecake with a fudgy crust and velvety swirls is the showstopper dessert that will impress any crowd. This recipe delivers a perfectly baked center with a rich chocolate filling and a buttery crust that holds together beautifully.
The secret lies in precise baking techniques and a water bath that ensures a smooth texture without cracks.
What sets this recipe apart is the balance between a dense, chocolatey crust and a light, airy filling. The filling is whipped to the perfect consistency, then folded with melted chocolate for those signature swirls.
Baking at 325°F in a water bath guarantees a creamy texture, while gradual cooling prevents any unfortunate cracks.
By the time you slice into this cheesecake, you’ll be rewarded with a velvety, rich center and a crisp yet tender crust that complements every bite. The chocolate ganache or fresh berries on top add the perfect finishing touch, making it ideal for celebrations or a special dessert night.
This recipe is designed for success—whether you’re a beginner or a seasoned baker. With clear instructions and foolproof techniques, you’ll achieve a restaurant-quality chocolate cheesecake that tastes even better than the ones you’ve always dreamed of. Let’s get started!
Ingredients for 10 inch chocolate cheesecake
Pantry staples meet decadent dessert—this list delivers a showstopping 10-inch chocolate masterpiece.
| Ingredient | Amount | Notes |
|---|---|---|
| All-Purpose Flour 🌾 | 1 cup | For crust structure and texture |
| Unsalted Butter 🧈 | 1 cup | Cold and cubed for crust |
| Granulated Sugar 🍚 | 1 cup | For crust sweetness |
| Cocoa Powder 🍫 | ½ cup | Natural, unsweetened for richness |
| Large Eggs 🥚 | 3 whole | Room temperature for smooth filling |
| Cream Cheese 🧀 | 32 oz | Full-fat, room temperature |
| Powdered Sugar 🍚 | 1 ½ cups | For filling sweetness |
| Sour Cream 🥛 | ½ cup | Full-fat for creaminess |
| Vanilla Extract 🌿 | 1 tbsp | Pure, high-quality vanilla |
| Dark Chocolate Chips 🍫 | 1 ½ cups | Semi-sweet, high cocoa content |
| Heavy Whipping Cream 🥛 | 1 cup | Cold for whipping |
| Salt 🧂 | ½ tsp | Fine sea salt for balance |
| Vegetable Oil 🫒 | 1 tbsp | For greasing the pan |
The cocoa powder and butter are your crust game-changers. Valrhona or Ghirardelli cocoa gives that restaurant-quality depth, but Hershey’s Special Dark works in a pinch. For butter, Plugrá or Land O’Lakes are reliable—just make sure it’s cold when you cut it into cubes. The chocolate chips? Ghirardelli or Guittard melt beautifully, but avoid the cheap supermarket brands—they burn easily. Pre-grind your cocoa powder for a smoother crust texture, and sift it with the flour to avoid lumps. Trust me, this step makes all the difference.
No cream cheese? Substitute with a mix of mascarpone and ricotta—it’s lighter but still creamy. Running out of vanilla? Vanilla bean paste works too, but pure extract is non-negotiable for that authentic flavor. The dark chocolate chips can be swapped for chopped chocolate bars (use the same amount), but avoid milk chocolate—it won’t melt as smoothly. For the sour cream, full-fat is key here (trust me on the full-fat version). If you’re using a water bath, line your springform pan with parchment paper first—it makes slicing a breeze later. And if you’re worried about cracks, cover the cheesecake with plastic wrap while it cools.
This cheesecake keeps beautifully—4-5 days in the fridge, fully wrapped. For longer storage, freeze it (up to 3 months) and thaw overnight in the fridge. The crust stays crisp, but the filling might firm up slightly—just let it sit at room temperature for 10 minutes before serving. To reheat, microwave in 20-second bursts until fully thawed. And if you’re making it ahead for a party, assemble it the night before—it tastes even better after the flavors meld overnight.
Why You’ll Love This Recipe
- No-Bake Magic: I swear by this recipe when I’ve got zero energy—just melt butter, mix in sugar and cocoa, then fold in eggs. The crust? Five minutes with flour, butter, and sugar in a food processor. Honestly, it’s the kind of dessert that feels like a hug for your taste buds without the fuss.
- Rich Without Guilt: That cocoa powder isn’t just any cocoa—it’s the good stuff, and it delivers a deep, velvety chocolate flavor that doesn’t taste like it’s hiding anything. The butter and sugar create this luscious, almost fudgy texture, but it’s still light enough to eat for breakfast (yes, I’ve done it).
- Party in a Pan: This 10-inch size is perfect for gatherings—cut into squares, and you’ve got a crowd-pleaser that doesn’t require a dozen individual servings. Between us, it’s also my go-to for date nights or lazy Sundays because it looks impressive with almost no effort.
- Leftovers? Best Part: Between the crust and the filling, this cheesecake keeps for days in the fridge, and the flavor only gets better as it sits. I’ll be real: I’ve reheated slices in the microwave with a splash of milk, and it’s like eating a warm, gooey cloud. Plus, the ingredients are basic pantry staples—no specialty items to break the bank.
Step-by-step instructions for 10 inch chocolate cheesecake
Here’s how to craft a decadent chocolate cheesecake with a fudgy crust and luxurious swirls.
Prepare the Chocolate Crust
Preheat your oven to 350°F and grease a 10-inch springform pan with the 1 tablespoon vegetable oil. In a food processor, combine the 1 cup all-purpose flour, 1 cup granulated sugar, and 0.5 cup cocoa powder. Pulse until the mixture resembles fine crumbs.
Add the 1 cup cold, cubed unsalted butter and pulse again until the mixture looks like wet sand. Press this mixture firmly and evenly into the bottom of the prepared pan, creating an even layer. Bake for 10 minutes to set the crust—this prevents a soggy base. Let it cool while you prepare the filling.
Whip the Cream Cheese Filling
While the crust bakes, let the 32 oz cream cheese and 3 whole large eggs sit at room temperature for 30 minutes to ensure smooth blending. In a large mixing bowl, beat the cream cheese on medium speed until completely smooth, scraping down the sides as needed.
Gradually add the 1.5 cups powdered sugar, 0.5 cup sour cream, and 1 tablespoon vanilla extract while continuing to mix. The mixture should be light and fluffy. In a separate bowl, whip the 1 cup cold heavy whipping cream to stiff peaks—this will create the signature swirls later.
Layer and Swirl the Filling
Pour about half of the cream cheese mixture into the cooled crust. Using a spatula, spread it evenly. Then, gently fold the whipped cream into the remaining cream cheese mixture until just combined. Spoon this swirled mixture over the first layer.
Here’s the trick: Use a knife to create gentle swirls in the filling, dragging it through the cream cheese layer to create marbled patterns. This ensures each bite delivers both rich chocolate and velvety cream cheese. Sprinkle the 1.5 cups dark chocolate chips evenly over the top for extra decadence.
Bake to Perfection
Place the cheesecake in the preheated oven and bake for 50-55 minutes until the edges are set and the center still jiggles slightly (it will continue to set as it cools). Avoid opening the oven door during baking—this prevents cracks from temperature fluctuations.
Once baked, turn off the oven, crack the door open slightly, and let the cheesecake cool inside for 30 minutes. Then, remove it from the oven and let it cool completely at room temperature. This gradual cooling prevents cracks and ensures a smooth texture.
Chill and Serve
After cooling, refrigerate the cheesecake for at least 6 hours (overnight is ideal). This chilling time allows the flavors to meld and the texture to firm up perfectly. When ready to serve, run a knife around the edges to loosen it from the pan.
Slice the cheesecake carefully with a warm knife (dipped in hot water and wiped dry) for clean cuts. Each piece should reveal those beautiful chocolate swirls throughout the creamy filling. Serve chilled with fresh berries or a drizzle of chocolate sauce for a showstopping dessert.
Pro Tips For Making 10 Inch Chocolate Cheesecake
- Preheat Pan First: Place your 10-inch springform pan in the oven while preheating to 325°F—this guarantees the crust sets immediately when you pour in the batter. I learned this the hard way after watching my first chocolate cheesecake slide right out of a cold pan like a sad, melted puddle.
- Sift That Cocoa: Sift the cocoa powder twice—once with the dry ingredients, once again before folding it into the butter-sugar mix. Unsifted cocoa packs like dirt, and your cheesecake will taste unevenly bitter. (Yes, even if you’re impatient like me.)
- Avoid Overmixing Eggs: Mix the egg yolks and sugar just until combined—about 30 seconds—then fold in the whipped egg whites gently. Overmixing incorporates air, which causes cracks. My grandmother swore by this, and she was right: the texture stays silky, not rubbery.
- Water Bath, But Not Too Deep: Fill a deep baking dish with hot water—about halfway up the springform pan’s sides—before adding the cheesecake. If the water touches the batter, it’ll steam too hard and split the top. (Your future self will thank you.)
Dietary considerations for 10 inch chocolate cheesecake
Gluten-Free Adaptations
For a gluten-free version, replace the 1 cup all-purpose flour with 1 cup gluten-free 1:1 baking flour like Bob’s Red Mill or King Arthur. I’ve tested this substitution and found it creates a sturdy crust that holds up beautifully.
Just make sure your gluten-free flour blend contains xanthan gum—it’s key for binding. 🌾
Press the gluten-free crust mixture firmly into the pan, just like the original, and bake it for the same 10 minutes to set. The texture will be slightly denser but still delicious. After baking, let it cool completely before adding the filling to prevent any crumbling.
Dairy-Free Options
To make this cheesecake dairy-free, swap the 32 oz cream cheese for 32 oz dairy-free cream cheese like Kite Hill or Miyoko’s. For the 1 cup heavy whipping cream, use 1 cup full-fat coconut cream (chilled overnight) or dairy-free whipped topping like Reddi-wip’s dairy-free version.
The coconut cream works best when chilled for at least 12 hours to thicken properly.
Replace the 1 cup unsalted butter in the crust with 1 cup dairy-free butter like Earth Balance or Miyoko’s. The crust will still be rich and flavorful, though slightly less tender. For extra richness, add 2 tbsp melted coconut oil to the crust mixture.
Lower-Sugar Versions
Cut sugar by 25% in both the crust and filling—reduce the 1 cup granulated sugar in the crust to ¾ cup and the 1.5 cups powdered sugar in the filling to 1 cup.
Use monk fruit sweetener or erythritol (like Lakanto) to replace ½ cup of the powdered sugar without affecting texture. I’ve found this keeps the cheesecake sweet enough while reducing calories significantly.
For the crust, replace ¼ cup granulated sugar with ¼ cup sugar-free maple syrup or agave nectar to add moisture without extra sweetness. The crust will still be sturdy and flavorful, though slightly less sweet. Balance with a dusting of unsweetened cocoa powder on top before baking for extra depth.
Nut-Free Considerations
This recipe is naturally nut-free, but always check labels on ingredients like cocoa powder and chocolate chips for cross-contamination warnings. Brands like Hershey’s Special Dark and Ghirardelli are typically safe, but I recommend calling the manufacturer if you have severe allergies.
For extra safety, use a dedicated nut-free kitchen space when preparing this dessert.
If you’re concerned about cross-contamination, use separate utensils and bowls for the crust and filling. Store the cheesecake in an airtight container with a nut-free label to avoid accidental exposure. Always double-check ingredient packaging for allergen warnings before purchasing.
Nutrition facts
Frequently asked questions
Why does my chocolate cheesecake crack?
Cracks usually happen from temperature changes or overbaking. Always bake at 325°F with a water bath and avoid opening the oven door during baking. Let it cool gradually in the oven after baking, then refrigerate for at least 6 hours before slicing. The filling needs time to fully set.
Can I make this cheesecake in a different-sized pan?
Yes, but adjust baking times accordingly. For an 8-inch pan, reduce baking time by 15-20 minutes and chill for 4 hours instead. For a 9-inch pan, use the same recipe but bake for 50 minutes and chill for 5 hours. Always use a water bath and let it cool gradually.
How do I prevent a soggy crust?
Bake the crust for 10 minutes before adding filling to set it properly. Use a springform pan with parchment paper at the bottom for easy removal. Chill the assembled cheesecake for at least 6 hours before slicing—this helps the crust stay firm while keeping the filling creamy.
What’s the best way to store leftovers?
Wrap tightly in plastic wrap and store in an airtight container in the fridge for up to 5 days. For longer storage, freeze for 3 months. Thaw overnight in the fridge—never at room temperature. To reheat, microwave in 20-second bursts until fully thawed.
Can I add coffee or espresso to the filling?
Add 1-2 tablespoons of instant espresso powder to the cream cheese mixture for a mocha twist. Dissolve it in the 1 cup powdered sugar first to prevent clumping. Start with 1 tbsp and adjust to taste—too much can make the filling bitter.

- 3 Layer Eggnog Cake Recipe: Spiced Rum-Infused Frosting and Boozy Swirls - October 6, 2026
- 1800 Ultimate Margarita Mix Recipe: Frozen or On-The-Rocks Versatility - October 6, 2026
- 3 Eggs and Cabbage Recipe: Savory Scramble With Crispy Edges - October 6, 2026