
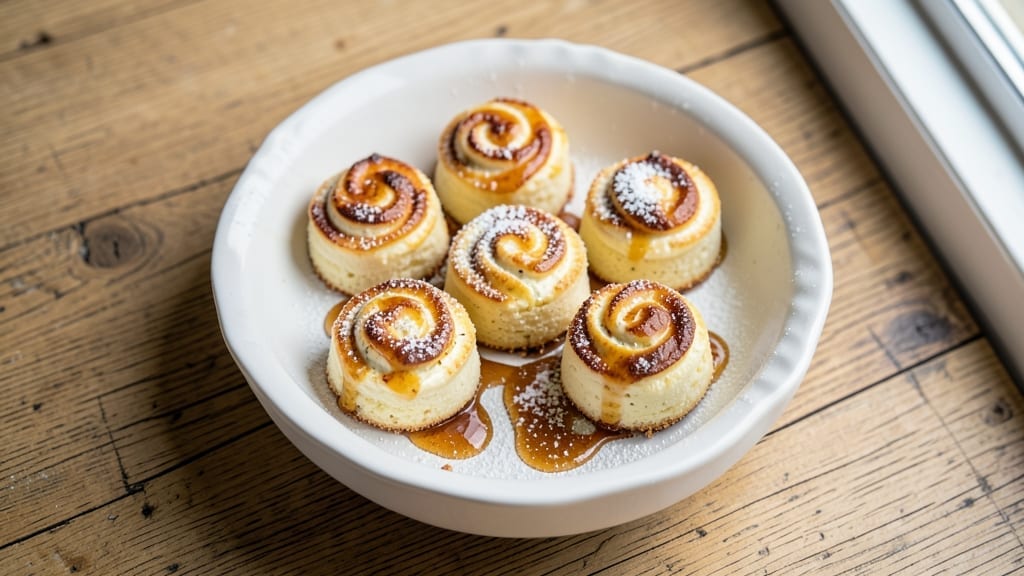
This 7Up cream cheese cake bites recipe transforms a nostalgic soda flavor into bite-sized dessert perfection—bright citrus notes that cut through the rich cream cheese frosting with every bite.
The secret lies in blending 7Up syrup into the batter, creating a zesty, tangy twist that keeps the classic cream cheese cake texture you love while adding a playful, retro kick.
I developed this recipe after years of experimenting with soda-infused desserts, and these bites consistently disappear faster than the classic version.
The magic happens in the frosting, where cream cheese and powdered sugar create a smooth, pipeable coating that holds its shape while staying tender. These aren’t your typical cake pops—they’re foolproof to assemble, with a crumbly yet moist cake base that pairs perfectly with the citrusy 7Up flavor.
The recipe uses a simple boxed cake mix for convenience, but you can easily swap it for homemade batter if you prefer a lighter texture.
What you’ll end up with are golden-brown, bite-sized treats that look as good as they taste—crisp edges from a quick dip in chocolate or sprinkles, and a creamy center that’s impossible to resist.
The 7Up flavor shines through without overpowering the cream cheese, making these ideal for parties, potlucks, or satisfying a sudden dessert craving. They stay fresh for up to a week when stored properly, so you can make a batch ahead and enjoy them whenever the mood strikes.
For extra flair, roll the bites in crushed citrus rind or colorful sprinkles before chilling. Serve them on a platter with a side of vanilla ice cream for the ultimate nostalgic dessert experience. Let’s get started on these zesty, crowd-pleasing bites!
Ingredients for 7up cream cheese cake bites
Bright citrus meets creamy classic—these ingredients turn nostalgia into bite-sized magic.
| Ingredient | Amount | Notes |
|---|---|---|
| Vanilla Cake Mix 🍰 | 1 box | Box (15.25 oz) preferred |
| 7Up Syrup 🍹 | ½ cup | Original flavor only |
| Large Eggs 🥚 | 4 whole | Room temperature preferred |
| Unsalted Butter 🧈 | ½ cup | Softened, not melted |
| All-Purpose Flour 🌾 | ¼ cup | For extra moisture |
| Milk 🥛 | ½ cup | Any variety works |
| Cream Cheese 🧀 | 8 oz | Room temperature, full-fat |
| Powdered Sugar 🍚 | 2 cups | Sifted for smooth frosting |
| Vanilla Extract 🌿 | 1 tsp | Pure vanilla preferred |
| White Chocolate Chips 🍫 | 1 cup | For dipping edges |
| Rainbow Sprinkles 🌈 | ½ cup | Optional for decoration |
| Lemon Zest 🍋 | 1 tbsp | Fresh for bright flavor |
The 7Up syrup is non-negotiable for that authentic soda kick. Grab the original flavor—none of that diet stuff. I usually pick up mine at Target or Walmart since it’s cheaper there than specialty stores. For the cake mix, Betty Crocker—it’s consistent and reliable. The cream cheese? Philadelphia is the only brand I trust for this recipe. It’s worth the extra few bucks to get the full-fat version (the low-fat one gets grainy). If you’re feeling fancy, add a splash of lemon juice to the batter for extra zing—trust me on this.
No 7Up syrup? Orange juice concentrate works in a pinch (use half the amount). Running low on vanilla extract? Almond extract at half the quantity gives a similar vibe. The white chocolate chips can be swapped for colored sprinkles if you’re going for a more playful look. For the cake mix, if you’re using homemade batter, add an extra egg to help bind everything together. The lemon zest can be skipped if you’re not a fan of extra citrus, but I always include it—it takes these bites to the next level.
These keep beautifully for 5 days in an airtight container at room temperature, or 2 weeks in the fridge. For freezing, chill the bites completely first, then transfer to a single layer on a tray before bagging. They thaw in 30 minutes at room temp. Pro tip: make the frosting a day ahead—it tastes even better after the flavors meld. Store it in the fridge until ready to use.
Why You’ll Love This Recipe
- No Mix-Up Needed: I swear by the boxed cake mix here—it’s my shortcut to perfect crumb texture without measuring dry ingredients. Just fold in the 7Up syrup and cream cheese, and you’ve got a foolproof base. Honestly, the only measuring I do is the eggs and butter, which takes all of 3 minutes.
- Nostalgic Twist: That 7Up syrup isn’t just a flavor—it’s a vibe. The citrusy fizz cuts through the richness of the cream cheese, giving these bites a playful, retro kick. My kids think it’s dessert, but I call it a mood booster any day of the week.
- Party in a Bite: These are my go-to for game day, potlucks, or just because. Bake a tray, chill them, and pop them in the fridge for hours—they stay fresh and bite-sized. No one will guess they’re secretly packed with cake mix magic.
- Budget-Friendly Magic: I make a double batch for $5 and have leftovers for snacking all week. The cream cheese adds luxury without breaking the bank, and the syrup stretches further than you’d think. (Yes, even on a Tuesday night.)
Step-by-step instructions for 7Up cream cheese cake bites
Here’s how to make these addictive, citrus-kissed cake bites that taste like dessert heaven in every bite.
Prepare the Cake Batter
In a large mixing bowl, combine the 1 box vanilla cake mix, 0.5 cup 7Up syrup, 4 whole large eggs, 0.5 cup softened unsalted butter, 0.5 cup milk, and 1 tbsp lemon zest. Use a hand mixer or stand mixer to beat on medium speed for 2-3 minutes until completely smooth and no dry spots remain.
Here’s the thing—those large eggs should be room temperature for best results. If they’re cold, warm them gently by placing them in warm water for 5 minutes before using. The 7Up syrup adds that signature citrusy flavor while keeping the texture moist. Mix in the 0.25 cup all-purpose flour last, just until combined—overmixing makes these bites dense.
Bake the Cake Bites
Preheat your oven to 350°F and line two baking sheets with parchment paper. Using a 2-tablespoon cookie scoop or measuring spoon, portion the batter into 24 equal mounds on the prepared sheets, spacing them 2 inches apart. This ensures even baking and prevents overcrowding.
Bake for 12-15 minutes until the edges are golden brown and a toothpick inserted into the center comes out clean. I know it seems like a short time, but these bite-sized cakes bake faster than full-sized ones. The lemon zest will give them a subtle citrus aroma as they bake—trust me, it’s worth it.
Prepare the Cream Cheese Frosting
While the cake bites cool, beat the 8 oz cream cheese and 2 cups powdered sugar in a separate bowl until smooth. Add the 1 tsp vanilla extract and mix until fully incorporated. The frosting should be thick but spreadable—if it’s too stiff, add 1-2 teaspoons of milk to loosen it.
Here’s where it gets fun—the cream cheese needs to be room temperature, or you’ll end up with lumps. If yours is cold, let it sit at room temperature for 30 minutes before starting. The powdered sugar should be sifted first to avoid graininess in the final frosting. Spread a thin layer of frosting over each cooled cake bite—just enough to hold the toppings.
Assemble and Decorate
Dip the bottom half of each cake bite into the 1 cup white chocolate chips to coat the edges. Immediately press the bite onto a rainbow sprinkle so it sticks. This creates that classic cake bite look while keeping the texture perfect. Work quickly—the white chocolate hardens fast!
Let the white chocolate set for 10 minutes at room temperature before serving. The rainbow sprinkles add a playful touch, but you could also use mini chocolate chips or crushed pistachios if you prefer. These bites keep well in an airtight container in the fridge for up to 5 days, though they rarely last that long.
Pro Tips For Making 7up Cream Cheese Cake Bites
- Chill the Syrup First: Pour the 7Up syrup into an ice bath for 10 minutes before folding it into the batter—this keeps the cream cheese from melting prematurely. I learned this the hard way after watching my first batch turn into a sad, soupy mess in the oven.
- Whisk Eggs Until Ribbon-Thick: Beat the eggs with the butter until they hold a slow ribbon when the whisk is lifted—about 3-4 minutes longer than you think. Overmixed? The bites will be dense. Under-mixed? They’ll crack in the oven. Aim for that perfect stretch.
- Grease Muffin Cups Well: Use a pastry brush to coat the muffin cups with softened butter, then dust with flour—don’t skip the flour, even if it feels like overkill. The 7Up syrup makes these sticky, and a well-greased cup guarantees easy release (your future self will thank you when you’re not prying bites off the tin).
- Bake in Two Batches: Fill the muffin tin halfway, bake the first batch until golden (about 12-15 minutes), then add the second round. Crowding the pan steams the bites instead of browning them—trust me, I’ve seen the sad, pale results. Patience here makes all the difference.
Make-ahead tips for leftovers
Prep Ahead
Make the cream cheese frosting a full 24 hours before assembling—it develops richer flavors when chilled. Store it in an airtight container in the fridge, and simply whisk it back to smooth consistency before using.
The 7Up syrup can also be mixed into the batter up to 12 hours ahead; just cover and refrigerate until ready to bake. 💫
Baking Efficiency
Bake two batches at once by using both oven racks—place one tray on the middle rack and another on the top rack. Rotate the pans halfway through baking for even golden-brown edges. Pre-scoop the batter into 24 uniform portions and refrigerate them for 30 minutes before baking to prevent spreading.
Frosting Shortcuts
For a no-chill frosting, beat the cream cheese with 1 tsp lemon juice instead of vanilla extract—it adds brightness and keeps the texture stable at room temperature. If you’re short on time, use store-bought white chocolate chips (like Hershey’s) for dipping instead of melting your own.
The rainbow sprinkles can be swapped for crushed graham crackers for a nostalgic twist. 🌈
Freezer-Friendly
Assembled bites freeze beautifully for up to 3 months—just chill them completely first, then transfer to a single layer on a tray before bagging. Once frozen, stack them in a ziplock bag with parchment paper between layers to prevent sticking.
Thaw for 1 hour at room temperature before serving. Pro tip: Label the bag with the date to track freshness.
Portion Control
Use a 2-tablespoon ice cream scoop for perfectly sized bites every time—no more guessing! For mini versions, reduce the batter to 12 portions and bake at 375°F for 8-10 minutes. If you’re making these for a party, double the recipe and use three baking sheets to maximize space.
The lemon zest can be pre-measured into a small jar for easy access during assembly. ✨
Storage Hacks
Keep bites fresh for 7 days at room temperature by storing them in a lidded cake carrier (like Wilton’s)—it protects them from drying out. For longer storage, refrigerate in an airtight container with a paper towel on top to absorb moisture.
If the frosting softens in warm weather, chill the bites for 10 minutes before serving to restore crispness. 🧊
Nutrition facts
Frequently asked questions
Can I use diet 7Up syrup in this recipe?
I don’t recommend it—the artificial sweeteners in diet 7Up won’t give you that same bright, citrusy flavor these bites are known for. The natural sugar in regular 7Up syrup helps create the perfect balance with the cream cheese frosting. If you’re watching sugar, try using half the amount of regular syrup and adding a splash of orange juice concentrate for that tangy kick.
Why did my cake bites turn out too dense?
Overmixing the batter is the most common culprit! Once you add the flour, mix just until combined—no more than 10 strokes with a spatula. Also ensure your butter and cream cheese are softened (not melted) and your eggs are room temperature. If the batter seems too thick, add 1-2 tablespoons of milk to help lighten the texture.
How can I make these bites gluten-free?
Swap the vanilla cake mix for a 1:1 gluten-free baking mix (like Bob’s Red Mill) and use gluten-free all-purpose flour. The recipe will work the same way, but check that your gluten-free mix doesn’t require extra eggs or liquid. For the frosting, make sure your powdered sugar is also gluten-free certified.
Can I make these without white chocolate chips?
Try melting 1 cup of white candy melts instead for an easier coating, or use colored sprinkles for a festive look. For a healthier option, dip the edges in melted coconut oil and roll in crushed nuts or coconut flakes. The key is to keep the coating thin so it sets quickly.
What’s the best way to transport these to a party?
Use a lidded cake carrier or stack them in a ziplock bag with layers separated by parchment paper. For extra protection, place them in a cooling rack inside a box to prevent crushing. Keep them in a cool place until serving—these bites are perfect for room temperature, but they’ll stay fresher longer if chilled until the last minute.

- 3 Layer Eggnog Cake Recipe: Spiced Rum-Infused Frosting and Boozy Swirls - October 6, 2026
- 1800 Ultimate Margarita Mix Recipe: Frozen or On-The-Rocks Versatility - October 6, 2026
- 3 Eggs and Cabbage Recipe: Savory Scramble With Crispy Edges - October 6, 2026