
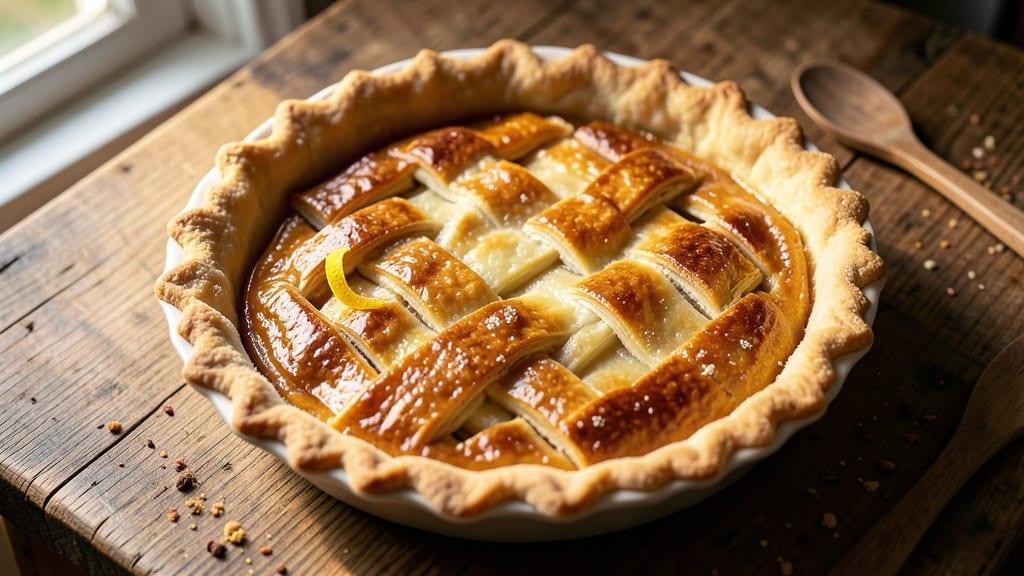
This 10-inch deep dish pie crust recipe demands precision to craft the ideal flaky, sturdy base for your favorite sweet or savory fillings. The secret lies in chilling the dough thoroughly and rolling it evenly to prevent cracking.
This recipe delivers a buttery, golden-brown crust that holds its shape under even the heaviest fruit or custard fillings.
Professional bakers know that proper layering of cold butter between dough sheets creates those signature flaky layers. I’ve refined this method over years to ensure the crust stays crisp at the edges while remaining tender inside.
The dough rests overnight for maximum flavor development, which transforms a simple crust into something extraordinary.
Once baked, you’ll have a deep dish crust with flaky layers that hold their shape perfectly, even when loaded with dense fillings. This crust is ideal for classic apple pie, rich pumpkin pie, or even savory options like chicken pot pie.
The key is patience—never rush the chilling or rolling steps, as they’re critical for success.
With this recipe, you’ll master the art of deep dish pie crusts that rival bakery quality. The instructions include step-by-step guidance for rolling, baking, and avoiding common pitfalls like shrinking or cracking. Let’s get started on creating your perfect pie foundation.
Ingredients for 10 inch deep dish pie crust
Five simple ingredients transform into a restaurant-quality deep dish crust that holds heavy fillings perfectly.
| Ingredient | Amount | Notes |
|---|---|---|
| All-Purpose Flour 🌾 | 3 ½ cups | Sifted for even texture |
| Unsalted Butter 🧈 | 1 ¼ cups | Cold, cubed, unsalted preferred |
| Ice Water 💧 | ½ cup | Chilled for firm dough |
| Diamond Crystal Kosher Salt 🧂 | 1 tsp | Fine grain preferred |
| Granulated Sugar 🍚 | 1 tbsp | For golden crust edges |
The butter is non-negotiable here—cold cubes are essential for those signature flaky layers. Plugrá or Land O’Lakes work great, but avoid pre-softened tubs. If your butter feels warm, pop it in the freezer for 10 minutes. The flour? King Arthur or Gold Medal are my go-tos—they’re consistent and reliable. Skip the self-rising; we’re controlling the salt here. Pro tip: measure your flour with the spoon-and-level method for accuracy—packing it down changes the texture completely.
No ice water? Freeze a small ice cube tray for this purpose—it’s cleaner than using tap water straight from the fridge. Running short on sugar? Brown sugar at half the amount works in a pinch, though it’ll give a slightly different finish. The salt matters too—Diamond Crystal dissolves better than Morton’s, but either works. If you’re baking in a high-altitude area, add 1 extra tbsp of flour to compensate for the thinner air. And for the love of pie, don’t substitute margarine—the flavor difference is night and day.
This dough needs 24 hours of chilling—no exceptions. Wrap it tightly in plastic and refrigerate it flat, not rolled. The longer it rests, the better it gets. For baking, preheat your oven to 375°F and use a 10-inch pie dish—don’t try to stretch it to fit. The crust keeps 3 days in the fridge, wrapped airtight. Freeze unbaked portions for up to 3 months—just thaw overnight in the fridge before using. And if you’re prepping ahead, make the dough first thing in the morning so it’s ready for evening baking.
Why You’ll Love This Recipe
- No-Fuss Assembly: I swear by this crust because it’s just flour, butter, ice water—no weird ratios or last-minute scrambling. You’ll be rolling it out in 10 minutes flat, and the secret’s in the cold butter cutting into the flour like magic.
- Buttery Crisp Edge: That sugar in the mix? It’s not just for looks—it caramelizes into a golden, shatteringly crisp rim while keeping the inside tender. Honestly, I’ll take this over store-bought any day.
- Pie or Pastry Hack: Use half the dough for a pie, fold the rest into a freezer bag, and boom—you’ve got a backup for pot pies, hand pies, or even a last-minute dessert. (Yes, even on a Tuesday night.)
- Pantry Staple Magic: Five ingredients, all of which you already own. No specialty flours, no weird salt substitutes—just reliable, budget-friendly basics that turn into something impressive with zero fuss.
Step-by-step instructions for perfect deep dish pie crust
Here’s how to build a sturdy, flaky crust that won’t shrink or crack under heavy fillings.
Mix Dry Ingredients for Even Texture
In a large bowl, combine the 3.5 cups all-purpose flour with the 1 tsp diamond crystal kosher salt and 1 tbsp granulated sugar. Whisk gently to distribute the salt and sugar evenly through the flour. I like to use a fork for this step—it keeps the flour from getting too aerated, which can lead to a tough crust later.
Here’s the thing—sifting isn’t strictly necessary with this method, but if you want to be extra careful, you can sift the flour mixture through a fine-mesh sieve. The key is to create a uniform blend where every spoonful of dough will have the same ratio of ingredients. This prevents any one spot from being too salty or too sweet, which could cause uneven browning.
Cut in Cold Butter for Flaky Layers
Add the 1.25 cups cold, cubed unsalted butter to the flour mixture. Using a pastry cutter or two forks, work the butter into the flour until you reach pea-sized crumbs with some flour still visible. This is crucial—you want to keep as much cold butter as possible to create those signature flaky layers.
Don’t rush this step. I press down on the butter pieces with my fingers to ensure they’re fully coated in flour, then cut through them with the pastry cutter. The butter should be cold enough that it doesn’t melt when you touch it. If it starts to soften too quickly, pop the bowl in the freezer for 5 minutes to firm it up again. You’re aiming for a texture that looks like coarse cornmeal with some larger butter pieces.
Add Ice Water Gradually for Firm Dough
Measure out the 0.5 cup ice water and add it to the flour-butter mixture 1 tablespoon at a time. After each addition, use a fork to gently stir until the water is absorbed. Be patient—this is where the dough comes together, and rushing can lead to a sticky mess.
You’ll know you’ve added enough water when the dough forms a shaggy mass that holds together when pressed. It should be moist but not wet. If it’s too dry, add another tablespoon of water. If it’s too sticky, sprinkle in a little more flour. The dough should be cool to the touch—this ensures it won’t shrink when it bakes. Wrap the dough in plastic wrap and chill in the refrigerator for at least 1 hour (up to 24 hours for best results).
Roll and Fit the Dough into Your Pan
On a lightly floured surface, roll the chilled dough into a 12-inch circle that’s about ⅛-inch thick. I use a rolling pin, but I also press down gently with my hands to keep the thickness even. The dough should be cold enough that it doesn’t stick to the rolling pin or your fingers.
Carefully transfer the rolled dough to your 10-inch deep dish pie pan, letting it drape over the edges. Gently press it into the pan, working from the center outward. Trim any excess dough hanging over the edge with kitchen shears, leaving about ½-inch overhang. Fold the overhang under itself to create a double thickness at the rim. This prevents the crust from shrinking during baking and gives you that classic deep dish look.
Pre-Bake for Structure Before Filling
Preheat your oven to 375°F. Line the crust with a round of parchment paper and fill it with dried beans or pie weights. Bake for 15 minutes, then remove the weights and bake for another 5-7 minutes until the edges are light golden brown. The crust should be set but not fully baked—it’ll finish cooking when you add your filling.
Here’s where it gets tricky: don’t overbake the crust. It should be firm enough to hold its shape but still slightly soft to the touch. If it starts to darken too quickly, tent it with foil. The goal is to create a sturdy base that won’t collapse under your filling. Once pre-baked, let the crust cool slightly before adding your filling—this helps prevent a soggy bottom.
Pro Tips For Making 10 Inch Deep Dish Pie Crust
- Work the Butter Fast: Cut that cold butter into the flour immediately—don’t let it sit in the bowl. I learned this the hard way when my crust turned out greasy and tough; the butter needs to stay pea-sized and coated in flour the whole time, or you’ll end up with a sad, crumbly mess. Use a pastry cutter or your fingers (yes, even if you’re impatient like me), but keep it moving.
- Chill the Dough Properly: Wrap the dough tightly in plastic and refrigerate it for at least 2 hours—overnight is better. I used to skip this, thinking I’d save time, but the crust would shrink in the oven or puff unevenly. The cold slows gluten development, which means a flakier, more stable crust when it bakes. No shortcut here.
- Blind-Bake the Bottom: If your filling is wet (like custard or fruit), line the crust with parchment, fill it with pie weights or dried beans, and bake for 15 minutes at 375°F before adding the filling. This prevents a soggy bottom—something that’ll ruin your whole pie. I was skeptical until I tried it, and now I never bake without it.
- Brush with Egg Wash: Whisk 1 egg yolk with 1 tablespoon water and brush it lightly over the chilled crust before baking. The sugar in the recipe will caramelize beautifully, giving you that golden, glossy finish without needing extra sugar. It’s the thing that makes a good crust look restaurant-worthy.
Perfect pairings for this dish
Sweet Fillings
This crust shines with classic apple pie—use a mix of Granny Smith and Honeycrisp apples tossed with 2 tbsp lemon juice, ¼ cup brown sugar, and 1 tsp cinnamon.
For a Southern twist, try peach pie with ripe peaches, a splash of bourbon, and a sprinkle of vanilla sugar.
My go-to is pumpkin pie with a spiced filling of 15 oz canned pumpkin, 1 cup heavy cream, and 3 eggs, baked until just set. 🍎
Savory Options
Swap sweet for savory with chicken pot pie—fill with shredded rotisserie chicken, cream of mushroom soup, and frozen peas/carrots. For a rustic touch, try quiche with 6 eggs, 1 cup heavy cream, and your choice of cheese or veggies.
A sausage and kale filling (browned Italian sausage, chopped kale, and garlic) adds hearty depth. The crust holds up beautifully to these rich mixtures.
Toppings & Garnishes
For sweet pies, a lattice crust made from the same dough adds visual appeal. Brush the top with egg wash before baking for a golden finish. Add a sprinkle of coarse sugar for crunch or a dollop of whipped cream after baking.
For savory pies, a sprinkle of fresh thyme or Parmesan cheese before serving elevates the flavor. 🌟
Beverage Pairings
Sweet pies pair perfectly with iced tea (add lemon slices and mint) or vanilla chai latte. For savory pies, a dry Riesling or hoppy IPA complements the rich flavors.
My favorite is hot apple cider with cinnamon sticks—it’s cozy and seasonal. Avoid heavy, oaky wines that can overpower the crust’s delicate flavor. 🍷
Seasonal Variations
Spring calls for rhubarb pie with tart-sweet filling, while summer is perfect for berry pies (strawberry, blueberry, or mixed berries). In fall, pecan pie with a buttery crust and maple syrup drizzle is a must.
Winter pies like gingersnap crust (mix in 1 cup crushed gingersnaps with the dough) add warmth and spice. Adjust sugar levels based on fruit sweetness—taste as you go! 🍂
Nutrition facts
Frequently asked questions
Why is chilling the dough so important for deep dish crust?
The 24-hour chill is non-negotiable—it prevents shrinking during baking and creates those signature flaky layers. Cold butter stays solid, creating steam pockets when baked, while resting relaxes the gluten. Skipping this step often results in a dense, tough crust that can’t hold heavy fillings.
Can I make this crust without a rolling pin?
Use a wine bottle or even your fists to press the dough into shape. For extra thickness control, wrap the dough in plastic and pound it gently with a meat mallet. The key is keeping everything cold—work on a chilled surface and use cold tools.
What’s the best way to prevent a soggy bottom?
Always pre-bake the crust for 15-20 minutes with pie weights before adding filling. For extra insurance, brush the bottom with egg white before filling. The crust should be firm but not fully baked—it’ll finish cooking with the filling. Never skip this step with juicy fillings like berries!
How do I fix a cracked crust after baking?
If cracks appear, they’re usually from uneven rolling or insufficient chilling. For minor cracks, brush with egg wash and bake 5 more minutes**. For deep cracks, create a lattice top from leftover dough to cover them. The good news? Cracks rarely affect flavor—they’re just cosmetic.
Can I use this crust for a 9-inch pie instead?
Yes, but you’ll need to adjust the dough quantity. Reduce flour to 2.5 cups and butter to 1 cup while keeping other measurements the same. The rolling technique remains identical—just scale down the circle to 10-inch diameter for a 9-inch pan. The crust will still be sturdy enough for deep fillings!

- Pea Soup Instant Pot Recipe: Velvety Green Smoothness in 20 Minutes - November 1, 2026
- Pork Loin Pulled Pork Crock Pot Recipe: Slow-Smoked Tenderness With Zero Dryness - November 1, 2026
- Baked Potatoes in Crock Pot Recipe: Buttery Interiors and Crispy Top Magic - November 1, 2026