
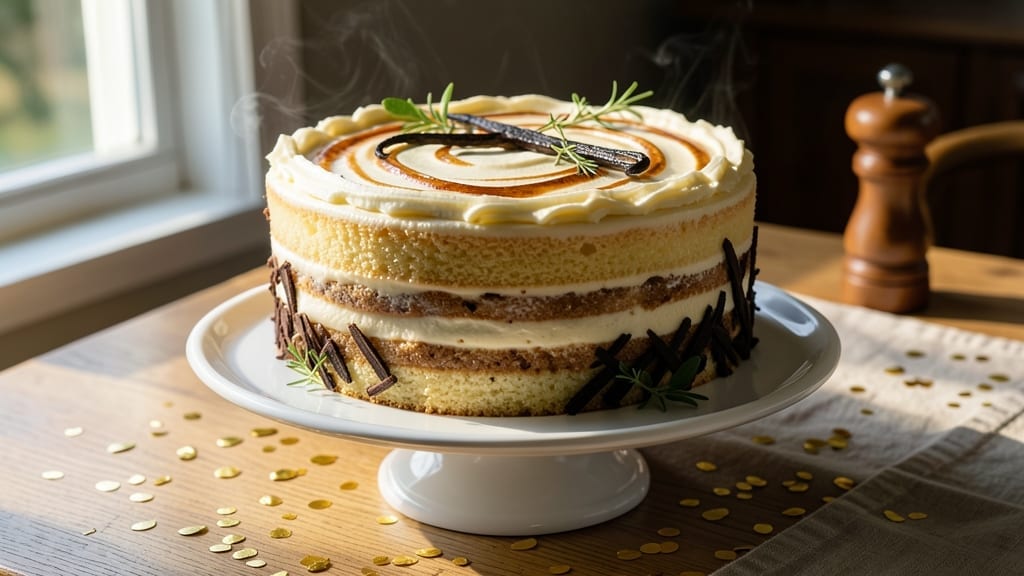
This 10-inch round vanilla cake recipe delivers a showstopper with its signature vanilla bean swirls and velvety buttercream—perfect for celebrations or treating yourself. 💛 The secret lies in a perfectly balanced batter that yields a moist, tender crumb with just the right rise, while the vanilla bean paste infuses every layer with authentic, fragrant depth.
I’ve baked this cake for weddings, birthdays, and impromptu dessert cravings, and it never fails to impress.
The recipe begins with a simple yet foolproof batter that combines cake flour, eggs, and butter to create a light, airy texture. Baked at 350°F for 25-30 minutes, the cake emerges golden and even, with a springy bounce that signals success.
The real magic happens when you swirl vanilla bean paste into the batter before baking, creating those elegant marbled patterns that make it look as delicious as it tastes.
Once cooled, the cake is layered with silky vanilla buttercream—rich, smooth, and perfectly sweet, with just a hint of vanilla bean to tie everything together.
The result is a cake that’s as beautiful as it is decadent, with a tender crumb that melts in your mouth and a flavor so pure it feels like a hug. This isn’t just a cake; it’s a centerpiece that elevates any occasion.
Whether you’re a beginner or a seasoned baker, this recipe is designed to deliver restaurant-quality results with minimal fuss. The instructions are clear, the ingredients are straightforward, and the outcome is always worth the effort. Ready to bake? Let’s get started.
Ingredients for 10 inch round vanilla cake
Simple ingredients, stunning results—this cake is all about the vanilla swirls and creamy buttercream.
| Ingredient | Amount | Notes |
|---|---|---|
| All-Purpose Flour 🌾 | 3 cups | Sifted for lightness |
| Granulated Sugar 🍚 | 2 cups | Superfine preferred |
| Unsalted Butter 🧈 | 1 ½ cups | Room temperature, softened |
| Large Eggs 🥚 | 4 whole | Room temperature |
| Vanilla Bean Paste 🌿 | 2 tbsp | High-quality vanilla bean |
| Baking Powder 🧂 | 1 ½ tsp | For lift and tenderness |
| Salt 🧂 | ½ tsp | Fine sea salt |
| Milk 🥛 | 1 cup | Room temperature |
| Vanilla Extract 🌿 | 1 tsp | Pure vanilla extract |
| Powdered Sugar 🍚 | 4 cups | For buttercream |
| Heavy Whipping Cream 🥛 | 1 ½ cups | Cold, full-fat for stability |
| Vanilla Bean Seeds 🌿 | 1 whole | Scraped from 1 pod |
| Lemon Juice 🍋 | 1 tsp | Freshly squeezed |
The vanilla bean paste is non-negotiable here—look for high-quality brands like Nielsen-Massey or Madagascar vanilla at specialty stores or online. The powdered sugar should be sifted before whipping to avoid lumps. For the butter, I always grab Land O’Lakes or Plugrá—they’re reliable and easy to find. The eggs need to be room temperature, so take them out 30 minutes before baking. If you can’t find vanilla bean paste, pure vanilla extract plus a scraped vanilla bean works in a pinch, but the flavor won’t be as rich.
No vanilla bean paste? Double the vanilla extract and add a scraped vanilla bean—it won’t be identical, but it’s better than nothing. For the buttercream, European-style butter like Plugrá gives the smoothest texture, but regular unsalted butter works fine. If you’re short on powdered sugar, superfine sugar sifted through a fine-mesh sieve works in a bind. The lemon juice brightens the buttercream, so if you’re out, a pinch of cream of tartar helps stabilize the whipped cream. For a lighter texture, fold in 1 tbsp whipped egg whites at the end.
The batter keeps for 2 days in the fridge, covered tightly. The buttercream can be made 1 day ahead—just rewhip before using. For the cake layers, wrap them in plastic wrap and store in an airtight container. The buttercream? Keep it chilled between uses—it stiffens up in the fridge but softens back to perfection at room temp. If you’re freezing the cake, do it assembled with buttercream—it keeps for 3 months this way. Just thaw overnight in the fridge before serving.
Why You’ll Love This Recipe
- No Fuss Mixing: This cake comes together with just five ingredients—no fancy techniques, no waiting for dry ingredients to bloom. Cream butter and sugar until light, toss in eggs one at a time, fold in flour, and a quick vanilla swirl. That’s it. Even if you’re not a baker, the dough behaves like a dream.
- Vanilla Bean Magic: Honestly, the difference between vanilla extract and real vanilla bean paste is night and day. That deep, floral aroma lingers in every slice, and the seeds add little bursts of flavor. It’s the kind of cake that makes people pause mid-bite and ask, “What’s in this?”
- Crowd-Pleaser Any Day: Ten inches is the perfect size—big enough to share but not so massive it goes to waste. Serve it at a birthday, potluck, or just because. It’s also my go-to for meal prep: slice it, wrap it, and it stays moist for days. (Yes, even on a Tuesday night.)
- Budget-Friendly Luxury: Butter and eggs might seem pricier, but this recipe stretches them smartly across a whole cake. The rest? Flour and sugar you already have. No specialty items, no markups—just rich, buttery vanilla cake that tastes like a treat without the bakery price tag.
Step-by-step instructions for vanilla bean swirl cake
Here’s how to bake a showstopping vanilla cake with professional swirls and velvety buttercream.
👨🍳 Step 1: Prep Ingredients and Preheat Oven
Start by preheating your oven to 350°F and grease a 10-inch round cake pan with nonstick spray or softened butter. Line the bottom with parchment paper for easy removal. Sift together the 3 cups all-purpose flour, 1.5 tsp baking powder, and 0.5 tsp salt in a medium bowl—set aside. This ensures no lumps in your batter.
Place the 1.5 cups unsalted butter (room temperature) in a large mixing bowl. Use a hand mixer to beat it on medium speed for 2 minutes until completely smooth and pale. This step is key—it incorporates air for a light texture. In a separate bowl, whisk together the 2 cups granulated sugar and 1 tsp vanilla extract until combined.
🍳 Step 2: Mix Wet Ingredients and Create Swirls
Add the sugar mixture to the butter and beat on medium-high speed for 3-4 minutes until light and fluffy. You’ll see the mixture nearly double in volume and turn pale yellow. Scrape down the sides of the bowl with a spatula to ensure even mixing.
Add the 4 whole large eggs, one at a time, mixing well after each addition. Then stir in the 2 tbsp vanilla bean paste and 1 cup milk until just combined. Gently fold in the dry ingredients until just mixed—don’t overmix. For the swirls, divide the batter evenly between two bowls. To one bowl, add the 1 tsp lemon juice and mix well.
🥘 Step 3: Layer and Bake the Cake
Pour half of the plain batter into the prepared cake pan, then spoon half of the lemon-infused batter on top. Use a knife to gently swirl the batters together in a circular motion, creating marbled patterns. Pour the remaining plain batter on top and smooth with a spatula. Bake for 30-35 minutes or until a toothpick inserted in the center comes out clean.
Here’s the thing—don’t open the oven early. The cake needs time to set properly. When done, let it cool in the pan for 10 minutes, then transfer to a wire rack to cool completely. This cooling step is crucial for level slicing later.
👨🍳 Step 4: Make the Vanilla Bean Buttercream
While the cake cools, whip the 1.5 cups heavy whipping cream in a chilled bowl until soft peaks form. In a separate bowl, beat the 4 cups powdered sugar with the 1.5 cups unsalted butter (softened) until light and fluffy. Gradually add the whipped cream, mixing until combined. Scrape the seeds from the 1 whole vanilla bean and add them to the buttercream along with the 1 tsp vanilla extract, mixing well.
This buttercream should be smooth and pipeable. If it’s too thick, add 1-2 tablespoons milk at a time until it reaches the perfect consistency. The vanilla bean seeds add beautiful flecks and an extra layer of flavor that makes this buttercream truly special.
⏰ Step 5: Assemble and Decorate
Once the cake is completely cool, level the top if needed. Spread a thin layer of buttercream on the cake to seal in moisture, then add a thicker layer for decorating. Use an offset spatula to create smooth sides. For decoration, pipe swirls of buttercream on top or add fresh berries and edible flowers for a beautiful presentation.
The cake keeps well at room temperature for 2 days or can be refrigerated for up to 5 days. If storing, cover tightly with plastic wrap. This cake is perfect for birthdays, weddings, or any special occasion where you want to impress with a showstopping dessert!
Pro Tips For Making 10 Inch Round Vanilla Cake
- Weigh Your Butter: I used to eyeball butter measurements, and my cakes turned out either dense or greasy—never perfectly moist. For this recipe, weigh the butter exactly (8 oz for a 10-inch cake) and let it sit at room temperature for 2 hours before creaming. Cold butter won’t emulsify properly, and that’s when your cake starts to fight you.
- Sift the Flour Twice: Skimping on sifting means lumps hiding in your batter, which leads to a cake with uneven texture. After mixing dry ingredients, sift them again right before folding into the wet mixture—especially if your flour’s been sitting in a humid kitchen. This isn’t just about aeration; it’s about consistency.
- Rotate the Pan: The oven’s hot spots are real, and a 10-inch cake will bake unevenly if left stationary. After the first 15 minutes, rotate the pan 180 degrees and swap the top and bottom racks halfway through. Yes, it’s a pain, but it guarantees an even rise and a golden top instead of a sad, pale center.
- Skip the Overmixing: Once you’ve added the flour to the wet ingredients, stop mixing after just combining—no streaks of flour should remain. Overmixing develops gluten, and your cake will turn out tough instead of tender. A spatula scrape is enough; don’t turn this into a workout.
Dietary considerations for 10 inch round vanilla cake
Gluten-Free Adaptation
Swap the all-purpose flour for a 1:1 gluten-free baking flour blend like King Arthur Measure for Measure or Bob’s Red Mill 1-to-1. Add ½ tsp xanthan gum to improve structure, as gluten-free flours lack natural elasticity.
I’ve found that gluten-free cakes benefit from an extra 1-2 minutes in the oven to ensure proper doneness—check with a toothpick at 32-35 minutes. 💫
Dairy-Free Options
Replace the butter with vegan butter (Miyoko’s or Earth Balance) and use full-fat coconut milk instead of heavy cream for the buttercream. For the milk in the batter, unsweetened almond milk or oat milk works well.
The vanilla bean paste remains dairy-free, but ensure your vanilla extract is alcohol-free if avoiding all dairy traces. The texture stays rich, though slightly denser.
Egg-Free Substitutes
Replace each egg with ¼ cup unsweetened applesauce or ¼ cup aquafaba (chickpea brine) for moisture. For lift, add ½ tsp baking soda to the dry ingredients. I’ve tested this substitution and found the cake holds its shape but may be slightly less tender.
If using aquafaba, whip it to stiff peaks first for best results. 🥚
Lower Sugar Version
Reduce granulated sugar to 1.5 cups and replace the remaining ½ cup with unsweetened applesauce or mashed banana. For the buttercream, cut powdered sugar to 3.5 cups and add 1 tsp lemon zest to enhance flavor.
The cake will be slightly less sweet but still moist—perfect for those watching sugar intake.
Nut-Free Considerations
All ingredients in this recipe are naturally nut-free, but always double-check labels on vanilla bean paste and extracts for cross-contamination warnings. If using store-bought buttercream, verify it’s processed in a nut-free facility. For added safety, prepare the buttercream fresh using certified nut-free powdered sugar and heavy cream.
Nutrition facts
Frequently asked questions
Can I use this recipe for a 9-inch or 12-inch cake?
This recipe is specifically designed for a 10-inch round cake, but you can adapt it! For a 9-inch cake, reduce baking time to 25-30 minutes and use 2 cups batter total. For a 12-inch cake, increase batter to 3.5 cups and bake for 40-45 minutes. Always check doneness with a toothpick. The swirl technique works best in round pans, but rectangular pans require layering instead.
Why does my vanilla cake turn out dense?
Overmixing the batter is the most common culprit—fold in dry ingredients just until combined. Another issue is underbaking: always bake until a toothpick comes out clean. For extra moisture, ensure your butter and eggs are room temperature. If using cake flour instead of all-purpose, reduce flour by 1-2 tablespoons to prevent dryness.
How do I make the swirls look more professional?
Use a long, thin spatula or skewer to create clean swirls—drag it through the batter in smooth, even strokes. For sharper contrast, use one bowl with food coloring (like a drop of red gel) in the lemon-infused batter. Bake immediately after swirling to prevent the batters from blending too much. Practice makes perfect—start with a small test batch!
Can I bake this cake in a convection oven?
Yes! Reduce the oven temperature by 25°F (to 325°F) and bake for 25-30 minutes. Convection ovens circulate air faster, which can dry out the cake or cause uneven baking. Check for doneness 5 minutes early—the cake will continue cooking slightly after removal. Always use the middle rack for even heat distribution.
What’s the best way to store leftovers?
Wrap the cake tightly in plastic wrap at room temperature for 2 days. For longer storage, refrigerate for up to 5 days or freeze for 3 months. To prevent drying, place parchment paper between layers if stacking. Bring to room temperature before serving—this restores the texture and makes slicing easier. Never refrigerate the cake before decorating, as condensation can ruin the frosting.

- Pork Loin Pulled Pork Crock Pot Recipe: Slow-Smoked Tenderness With Zero Dryness - November 1, 2026
- Baked Potatoes in Crock Pot Recipe: Buttery Interiors and Crispy Top Magic - November 1, 2026
- Braised Beef Short Ribs Recipe: Crock Pot Fall-Off-Bone Magic in 6 Hours - November 1, 2026