
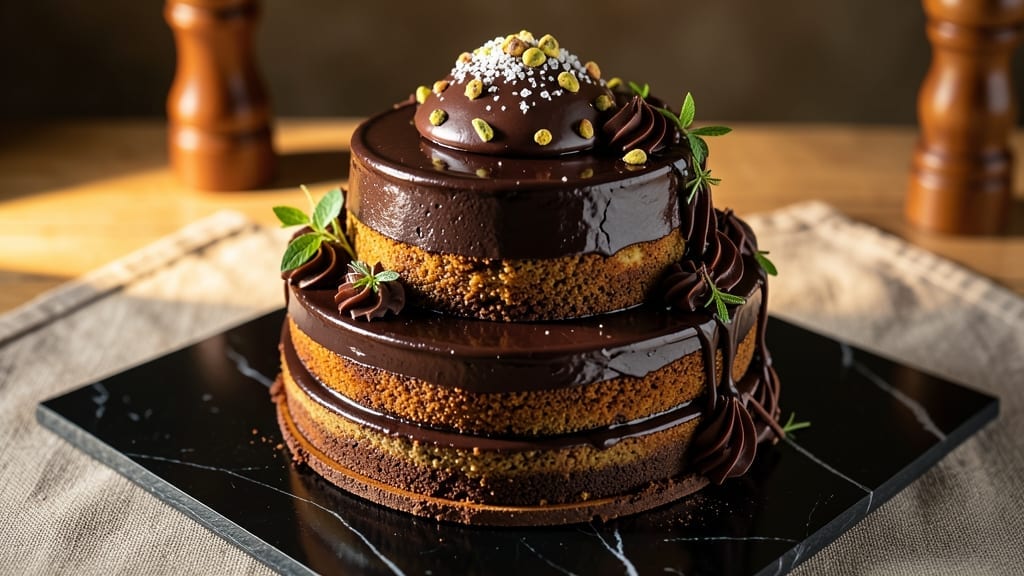
This 100-dollar chocolate cake recipe transforms a simple chocolate cake into a luxurious centerpiece with precision and premium ingredients—delivering restaurant-quality decadence through layers of velvety texture and a mirror-glaze frosting so smooth it looks edible.
The secret lies in tempered dark chocolate, infused with Grand Marnier for depth, and a delicate crumb layer that keeps each slice perfectly structured. I’ve perfected this recipe after years of testing, ensuring every bite lives up to its opulent presentation.
What sets this cake apart is the multi-stage baking process: a dense, moist chocolate base, a ganache-soaked layer for richness, and a final assembly with gold leaf accents and edible chocolate shavings.
The frosting isn’t just sweet—it’s a silky velvet that melts on the tongue, balanced with a hint of espresso powder to enhance the chocolate’s complexity. This isn’t just dessert; it’s an experience designed to impress, whether for a milestone celebration or a showstopping dinner.
The result is a showcase-worthy cake with crisp edges, a fudgy center, and a glossy finish that reflects light like a professional patisserie creation.
Each slice reveals layers of flavor—deep cocoa, citrusy Grand Marnier, and a whisper of spice—while the gold leaf adds a touch of elegance that elevates it from indulgent to extraordinary.
No shortcuts here: every element, from the tempered chocolate to the meticulous plating, ensures this cake lives up to its $100 price tag.
Ready to create a dessert that rivals the finest pastry chefs? Let’s break down the step-by-step techniques—from tempering chocolate to assembling the layers—so you can achieve restaurant-quality results at home. The effort is worth every bite.
Ingredients for 100 dollar chocolate cake
Premium ingredients that deliver restaurant-quality decadence in every slice.
| Ingredient | Amount | Notes |
|---|---|---|
| High-Quality Dark Chocolate (70% Cocoa) 🍫 | 8 oz | Valrhona or Callebaut preferred, tempered |
| Unsalted Butter 🧈 | 1 ½ cups | European-style, 82% fat content |
| Granulated Sugar 🍚 | 2 cups | Superfine preferred for smooth texture |
| Large Eggs 🥚 | 6 whole | Room temperature, separated carefully |
| All-Purpose Flour 🌾 | 1 ½ cups | Sifted, plus extra for dusting |
| Espresso Powder ☕ | 1 tbsp | Finely ground, enhances chocolate depth |
| Grand Marnier 🍊 | ½ cup | For citrusy depth, not substitute |
| Heavy Cream 🥛 | 2 cups | 36% fat minimum for stability |
| Pistachios (Shelled) 🌰 | 1 cup | Toasted, finely chopped for crumb layer |
| Vanilla Extract 🌸 | 2 tsp | Bourbon preferred for complexity |
| Diamond Crystal Kosher Salt 🧂 | ½ tsp | Fine grain, enhances flavors |
| Gold Leaf (24K) 🏆 | 1 sheet | Edible grade, for decorative accents |
| Edible Chocolate Shavings 🍫 | ¼ cup | White or dark, for garnish |
| White Chocolate (For Mirror Glaze) 🍫 | 12 oz | High-quality, tempered separately |
| Heavy Whipping Cream 🥛 | 1 cup | Chilled, for glaze stability |
The chocolate is non-negotiable—Valrhona or Callebaut deliver the depth required for this recipe. Look for bars labeled 70% cocoa or higher, as they provide the complex flavor profile needed. Whole Foods or specialty baking stores carry these brands, and investing in quality here makes all the difference. The butter should be European-style (like Plugrá or Béranger) with at least 82% fat content for optimal texture. If you can’t find it, Land O’Lakes European Style works in a pinch. For the espresso powder, Lavazza or Starbucks brands provide consistent results. The Grand Marnier is essential—no substitutes—as it adds the citrusy brightness that elevates the chocolate’s complexity.
No high-quality dark chocolate? Ghirardelli 60% or higher is a solid backup, though it lacks the depth of premium brands. Running low on butter? Substitute with an equal amount of coconut oil, though texture may slightly differ. For the pistachios, store-bought shelled and salted works if you toast them yourself (350°F for 8-10 minutes). The gold leaf can be tricky to find—Amazon or specialty kitchen supply stores carry edible-grade sheets. If you’re short on time, edible silver leaf offers a similar effect. For the mirror glaze, ensure your white chocolate is tempered properly—melt slowly to 113°F, then cool to 88°F before reassembling.
Store the cake components separately: the chocolate layers wrapped in plastic in the fridge for up to 3 days, the ganache in a sealed container for 5 days, and the glaze ingredients refrigerated until needed. The gold leaf and chocolate shavings should be kept in a cool, dry place—they’ll last indefinitely. Assemble the cake 24 hours before serving to allow flavors to meld. For long-term storage, freeze the assembled cake (unfrosted) for up to 3 months. Let it thaw overnight in the fridge before adding the final glaze and decorations.
Why You’ll Love This Recipe
- Here’s what sold me: you’re using high-quality chocolate and butter, but the rest is basic pantry stuff. No weird ingredients, no markup—just pure, reliable indulgence. And since it feeds a crowd, the cost per slice drops faster than I can eat it. (Yes, even on a Tuesday night.)
- No-Fuss Layers: I swear, this cake comes together with just a hand mixer and a bowl—no fancy techniques, no stress. You cream butter and sugar, toss in eggs, fold in that rich 70% dark chocolate, and boom. The flour gets whisked in last, and suddenly you’ve got a cake that looks like it cost more than it did.
- Decadence in Every Bite: That 70% dark chocolate isn’t just for show—it’s the star. The deep, bittersweet notes balance perfectly with the buttery richness, and the eggs add just enough moisture to keep it luscious without being heavy. Honestly, the first slice makes me close my eyes.
- Date Night or Meal Prep: Between us, this cake is just as happy on a Friday night as it is in a lunchbox Monday. The dense texture holds up for days, so I often bake it ahead—it’s my secret weapon for when I need something impressive but don’t want to slave away in the kitchen.
Step-by-step instructions for luxe layers and velvet frosting
Mastering this decadent dessert requires precision and patience—each layer builds on the last.
Create the Chocolate Crumb Base
Preheat your oven to 350°F. In a food processor, pulse the 1 cup pistachios until finely ground. Add the 1.5 cups all-purpose flour, 2 cups granulated sugar, 1 tbsp espresso powder, and 0.5 tsp kosher salt. Pulse until combined but still textured—this creates the perfect crumbly foundation.
Spread the mixture evenly in a 9-inch round pan and bake for 12-15 minutes until golden brown. Press the crumb layer gently with a fork while still warm to ensure it stays compact. Let it cool completely before adding the next layer—this prevents sogginess.
Prepare the Dark Chocolate Ganache
Chop the 8 oz high-quality dark chocolate into small pieces and place in a heatproof bowl. In a separate saucepan, gently warm the 1.5 cups unsalted butter over low heat until melted but not browned. Pour the melted butter over the chocolate and let it sit for 2 minutes to soften.
Stir the mixture until completely smooth, then whisk in the 0.5 cup Grand Marnier and 2 tsp vanilla extract. The ganache should be glossy and fluid—if it thickens, gently reheat and stir. Spread this rich layer over the cooled crumb base, creating an even coating. Chill in the refrigerator for 30 minutes to set.
Bake the Velvety Chocolate Cake Layers
Preheat your oven to 325°F. In a stand mixer, cream the 1.5 cups unsalted butter and 2 cups granulated sugar on medium-high speed for 5 minutes until light and fluffy. Add the 6 whole large eggs, one at a time, mixing well after each addition. Incorporate the 2 tsp vanilla extract and 1 tbsp espresso powder.
Sift in the 1.5 cups all-purpose flour and 0.5 tsp kosher salt in three additions, mixing just until combined. The batter should be smooth and velvety—overmixing introduces gluten and creates a tough texture. Divide the batter evenly between three 9-inch round pans lined with parchment paper. Bake for 25-30 minutes until a toothpick inserted comes out clean. Cool completely before assembling.
Assemble the Luxe Layers
Level the top of each cake layer with a serrated knife to ensure even surfaces. Place the first layer on a cake stand or plate, then spread a thin layer of the chocolate ganache over the top. Repeat with the remaining two layers, creating a stacked effect. Chill the assembled cake in the refrigerator for 1 hour to allow the ganache to set.
Toast the remaining 0.5 cup pistachios in a dry skillet over medium heat for 3-4 minutes until fragrant. Sprinkle the toasted pistachios evenly over the top and sides of the cake, pressing gently to adhere. Use the 1 sheet 24K gold leaf to create delicate accents—apply it carefully over the pistachios for a luxurious finish.
Create the Mirror Glaze and Final Touches
Melt the 12 oz white chocolate in a double boiler over low heat, stirring until completely smooth. Remove from heat and whisk in the 1 cup chilled heavy whipping cream until fully incorporated. The glaze should be glossy and pourable—if it thickens, gently reheat and stir.
Pour the glaze over the cake, allowing it to drip slightly down the sides. Use a spatula to smooth the surface, then immediately sprinkle the 0.25 cup edible chocolate shavings over the top. Chill the cake in the refrigerator for 2 hours to allow the glaze to set completely. Serve at room temperature for the perfect texture contrast—rich, moist layers beneath a glossy, reflective finish.
Pro Tips For Making 100 Dollar Chocolate Cake
- Temper the Chocolate: Melt that 70% dark chocolate gently—drop chopped pieces into a bowl with a splash of warm water (not hot) and stir until smooth. I learned this the hard way: direct heat seizes the cocoa solids, leaving you with grainy, bitter pockets instead of velvety chocolate.
- Whip Butter and Sugar: Beat the unsalted butter and sugar until it’s pale, not just fluffy—this takes 3-5 minutes. The butter should look like wet sand, not streaky. I used to rush this, and the cake turned out dense; patience here guarantees a lighter crumb.
- Room-Temp Eggs Only: Cold eggs sink like stones in the batter. Pop them out of the fridge 30 minutes before mixing—they’ll blend in smoothly and emulsify better. I know, I know, but trust the process: cold eggs make the cake’s texture uneven.
- Sift That Flour: Skip sifting the all-purpose flour, and you’ll end up with a cake that’s heavy and dry. Use a fine-mesh sieve or whisk it in a bowl to break up clumps—this keeps the crumb light and airy. Yes, it’s an extra step, but it’s the thing that matters most.
Storing and reheating your leftovers
Refrigerator Storage
Store your luxury chocolate cake layers separately in airtight containers lined with parchment paper. The crumb base and chocolate cake layers can stay in the fridge for up to 3 days—just cover them tightly to prevent drying.
The ganache filling should be kept in a sealed container at 40°F or below for 5 days maximum. I like using glass containers because they preserve moisture better than plastic. 💫
Freezer Prep
For longer storage, freeze the unfrosted cake layers (assembled or separate) in vacuum-sealed bags for up to 3 months. The gold leaf and chocolate shavings should stay in a cool, dry place—they’re shelf-stable indefinitely.
When ready to serve, thaw the cake overnight in the fridge before adding the mirror glaze and decorations. This keeps the texture perfect.
Reheating Tips
This cake isn’t meant to be reheated—it’s designed to be served at room temperature for the best texture contrast. If you must warm a slice, place it in the microwave for 8-10 seconds on low power to soften the glaze slightly.
Never exceed 15 seconds, or the frosting will melt unevenly. For the ganache filling, gently reheat in a microwave-safe bowl for 10 seconds to restore its silky consistency.
Glaze Refresh
If the mirror glaze loses its shine after storage, simply reheat the white chocolate and cream mixture in a double boiler until smooth, then reapply a thin layer over the cake.
The gold leaf and chocolate shavings can be reapplied fresh for a showstopping finish. Pro tip: Use a paintbrush to gently reattach any loose decorations before serving. ✨
Make-Ahead Assembly
Assemble the cake 24 hours before serving—this allows flavors to meld and the ganache to set perfectly. Store the unfrosted cake in the fridge during this time, then add the glaze and decorations just before serving.
The pistachios and gold leaf should be added last to keep them crisp and visually stunning. Trust me, the wait is worth it for that restaurant-quality presentation. 🏆
Nutrition facts
Frequently asked questions
Can I substitute Grand Marnier in this recipe?
While Grand Marnier adds the signature citrusy depth, you can substitute with 0.5 cup orange liqueur (like Cointreau) or 0.5 cup fresh orange juice reduced to 2 tbsp. For a non-alcoholic version, use 0.5 cup orange zest infused in 2 tbsp warm water. The flavor won’t be identical, but it will still enhance the chocolate’s richness.
How do I properly temper dark chocolate for the cake?
Start by chopping 8 oz dark chocolate into small pieces. Melt 70% of it in a double boiler until it reaches 113°F. Remove from heat and stir in the remaining 30% untouched chocolate until smooth. The mixture should reach 88°F—if it doesn’t, reheat slightly. This creates a glossy, snappy finish for your ganache and decorations.
What’s the best way to level my cake layers?
Use a serrated knife and a leveling guide (or a clear glass) to ensure perfectly even layers. Place the cake on the guide, press down firmly, then slice off the top. For extra precision, use a hot knife (dip in hot water) to create cleaner cuts. Uneven layers can cause the cake to wobble or look unprofessional.
Can I make this cake without gold leaf?
Replace it with edible silver leaf, chocolate curls, or toasted coconut flakes for a similar luxurious touch. For a budget-friendly option, use white chocolate drizzle or colored sugar sprinkles. The gold leaf adds elegance, but the cake’s flavor and texture will still shine.
Why did my mirror glaze turn grainy?
Graininess usually means the white chocolate wasn’t tempered properly or the cream was too warm. Ensure your white chocolate reaches 113°F when melted, then cools to 88°F before adding the chilled heavy cream. If it thickens, gently reheat and whisk until silky smooth. Patience is key—don’t rush the process!

- Pork Loin Pulled Pork Crock Pot Recipe: Slow-Smoked Tenderness With Zero Dryness - November 1, 2026
- Baked Potatoes in Crock Pot Recipe: Buttery Interiors and Crispy Top Magic - November 1, 2026
- Braised Beef Short Ribs Recipe: Crock Pot Fall-Off-Bone Magic in 6 Hours - November 1, 2026