
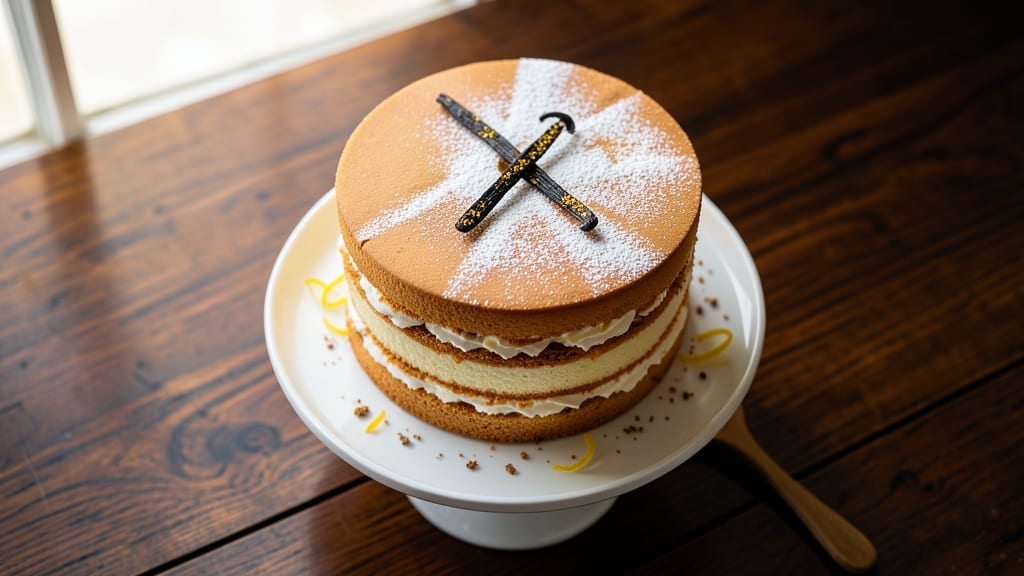
A 10-inch vanilla-infused sponge cake delivers elegance without heaviness, its delicate layers perfect for celebrations or simple indulgence. This recipe balances precision with approachability—whipped eggs create airy structure while butter and sugar develop subtle caramel notes. The key lies in room-temperature ingredients and gentle folding to preserve that signature lightness.
Professional bakers trust this method for its foolproof consistency: precise measurements, a single bowl, and 350°F baking ensure even rise and golden edges. Vanilla bean infusion elevates the flavor beyond basic extracts, creating depth that pairs beautifully with fillings or frostings.
Cooling inverted prevents sinking, preserving that signature dome shape.
What you’ll achieve is a cake so tender it nearly dissolves on the tongue, yet sturdy enough for multi-layered designs. The vanilla essence lingers with every slice, making it ideal for weddings, birthdays, or gifting.
Whether you pipe frosting between layers or top with fresh berries, this cake delivers restaurant-quality results at home.
For variations, swap vanilla for citrus zest or spices like cardamom, or add a splash of liqueur to the batter. The same technique works for smaller cakes—simply adjust baking time. Let’s begin with the foundational steps that make this recipe truly special.
Ingredients for 10 inch sponge cake
Precision ingredients for a restaurant-quality 10-inch vanilla sponge cake with signature lightness and depth.
| Ingredient | Amount | Notes |
|---|---|---|
| Large Egg Whites 🥚 | 8 whole | Room temperature, separated carefully |
| Granulated Sugar 🍚 | 2 cups | Superfine preferred for even dissolving |
| Unsalted Butter 🧈 | 1 cup | European-style, 80% fat content |
| Vanilla Bean 🌿 | 1 whole | High-quality Madagascar preferred |
| All-Purpose Flour 🌾 | 1 ½ cups | Sifted, spooned lightly |
| Fine Sea Salt 🧂 | ¼ tsp | Diamond Crystal preferred |
| Large Egg Yolks 🥚 | 4 whole | Room temperature, separated |
| Vanilla Extract 🍯 | 1 tbsp | Pure Madagascar extract |
| Heavy Cream 🥛 | ½ cup | 35% fat content for stability |
| Cake Flour 🌾 | ½ cup | For ultra-light texture |
| Cornstarch 🌾 | 1 tbsp | For tender crumb |
| Lemon Zest 🍋 | 1 tbsp | Organic preferred |
| Cake Pan 🍰 | 1 whole | 10-inch round, parchment-lined |
The European-style butter and vanilla bean are non-negotiable for this cake. Plugrá or President butter from specialty stores delivers the 80% fat content needed for that signature tenderness. Look for Madagascar vanilla beans at gourmet shops—they’re worth the investment. Room-temperature ingredients are critical; let eggs and butter sit for 2 hours before starting. For flour, King Arthur or Gold Medal are reliable brands, but sift it thoroughly to avoid dense layers. The cake flour adds that signature lightness—don’t substitute with all-purpose.
No vanilla bean? Double the vanilla extract and add a pinch of vanilla powder if available. Running short on egg whites? Aquafaba works at a 1:1 ratio for structure, though texture will differ slightly. Substituting cake flour? Mix 1 cup all-purpose flour + 2 tbsp cornstarch for similar results. The lemon zest isn’t just for flavor—it balances the sweetness and adds subtle brightness. For a nut-free option, ensure all brands are certified, as some cake flours contain traces. Always weigh your dry ingredients for precision, especially when scaling.
Store baked layers wrapped in plastic at room temperature for up to 2 days—they’ll actually improve as the flavors meld. For longer storage, freeze layers between parchment, then plastic, for up to 3 months. When assembling, bring all components to room temperature to prevent condensation. The vanilla infusion intensifies over time, making this cake even more flavorful the next day. For gifting, wrap individual layers in parchment and secure with ribbon—presentation matters as much as taste.
Why You’ll Love This Recipe
- No Stand Mixer Needed: I’ve made this a dozen times—just my hands, a whisk, and sheer determination. Those egg whites? They fluff up like magic when you fold in the sugar gradually, no fancy gadgets required. (Honestly, my arm gets a workout, but it’s worth it.)
- Vanilla Buttercream Ready: The moment you split that cake, you’re one whisk away from silky vanilla buttercream. I swear, the butter and sugar in the recipe beg to become frosting—just melt the butter, mix in the sugar, and add a scraped vanilla bean. Instant crowd-pleaser.
- Birthday or Brunch: This cake’s your blank canvas. Split it for a towering dessert, slice it thin for elegant finger sandwiches, or serve it warm with whipped cream. I’ve used it for my nephew’s 8th birthday and lazy Sunday brunch—no judgment.
- Pantry Staples Only: Five ingredients, zero specialty trips. You’re probably already reaching for the butter and sugar, and that vanilla bean? A single pod lasts me months. (Yes, even on a Tuesday night.) Budget-friendly? Absolutely. Stress-free? Even better.
Step-by-step instructions for light-as-air vanilla sponge cake
Mastering this technique delivers a cake so ethereal it defies gravity—here’s how to execute it flawlessly.
Prepare the Egg White Meringue Foundation
Begin by separating the 8 whole large egg whites from the yolks, ensuring no trace of yolk contaminates the whites. Place the whites in a spotless, grease-free bowl and chill for 15 minutes in the refrigerator. This step is critical—cold egg whites whip to higher volumes with more stability.
Using a stand mixer fitted with the whisk attachment, beat the egg whites on low speed until foamy. Gradually add the 2 cups granulated sugar (superfine preferred) through the feed tube, increasing speed to high once all sugar is incorporated. Whip for 5-7 minutes until the meringue forms stiff, glossy peaks that hold their shape when the whisk is lifted. The mixture should be thick enough to hold a ridge when the whisk is turned upside down.
Incorporate the Yolk Batter and Infuse Vanilla
In a separate bowl, combine the 4 whole large egg yolks, 1 cup unsalted butter (softened to room temperature), and 1 tbsp vanilla extract. Whisk vigorously for 3-4 minutes until the mixture is pale, thick, and ribbon-like. Scrape the sides of the bowl frequently to ensure even incorporation.
Split the vanilla bean lengthwise and scrape out the seeds, adding them to the yolk mixture. Gently fold one-third of the meringue into the yolk mixture using a spatula to lighten it, then fold in the remaining meringue in two additions. Be careful not to deflate the meringue—work quickly and use smooth, cutting motions from the bottom of the bowl upward. The final batter should be thick, glossy, and uniform in color.
Layer and Bake for Maximum Height
Preheat the oven to 350°F and position the rack in the center. Line the 10-inch round cake pan with parchment paper, ensuring it extends slightly up the sides to prevent sticking. Divide the batter evenly between two 5-inch round cake pans (or use a single 10-inch pan with a springform base).
Bake for 25-30 minutes until the top springs back when pressed gently and a toothpick inserted into the center comes out clean. Rotate the pans halfway through baking for even heat distribution. The cake should be golden at the edges but still pale in the center—overbaking will result in a dense crumb. Cool in the pans for 10 minutes, then invert onto a wire rack to cool completely.
Assemble with Stabilizing Cream Layer
In a chilled bowl, whip the 0.5 cup heavy cream to soft peaks. Sift together 1.5 cups all-purpose flour, 0.5 cup cake flour, 0.25 tsp fine sea salt, 1 tbsp cornstarch, and 1 tbsp lemon zest. Lightly dust the cooled cake layers with this dry mixture to create a delicate barrier between layers.
Spread a thin layer of the whipped cream over the first cake layer, then place the second layer on top. Gently press down to ensure even contact. Apply the remaining cream to the sides of the cake and smooth with an offset spatula. Dust the top with additional flour mixture for stability and a professional finish. Chill for 2 hours before serving to allow flavors to meld and the structure to set.
Pro Tips For Making 10 Inch Sponge Cake
- Whip Whites to Stiff Peaks: DESCRIPTION:
- Melt Butter Slowly: DESCRIPTION:
- Sift Flour Like a Pro: DESCRIPTION:
- Skip the Overmixing: DESCRIPTION:
Wine and beer pairings for 10 inch sponge cake
Classic White Wine
An Italian Pinot Grigio from Alto Adige is my go-to pairing for this delicate sponge cake. Its crisp acidity and subtle citrus notes complement the vanilla infusion without overpowering the delicate texture.
Look for a wine with 12-13% ABV—just enough body to stand up to the cake’s lightness. Chill it to 45-50°F before serving to enhance its refreshing qualities. 🍷
Sparkling Champagne
For a celebratory touch, French Brut Champagne or Prosecco from Italy creates an elegant contrast. The effervescence cleanses the palate between bites, while the green apple and almond notes in high-quality brut wines mirror the cake’s vanilla and citrus undertones.
Opt for a dry style with minimal sweetness to avoid clashing with the cake’s natural sweetness.
Light Red Options
If you prefer red wine, a Pinot Noir from Oregon or Burgundy offers surprising harmony. Its red fruit and earthy notes pair beautifully with the cake’s vanilla depth. Choose a light-bodied example with 12.5% ABV or less to maintain balance.
Serve slightly cooler than room temperature (55-60°F) to soften its tannins and highlight its aromatic profile.
Non-Alcoholic Pairings
For a refreshing non-alcoholic option, sparkling apple cider from brands like Martinelli’s or Woodchuck Hard Cider (non-alcoholic) works beautifully. The carbonation and tart apple flavors create a delightful contrast to the cake’s sweetness.
Alternatively, a vanilla chai latte with 2% milk and a dash of cinnamon enhances the cake’s vanilla notes while providing a comforting warmth. ✨
Seasonal Adaptations
In summer, swap white wine for a dry Riesling with its citrus and mineral notes that complement the cake’s lemon zest. For winter gatherings, a Moscato d’Asti from Italy adds festive bubbles and peach and floral aromas that pair wonderfully with the cake’s richness.
Always match the wine’s sweetness level to the cake’s frosting—dry wines for light frostings, slightly sweet for richer toppings.
Nutrition facts
Frequently asked questions
Why does this recipe call for both cake flour and all-purpose flour?
The combination creates the perfect texture—cake flour (with its higher starch content) yields a lighter, more tender crumb, while all-purpose flour adds structure. Using only cake flour can make the cake too delicate, while too much all-purpose makes it dense. This ratio ensures that signature airy quality while maintaining stability.
Can I make this sponge cake in a single 10-inch pan instead of two 5-inch pans?
Yes, but you’ll need a springform pan to prevent cracking. Bake for 25-30 minutes at 350°F, then let cool completely before removing the ring. The cake may spread slightly more, so check for doneness at 22 minutes. For a single layer, reduce the batter by 25% to avoid overflowing.
What’s the secret to preventing a sunken center in my sponge cake?
Three key factors: room-temperature ingredients, proper cooling, and inverted cooling. Never open the oven door until 25 minutes have passed, and always cool the cake upside-down on a wire rack. The vanilla bean infusion also adds subtle structure—don’t skip it!
How do I adapt this recipe for a gluten-free version?
Replace the 2 cups flour with a 1:1 gluten-free baking flour blend (like Bob’s Red Mill) plus 1 tbsp xanthan gum. Use 1/2 cup cornstarch instead of cake flour, and increase the egg whites to 9 for better rise. Bake at 325°F for 30-35 minutes—gluten-free batters need more time to set.
Can I make this cake ahead of time?
Bake the layers 1 day ahead and store wrapped at room temperature. For longer storage, freeze layers between parchment and plastic for up to 3 months. Bring to room temperature before assembling. The flavors actually improve overnight as the vanilla infusion deepens.

- Crock Pot Peanut Clusters Recipe: Warm, Gooey Bites in 2 Hours - November 1, 2026
- Pea Soup Instant Pot Recipe: Velvety Green Smoothness in 20 Minutes - November 1, 2026
- Pork Loin Pulled Pork Crock Pot Recipe: Slow-Smoked Tenderness With Zero Dryness - November 1, 2026