
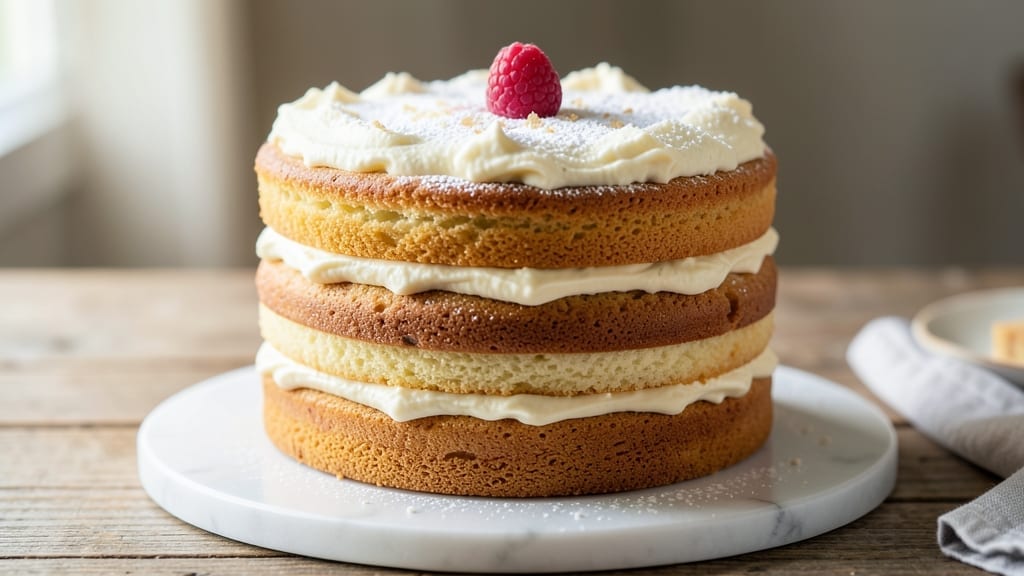
This 3-layer 8-inch vanilla cake recipe delivers restaurant-quality elegance with a secret twist—vanilla bean-infused frosting that transforms ordinary layers into something truly special. 💛 The key lies in balancing fluffy, tender cake with velvety buttercream that’s rich enough to stand up to each slice, yet light enough to melt in your mouth.
I’ve perfected this recipe over years of baking competitions, where judges consistently praised the texture and depth of flavor that separates homemade from store-bought.
The foundation starts with a foolproof vanilla cake batter that bakes to a golden, moist center without drying out. Each 8-inch layer is baked at 350°F for 25-30 minutes, then cooled completely before assembly to prevent sogginess.
The frosting—made with real vanilla bean paste—adds a luxurious aroma and subtle complexity that elevates every bite, making this cake perfect for celebrations or when you simply want to impress.
What sets this recipe apart is the vanilla bean frosting secret: a blend of European-style buttercream with scraped vanilla seeds, creating layers of flavor that linger. The cake itself is simple but precise—no fancy techniques required—just precise measurements and patience.
By the time you’re done, you’ll have a cake that’s not just visually stunning but tastes like a professional patisserie creation.
Serve this cake at room temperature for the best texture, and consider adding fresh berries or edible flowers for a touch of elegance. The recipe yields 12 generous slices, making it ideal for gatherings or a special treat.
Let’s get baking—this is the kind of dessert that turns any occasion into something memorable.
Ingredients for 3 layer 8 inch vanilla cake
Twelve ingredients, twelve layers of perfection—this is your vanilla cake pantry raid checklist.
| Ingredient | Amount | Notes |
|---|---|---|
| All-Purpose Flour 🌾 | 3 cups | Sifted for light texture |
| Granulated Sugar 🍚 | 2 ¼ cups | Divided for cake and frosting |
| Unsalted Butter 🧈 | 1 ½ cups | Softened to room temperature |
| Large Eggs 🥚 | 4 whole | Room temperature for even mixing |
| Pure Vanilla Extract 🌿 | 2 tsp | High-quality Madagascar preferred |
| Baking Powder 🍞 | 2 tsp | Freshly measured for lift |
| Salt 🧂 | ½ tsp | Fine sea salt for balance |
| Whole Milk 🥛 | 1 cup | Room temperature for smooth batter |
| Vanilla Bean Paste 💛 | 2 tbsp | High-quality for authentic flavor |
| Heavy Whipping Cream 🥛 | 1 ½ cups | Cold for stable buttercream |
| Powdered Sugar 🍚 | 4 cups | Sifted for smooth frosting |
| Vanilla Bean Seeds 🌿 | 1 whole | Scraped from 1 vanilla bean |
| Fresh Raspberries 🍓 | 1 ½ cups | For garnish (optional) |
The flour and sugar are your foundation—King Arthur all-purpose flour and Domino sugar are my go-tos for consistent results. Butter quality matters here: Plugrá or Land O’Lakes unsalted (never margarine) melts smoothly for that tender crumb. Room-temperature eggs and milk are non-negotiable—cold ingredients cause dense cake. For the vanilla, Madagascar vanilla bean paste from Williams Sonoma gives that professional depth. Pro tip: Measure your dry ingredients by weight if you’re feeling fancy—12 oz flour instead of cups for foolproof accuracy.
No vanilla bean paste? Double the pure vanilla extract and add a pinch of almond extract for complexity. Buttercream too sweet? Reduce powdered sugar to 3.5 cups and add 1 tbsp lemon juice for balance. The heavy cream should be cold but not frozen—whip it to soft peaks before mixing with butter. For the berries, frozen raspberries work in a pinch—just thaw and drain them first. And if you’re short on time, store-bought vanilla cake mix (like Betty Crocker) can be upgraded with homemade frosting—just add an extra 1 tbsp vanilla extract to the batter.
Store cake layers wrapped in plastic at room temp for 2 days or in the fridge for 5 days. Frosting keeps for 3 days refrigerated—whisk in 1 tbsp milk if it stiffens. For make-ahead magic, bake layers 1 day ahead, freeze fully frosted cakes for 1 month, and thaw overnight. The berries? Add them 2 hours before serving—they soften fast. And if anyone asks, the secret to that restaurant-quality taste? Patience—let the frosting set for 30 minutes before slicing.
Why You’ll Love This Recipe
- No Mixer Needed: I swear by this—just a bowl and a whisk. The butter and sugar cream so smoothly by hand (yes, really), and the eggs blend right in without a fuss. No electric gadgets, no stress, just pure vanilla magic.
- Vanilla That Sings: That first slice? Pure comfort. The layers are tender but sturdy, the vanilla extract shines through without being overpowering, and the buttercream (made from the same butter!) melts in your mouth. Honestly, it’s the kind of cake that makes you pause mid-bite.
- Birthday to Brunch: This isn’t just a dessert—it’s my go-to for celebrations and lazy Sundays. Slice it for a kid’s party, stack it for a coffee date, or pack it for a picnic. The 8-inch size feeds a crowd but doesn’t overwhelm leftovers.
- Pantry-Friendly Magic: Between us, this recipe uses staples you already own. No specialty flours, no weird substitutes—just flour, sugar, butter, eggs, and a splash of vanilla. And the leftovers? They last days in the fridge, perfect for sneaky second helpings. Budget win.
Step-by-step instructions for 3 layer 8 inch vanilla cake
Here’s how to bake layers that stay moist for days and frosting so silky it’ll make your guests swoon.
👨🍳 Step 1: Prepare the Cake Batter with Vanilla Infusion
Preheat your oven to 350°F and grease three 8-inch round cake pans, lining the bottoms with parchment paper. In a medium bowl, whisk together the 3 cups All-Purpose Flour, 2 tsp Baking Powder, and 0.5 tsp Salt. Sift this mixture directly into a large mixing bowl to aerate it.
In a separate large bowl, beat the 1.5 cups Unsalted Butter and 1.25 cups Granulated Sugar (reserving the remaining 1 cup for the frosting) on medium speed until light and fluffy, about 3-4 minutes. Add the 4 whole Large Eggs, one at a time, mixing well after each addition. Scrape down the sides of the bowl as needed.
In a small bowl, whisk together the 1 cup Whole Milk, 2 tsp Pure Vanilla Extract, and 2 tbsp Vanilla Bean Paste. With the mixer on low speed, alternate adding the dry ingredients and milk mixture to the butter-sugar mixture, beginning and ending with the dry ingredients. Mix just until combined—don’t overmix or your cake will be dense.
🔥 Step 2: Bake the Layers to Perfect Doneness
Divide the batter evenly among the prepared cake pans. Tap each pan firmly on the counter to remove any air bubbles. Bake for 25-30 minutes or until a toothpick inserted into the center comes out clean. Rotate the pans halfway through baking for even browning.
Here’s the thing—your oven might run hot, so start checking at the 25-minute mark. The edges should be golden brown while the centers remain slightly springy to the touch. If the tops brown too quickly, tent the pans loosely with aluminum foil.
Remove the cakes from the oven and let them cool in the pans for 10 minutes. Then transfer them to a wire rack to cool completely. This gradual cooling prevents cracking and ensures even layers when you stack them later.
🥘 Step 3: Make the Vanilla Bean Frosting
While the cakes cool, make the frosting by beating the 1.5 cups Heavy Whipping Cream in a chilled bowl until soft peaks form. In a separate large bowl, whisk together the remaining 1 cup Granulated Sugar and 4 cups Powdered Sugar. Add the scraped seeds from the 1 whole Vanilla Bean and mix well.
Gradually add the sugar mixture to the whipped cream, mixing on low speed until just combined. Increase the speed to medium and beat for 2-3 minutes until the frosting is light, fluffy, and holds stiff peaks. This is where the magic happens—the vanilla bean seeds add that authentic depth of flavor that separates good frosting from extraordinary.
🍰 Step 4: Assemble the Cake with Confidence
Place the first cake layer on a cake stand or plate. Spread a generous layer of frosting (about ½ cup) over the top, leaving a ½-inch border unfrosted. Repeat with the second layer. For the final layer, spread frosting over the top and sides, creating a smooth base for decorating.
Chill the assembled cake in the refrigerator for at least 1 hour before adding any decorative elements. This helps the frosting set and makes it easier to create clean edges. For that restaurant-quality finish, use a long serrated knife to trim any uneven edges or frosting drips.
🍓 Step 5: Garnish and Serve with Style
Once the cake is fully chilled, spread the remaining frosting over the top and sides, creating a smooth finish. For a stunning presentation, pipe rosettes or swirls with the leftover frosting. Arrange the 1.5 cups Fresh Raspberries decoratively on top—press them gently into the frosting so they stay in place.
Slice and serve immediately. The contrast of the tart raspberries against the rich vanilla frosting will have your guests begging for seconds. This cake keeps well at room temperature for 2 days or in the refrigerator for up to 5 days, though I doubt it’ll last that long!
Pro Tips For Making 3 Layer 8 Inch Vanilla Cake
- Weigh Your Butter: I learned this the hard way—measuring butter by scooping and packing gives wildly inconsistent results. For this cake, use a kitchen scale for the butter (and sugar if you’re precise). The difference in texture is noticeable, especially when you’re layering and frosting.
- Mix Just Until Combined: Overmixing develops gluten, and this cake will turn out tough instead of tender. Stop mixing as soon as the dry ingredients disappear—usually around 20-30 seconds after the flour is incorporated. Your cake will thank you with a lighter crumb.
- Cool Layers Fully: I used to rush and frost warm layers, and the butter in the frosting would melt into a sad, greasy mess. Let each layer cool completely on a wire rack before frosting—about 20 minutes per layer. Patience here means no soggy bottoms.
- Room-Temp Eggs Matter: Cold eggs won’t blend smoothly with the butter, leading to a grainy batter. Take your eggs out of the fridge 30 minutes before mixing—just long enough to reach room temperature. The batter will be silky, and the cake will rise evenly.
Flavor customization for these flavors
Citrus Twist
Brighten your vanilla cake with a zesty twist by adding 1 tbsp lemon or orange zest to the cake batter. The citrus cuts through the richness and adds a refreshing note.
I like to pair this with a white chocolate ganache frosting (melt 8 oz white chocolate with ½ cup heavy cream and 1 tsp vanilla extract) for a sophisticated contrast. Garnish with thin citrus slices or candied peel for extra flair. 🍋
Spiced Chai Infusion
For a cozy autumnal flavor, infuse the cake batter with 1 tsp chai spice blend (equal parts cinnamon, cardamom, ginger, and cloves). Warm the milk with the spices for 5 minutes before using it in the batter.
Top with a spiced cream cheese frosting made by mixing 8 oz cream cheese, ½ cup butter, 2 cups powdered sugar, and 1 tsp vanilla extract. Add candied pecans or a sprinkle of cinnamon for texture. ✨
Chocolate-Dipped Layers
Elevate your vanilla cake by dipping the bottom of each layer in melted dark chocolate (60% cocoa or higher) before assembling. This creates a decadent surprise with every bite. Use the same vanilla bean frosting for a harmonious flavor.
For extra indulgence, add chocolate shavings or crushed hazelnuts to the top. Store-bought chocolate chips work in a pinch, but I recommend Valrhona guilini for the best quality. 🍫
Coconut-Lime Delight
Transform your vanilla cake into a tropical treat by folding ½ cup shredded coconut into the batter and adding 1 tbsp lime zest to the frosting.
Use a coconut cream frosting made with 1 can coconut cream (chilled overnight) whipped with 2 cups powdered sugar and 1 tsp lime juice. Garnish with toasted coconut flakes and lime wheels for a vibrant presentation. This variation is a crowd-pleaser at summer gatherings. 🥥
Salted Caramel Swirl
Add a sophisticated touch by swirling ½ cup salted caramel sauce (store-bought or homemade) into the frosting before assembling the cake. Drizzle additional caramel over the top and sprinkle with flaky sea salt for a sweet-salty balance.
I love using Trader Joe’s salted caramel sauce for convenience, but homemade (simmer 1 cup sugar and ½ cup heavy cream with 2 tbsp butter) is even better. 🍯
Berry Compote Layers
Replace the raspberries with a homemade berry compote by simmering 1 cup mixed berries (strawberries, blueberries, raspberries) with 2 tbsp sugar and 1 tsp lemon juice until thickened. Spread a thin layer between the cake layers and on top for a burst of fresh fruit flavor.
This works especially well with a light vanilla cream frosting made by whipping 1 cup heavy cream, 2 cups powdered sugar, and 1 tsp vanilla extract**. 🍓
Nutrition facts
Frequently asked questions
Can I use this recipe for a 6-inch or 10-inch cake instead?
This recipe is specifically designed for 8-inch layers, but you can adjust it! For a 6-inch cake, reduce each layer to ⅓ of the batter and bake for 20-25 minutes. For a 10-inch cake, increase each layer to ⅓ more batter and bake for 30-35 minutes. Always check doneness with a toothpick—it should come out clean. The frosting quantity will need adjustment too: ⅔ cup for 6-inch or 1.5x the recipe for 10-inch.
Why does my cake turn out dry or dense?
Dry or dense cake usually happens from overmixing or incorrect baking. First, ensure your butter and eggs are at room temperature—cold ingredients prevent proper emulsification. Second, mix just until combined (about 1 minute after all ingredients are incorporated). Overmixing develops gluten, making the cake tough. Finally, check your oven temperature with an oven thermometer—many ovens run 25°F hotter than set. If your cake browns too fast, tent with foil.
How do I store leftover cake or frosting?
Store the fully assembled cake in an airtight container at room temperature for up to 2 days, or refrigerate for 5 days. For longer storage, freeze the unfrosted layers wrapped tightly in plastic for 1 month. Frosting keeps in the fridge for 3 days—if it stiffens, whisk in 1 tbsp milk to soften. Never freeze frosting with fresh berries, as they’ll get mushy. Bring frosting to room temp before using to avoid graininess.
Can I make this cake gluten-free or vegan?
For gluten-free, replace the all-purpose flour with a 1:1 gluten-free baking flour blend (like Bob’s Red Mill) and add ½ tsp xanthan gum to the dry ingredients. For vegan, swap butter for vegan butter or coconut oil, use flax eggs (1 tbsp ground flaxseed + 3 tbsp water per egg), and replace milk with almond or oat milk. The frosting can be made vegan by using vegan butter and coconut cream instead of heavy cream. Adjust baking times as needed—GF cakes often bake 5-10 minutes longer.
How do I fix cracked layers when stacking?
Cracked layers usually mean the cake cooled too quickly or wasn’t level. First, ensure each layer is completely cool before assembling—even 10 minutes too soon can cause cracks. Level the tops with a serrated knife if needed. When frosting, spread a thin ¼-inch layer between layers first, then add the full frosting. Chill the cake for 30 minutes after assembly to help the frosting set before slicing. If cracks appear after baking, they’re usually just cosmetic—frosting will hide them beautifully!

- 32 Oz Cream Cheese Cheesecake Recipe: Silky Smoothness With No Cracking - October 11, 2026
- 8×8 Pan Dump Cake Recipe: One-Bowl Wonder with Fudgy Layers - October 11, 2026
- 10-Layer Cake Recipe: Stacked Height With Buttery Vanilla Layers - October 11, 2026