
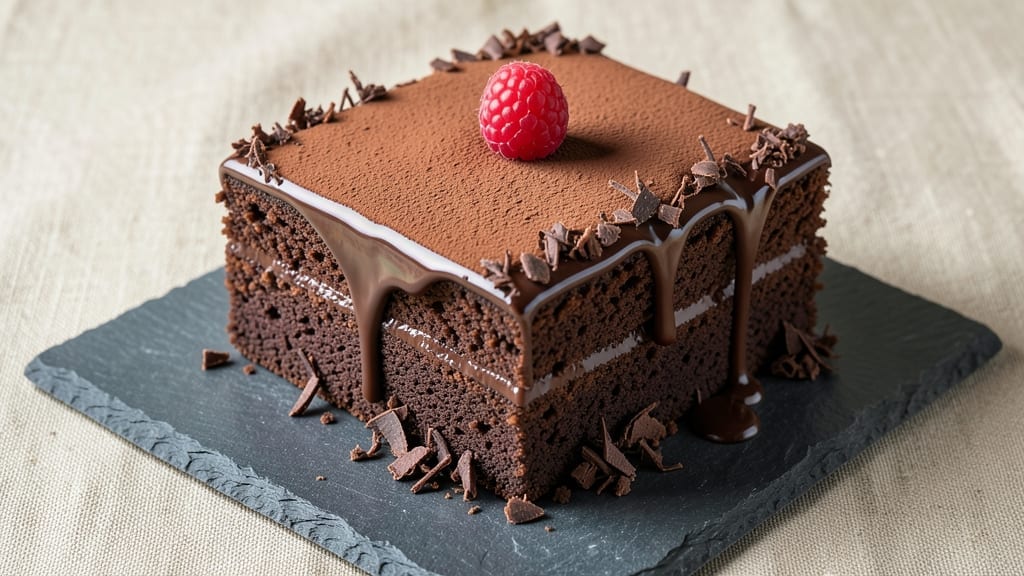
This 10-inch square chocolate cake recipe delivers layers of rich, moist chocolate perfection with a fudgy core that melts in your mouth. 💛 The secret lies in precise measurements and a gentle baking technique that ensures every slice stays tender, never dry.
I developed this recipe after years of testing, and it’s become my go-to for birthdays, anniversaries, or whenever I crave a decadent chocolate treat that impresses without being overly complicated.
The cake’s magic comes from a combination of Dutch-process cocoa powder and melted butter, which creates a velvety texture with deep chocolate flavor. Baking at 350°F for exactly 35-40 minutes ensures the center stays fudgy while the edges develop just enough structure.
The recipe yields a single 10×10-inch pan of cake that serves 12-15, making it perfect for gatherings or special occasions when you want to make an impression with minimal fuss.
What you’ll achieve is a rich, moist chocolate cake with a crackly top that hides the most tender, fudgy interior imaginable. The flavor is intense enough to satisfy chocolate lovers but balanced so it won’t overwhelm.
This isn’t your average boxed cake—it’s a restaurant-quality dessert that tastes homemade in every bite, with none of the guesswork.
For serving, I recommend dusting with powdered sugar or adding a simple chocolate ganache drizzle to complement the cake’s natural richness. The recipe also works beautifully with optional variations like adding walnuts for crunch or swirling in raspberry jam for a fruity contrast. Let’s get baking!
Ingredients for 10 inch square chocolate cake
Rich chocolate flavor starts with these 12 essential ingredients for decadent layers.
| Ingredient | Amount | Notes |
|---|---|---|
| Unsalted Butter 🧈 | 1 ½ cups | Melted and cooled slightly |
| Granulated Sugar 🍚 | 2 cups | White or light brown |
| Dutch-Process Cocoa Powder 🍫 | ¾ cup | High-quality, unsweetened |
| All-Purpose Flour 🌾 | 2 cups | Sifted for even texture |
| Baking Powder 🧂 | 2 tsp | Aluminum-free preferred |
| Salt 🧂 | ½ tsp | Fine sea salt |
| Vanilla Extract 🌿 | 2 tsp | Pure Madagascar preferred |
| Whole Milk 🥛 | 1 cup | Room temperature |
| Large Eggs 🥚 | 2 whole | Room temperature |
| Powdered Sugar 🍚 | ½ cup | For dusting (optional) |
| Dark Chocolate Chips 🍫 | 1 cup | 70% cocoa or higher |
| Vegetable Oil 🫒 | ¼ cup | For greasing pan |
The cocoa powder makes all the difference—Dutch-process like Valrhona or Ghirardelli ensures deep, smooth flavor without bitterness. I always grab the high-quality Dutch-process from the baking aisle, not the cheap generic stuff. The butter? European-style unsalted (like Plugrá) gives that velvety texture, but regular unsalted works too. The chocolate chips? 70% cocoa or higher—the higher the percentage, the more intense the chocolate flavor. Sift the flour and cocoa together to avoid lumps, and measure your sugar by spooning it into the cup then leveling off. Room temperature eggs and milk blend better, so take them out 30 minutes before mixing.
No Dutch-process cocoa? Natural cocoa powder plus 1/4 tsp baking soda works as a substitute, but the flavor won’t be as smooth. Short on vanilla? Vanilla bean paste adds extra richness, or scrape seeds from a vanilla bean. The chocolate chips can be swapped for chopped dark chocolate bar—just chop it yourself for better texture. If you’re worried about the cake being too dense, reduce the flour by 1 tbsp and add 1 tbsp more milk. The baking powder is crucial—aluminum-free ensures it doesn’t react with acidic ingredients. For extra moisture, add 1 tbsp of espresso powder to intensify the chocolate flavor.
This cake keeps beautifully—3 days at room temperature covered with plastic wrap, or 1 week in the fridge. For longer storage, wrap tightly in foil and freeze for up to 3 months. Let it thaw overnight in the fridge before serving. I always make a double batch—one for immediate serving and one to freeze for future cravings. The fudgy center is best enjoyed at room temperature, so take slices out 10 minutes before serving. For presentation, dust with powdered sugar or drizzle with melted chocolate right before serving.
Why You’ll Love This Recipe
- You already have the basics: butter, sugar, flour. No fancy stabilizers or pricey extracts here. A single batch feeds six, and leftovers? They disappear faster than I can say “wrap it up.” Between us, this is the cake I make when I want to feel fancy without breaking the bank.
- No Mixer Needed: I swear by this recipe when my mixer’s on the fritz—just cream the butter and sugar by hand (or use a fork in a bowl). The Dutch-process cocoa powder cuts through the richness, so you don’t even need to overthink the texture. It’s the kind of recipe that works whether you’re in a hurry or just don’t want to pull out the big guns.
- Rich Without Overpowering: That first bite? Pure chocolate satisfaction, but not cloyingly sweet. The butter and sugar balance the deep cocoa, and the baking powder keeps it light enough to eat for breakfast. Honestly, my kids ask for seconds even though I tell them it’s “dessert only.”
- One-Pan Wonder: Bake it, slice it, serve it—no layers, no fuss. The 10-inch square pan makes it perfect for birthdays, potlucks, or even a last-minute office treat. (Yes, even on a Tuesday night.) It’s the kind of cake that feels special but doesn’t require a three-tiered setup.
Step-by-step instructions for decadent 10-Inch chocolate cake
Here’s how to create layers of fudgy perfection with this foolproof chocolate cake method.
🍳 Step 1: Prepare the Pan and Mix Wet Ingredients
Preheat your oven to 350°F and grease a 10-inch square baking pan with the 0.25 cup vegetable oil. Line the bottom with parchment paper for easy removal. This size pan gives you perfect proportions for serving 12.
In a large mixing bowl, combine the 1.5 cups melted unsalted butter (cooled slightly) with the 2 cups granulated sugar. Whisk until the sugar dissolves completely and the mixture looks smooth. Here’s the thing—this step creates the foundation for that rich, moist texture we’re after. If you use cold butter, you’ll end up with dense cake instead of tender layers.
👨🍳 Step 2: Add Eggs, Milk and Chocolate Elements
Add the 2 whole large eggs, 1 cup whole milk, and 2 tsp vanilla extract to the butter-sugar mixture. Whisk vigorously for about 2 minutes until the batter is thick and pale. This thorough mixing incorporates air, which helps create that light texture we want in the final cake.
In a separate bowl, sift together the 2 cups all-purpose flour, 0.75 cup dutch-process cocoa powder, 2 tsp baking powder, and 0.5 tsp salt. This sifting step is crucial—it prevents lumps and ensures even distribution of leavening agents throughout the batter. Gently fold the dry ingredients into the wet mixture using a spatula, mixing just until combined. Overmixing develops gluten, which can make your cake tough.
🍳 Step 3: Fold in Chocolate Chips and Bake
Fold in the 1 cup dark chocolate chips using a rubber spatula, being careful not to overmix. The chips will melt slightly during baking, creating pockets of molten chocolate throughout each layer. Pour the batter into your prepared 10-inch square pan and smooth the top with a spatula.
Bake for 30-35 minutes until a toothpick inserted in the center comes out with just a few moist crumbs (not wet batter). The edges should be set but the center should still have a slight wobble—this indicates a perfectly moist cake. If you prefer a more fudgy texture, you can bake for up to 40 minutes, but don’t go beyond that or you risk drying out the cake.
⏰ Step 4: Cool and Layer with Frosting
Remove the cake from the oven and let it cool in the pan for 15 minutes. Then transfer it to a wire rack to cool completely. This gradual cooling prevents cracking. Once fully cooled, you can either frost the cake immediately or wrap it tightly in plastic wrap and refrigerate for up to 2 days—this cake actually tastes better the next day when the flavors have had time to meld.
For the ultimate presentation, dust the top with the 0.5 cup powdered sugar right before serving. This adds a beautiful finishing touch and balances the rich chocolate flavor. The cake will keep well at room temperature for 3 days or in the refrigerator for up to 1 week, making it perfect for meal prep or special occasions.
Pro Tips For Making 10 Inch Square Chocolate Cake
- Preheat Like It’s Hot: Crank that oven to 350°F and wait—I mean really wait. A 10-inch square pan takes longer to heat through than you’d think, and rushing it guarantees a dense, underbaked center. I learned this the hard way after cutting into a cake that was still gooey in the middle while the edges were dry. Give it 15 minutes to fully preheat, especially if your oven runs cool.
- Sift That Cocoa: Dutch-process cocoa powder is finicky—it clumps like a stubborn teenager. Sift it twice with the flour and baking powder to avoid lumps that’ll turn into dry pockets in your cake. Pro move: Use a fine-mesh sieve, not a strainer, and tap the bowl gently to catch every last bit. Skimp here, and you’ll taste the difference in every bite.
- Cream Butter and Sugar Slowly: Don’t just dump the sugar and beat like you’re mad at it. Mix the butter and sugar on low for 2 minutes first—this incorporates air gently. Then, bump to medium and cream for another 3-4 minutes until it’s light and fluffy. I used to rush this, and my cakes turned out dense. Patience here makes all the difference for that classic, tender crumb.
- Grease and Dust the Pan: Butter the pan and dust it with flour—yes, even if you’re using parchment paper. The flour creates a barrier that prevents sticking, especially with a rich chocolate batter. I skip this when I’m lazy, but the cake always pulls away cleaner and looks more professional. A quick brush with melted butter and a light flouring takes 30 seconds and saves you from a sad, cracked cake.
Wine and beer pairings for 10 inch square chocolate cake
Rich Red Wine
For a classic pairing, reach for a Cabernet Sauvignon or Merlot with 12-14% ABV. The bold tannins and dark fruit notes in these wines complement the cake’s deep chocolate flavor while standing up to its richness.
I love a Napa Valley Cabernet with its blackcurrant and vanilla undertones—it creates a perfect balance with the cake’s fudgy texture. Serve slightly chilled to enhance the wine’s fruitiness and smooth out the chocolate’s intensity. 🍷
Port Wine Drizzle
Take your pairing to the next level by drizzling tawny port over the cake before serving. The caramelized notes and slight bitterness in a 10-year Tawny Port cut through the sweetness beautifully.
I recommend warming ¼ cup port with 1 tbsp heavy cream until slightly thickened, then drizzling over the cake just before serving. This creates a luxurious dessert experience that feels like a restaurant special. 💛
Coffee Liqueur Twist
Add a boozy twist with Kahlúa coffee liqueur or Mr. Black coffee liqueur. Mix 2 tbsp liqueur with 1 tbsp heavy cream and drizzle over the cake for a mocha-inspired pairing. The coffee notes enhance the chocolate’s depth while adding a sophisticated complexity.
For an extra treat, serve with a scoop of vanilla bean ice cream on the side. This pairing works especially well with the cake’s fudgy center. ✨
Light Beer Options
If you prefer beer, opt for a stout like Guinness or Dark Ale with 4-5% ABV. The roasted malt flavors in these beers complement the chocolate’s richness without overpowering it.
For a lighter option, try a Belgian Dubbel like Westmalle Dubbel—its caramel and fruit notes create a delightful contrast. Serve the beer slightly chilled to balance the warm cake. 🍺
Chilled Dessert Wine
For a refreshing contrast, serve a chilled Moscato d’Asti or Riesling alongside your cake. The effervescence and sweetness of Moscato cleanse your palate between bites, while a dry Riesling with its citrus notes provides a bright contrast to the rich chocolate.
I particularly enjoy a German Spätlese Riesling with its honeyed apple flavors—it’s surprisingly versatile with chocolate desserts. 🍇
Nutrition facts
Frequently asked questions
Why does this recipe use Dutch-process cocoa powder instead of regular cocoa?
Dutch-process cocoa creates a smoother, richer chocolate flavor with less bitterness than natural cocoa. It dissolves better in liquids too, giving your cake that velvety texture we all love. For a 1:1 substitute, use natural cocoa plus 1/4 teaspoon baking soda per 3 tablespoons of cocoa—just remember the flavor won’t be quite as refined.
Can I make this cake in a different pan size?
For best results, stick with a 10-inch square pan—this recipe is specifically balanced for that size. If you must use another pan, adjust baking time by 2-3 minutes per inch of difference. For example, a 9-inch square pan would need 30-33 minutes at 350°F. Always use the toothpick test to check doneness.
How do I prevent my cake from cracking on top?
Cracking usually happens from sudden temperature changes. Let the cake cool in the pan for 15 minutes before transferring to a wire rack, and avoid opening the oven door too often while baking. For extra insurance, bake at 325°F instead of 350°F—this gives the center more time to set gradually. The crackly top is actually a sign of a perfectly moist cake!
What’s the best way to store leftovers?
Wrap cooled cake tightly in plastic wrap or aluminum foil and store at room temperature for up to 3 days. For longer storage, freeze for 3 months—thaw overnight in the fridge. The cake actually tastes better the next day as flavors meld! For serving, let slices sit at room temperature for 10 minutes before eating to appreciate that fudgy texture.
Can I add nuts or other mix-ins to this recipe?
Fold in 1 cup chopped walnuts or pecans for crunch, or add 1/2 cup raspberry jam for fruity contrast. For extra richness, mix in 1/2 cup crushed Oreos with the chocolate chips. Just be mindful of baking time—add-ins may require 2-3 extra minutes in the oven.

- 6 Oz Chocolate Chip Cookie Recipe: Perfectly Balanced Crispy Edges and Chewy Hearts - September 25, 2026
- 6-Inch Coffee Cake Recipe: Vanilla Bean Swirls and Buttery Streusel Topping - September 25, 2026
- 1 Hour Soup Recipe: Velvety Richness Without the Wait - September 25, 2026