
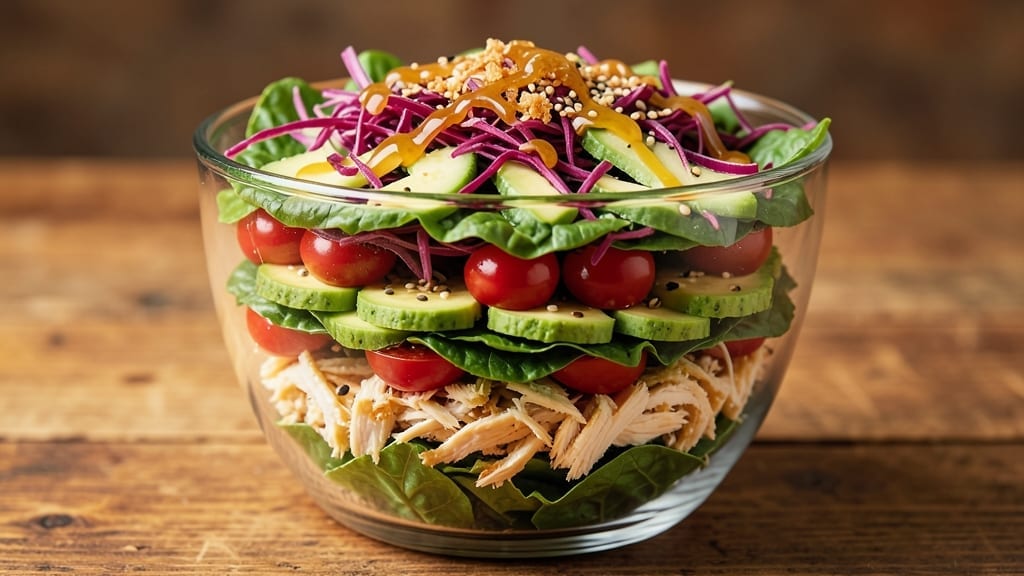
This 10-layer salad recipe turns an ordinary meal into a showstopping, restaurant-quality dish that’s just as tasty as it is beautiful. The key lies in strategic layering—each component adds texture, flavor, and color to create a harmonious bite.
This isn’t just a salad; it’s a creamy, crunchy, and vibrant masterpiece that elevates any gathering.
What sets this recipe apart is the balance of textures—crisp vegetables, creamy dressings, and protein layers that hold together beautifully. The assembly process is methodical but straightforward, ensuring each layer stays distinct while contributing to the whole.
Whether you’re hosting a dinner party or meal prepping for the week, this salad delivers both presentation and flavor.
The result is a salad that looks as good as it tastes—golden croutons, fresh greens, creamy avocado, and layers of protein all stacked to perfection. The dressing binds everything together without overwhelming the fresh ingredients, creating a cohesive bite with every forkful.
This is the kind of dish that makes healthy eating feel indulgent.
Customize it with your favorite proteins, swap ingredients for dietary needs, and adjust the layers to suit your taste. The possibilities are endless, but the foundation remains the same: a foolproof method for building a salad that’s as impressive as it is delicious. Let’s get started!
Ingredients for 10 layer salad
Fifteen ingredients layered strategically for a salad that’s as visually stunning as it is flavorful.
| Ingredient | Amount | Notes |
|---|---|---|
| Romaine Lettuce 🥬 | 1 whole | Chopped into bite-sized pieces |
| Red Cabbage 🥬 | ½ lb | Shredded, thinly sliced |
| Cucumber 🥒 | 1 whole | Seedless, thinly sliced |
| Avocado 🥑 | 2 whole | Ripe, sliced into 1/4-inch pieces |
| Cherry Tomatoes 🍅 | 1 cup | Halved, cherry variety |
| Cooked Chicken Breast 🍗 | 1 ½ lb | Diced into 1/2-inch cubes |
| Golden Croutons 🍞 | 1 ½ cups | Store-bought or homemade |
| Crumbled Feta Cheese 🧀 | ½ cup | Freshly crumbled, not pre-shredded |
| Pepitas 🥜 | ¼ cup | Toasted for added crunch |
| Blue Cheese Crumbles 🧀 | ¼ cup | For tangy contrast |
| Red Wine Vinaigrette 🍷 | ½ cup | Homemade or quality store-bought |
| Extra-Virgin Olive Oil 🫒 | 2 tbsp | For drizzling between layers |
| Diamond Crystal Kosher Salt 🧂 | ½ tsp | For seasoning proteins and dressings |
| Freshly Ground Black Pepper 🌶️ | ¼ tsp | For finishing each layer |
| Balsamic Glaze 🍇 | 2 tbsp | For drizzling over finished salad |
The Romaine lettuce and red cabbage form the foundational crunch—opt for organic if possible, as the vibrant colors translate best. Whole Foods or local farmers’ markets carry the most visually appealing varieties. For the avocado, ripeness is key: press gently—they should yield slightly but not feel mushy. Trader Joe’s often has pre-ripened avocados that arrive perfect for layering. The chicken breast should be cooked to an internal temperature of 165°F and diced uniformly for even distribution across layers. If you prefer plant-based, swap in marinated tofu or chickpeas for a protein-packed alternative.
No feta cheese? Vegan feta or goat cheese works beautifully—just adjust the tanginess by adding a splash of lemon juice. The pepitas can be swapped for toasted sunflower seeds if you’re avoiding nuts. For the red wine vinaigrette, a simple mix of red wine vinegar, Dijon mustard, and extra-virgin olive oil elevates the dish without overpowering. If you’re short on time, Primal Kitchen or Annie’s dressings offer high-quality options. The balsamic glaze adds a touch of sweetness—look for one with a thick, syrupy consistency for the best drizzle effect.
Assemble the salad in a glass bowl to showcase the layers, and store each component separately in the fridge until ready to build. The avocado should be added last to prevent browning, and the dressing should be drizzled between layers rather than poured on top to maintain crispness. This salad keeps beautifully for 3-4 days when stored in an airtight container with parchment paper between layers. For meal prep, portion into individual containers, adding the final drizzle of balsamic glaze just before serving to preserve its glossy finish.
Why You’ll Love This Recipe
- No-Chop Struggle: I’ll be real—this salad only needs five actual cuts (yes, I counted). The Romaine stays whole, the cabbage gets a rough chop, and the rest? Just slice-and-dice basics. Even my toddler could handle it, and honestly, that’s saying something.
- Crunchy-Creamy Magic: That first bite of cool cucumber and avocado? Chef’s kiss. The red cabbage adds this perfect sharpness, while the cherry tomatoes pop like little edible jewels. It’s the kind of salad that makes you forget it’s “just” veggies.
- Lunchbox Legend: Between us, this is my go-to for packed lunches—no soggy lettuce here. The layers hold up for days, and the avocado stays creamy if you prep it last. I’ve sent this to work, picnics, and even school lunches (kids love the “rainbow layers”).
- Budget Brightener: Red cabbage and Romaine last forever, and I can use half a cucumber and still have leftovers. Avocado’s the splurge, but one fruit goes a long way when sliced thin. It’s the kind of meal that stretches your grocery dollars without feeling cheap.
Step-by-step instructions for building the 10-Layer salad
This layered salad creates a perfect balance of textures and flavors through careful assembly.
Prepare the Base Layer with Romaine Lettuce
Begin by arranging the chopped romaine lettuce evenly across the bottom of a large glass or serving dish. Press down gently to create a stable foundation—this prevents the layers from shifting when you add subsequent ingredients. The lettuce should be spread in an even layer, about ¼-inch thick, covering the entire bottom surface of your dish.
Use your hands to gently press the lettuce into place, ensuring there are no gaps. This step is crucial because it creates a solid base that supports all the layers above. If you notice any areas where the lettuce is too thick, spread it out evenly to maintain a consistent thickness throughout.
Layer the Red Cabbage and Cucumber
Next, distribute the shredded red cabbage evenly over the lettuce layer. The cabbage should be spread in a thin, even layer—about ⅛-inch thick. Follow this with the thinly sliced cucumber, arranging the slices in a slightly overlapping pattern to create a continuous layer. This arrangement adds both color and crunch to the salad.
Press down lightly on each layer as you go to help them adhere to the layer below. The red cabbage will add a subtle sweetness and vibrant color, while the cucumber provides a refreshing crispness. Be mindful not to overcrowd these layers, as this can lead to a soggy texture in the finished salad.
Add the Avocado and Cherry Tomatoes
Arrange the sliced avocado pieces evenly over the cucumber layer. The avocado should be spread in a single layer, with each slice placed cut-side down to prevent browning. Follow this with the halved cherry tomatoes, placing them cut-side up in a slightly overlapping pattern. This layer adds creaminess and a burst of juicy sweetness.
Work quickly with the avocado to prevent oxidation. If you notice any slices beginning to brown, lightly brush them with a small amount of the red wine vinaigrette to help preserve their color and flavor. The tomatoes should be evenly distributed, with no more than two halves per section to maintain balance.
Incorporate the Chicken Breast and Croutons
Sprinkle the diced cooked chicken breast evenly over the tomato layer. The chicken should be distributed in a single layer, with each piece placed gently to avoid disturbing the layers below. Follow this with the golden croutons, spreading them evenly across the top of the chicken. This layer adds protein and a satisfying crunch.
Lightly press down on the croutons to help them adhere to the chicken layer. The croutons should be spread evenly, with no more than two pieces per section to maintain a balanced texture. If you notice any areas where the croutons are too thick, gently spread them out to create a uniform layer.
Add the Cheeses and Pepitas
Sprinkle the crumbled feta cheese evenly over the croutons, followed by the blue cheese crumbles. Both cheeses should be distributed in a single layer, with the feta providing a mild tang and the blue cheese adding a bold, creamy contrast. Finally, sprinkle the pepitas evenly over the top of the cheese layer to add a nutty crunch.
Use a fine-mesh strainer or your fingers to distribute the pepitas evenly. This step adds texture and visual interest to the salad. Be mindful not to overcrowd this layer, as too many pepitas can make the salad overly crunchy and unbalanced.
Drizzle and Finish the Salad
Drizzle the extra-virgin olive oil evenly over the entire salad, followed by the red wine vinaigrette. The vinaigrette should be spread in a thin, even layer, coating all the ingredients below. Finally, drizzle the balsamic glaze in a zigzag pattern over the top of the salad for added sweetness and visual appeal.
Season the entire salad with the diamond crystal kosher salt and freshly ground black pepper. Sprinkle the salt and pepper evenly over the top, ensuring each layer is lightly seasoned. Allow the salad to rest for 10-15 minutes before serving to let the flavors meld and the layers settle.
Pro Tips For Making 10 Layer Salad
- DRESS LETTUCE LAST: The romaine’s crispness wilts under dressing like a sad houseplant left out in the rain. Toss it separately in a small bowl just before assembling—this keeps the base sturdy while letting the other layers soak up flavor without turning to mush.
- SALT CABBAGE FIRST: Red cabbage holds onto moisture like a stubborn toddy. Toss it with ½ teaspoon salt and let it sit for 10 minutes before draining. This softens the texture and removes that sharp bite—trust me, your salad will thank you later.
- SKIP HALVING TOMATOES: Cherry tomatoes burst into a watery mess when cut, drowning your layers. Leave them whole and nestle them into the salad like little jewels—they’ll stay intact and add pops of color without turning your dish into a soggy swamp.
- AVOCADO HACK: TOSS WITH LEMON: Sliced avocado turns brown faster than my ex’s promises. Toss the slices with a squeeze of lemon juice right before layering—this buys you 15-20 minutes of vibrant green instead of sad gray. (Yes, even if you’re impatient like me.)
Common mistakes when making perfect results
Overcrowding Layers
One of the biggest mistakes is piling ingredients too thickly in any single layer. When layers become too dense—especially with soft items like avocado or tomatoes—they can collapse under the weight of subsequent layers.
I’ve seen salads where the bottom lettuce layer turns soggy because the cabbage was packed too tightly above it. Aim for ⅛-inch to ¼-inch thickness per layer and press gently to help ingredients adhere without compressing.
For crunchy elements like croutons or pepitas, resist the urge to over-sprinkle. Too many can make the salad unpleasantly dry or disrupt the visual balance. A good rule of thumb: no more than two pieces of croutons or one teaspoon of pepitas per 2-inch section of your dish. 🥗
Skipping the Base Press
The foundation is everything in a 10-layer salad, yet many cooks skip pressing the romaine lettuce into place. Without this step, your layers will shift when you add heavier ingredients like chicken or cheese, creating an uneven, unstable structure.
I’ve seen entire salads slide apart when served because the base wasn’t secured. Use your hands to gently press the lettuce into the dish, filling any gaps—this creates a stable platform for all subsequent layers.
Pro tip: If you’re prepping ahead, store the base lettuce layer separately in a sealed container and press it down again just before assembling. This maintains its integrity even after refrigeration. ❄️
Adding Dressing Too Early
Drizzling dressing on top of a fully assembled salad is a common mistake that turns crisp ingredients into a soggy mess. The moisture from the dressing seeps downward, causing layers like croutons and pepitas to lose their crunch.
Instead, apply dressing between layers—especially between the lettuce and cabbage, and again between the chicken and cheese layers. This keeps each component distinct while still tying the salad together.
For the final drizzle of balsamic glaze, wait until serving time. This preserves its glossy appearance and prevents the salad from becoming overly wet. A light mist of olive oil right before serving also adds shine without compromising texture. 💧
Uneven Ingredient Distribution
An unbalanced salad isn’t just visually unappealing—it’s also unpleasantly textured. I’ve tasted salads where one bite had too much feta and the next had none, or where the chicken was clumped in one corner.
To avoid this, distribute each ingredient evenly across the entire surface before moving to the next layer. Use a fine-mesh strainer for crumbly items like cheese or pepitas to ensure even dispersion.
Work in sections if needed: divide your dish into quadrants and fill each quadrant completely before moving to the next. This method guarantees consistent coverage and prevents any single area from becoming overloaded. 🎨
Ignoring the Resting Time
Rushing to serve a 10-layer salad immediately after assembly is a recipe for disaster. Without a 10-15 minute rest, the layers won’t settle, and the flavors won’t meld.
I’ve seen salads where the croutons slide off the plate or the dressing pools at the bottom because they weren’t given time to absorb. Let the salad sit at room temperature while you set the table—this allows the ingredients to relax into their positions and the dressing to distribute evenly.
If you’re serving immediately, place the assembled salad in the fridge for 5 minutes before bringing it to the table. The slight chill helps everything hold together better. 🕒
Nutrition facts
Frequently asked questions
Can I make this layered salad ahead of time?
Assemble all layers except the avocado and final dressings, then store in an airtight container with parchment between layers. Keep it refrigerated for up to 3 days. Add avocado and dressings just before serving to preserve freshness and crunch. The base lettuce layer holds best if pressed again before serving.
What’s the best way to keep avocado from browning?
Slice avocado just before assembling the salad and place cut-side down on the cucumber layer. Brush slices lightly with red wine vinaigrette or lemon juice, then cover with plastic wrap until ready to serve. For extra protection, sprinkle a pinch of salt on avocado slices—it helps slow oxidation. Work quickly to minimize exposure to air.
How do I adjust this for vegetarian/vegan diets?
Replace chicken with marinated tofu (press and bake for 15 minutes at 400°F), grilled tempeh, or chickpeas. Swap feta for vegan feta and blue cheese for vegan blue cheese crumbles. Use olive oil-based dressings instead of wine vinaigrette. All other layers remain the same—just check each ingredient for plant-based alternatives.
Can I use different greens as the base?
Yes! Try butter lettuce for extra tenderness or arugula for peppery bite. For heartier salads, mix romaine with spinach or kale. The key is pressing the base layer firmly to create stability. Avoid overly watery greens like iceberg—they won’t hold layers well. For colorful options, consider red leaf lettuce or purple cabbage as a base alternative.
What’s the secret to perfect layer presentation?
Use a clear glass bowl to showcase colors, and assemble in a spiral pattern starting from the outer edge. Press each layer gently but firmly, and use a small offset spatula to smooth edges. For extra flair, arrange cherry tomatoes in a circular pattern on top. The final drizzle of balsamic glaze should follow the natural curves of the salad for an artistic finish.

- Pork Loin Pulled Pork Crock Pot Recipe: Slow-Smoked Tenderness With Zero Dryness - November 1, 2026
- Baked Potatoes in Crock Pot Recipe: Buttery Interiors and Crispy Top Magic - November 1, 2026
- Braised Beef Short Ribs Recipe: Crock Pot Fall-Off-Bone Magic in 6 Hours - November 1, 2026