
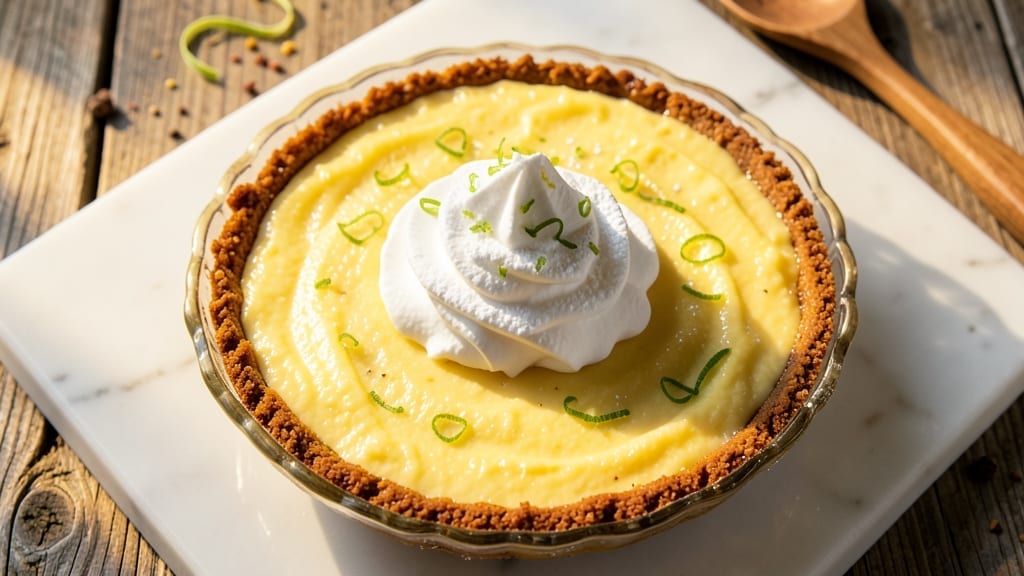
This 5-ingredient key lime pie delivers the perfect balance of zesty tang and velvety cream—no complicated techniques required. The secret lies in using fresh key lime juice and sweetened condensed milk to create a filling that’s both rich and light, all while keeping prep simple.
I’ve perfected this version to cut down on ingredients without sacrificing that signature Florida-inspired flavor, so you get restaurant-quality results with minimal effort.
The filling comes together in just 10 minutes, and the crust can be store-bought or homemade for extra convenience. A graham cracker crust adds a buttery crunch, while the lime filling stays perfectly set after 4 hours in the fridge.
The best part? No baking required—just mix, pour, and chill. This pie is ideal for potlucks, summer gatherings, or when you crave something tangy and sweet without the fuss.
What you’ll end up with is a slice of sunshine in dessert form—creamy, vibrant, and bursting with lime flavor. The texture is smooth and luscious, with a subtle crunch from the crust that keeps every bite interesting.
Serve it chilled with a dollop of whipped cream or a sprinkle of toasted meringue for extra indulgence. Trust me, this version will become your go-to for effortless yet impressive desserts.
Perfect for beginners or busy bakers, this recipe scales easily for parties or single servings. Store leftovers in the fridge for up to 5 days, or freeze for longer shelf life. Here’s how to make it—simple, foolproof, and delicious.
Ingredients for 5 ingredient key lime pie
Five ingredients transform into a creamy, tangy key lime pie without the fuss.
| Ingredient | Amount | Notes |
|---|---|---|
| Key Lime Juice 🍋 | 1 ½ cups | Freshly squeezed from 6-8 limes |
| Sweetened Condensed Milk 🥛 | 1 can | 14 oz can, unopened |
| Graham Cracker Crust 🍪 | 1 package | 9-inch size, store-bought or homemade |
| Heavy Whipping Cream 🧈 | 1 cup | Full-fat for best texture |
| Granulated Sugar 🍚 | ½ cup | For extra sweetness if needed |
The lime juice is everything here—freshly squeezed from 6-8 limes gives you that bright, zesty punch. Mexican Key limes are ideal if you can find them, but regular limes work too (just use more). The condensed milk can be any brand, but Carnation is a classic—just make sure it’s unopened for the best texture. For the crust, store-bought graham cracker crusts are a game-changer, but homemade is totally doable if you’re feeling ambitious. Just crush 2 cups of graham crackers with 6 tbsp melted butter and 2 tbsp sugar—easy peasy.
No fresh limes? Bottled lime juice works in a pinch, but you’ll need to add a pinch of salt to mimic the freshness. The condensed milk is non-negotiable—it’s what gives the pie that signature velvety texture. If you’re worried about sweetness, add the sugar gradually and taste as you go. The whipped cream should be full-fat for that luscious consistency, but if you’re using a lighter version, chill it longer before whipping. The crust can be made ahead and stored in the fridge for up to 2 days—just let it sit at room temperature for 10 minutes before assembling the pie.
This pie is all about patience—4 hours in the fridge lets the filling set perfectly. Store leftovers in an airtight container for up to 5 days, though it rarely lasts that long. For parties, double the filling and use a 9-inch springform pan—just make sure the crust is sturdy enough to hold the extra weight. The beauty of this recipe? It scales effortlessly. Need to feed a crowd? Triple the filling and use a 12-inch crust. The key is always the same: fresh lime juice and that rich, creamy condensed milk.
Why You’ll Love This Recipe
- Pantry Magic: I swear by this—no special shopping trips, just what’s probably already lurking in your fridge. The condensed milk and heavy cream do the heavy lifting, while the key lime juice punches up the flavor without extra fuss.
- Tart-Creamy Bliss: That perfect balance? The zesty key lime juice cuts through the sweet condensed milk, while the whipped cream adds a cloud-like finish. Honestly, it’s the kind of dessert that makes you pause mid-bite.
- Party in a Bowl: Serve it at brunch, potlucks, or even as a midnight snack—no one will guess it’s five ingredients. The graham crust holds up, and the filling stays silky, so it’s always a crowd-pleaser.
- Leftovers? Even Better: Make one, and you’ll have seconds (or thirds) because it keeps beautifully for days. The texture stays creamy, not grainy, and it’s the easiest way to turn a simple dessert into a repeat request.
Step-by-step instructions for 5-Ingredient key lime pie
Here’s how to create that perfect balance of zesty and creamy in just a few simple steps.
Prepare the Key Lime Filling
In a medium mixing bowl, combine the 1.5 cups key lime juice and 1 can sweetened condensed milk. I like to use a whisk for this step to ensure everything is fully incorporated—you want to see those bright yellow specks of lime suspended throughout the mixture. The acidity from the lime juice will start to react immediately with the sweetened condensed milk, creating a thick, tangy base.
Next, gently fold in the 0.5 cup granulated sugar until completely dissolved. This extra sweetness balances the tartness of the key lime juice beautifully. The mixture should be smooth and homogenous—if you see any undissolved sugar, whisk a bit longer. The filling should have a thick, custard-like consistency, similar to pudding. This is your foundation, so take your time to get it just right.
Assemble the Pie
Place the graham cracker crust in a 9-inch pie dish. I always press it gently into the dish to ensure it fits snugly and doesn’t shift during baking. This crust is your sturdy base, and it needs to hold up to the creamy filling without crumbling. If you’re using a homemade crust, make sure it’s fully chilled and firm before proceeding.
Pour the key lime filling into the prepared crust, spreading it evenly with a spatula. The filling should come up to about ¼ inch from the top edge of the crust. This ensures you have enough space for the whipped cream layer later without overflowing. Tap the pie dish gently on the counter a few times to release any air bubbles that might have formed during pouring.
Add the Whipped Cream Layer
In a separate bowl, whip the 1 cup heavy whipping cream until it forms soft peaks. I use a hand mixer for this, but you can also use a stand mixer if you prefer. The cream should be thick enough to hold its shape when you lift the whisk, but not so stiff that it’s dry. This layer is what gives the pie its signature creamy texture and light, airy finish.
Spread the whipped cream evenly over the key lime filling, creating a smooth, even layer. Use a spatula to gently press down on the cream to help it adhere to the filling below. This step is all about creating that perfect contrast between the tangy lime and the sweet, velvety cream. Don’t worry if it doesn’t look perfectly smooth—it will still taste amazing!
Chill and Set
Cover the pie loosely with plastic wrap and refrigerate for at least 4 hours, or preferably overnight. This chilling time is crucial—it allows the filling to fully set and the flavors to meld together. The pie should have a firm, jiggly texture when you remove it from the fridge, almost like a thick pudding. If you’re short on time, you can speed this up by placing the pie in the freezer for 1-2 hours, but I find the overnight chill gives the best results.
Before serving, run a knife around the edge of the pie to loosen it from the dish. Then, carefully slide a spatula underneath and transfer the pie to a serving plate. The contrast of the golden graham cracker crust, the vibrant lime filling, and the cloud-like whipped cream is what makes this pie so irresistible. Serve it chilled, and enjoy the perfect balance of sweet and tangy flavors in every bite.
Pro Tips For Making 5 Ingredient Key Lime Pie
- Whisk the Filling Cold: Mix the condensed milk, key lime juice, and sugar before adding the heavy cream—it’s easier to control the texture. I used to add the cream first, and the mixture would turn into a sticky mess instead of a smooth custard. Cold ingredients blend better and prevent lumps.
- Strain the Lime Juice: Run the key lime juice through a fine-mesh sieve to remove pulp—trust me, you don’t want grainy pie filling. I learned this the hard way after biting into a chunk of lime in every spoonful. Takes 30 seconds and makes a world of difference.
- Chill the Crust First: Pop the graham cracker crust in the freezer for 10 minutes before adding the filling—it keeps the base from getting soggy. I skipped this once and ended up with a mushy bottom that ruined the whole pie. (Yes, even if you’re impatient like me.)
- Whip Cream to Stiff Peaks: Beat the heavy cream until it holds firm peaks, not just soft ones—this ensures the pie stays stable when sliced. I used to stop when it looked “fluffy enough,” but it’d collapse by the second slice. A few extra seconds at the end save you from a deflated dessert.
Dietary considerations for this dish
Gluten-Free Adaptations
For a gluten-free version, simply replace the graham cracker crust with a gluten-free graham cracker crust or a pre-made gluten-free pie crust. Brands like Annie’s or Schär make excellent gluten-free graham crackers that work perfectly.
Crumble 1½ cups gluten-free graham crackers with 6 tbsp melted butter and 2 tbsp granulated sugar to create your crust. Press it firmly into a 9-inch pie dish and chill for 15 minutes before adding the filling. This keeps the texture sturdy and crunchy without gluten. 🌱
Dairy-Free Options
To make this pie dairy-free, swap the heavy whipping cream for coconut cream (chilled overnight) or full-fat coconut milk. For the crust, use a dairy-free graham cracker crust or make your own with gluten-free oats, almond flour, and coconut oil.
The filling stays the same, but the coconut cream will add a subtle tropical note that pairs beautifully with the lime. Chill the pie for 6 hours to ensure the coconut cream sets properly. 🥥
Lower Sugar Swaps
Reduce sugar by ¼ cup and use monk fruit sweetener or erythritol instead of granulated sugar. These alternatives maintain sweetness without spiking blood sugar. For a keto-friendly version, omit the sugar entirely and use sweetened condensed coconut milk (like So Delicious) instead of regular condensed milk.
The filling will still be rich and creamy, just with fewer carbs. Always taste as you go—key lime juice is tart, so less sugar might be needed than you think. 🍯
Nut-Free Considerations
This recipe is naturally nut-free, but if you’re using a homemade graham cracker crust, ensure it contains no nuts. Store-bought graham crackers (like Keebler) are typically nut-free, but always check labels. For extra safety, use a certified nut-free facility brand.
The filling ingredients—key lime juice, condensed milk, and whipped cream—are inherently nut-free, making this pie a safe choice for nut allergies. Always double-check packaging for cross-contamination warnings. 🚫🌰
Vegan Adaptations
For a vegan key lime pie, replace the heavy whipping cream with coconut whipped cream (chilled coconut cream whipped with 1 tsp powdered sugar). Use coconut condensed milk (like Goya) instead of dairy condensed milk.
The crust can be made with vegan graham crackers or a coconut oil-based crust. The texture will be slightly different but still delicious. Chill the pie for 8 hours to let the coconut cream firm up properly. 🌿
Nutrition facts
Frequently asked questions
Can I use regular limes instead of key limes?
Yes, but you’ll need to adjust the quantity! Regular limes are less acidic, so use 2 cups of juice (about 10-12 limes) instead of 1.5 cups. Add 1 teaspoon of bottled lime juice concentrate to boost tartness. The flavor will be close, though Mexican key limes deliver that signature bright punch.
Why does my key lime pie filling look grainy?
Graininess usually means the condensed milk didn’t fully incorporate or the lime juice was too cold when mixing. Warm the lime juice slightly (don’t boil) before combining with the condensed milk, then whisk vigorously for 2-3 minutes. If it’s still grainy, strain the mixture through a fine-mesh sieve before pouring into the crust. The sugar should dissolve completely for a smooth texture.
How do I make this pie ahead of time?
This pie actually tastes better the next day! Assemble it completely (including the whipped cream layer) and refrigerate for 24 hours before serving. The flavors meld beautifully, and the texture becomes even more velvety. For make-ahead parties, cover tightly with plastic wrap and keep refrigerated for up to 5 days. Bring to room temperature for 30 minutes before slicing for perfect slices.
Can I skip the whipped cream layer?
The whipped cream adds richness, but it’s not essential. If you prefer, simply top the pie with toasted meringue (whipped egg whites + sugar, baked until golden) or a sprinkle of crushed graham crackers for texture. The lime filling will still be delicious on its own—just expect a slightly denser texture. For extra flair, add a few lime zest strips on top before chilling.
What if I don’t have a pie dish?
No problem! Use a 9-inch round cake pan or even a deep bowl lined with plastic wrap. For a rustic look, try a cast-iron skillet (greased well) or a ramen noodle bowl (trust me, it works!). Just make sure your container is at least 2 inches deep to hold the filling. Serve directly from the container or transfer to plates for a fun presentation.

- Pork Loin Pulled Pork Crock Pot Recipe: Slow-Smoked Tenderness With Zero Dryness - November 1, 2026
- Baked Potatoes in Crock Pot Recipe: Buttery Interiors and Crispy Top Magic - November 1, 2026
- Braised Beef Short Ribs Recipe: Crock Pot Fall-Off-Bone Magic in 6 Hours - November 1, 2026