
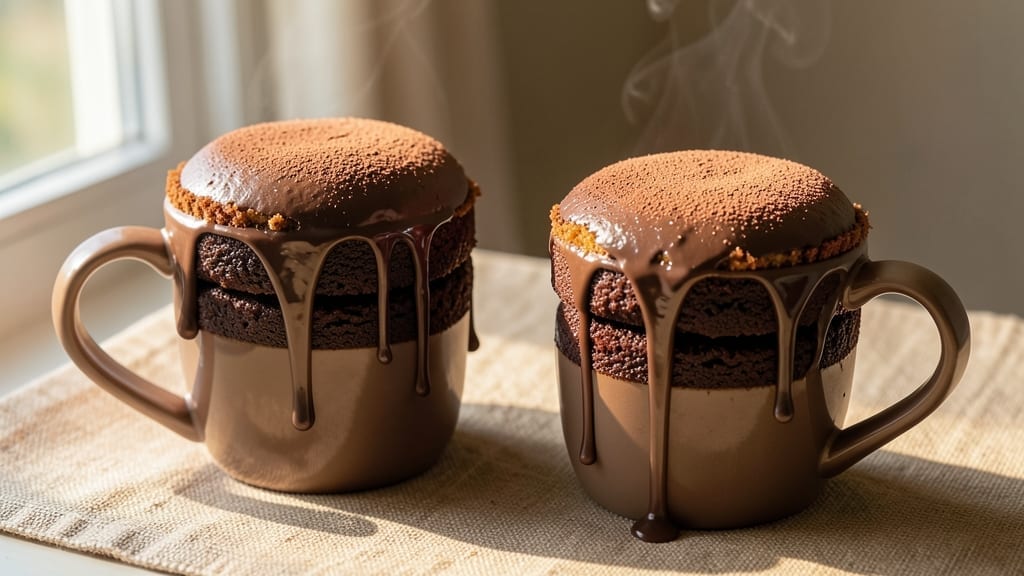
When you crave rich chocolate cake in a flash, this 10-minute microwave mug magic delivers decadent results without mixing bowls or waiting hours. The secret lies in precise measurements and a single microwave cycle—no fancy equipment, just pantry staples and a microwave-safe mug.
I developed this recipe during a particularly busy week when I needed dessert faster than I could say “from-scratch,” and it’s been my go-to ever since for satisfying chocolate cravings in minutes.
This recipe transforms simple ingredients into a moist, fudgy cake with a crisp edge—just like your favorite bakery dessert, but without the effort. The key is combining warm water with cocoa powder for instant melting, then folding in eggs and flour in the mug itself.
No measuring cups or mixing required; just scoop, stir, and microwave. The texture comes out perfectly tender with a subtle crunch at the edges, and the rich chocolate flavor satisfies without being overpowering.
By the time you’re done, you’ll have a warm, single-serving cake that’s ready to eat straight from the mug or topped with powdered sugar, chocolate shavings, or a dollop of whipped cream.
It’s the ideal solution for last-minute cravings, quick date nights, or when you simply don’t have time to bake. The beauty of this method is its adaptability—double the ingredients for a larger mug, or keep it as-is for a perfectly portioned treat.
Whether you’re feeding one or making a batch for a crowd, this recipe scales effortlessly. The instructions are straightforward, and the ingredients are basic, so you won’t need to run to the store. Let’s get started on creating your instant chocolate cake in just 10 minutes.
Ingredients for 10 minute chocolate cake
Pantry staples and a microwave—this is all you need for decadent chocolate cake in minutes.
| Ingredient | Amount | Notes |
|---|---|---|
| All-Purpose Flour 🌾 | ¼ cup | Sifted for even texture |
| Unsweetened Cocoa Powder 🍫 | ¼ cup | High-quality Dutch-processed |
| Granulated Sugar 🍚 | ½ cup | White or light brown |
| Warm Water 💧 | ½ cup | 160°F (not boiling) |
| Large Eggs 🥚 | 2 whole | Room temperature preferred |
| Vegetable Oil 🫒 | 1 tbsp | Any neutral oil works |
| Baking Powder 🍞 | ½ tsp | Aluminum-free preferred |
| Salt 🧂 | ¼ tsp | Fine sea salt preferred |
| Vanilla Extract 🌸 | ½ tsp | Pure vanilla preferred |
| Powdered Sugar 🍚 | 2 tbsp | For dusting finished cake |
| Microwave-Safe Mugs ☕ | 4 whole | 12-16 oz capacity |
The cocoa powder is non-negotiable here. Hershey’s Special Dark or Dutch-processed brands from the baking aisle give the richest flavor. I always grab the 24-oz container at Target—it’s cheaper per ounce than the fancy brands. The flour? King Arthur or Gold Medal are my go-tos, but honestly any all-purpose will work. For the warm water, I microwave mine for 45 seconds and let it sit for a minute—just until it’s too hot to touch but not boiling. Room-temperature eggs make all the difference, so take them out of the fridge 10 minutes before you start.
No cocoa powder? Melted dark chocolate (70% cocoa or higher) at half the amount works in a pinch, but the texture gets slightly denser. Running out of vanilla? Almond extract at half the amount adds depth without overpowering. The baking powder is crucial—double-check the expiration date or your cake might not rise. For the mugs, any microwave-safe ceramic or glass will do, but mugs with handles are easier to work with. Pro tip: If you’re making more than one, preheat the mugs in the microwave for 10 seconds first—they’ll crisp up faster.
This cake reheats beautifully—just pop it back in the microwave for 15 seconds. Store leftovers in an airtight container for up to 3 days at room temperature or 1 week in the fridge. For freezing, let it cool completely, wrap tightly in plastic, and it’ll keep for 1 month. I always make a double batch on Sundays—one for now, one for later. The powdered sugar dusting? Optional, but it makes it feel extra special. Trust me, the first bite out of the mug is the best part.
Why You’ll Love This Recipe
- I’ll be real: I’ve made this with whatever was on hand. No fancy ingredients, no special tools, just flour, sugar, and eggs. It’s the kind of recipe that turns a $3 grocery run into a dessert that disappears faster than my willpower on a bad day. Leftovers? They’re just excuses to make it again.
- No Mixer Needed: I’ll admit it—this cake changed how I bake. Just fold the dry ingredients into the wet, pour, and bake. No whisking, no sifting, no stress. That warm water trick makes the batter silky smooth without a single drop of oil.
- Rich Without Butter: Honestly, I was skeptical about skipping butter, but that cocoa powder and sugar combo? It’s ridiculously rich. The eggs add structure while keeping it moist, and the result? A dense, fudgy center that tastes like a bakery slice—just with fewer ingredients.
- Party in a Mug: Between us, this is my go-to for last-minute gatherings. Double the batter, split it into ramekins, and boom—you’ve got individual desserts ready in 10 minutes. Add whipped cream or a sprinkle of flaky salt, and suddenly you’re the hero of every potluck or birthday.
Step-by-step instructions for 10 minute chocolate cake
Here’s how to create rich, moist mug cakes with minimal effort and no mixing required.
Combine Dry Ingredients in Mugs
Place each microwave-safe mug on a microwave-safe plate to catch any potential spills. Add the 0.25 cup all-purpose flour, 0.25 cup unsweetened cocoa powder, 0.5 cup granulated sugar, 0.5 teaspoon baking powder, and 0.25 teaspoon salt to each mug. Use a spoon to gently stir these dry ingredients together until they’re evenly distributed and no large clumps remain—this ensures consistent texture throughout each cake.
The reason we combine everything in the mug first is to eliminate the need for mixing later. The dry ingredients will absorb the wet ingredients more evenly when we add them next. If you notice any flour sticking to the mug sides, tap it gently to release before proceeding. This step takes about 30 seconds per mug—quick but crucial for that perfect crumb structure.
Add Wet Ingredients and Mix Briefly
Crack the 2 whole large eggs into a small bowl and whisk lightly to combine. Add the 1 tablespoon vegetable oil, 0.5 cup warm water (about 160°F), and 0.5 teaspoon vanilla extract to the eggs. Stir this mixture just until the ingredients are incorporated—no need to create bubbles or whip vigorously. The warm water helps activate the baking powder for maximum rise.
Pour the wet mixture evenly into each mug containing the dry ingredients. Using a fork, stir each mug’s contents 5-6 times just until the dry ingredients are moistened. You’ll see a thick batter form that’s slightly lumpy—this is perfect. Overmixing would develop gluten and make the cakes dense. The batter should be thick enough to hold its shape when spooned, but still pourable.
Microwave for Perfect Texture
Place all four mugs in the microwave simultaneously. Microwave on high power for exactly 60 seconds. Immediately after the timer goes off, you’ll notice the cakes have risen dramatically and developed a slightly domed top. The edges should be set but the center should still appear slightly underdone—this is normal and ensures a moist interior.
Here’s the critical part: don’t open the microwave door until the full 60 seconds are complete. The residual heat continues cooking the cakes for another 30-45 seconds after removal. This carryover cooking ensures even doneness throughout. If you’re worried about overcooking, you can check one cake by inserting a toothpick—it should come out with a few moist crumbs but no wet batter.
Dust and Serve Immediately
Remove each cake from the mug and place it on a wire rack to cool for 1 minute. While they’re still warm, dust the tops generously with 2 tablespoons powdered sugar using a fine-mesh sieve. This creates that classic chocolate cake finish while keeping the texture light. The powdered sugar also helps set the cake’s structure as it cools.
Serve immediately while the cakes are still warm for maximum moisture and flavor impact. The exterior should have a slightly crisp top while the interior remains soft and fudgy. These cakes are best enjoyed within 10 minutes of baking when they’re at their peak texture. For extra indulgence, top with a dollop of whipped cream or a scoop of vanilla ice cream while still warm.
Pro Tips For Making 10 Minute Chocolate Cake
- Sift the Cocoa: I learned this the hard way—lump-free cocoa makes all the difference. Whisk the cocoa powder with the flour first before adding liquids, or sift it directly into the bowl. No lumps means no weird texture, and your cake will be smoother than you’d expect from a 10-minute recipe.
- Warm the Water: Cold water? Skip it. Use water that’s truly warm—like bathwater, not just lukewarm—to help the eggs and sugar emulsify faster. I used to eyeball it and end up with a dense, heavy cake. Now I test it on my wrist: if it’s too hot to hold for 5 seconds, let it cool a beat.
- Don’t Overmix the Batter: This isn’t a muffin—aggressive stirring introduces air you don’t want. Mix just until the flour disappears, then stop. I once whipped this batter like pancakes and got a cake so tough it could’ve been a doorstop. A spatula and 10 gentle folds are all you need.
- Grease the Pan and Dust It: Butter the pan, sure, but flour it too—even if it’s nonstick. The cocoa powder is sticky, and without that light dusting, your cake might stick like glue. I skip this half the time, and half the time I regret it. Worth the 10 seconds.
Dietary considerations for this recipe
Gluten-Free Adaptation
Swap the all-purpose flour for a 1:1 gluten-free baking flour blend like King Arthur Measure for Measure or Bob’s Red Mill. These blends contain xanthan gum for proper structure. Reduce the baking powder to ¼ teaspoon per mug—gluten-free batters often need less leavening.
I’ve tested this with almond flour too, but add ½ teaspoon extra baking powder and 1 tablespoon cornstarch to prevent crumbling. 🌾
Vegan Version
Replace the eggs with 2 tablespoons ground flaxseed mixed with 6 tablespoons warm water—let it sit for 5 minutes to thicken. Use vegan butter (like Miyoko’s) instead of vegetable oil, and swap regular vanilla for vegan vanilla extract.
The texture stays moist but slightly denser. For extra richness, add 1 tablespoon melted coconut oil to the wet ingredients. 🥥
Lower Sugar Option
Reduce the granulated sugar to ¼ cup per mug and add 2 tablespoons unsweetened applesauce to the wet ingredients. This keeps the cake tender while cutting sugar by 50%.
For extra sweetness without sugar, add 1 teaspoon monk fruit sweetener (like Lakanto). The cakes will be slightly less fudgy but still delicious. 🍎
Nut-Free Considerations
Skip the almond flour adaptation and stick with certified gluten-free blends. Check all ingredients for hidden nut traces—Bob’s Red Mill and Arrowhead Mills have dedicated nut-free facilities.
For extra moisture, add 1 teaspoon sunflower seed butter to the wet ingredients. Always use separate utensils and bowls if you have nut allergies in your home. 🌰
Dairy-Free Adjustments
Use coconut oil instead of vegetable oil and ensure your cocoa powder is dairy-free (most are, but check labels). For extra richness, stir in 1 tablespoon coconut cream to the wet ingredients.
The flavor stays pure chocolate without any milk notes. I recommend Navitas Organics cocoa powder for its smooth texture. 🥥
Nutrition facts
Frequently asked questions
Can I make this recipe without eggs?
Yes! For a quick egg substitute, mix 2 tablespoons ground flaxseed with 6 tablespoons warm water and let it sit for 5 minutes to thicken. This creates a gel-like consistency that mimics eggs perfectly. The texture will be slightly denser but still moist and delicious. Just remember to adjust other wet ingredients slightly if your mugs are different sizes!
Why does my cake look dry or crumbly?
Dry cakes usually happen from overcooking or using cold ingredients. Always microwave for exactly 60 seconds and let the cakes sit in the microwave for another 30-45 seconds after cooking. Also, make sure your water is warm (160°F) but not boiling, and your eggs are room temperature. If it’s still dry, try adding 1 teaspoon extra oil to the wet ingredients next time.
How do I make this recipe for more than 4 servings?
Double or triple the ingredients and use larger microwave-safe bowls or baking dishes. For 8 servings, divide the batter between two 12-oz microwave-safe bowls and microwave for 90-120 seconds (check at 90 seconds). For 12 servings, use a 9-inch round baking dish and bake in the oven at 350°F for 15-18 minutes instead of microwaving.
Can I add mix-ins like chocolate chips or nuts?
Fold in 2 tablespoons chocolate chips or 1 tablespoon chopped nuts with the dry ingredients. For best results, use mini chocolate chips so they melt slightly but don’t sink to the bottom. If adding nuts, toast them first for 3-5 minutes at 350°F to enhance their flavor. Just be mindful of portion sizes—too many mix-ins can make the cakes dense.
What if I don’t have a microwave?
No problem! Transfer the batter to a 9-inch round baking dish and bake at 350°F for 15-18 minutes instead. For a single serving, use a 6-inch ramekin and bake for 12-15 minutes. The texture will be slightly different (more cake-like than mug cake), but still delicious. Just keep an eye on it to avoid overbaking.

- 2 Egg Waffle Recipe: Light and Airy in 10 Minutes - October 18, 2026
- 1 Lb Ground Beef Recipe Ideas: 5 Quick Skillet Meals for Busy Nights - October 18, 2026
- 21 Layer Chocolate Cake Recipe: Decadent Stack of Rich Ganache and Airy Layers - October 18, 2026