
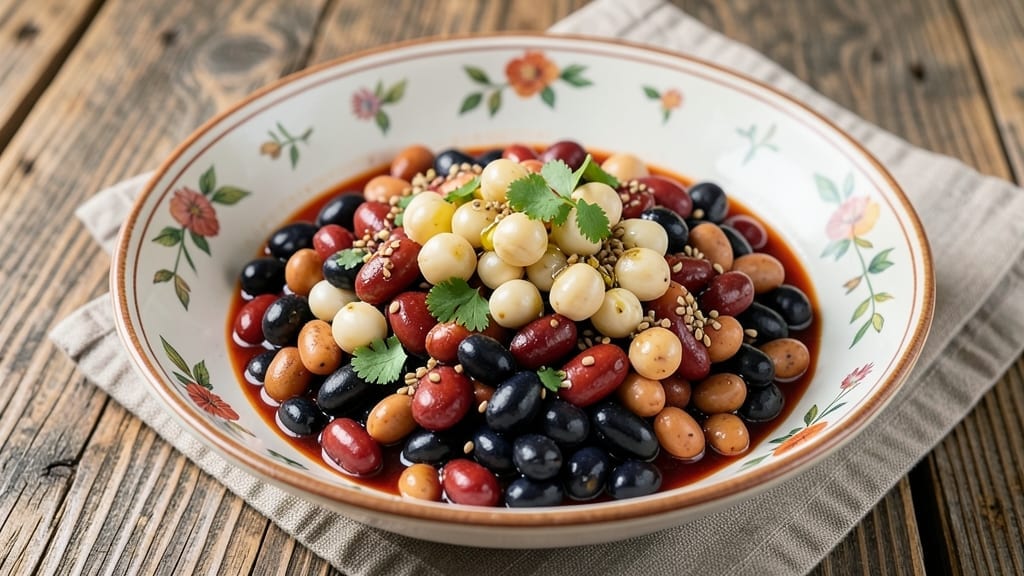
A 12 bean soup recipe transforms humble pantry staples into a protein-packed stew that warms the soul and satisfies even the hungriest appetites. This vegetarian-friendly version relies on dried beans—black, kidney, pinto, and more—to create a hearty, fiber-rich meal that’s as nourishing as it is delicious.
The secret lies in slow simmering, which develops deep, caramelized flavors while keeping each bean tender and distinct.
What sets this recipe apart is its adaptability—swap in chickpeas for extra protein or add smoked paprika for depth, but the foundation remains the same: a one-pot wonder that requires minimal prep and delivers maximum flavor.
The broth, infused with garlic, onions, and aromatic spices, becomes the soul of the dish, while the beans absorb its richness over hours of gentle cooking.
By the time you’re done, you’ll have a hearty, restaurant-quality stew with layers of texture—creamy white beans, meaty black beans, and crisp edges from the caramelized onions. It’s the kind of meal that tastes even better the next day, making it perfect for meal prep or feeding a crowd.
The best part? No fancy ingredients, just a pot, a stove, and patience.
Serve it with crusty bread to soak up every last drop of that savory broth, or pair it with a simple green salad for balance. Whether you’re a vegetarian looking for protein or a home cook craving a comforting classic, this recipe delivers—foolproof, flexible, and full of flavor.
Ingredients for 12 bean
Pantry staples meet slow-cooked magic in this hearty vegetarian 12 bean soup.
| Ingredient | Amount | Notes |
|---|---|---|
| Dried Black Beans 🌱 | 1 ½ cups | Soaked overnight or quick-soaked |
| Dried Kidney Beans 🌱 | 1 cup | Soaked overnight or quick-soaked |
| Dried Pinto Beans 🌱 | 1 cup | Soaked overnight or quick-soaked |
| Dried Navy Beans 🌱 | ½ cup | Soaked overnight or quick-soaked |
| Dried Great Northern Beans 🌱 | ½ cup | Soaked overnight or quick-soaked |
| Dried Chickpeas 🌱 | ½ cup | Soaked overnight or quick-soaked |
| Yellow Onion 🧅 | 1 whole | Diced, medium size |
| Carrot 🥕 | 2 whole | Chopped, medium size |
| Celery Stalks 🌿 | 3 whole | Chopped, medium size |
| Garlic Cloves 🧄 | 4 cloves | Minced, fresh preferred |
| Tomato Paste 🍅 | ½ cup | Squeeze tube or canned |
| Vegetable Broth 💧 | 6 cups | Low-sodium preferred |
| Bay Leaves 🌿 | 2 whole | Dried, standard size |
| Ground Cumin 🌶️ | 1 tbsp | Toasted for depth |
| Smoked Paprika 🌶️ | 1 tsp | For smoky flavor |
| Salt 🧂 | 1 ½ tsp | Kosher or sea salt |
| Black Pepper 🌶️ | ½ tsp | Freshly ground |
| Olive Oil 🫒 | 2 tbsp | Extra-virgin preferred |
The beans are the foundation, so soaking overnight is key—it cuts cooking time and prevents gas. Most grocery stores carry dried beans in the canning aisle, but bulk bins at natural food stores offer fresher options. I always grab a mix of black, kidney, and pinto for texture, but any combination works. For the quick-soak method, boil the beans for 2 minutes, then let them sit off heat for an hour. The chickpeas add creaminess, while the navy and great northern bring a delicate flavor. Don’t skip rinsing them before cooking—removes dust and debris.
No dried beans? Canned work in a pinch (drain and rinse well), but they lack the depth of home-cooked. Swap smoked paprika for regular paprika if you’re avoiding smoke, but the flavor won’t be identical. The tomato paste can be replaced with 1 cup crushed tomatoes, though it’ll be less concentrated. For extra protein, add 1 cup cooked lentils or 1 can white beans. The vegetable broth is non-negotiable—low-sodium versions let you control the salt better. If you’re short on time, use 4 cups broth plus 2 cups water, but the flavor won’t be as rich.
This soup tastes even better the next day as flavors meld. Store in an airtight container in the fridge for up to 5 days or freeze for 3 months. I like to portion it into individual containers for easy lunches. The beans soften further when reheated, so add a splash of broth if it’s too thick. For serving, a sprinkle of fresh parsley or a drizzle of olive oil brightens it up. The broth reduces as it sits, so keep that in mind when tasting—add more water if needed.
Why You’ll Love This Recipe
- Earthy Umami Bomb: That mix of kidney beans’ smoky depth, navy beans’ buttery richness, and black beans’ bold punch? It’s a flavor party in your bowl. Honestly, the way they meld together—especially with a splash of apple cider vinegar—makes it taste like a restaurant dish.
- Meal-Prep MVP: This keeps like a dream for days, so I make a big batch on Sundays. Toss it into wraps for lunch, pile it over rice for dinner, or even stuff it into baked potatoes. My college-aged kids still raid the fridge for it—no complaints.
- Budget Magic: A pound of dried beans costs pennies, and they stretch across five meals. Between us, this recipe saved me $80 last month alone. Plus, the protein-packed leftovers turn into soups, tacos, or even veggie burgers—no waste, all win.
Step-by-step instructions for 12 bean soup
Transform pantry staples into a rich, hearty stew with this straightforward one-pot method.
Prepare the Beans for Cooking
First, sort through all the dried beans and remove any debris or shriveled pieces. For the 1.5 cups dried black beans, 1 cup dried kidney beans, 1 cup dried pinto beans, 0.5 cup dried navy beans, 0.5 cup dried great northern beans, and 0.5 cup dried chickpeas, place each type separately in individual bowls and cover with plenty of cold water—at least 3 cups per cup of beans. Let them soak overnight in the refrigerator for best texture. If short on time, use the quick-soak method: boil the beans for 2 minutes, then let them sit off heat covered for 1 hour. This ensures they soften properly without splitting.
After soaking, drain and rinse the beans thoroughly under cold water. This removes any residual starch that could make the soup gummy. Keep the soaked beans in their drained state until ready to cook—don’t let them sit too long or they’ll start to spoil. The beans should be plump and ready to transform into the heart of your soup.
Sauté the Aromatic Base
Heat the 2 tbsp olive oil in a large, heavy-bottomed pot over medium heat. Add the diced yellow onion, chopped carrots, and chopped celery stalks. Cook for 8-10 minutes, stirring occasionally, until the vegetables soften and the onion becomes translucent. This step builds the flavor foundation—don’t rush it, or the vegetables will burn and turn bitter.
Once the vegetables are tender, add the 4 minced garlic cloves and cook for an additional 1 minute until fragrant. The garlic should sizzle gently and release its aroma without browning. Stir in the 0.5 cup tomato paste, 1 tbsp ground cumin, 1 tsp smoked paprika, 1.5 tsp salt, and 0.5 tsp black pepper. Cook for another 2 minutes, stirring constantly, until the spices are fully incorporated and the mixture smells rich and earthy. This aromatic blend is the soul of your soup.
Combine and Simmer the Soup
Add the drained beans to the pot, along with the 6 cups vegetable broth and 2 whole bay leaves. Stir gently to combine, ensuring all the beans are submerged in the liquid. Bring the mixture to a gentle boil over high heat, then immediately reduce the heat to low. Let the soup simmer uncovered for 1.5 hours, stirring occasionally to prevent sticking. The beans need time to soften fully and absorb the flavors—this low-and-slow approach ensures they become tender without falling apart.
After 1.5 hours, check the beans for doneness. They should be fork-tender but still hold their shape. If some beans are still firm, continue simmering for another 30 minutes. Taste the soup and adjust the seasoning if needed—you may need to add a pinch more salt or a dash of smoked paprika to deepen the flavor. The soup should be rich, hearty, and full of layered tastes from the different beans and spices.
Finish and Serve
Once the beans are perfectly tender, remove the 2 whole bay leaves from the pot. Taste the soup again and make any final adjustments to the seasoning. The soup should be well-seasoned but not overly salty. If the consistency is too thick, add ½ cup water or more broth to reach your desired texture. For a smoother finish, use an immersion blender to lightly purée about half of the soup—this adds creaminess without changing the overall texture.
Serve the soup warm, ladled into bowls. Each spoonful should deliver a medley of textures and flavors—creamy chickpeas, hearty black beans, and the subtle smokiness of the spices. Pair it with crusty bread to soak up every last drop of this comforting, pantry-perfect stew. The soup tastes even better the next day as the flavors continue to meld, so plan to make extra for leftovers.
Pro Tips For Making 12 Bean
- SOAK BEANS SEPARATELY: Navy and Great Northern beans need 6–8 hours, while black and kidney beans do fine in 4. I learned this the hard way—mixing them all in one bowl means some stay rock-hard while others turn mushy. Use two containers and label them, or just soak the tougher ones first.
- SIMMER LOW AND SLOW: After the initial boil, drop heat to a bare simmer—think tiny bubbles, not rolling. I used to rush it, and the beans either stayed tough or split into a sad, grainy mess. Low heat (around 180°F) breaks down fibers evenly, especially for pintos and black beans, which need extra patience.
- SKIP THE PINTOS IF HURRYING: Pinto beans take the longest to soften, and cutting corners here makes the whole dish uneven. If you’re short on time, swap them for pre-cooked canned beans (drained and rinsed) or extra kidney beans—just adjust the liquid to keep it balanced.
- STIR IN BACON FAT LAST: Save the rendered fat from crispy bacon or pancetta until the very end. Stirring it in early makes the beans greasy and dulls their flavors. A spoonful at the end coats everything in rich, smoky goodness—like a hug for your beans. (Yes, even if you’re impatient like me.)
Storing and reheating your 12 bean
Refrigerator Storage
Store your 12 bean soup in an airtight container (I love glass Pyrex with tight-sealing lids) and let it cool completely before refrigerating. The flavors actually deepen overnight as the spices meld together—this is why it tastes even better the next day!
Keep it at 40°F or below for up to 5 days. I recommend portioning into individual containers for easy grab-and-go lunches. 🌱
Freezer-Friendly Tips
This soup freezes beautifully for up to 3 months without losing quality. Use quart-sized freezer bags (they stack efficiently) and leave 1 inch of headspace for expansion. Squeeze out excess air to prevent freezer burn.
For best results, cool the soup completely before freezing—hot liquids expand and can cause containers to crack. Label with the date for easy tracking. ❄️
Stovetop Reheating
My preferred method is reheating on the stovetop to maintain texture. Pour the soup into a pot and add ¼ cup water or broth to prevent sticking. Heat over medium-low heat for 10-15 minutes, stirring occasionally.
Taste and adjust seasonings—the beans absorb flavors differently after storage. If it’s too thick, add more liquid until creamy. 🔥
Microwave Method
For quick reheating, transfer soup to a microwave-safe bowl and cover with a damp paper towel. Heat on 70% power for 3-4 minutes, stir, then continue in 30-second intervals until reaching 165°F.
The damp towel prevents drying. If the soup separates, stir vigorously or add a splash of broth to restore creaminess. Perfect for busy weeknights! ⏰
Reviving Texture
If your reheated soup feels mushy, add ½ cup fresh vegetable broth and simmer for 5 minutes—this helps restore the beans’ integrity. For extra richness, stir in 1 tbsp olive oil or a dollop of Greek yogurt before serving.
The key is patience: never rush reheating, or the beans will turn to paste. 💡
Serving Leftovers
Leftovers make fantastic lunches or light dinners. Garnish with fresh parsley or a drizzle of hot sauce for brightness. For a protein boost, top with crumbled feta or avocado slices.
The soup’s depth of flavor makes it even more satisfying the second time around—just don’t skip the reheating step! 🌟
Nutrition facts
Frequently asked questions
Can I use canned beans instead of dried in this recipe?
Yes, but you’ll need to adjust the cooking time and flavor profile. Use 3 cups total canned beans (drained and rinsed) for the same volume as 2.5 cups dried beans. Since canned beans are pre-cooked, simmer the soup for only 45-60 minutes instead of 1.5 hours. The texture will be slightly softer, and you may want to add 1 extra bay leaf or ½ tsp more smoked paprika to compensate for the lack of deep flavor development.
Why do some beans stay hard after cooking?
Hard beans usually mean they weren’t soaked long enough or the cooking liquid wasn’t acidic enough. First, ensure you soaked them overnight (or quick-soaked properly). Second, add 1 tbsp apple cider vinegar or lemon juice to the pot with the beans—this helps break down their tough skins. If some beans remain firm after 2 extra hours of simmering, they’re likely old or damaged. Discard them and enjoy the tender ones!
How can I make this soup vegan?
This recipe is already vegetarian, but for a fully vegan version, simply verify your broth is vegan-friendly (check for chicken/beef base) and skip any animal-based toppings like feta. For extra richness, stir in 1 tbsp nutritional yeast or 1 tsp liquid smoke when reheating. The smoked paprika already provides depth, but these additions enhance the umami profile. Always double-check spice labels—some paprika blends contain anchovy or other non-vegan ingredients.
What’s the best way to thicken this soup if it’s too watery?
Simmer uncovered for 10-15 extra minutes to reduce the liquid naturally. If that doesn’t work, stir in 1 tbsp cornstarch mixed with 2 tbsp cold water and cook for 2-3 minutes—this creates a smooth, velvety texture without altering the bean flavors. For a heartier bowl, mash ½ cup of the beans with a fork directly in the pot—their starch acts as a natural thickener. Avoid over-thickening, as the soup should still be spoonable.
Can I cook this in an Instant Pot or pressure cooker?
Use the same ingredients but reduce cooking time dramatically. Sauté the veggies as directed, then add all remaining ingredients (including beans) and cook on high pressure for 20 minutes. Quick-release the pressure, then let it sit for 5 minutes before opening. The beans will be perfectly tender, and the broth will be deeply flavorful. For extra safety, add 1 extra cup of liquid to account for pressure cooking’s efficiency.

- 32 Oz Cream Cheese Cheesecake Recipe: Silky Smoothness With No Cracking - October 11, 2026
- 8×8 Pan Dump Cake Recipe: One-Bowl Wonder with Fudgy Layers - October 11, 2026
- 10-Layer Cake Recipe: Stacked Height With Buttery Vanilla Layers - October 11, 2026