
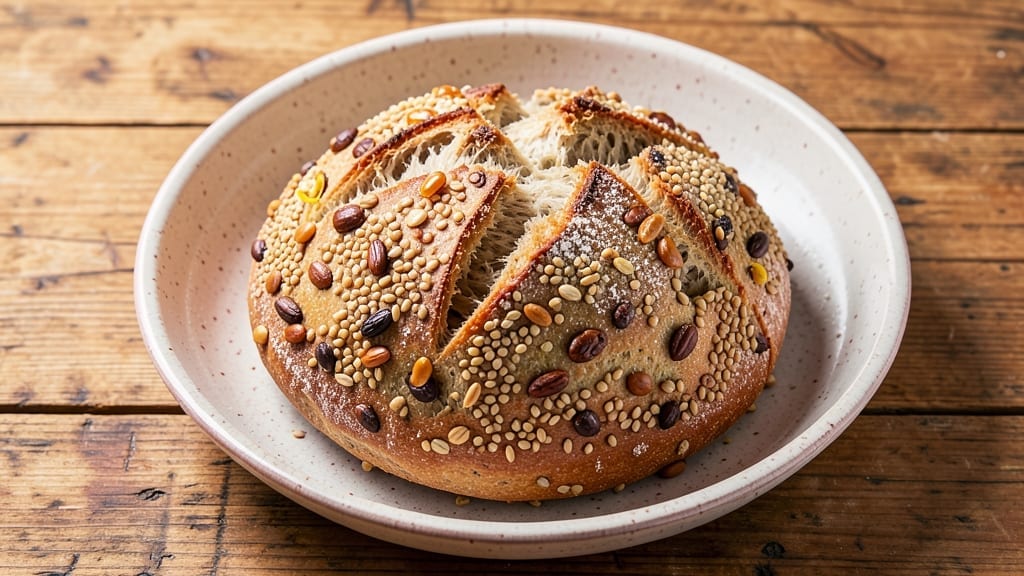
This 12-grain sourdough bread recipe delivers a symphony of textures and flavors you won’t find in standard loaves—think deep nutty crusts and an airy, open crumb studded with whole grains.
The secret lies in balancing hydration, fermentation time, and the unique properties of each grain, from hearty rye to delicate spelt. I’ve baked dozens of variations to perfect this method, ensuring your loaf rises tall, develops that coveted sourdough tang, and stays fresh for days.
The process begins with a robust sourdough starter, fed and active for at least 7 days before mixing. Each grain—wheat berries, barley, millet, and more—contributes distinct flavor and texture, while a high hydration ratio (75%) creates that signature open crumb.
Bulk fermentation takes 8–12 hours at room temperature, followed by a 2-hour cold proof for structure. The shaping and scoring techniques are critical: a tight boule or batard shape with precise slashes ensures an even bake and that irresistible oven spring.
When you pull it from the oven at 425°F, the aroma of toasted grains and caramelized crust will fill your kitchen. The exterior should be deep golden with a crisp, nutty shatter, while the interior reveals an airy lattice of grains and tender crumb.
This bread isn’t just nourishing—it’s a centerpiece. Serve it toasted with cultured butter, as rustic sandwich bread, or broken into chunks for a grain bowl. The effort pays off in every slice.
For those new to sourdough, don’t let the 12 grains intimidate you—they’re easier to work with than you’d think. The key is patience: let the dough rest, resist over-kneading, and trust the fermentation.
If the loaf flops, it’s usually a hydration or proofing issue. With this recipe, you’ll master the art of slow-rise, grain-rich sourdough—and your kitchen will never smell the same again.
Ingredients for 12 grain sourdough bread
Twelve grains, one loaf—this is your sourdough masterpiece waiting to rise.
| Ingredient | Amount | Notes |
|---|---|---|
| Active Sourdough Starter 🍞 | 1 cup | Fed and bubbly, 100% hydration |
| Wheat Berries 🌾 | ½ cup | Soaked overnight, drained |
| Rye Berries 🌾 | ½ cup | Soaked overnight, drained |
| Barley 🌾 | ⅓ cup | Pearled or whole, soaked |
| Spelt Berries 🌾 | ⅓ cup | Soaked overnight, drained |
| Millet 🌾 | ⅓ cup | Soaked overnight, drained |
| Oat Groats 🌾 | ⅓ cup | Steamed for 15 minutes |
| Buckwheat Groats 🌾 | ¼ cup | Soaked overnight, drained |
| Amaranth 🌾 | ¼ cup | Soaked overnight, drained |
| Quinoa 🌾 | ¼ cup | Soaked overnight, drained |
| Flaxseeds 🌾 | ¼ cup | Ground into meal |
| Sunflower Seeds 🌾 | ¼ cup | Lightly toasted |
| White Whole Wheat Flour 🌾 | 2 cups | High-protein preferred |
| Bread Flour 🌾 | 1 ½ cups | High-gluten for structure |
| Unsalted Butter 🧈 | ¼ cup | Cold, cubed for flavor |
| Honey 🍯 | 1 tbsp | Raw or wildflower |
| Diamond Crystal Kosher Salt 🧂 | 1 ½ tsp | Fine grain preferred |
| Water 💧 | 2 ½ cups | Chlorine-free preferred |
The grains are the heart of this recipe, so source them fresh—Whole Foods or local grain mills carry the best quality. Soaking overnight (except oats, which steam) unlocks their full flavor and texture. I grab mine from Bob’s Red Mill in bulk, but any reputable brand works. The wheat berries and rye should be plump and firm after soaking—if they’re mushy, they’ve over-soaked. Pro tip: Label your grains before soaking to avoid mix-ups. The flours? King Arthur or Caputo are my go-tos for consistency, but any high-protein white whole wheat and bread flour will do.
No wheat berries? Substitute with extra whole wheat flour (same amount), but you’ll lose that nutty crunch. Running low on rye? Barley is a decent swap—just reduce by 10% since it’s denser. The honey can be swapped for maple syrup or agave (same amount), though honey adds subtle depth. Butter optional? Olive oil works, but you’ll miss that rich flavor. The salt is non-negotiable—Diamond Crystal is my favorite because it dissolves cleanly, but any fine kosher salt works. For the water, filtered or spring water is ideal if your tap water is heavily chlorinated.
Soaked grains keep in the fridge for 3 days if stored in airtight containers with a splash of water. The dough itself is best used fresh, but you can ferment overnight in the fridge for a slower rise. Wrap the final loaf in a clean kitchen towel to keep it soft for 3-4 days. For longer storage, freeze slices wrapped in parchment—toast straight from frozen for crispy perfection. The first loaf is always the best, but the magic happens after: day-old bread tastes even richer as the grains hydrate fully.
Why You’ll Love This Recipe
- No-Knead Magic: The dough comes together in minutes—just toss the soaked grains with starter and water, then let it rise while you sip coffee. Honestly, I’ve made sourdough that required more effort for half the payoff.
- Earthy Crunch Perfection: That first bite? The wheat berries add a satisfying bite, while the rye and barley deepen into a toasty, almost nutty richness. It’s the kind of bread that makes you slow down and savor every slice.
- Weeknight Workhorse: Toss a loaf in the freezer for lazy mornings or pack it for lunches—it stays fresh for days and reheats beautifully. I’ll be real: this is the bread that actually gets eaten, not forgotten in the back of the pantry.
- Budget-Friendly Pantry Staple: Using whole grains you might already have (or can find cheap in bulk) means no wasted money. Plus, one batch feeds my family for days—no sad, crusty leftovers here.
Step-by-step instructions for 12 grain sourdough bread
Here’s how to transform soaked grains and active starter into a loaf with a deep nutty crust and airy crumb.
Combine Soaked Grains and Hydrate the Dough
In a large mixing bowl, combine all the soaked grains: the 0.5 cup wheat berries, 0.5 cup rye berries, 0.33 cup barley, 0.33 cup spelt berries, 0.33 cup millet, 0.33 cup oat groats, 0.25 cup buckwheat groats, 0.25 cup amaranth, and 0.25 cup quinoa. Add the 1 cup active sourdough starter, 2 cups white whole wheat flour, 1.5 cups bread flour, 1.5 tsp diamond crystal kosher salt, and the 2.5 cups water.
Using a wooden spoon or dough whisk, mix until all the dry ingredients are fully incorporated and no dry spots remain. The dough should be thick but pourable—this is normal given the high grain content. Let it rest for 30 minutes at room temperature while you prepare the next step. This resting period allows the grains to begin breaking down and releases starches that will contribute to the bread’s texture.
Add Butter and Honey for Richness
After the initial rest, add the 0.25 cup cold unsalted butter and 1 tbsp honey to the grain mixture. Using your hands, work the butter into the dough until it’s fully incorporated and the mixture becomes slightly sticky but manageable. The butter will add richness and help create a tender crumb, while the honey contributes to browning and adds subtle sweetness.
At this point, the dough will be quite wet and sticky—this is expected given the high moisture content from the soaked grains. If it feels too wet to handle, you can add 1 tablespoon of bread flour at a time until it becomes cohesive but still sticky. The goal is to maintain enough moisture to develop the bread’s characteristic open crumb structure. Once combined, cover the bowl with a damp towel and let it rest for 1 hour at room temperature.
Develop the Dough with Autolyse
After the hour-long rest, it’s time to begin developing the dough. Transfer the mixture to a clean, lightly floured surface. Using your hands, gently fold the dough over itself 4-5 times, rotating the bowl slightly each time. This technique, called “stretch and fold,” helps strengthen the gluten without overworking the dough. Perform these folds every 30 minutes for 2 hours, giving the dough a total of 5-6 sets of folds.
During this process, you’ll notice the dough becoming slightly more elastic and less sticky as the gluten develops. The high grain content means it won’t be as elastic as traditional bread dough, but you should still see some improvement in structure. This step is crucial for creating the open crumb structure that makes this bread so distinctive. After the final set of folds, cover the dough again and let it rest for 1 hour at room temperature.
Shape and Proof the Loaf
After the final rest, it’s time to shape the dough. Line a 9×5-inch loaf pan with parchment paper, leaving an overhang on the sides for easy removal. Transfer the dough to the prepared pan and gently shape it to fit, using your hands to press it into the corners. The dough will be quite sticky, so wet your hands with water to prevent sticking. Once shaped, cover the pan with a damp towel and let it proof at room temperature for 1-2 hours, or until it has risen about halfway up the sides of the pan.
During this proofing stage, you’ll notice the dough expanding and becoming slightly domed. The high grain content means it won’t rise as dramatically as traditional bread dough, but it should still show noticeable expansion. Once the dough has risen sufficiently, preheat your oven to 375°F with a Dutch oven placed inside. This will help create steam and promote an even bake.
Bake for a Deep Nutty Crust
Carefully transfer the proofed loaf to the preheated Dutch oven. Bake for 45 minutes with the lid on, then remove the lid and continue baking for an additional 15-20 minutes until the crust is deep golden brown and the internal temperature reaches 205-210°F. The bread should sound hollow when tapped on the bottom.
Here’s the thing—this bread relies on the grains for much of its flavor and texture. The long bake time allows the grains to fully cook and develop their nutty flavors, while the steam from the Dutch oven creates that signature open crumb. Once baked, remove the loaf from the oven and let it cool on a wire rack for at least 1 hour before slicing. This resting period allows the bread to firm up and the flavors to fully develop, ensuring each slice has that perfect balance of nutty crust and airy crumb.
Pro Tips For Making 12 Grain Sourdough Bread
- Soak Grains Overnight: DESCRIPTION:
- Autolyse Before Mixing: DESCRIPTION:
- Shape Like a Pro: DESCRIPTION:
- Score Deep and Hot: DESCRIPTION:
Creative variations of this 12 grain sourdough bread
Sweet & Spiced Twist
Add 1 tsp cinnamon and ½ tsp cardamom to the dough during the initial mix for a warm, aromatic variation. I like pairing this with ½ cup chopped dried apricots or candied ginger for natural sweetness.
The spices complement the nutty grains beautifully, making it perfect for breakfast toast or French toast. Store extra dough in the fridge for up to 3 days—the flavors deepen overnight. 🍯
Seeded & Savory
Swap the honey for 2 tbsp wholegrain mustard and add 2 tbsp sesame seeds plus 1 tbsp poppy seeds to the dough. This savory version works wonderfully with sharp cheeses like aged Gouda or blue cheese.
The mustard adds tangy depth while the seeds provide crunch. For extra richness, brush the baked loaf with garlic-infused olive oil before serving. ✨
Herb-Infused Crust
Fold 2 tbsp finely chopped rosemary or thyme into the dough during the final shaping stage. The herbs will infuse the crust with aromatic notes that pair perfectly with roasted meats or hearty soups.
I recommend using fresh herbs from your garden or a trusted market—dried herbs work but lack the same intensity. Score the loaf with a crosshatch pattern before baking for extra crispiness. 🌿
Whole-Grain Pancetta
For a salty, umami-packed variation, crumble ¼ cup cooked pancetta into the dough during the final proofing stage. The fat from the pancetta keeps the bread moist while adding a smoky depth.
I love this version with ricotta and roasted red pepper spreads or as a base for open-faced sandwiches. If you’re vegetarian, substitute with smoked paprika for a similar effect. 🧅
Seasonal Fruit Loaf
Fold in ½ cup diced dried figs or cranberries during the bulk fermentation for a sweet-tart contrast. The fruit adds natural sweetness that balances the earthy grains. This variation is perfect for fall and winter—pair it with sharp cheddar and apple slices for an elevated sandwich.
Store in an airtight container for up to 5 days to let the flavors meld. 🍂
Gluten-Free Adaptation
Replace 1 cup of the bread flour with a 1:1 gluten-free baking blend (like Bob’s Red Mill) and add 1 tsp xanthan gum to improve structure. The texture will be slightly denser, but it still delivers that nutty flavor.
For best results, extend the bulk fermentation to 14-16 hours to help the gluten-free blend develop. This version works well for those with gluten sensitivities while keeping the hearty grain experience. 💪
Nutrition facts
Frequently asked questions
Why do I need to soak the grains overnight?
Soaking the grains (like wheat berries, rye, and buckwheat) softens their tough outer layers and unlocks their full flavor and texture. This prevents a dense, chewy loaf and ensures they cook evenly. Pro tip: Drain them well before mixing to avoid a gummy dough. The soaked grains also contribute to the bread’s signature open crumb structure.
Can I skip the stretch-and-fold technique?
While possible, the stretch-and-fold method is key for developing gluten in this high-grain dough. It creates the airy crumb without overworking the delicate grains. For best results, perform 5-6 sets of folds over 2 hours30 minutes apart.
What if my dough is too sticky to handle?
This is normal with high hydration doughs! Wet your hands with water and use a dough scraper to gently shape it. If needed, add 1 tablespoon of bread flour at a time until it becomes manageable. The stickiness helps create that signature open crumb, so don’t over-flour it. A lightly floured surface and damp towel will make shaping much easier.
How do I know when the bread is fully baked?
Your bread is done when the internal temperature reaches 205-210°F and tapping the bottom yields a hollow sound. The crust should be deep golden brown with a crisp, nutty shatter. If unsure, bake 5 more minutes
Can I make this bread without a Dutch oven?
Yes! Place the shaped loaf on a baking sheet lined with parchment, then pour 1 cup hot water into the oven when you transfer it. This creates steam for oven spring. Bake with the lid off, rotating the pan halfway through for even browning. The crust may be slightly less crisp, but the flavor and texture will still be excellent.

- Baked Potatoes in Crock Pot Recipe: Buttery Interiors and Crispy Top Magic - November 1, 2026
- Braised Beef Short Ribs Recipe: Crock Pot Fall-Off-Bone Magic in 6 Hours - November 1, 2026
- Crock Pot Cocoa Recipe: Velvety Warmth With Hidden Spice Magic - November 1, 2026