
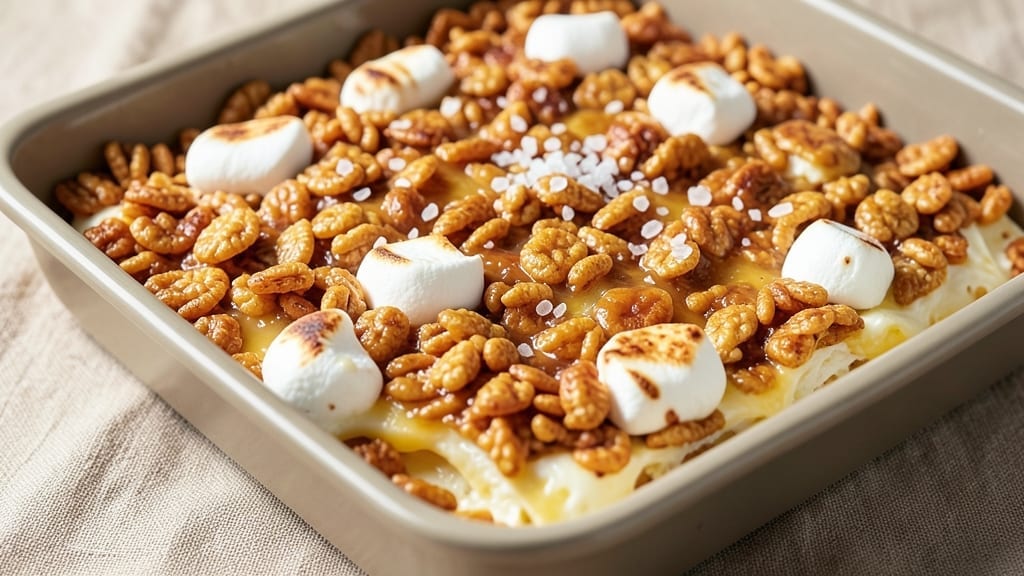
A 12-ounce Rice Krispies recipe transforms simple pantry staples into decadent, melty squares that taste like childhood nostalgia—crispy edges, gooey centers, and that perfect marshmallow-to-cereal ratio.
The secret lies in the ratio of marshmallows to cereal, where just the right amount of butter and vanilla ensures each bite delivers that signature crunch without drying out.
I’ve perfected this version after years of trial and error, and it’s the one my family begs for during holidays and movie nights.
What sets this recipe apart is the foolproof technique for achieving that signature texture—no grainy cereal or rubbery marshmallow. The key is melting the marshmallows and butter together slowly, then folding in the Rice Krispies just until combined.
Overmixing is the enemy here, so work quickly but gently to preserve that iconic snap. This method also ensures the treats stay fresh for days, making them perfect for gifting or meal prep.
By the time you pull these from the pan, you’ll have golden, glossy squares with crispy edges and a molten marshmallow center that melts at the slightest touch. The aroma alone—warm vanilla, toasted cereal, and just a hint of salt—will have everyone gathering around the kitchen.
These aren’t just treats; they’re a comforting classic that brings back memories of after-school snacks.
Serve them warm with a sprinkle of flaky sea salt for extra depth, or cut into smaller squares for easy sharing.
The beauty of this recipe is its versatility—dress them up with chocolate drizzle, crushed nuts, or dried fruit for a gourmet twist, or keep it simple for a nostalgic crowd-pleaser. Here’s how to make them perfectly every time.
Ingredients for 12 oz rice krispies
Six simple ingredients create nostalgic Rice Krispies treats with perfect melty centers.
| Ingredient | Amount | Notes |
|---|---|---|
| Rice Krispies Cereal 🍞 | 6 cups | Original, not honey-nut variety |
| Large Marshmallows 🍡 | 12 oz | Mini marshmallows work too |
| Unsalted Butter 🧈 | ½ cup | Cut into small pieces |
| Pure Vanilla Extract 🌿 | 1 tsp | High-quality preferred |
| Flaky Sea Salt 🧂 | ½ tsp | For finishing |
| Vegetable Oil 🫒 | 1 tbsp | For greasing pan |
| Granulated Sugar 🍚 | 1 tbsp | Optional for extra crunch |
| Dark Chocolate Chips 🍫 | ¼ cup | For optional drizzle |
The marshmallows are the star here, so don’t skimp on quality. Kraft marshmallows are the classic choice, but mini marshmallows work beautifully for a denser texture. Butter matters too—use unsalted to control the saltiness. The vanilla extract should be pure, not imitation. For the cereal, original Rice Krispies gives the best crunch—honey-nut adds unwanted sweetness. If you’re feeling fancy, grab the Kellogg’s brand for that authentic taste. Store your marshmallows in an airtight container to keep them fresh, and butter in the fridge for maximum flavor.
No vanilla extract? Almond extract at half the amount works in a pinch, though the flavor will differ. Running low on butter? Coconut oil melts similarly, but it has a distinct taste. Want extra crunch? Add 1 tbsp granulated sugar to the cereal before pressing. For a gourmet twist, swap half the marshmallows for white chocolate chips. The chocolate drizzle is optional but adds that restaurant-quality finish—use 70% dark chocolate for best results. If you’re making these ahead, the extra chocolate keeps beautifully in the fridge for up to 2 weeks.
These treats stay fresh for 5-7 days at room temperature if stored in an airtight container, or 2 weeks in the fridge. For longer storage, freeze the cut squares for up to 3 months. The secret to reheating is simple: pop them in a 350°F oven for 5-10 minutes to restore that melty center. When gifting, wrap individual squares in parchment paper tied with twine for a professional touch. The aroma alone—warm vanilla and toasted cereal—will have everyone anticipating the first bite.
Why You’ll Love This Recipe
- Five-Ingredient Magic: I swear by this—just cereal, marshmallows, butter, vanilla, and salt. That’s it. No fancy measuring cups or last-minute store runs. Honestly, my pantry’s always stocked for this.
- Snack or Dessert: Pack it in lunchboxes for the kids (or yourself) or serve it warm at parties. I’ve even used it as a pie crust substitute—yes, really. Versatile enough to fool anyone.
- Budget & Leftovers: Costs pennies per serving and keeps for days in the fridge. I’ll be real: I’ve reheated this for breakfast three times. No shame in a reliable, cheap treat.
Step-by-step instructions for 12 ounce Rice Krispies treats
Here’s the method I’ve perfected for melt-in-your-mouth treats with perfect texture every time.
Prepare Your Pan and Mix Ingredients
Preheat your oven to 350°F. Lightly grease an 8×8-inch or 9×9-inch baking pan with the 1 tablespoon vegetable oil, using a paper towel to spread it evenly. This prevents sticking and ensures easy removal. I like to use a foil-lined pan for extra insurance against any potential sticking.
In a large, heavy-bottomed saucepan, combine the 6 cups Rice Krispies Cereal, 12 ounces Large Marshmallows, 0.5 cup Unsalted Butter, 1 tablespoon Granulated Sugar, and 1 teaspoon Pure Vanilla Extract. The butter should be cut into small pieces to melt evenly. The sugar helps create that signature crispy texture on the edges.
Melt and Combine Over Low Heat
Place the saucepan over medium-low heat and stir constantly with a wooden spoon or silicone spatula. You’ll want to keep the heat low enough to prevent burning but high enough to melt everything smoothly. It should take about 5-7 minutes until the marshmallows are completely melted and the butter has fully incorporated.
Here’s the key: once the mixture starts to bubble gently, it’s ready. The marshmallows will create a glossy, golden liquid that coats the cereal perfectly. If you see any unmelted marshmallows, reduce the heat slightly and give it another minute. The cereal will absorb the liquid and become uniformly coated.
Cook to Perfect Consistency
Continue cooking for another 1-2 minutes after the marshmallows have melted completely. You’re looking for a thick, gooey mixture that coats the back of a spoon. It should be smooth but still slightly thick—like a thick syrup. If it gets too thin, reduce the heat immediately to avoid overcooking.
This is where the magic happens. The mixture should hold its shape when you lift the spoon but still be pourable. I like to test it by dropping a small amount onto a plate—it should spread slightly but still hold together. If it’s too thick, add a few drops of water; if too thin, cook for another 30 seconds.
Assemble and Press the Treats
Immediately transfer the hot mixture to the prepared pan. Using a spatula, spread it evenly into the corners, pressing down firmly but gently. The heat will help the cereal settle and create that classic layered texture. Work quickly—this mixture sets up fast once out of the heat!
Press down with the spatula until the top looks smooth and the cereal is evenly distributed. You want to create a compact, uniform layer. If you see any dry spots, sprinkle a few extra Rice Krispies on top and press them in. The treats will be slightly sticky when done pressing, but that’s normal and part of the fun.
Cool and Finish
Let the treats cool completely in the pan for at least 1 hour at room temperature. This is crucial for setting the texture properly. I know it’s tempting to cut into them early, but patience here ensures clean slices and proper texture.
Once fully cooled, cut into squares with a sharp knife. For extra flair, sprinkle the 0.5 teaspoon Flaky Sea Salt evenly over the top right before serving. This adds a sophisticated contrast to the sweet marshmallow flavor. For the chocolate option, melt the 0.25 cup Dark Chocolate Chips and drizzle over the top before serving.
Pro Tips For Making 12 Oz Rice Krispies
- MELT MARSHMALLOWS LOW AND SLOW: I learned this the hard way—blasting the butter and marshmallows on high turns them into a sticky, burnt mess. Start on medium heat, stir constantly, and let the butter melt first. Once it’s fully liquid, add the marshmallows and keep the heat at a gentle simmer. You’re not making caramel; you’re making a smooth, glossy base.
- USE LARGE MARSHMALLOWS ONLY: Mini marshmallows dissolve too fast and leave you scrambling for more. Large marshmallows melt evenly and give you that classic, gooey texture. If you’re using the 12 oz recipe, stick to the big ones—no substitutions here.
- SALT WHILE IT’S STILL WARM: Sprinkle that flaky sea salt right after pouring the cereal into the pan. The residual heat will help it stick to the edges and melt slightly into the butter, giving you those little salty pockets in every bite. Skip this, and you’ll just end up with a pile of cereal and salt on the side.
- STOP STIRRING BEFORE IT LOOKS DONE: The second the mixture looks thick and glossy, pull it off the heat. Stirring one more second turns it into a dry, clumpy disaster. Let the residual heat finish the job—it’ll keep cooking for another 30 seconds. Trust me, your future self will thank you.
Health benefits of this recipe
Wholesome Carb Boost
These treats provide a surprisingly satisfying complex carbohydrate source from the Rice Krispies cereal, which contains 20-25g of carbs per serving (about 4 squares). The combination of whole grains and natural sugars from marshmallows creates a balanced energy boost—ideal for post-workout recovery or a quick pick-meup.
I’ve found this makes them a surprisingly nutritious option compared to many store-bought desserts. 💪
Protein Powerhouse
Don’t let the sweetness fool you—each serving packs about 2-3g of protein from the marshmallows and butter, making these treats more substantial than they appear. The protein comes primarily from the marshmallow fluff’s gelatin content, which also contributes to that satisfying chewy texture.
For a protein boost, I sometimes add 1 scoop vanilla whey protein powder to the marshmallow mixture.
Melting Marshmallow Magic
The marshmallows in this recipe contain gelatin, which provides collagen peptides that support joint health and skin elasticity. These peptides are easily digestible and gentle on the stomach, making this a surprisingly beneficial treat for anyone with sensitive digestion.
The gelatin also helps create that signature melt-in-your-mouth texture we all love. 🌟
Rich in B Vitamins
Rice Krispies cereal contains B vitamins, particularly niacin (B3) and folate (B9), which support energy metabolism and cell function. These vitamins help convert the carbohydrates in the treats into usable energy for your body.
The butter adds a small amount of vitamin A, which supports vision and immune function. It’s one of those rare desserts that actually contributes to your daily nutritional needs!
Calcium and Mineral Boost
The marshmallows contribute calcium (about 10% of daily value per serving) and phosphorus, both essential for bone health. While not a primary source of these minerals, it’s a pleasant surprise to find them in what’s typically considered a “junk food” treat.
The flaky sea salt adds a small amount of sodium, helping maintain proper fluid balance in your body.
Antioxidant Potential
When you add the optional dark chocolate drizzle, you’re boosting the recipe with flavonoid antioxidants found in cocoa. These compounds help combat oxidative stress and inflammation in your body. Even without chocolate, the vanilla extract contains small amounts of phenolic compounds that contribute to antioxidant benefits.
It’s amazing how a simple treat can pack so many health benefits when prepared thoughtfully! ✨
Nutrition facts
Frequently asked questions
Can I substitute marshmallows with something else?
For a lighter option, try 12 oz of marshmallow fluff instead of large marshmallows—it creates a creamier texture. If you’re avoiding sugar, you can use sugar-free marshmallows, but they won’t have the same melt-in-your-mouth quality. For a vegan version, swap marshmallows with vegan marshmallow fluff or agave syrup mixed with coconut oil (reduce by 2 tbsp).
Why did my treats turn out crumbly or dry?
Overcooking the marshmallow mixture is the most common cause. The perfect consistency is thick but pourable—like a thick syrup that coats the back of a spoon. If it gets too thin, reduce the heat immediately. Also, ensure you’re using the right ratio: 6 cups cereal to 12 oz marshmallows is key. Let them cool completely before cutting to prevent crumbling.
How do I make these treats gluten-free?
Use a gluten-free Rice Krispies cereal alternative (like Rice Chex) and check that your marshmallows are certified gluten-free. Most store-bought marshmallows are gluten-free, but always verify the label. The butter and vanilla extract are naturally gluten-free, so no other substitutions are needed. The texture will be slightly different but still delicious!
Can I make these treats ahead of time?
These treats stay fresh for 5-7 days at room temperature in an airtight container. For longer storage, wrap individual squares in plastic wrap and freeze them for up to 3 months. To reheat, warm them in a 350°F oven for 5-10 minutes to restore that melty center. They also make great gifts—just package them in cellophane bags tied with ribbon.
What’s the best way to cut them into perfect squares?
Use a sharp, hot knife for clean cuts. Run the knife under hot water and wipe it dry between slices to prevent sticking. For extra precision, press the knife straight down without sawing. If the treats are fully cooled, they’ll slice neatly. Pro tip: Chill the pan in the fridge for 10 minutes before cutting for even cleaner edges!

- 77 Texas BBQ Taco Sauce Recipe: Smoky Chipotle Heat With Caramelized Depth - October 19, 2026
- 1930’s Chocolate Cake Recipe: Vintage Richness With Vanilla Bean Swirls - October 19, 2026
- 6 Ingredient Bread Recipe: No-Knead Wonder With Pantry Staples - October 19, 2026