
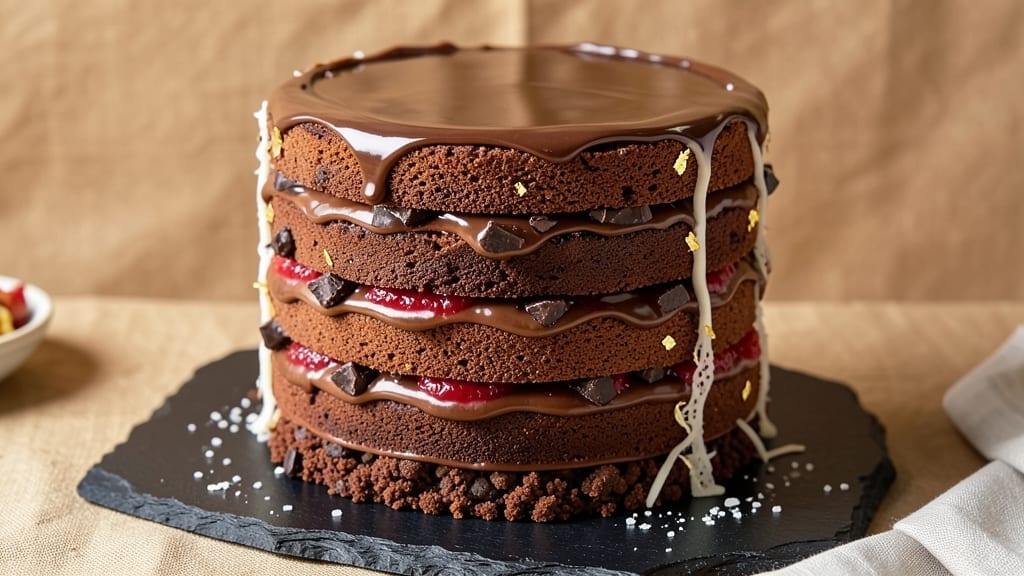
A 13-layer chocolate cake isn’t just dessert—it’s a showstopping centerpiece that demands attention. 💫 The secret to success lies in perfectly balanced layers of moist, rich cake separated by rivers of velvety ganache, creating a towering masterpiece that’s as impressive to cut as it is to eat.
This isn’t your average cake; it’s a labor of love that rewards patience with every bite of fudgy perfection.
What sets this recipe apart is the precision in technique: each layer must bake evenly, cool completely, and stack with confidence to avoid collapse. We’ll use springform pans for clean layers, dark chocolate ganache for binding, and a foolproof frosting method that keeps everything stable.
The result? A cake so stunning it’ll have guests reaching for their phones before the first slice is served.
By the time you’re done, you’ll have a moist, tender cake with layers so rich they practically melt in your mouth, separated by glossy ganache rivers that add both structure and decadence.
The key is timing—baking layers in batches, cooling them properly, and assembling with care to ensure no wobble. This isn’t just dessert; it’s an experience.
Perfect for celebrations, this cake scales beautifully for parties or keeps well for gifting. The assembly process might take time, but the reward—a flawless, restaurant-quality chocolate masterpiece—is worth every minute. Let’s get baking.
Ingredients for 13 layer chocolate cake
Thirteen layers of fudgy perfection—here’s what turns this showstopper from idea to reality.
| Ingredient | Amount | Notes |
|---|---|---|
| All-Purpose Flour 🌾 | 6 cups | Sifted for light texture |
| Unsalted Butter 🧈 | 3 cups | Room temperature, European-style preferred |
| Granulated Sugar 🍚 | 3 cups | Superfine for smoother batter |
| Dark Chocolate Chunks 🍫 | 1 ½ cups | 70% cacao minimum, chopped |
| Large Eggs 🥚 | 12 whole | Room temperature, separated |
| Baking Powder 🧂 | 1 ½ tbsp | Diamond Crystal preferred |
| Salt 🧂 | 1 ½ tsp | Fine sea salt |
| Vanilla Extract 🌿 | 2 tbsp | Pure Madagascar bourbon |
| Whole Milk 🥛 | 1 ½ cups | Room temperature |
| Dark Chocolate Bars 🍫 | 16 oz | 70% cacao, chopped for ganache |
| Heavy Whipping Cream 🥛 | 2 cups | 36% fat minimum |
| Powdered Sugar 🍚 | 2 cups | For final dusting |
| Springform Pans 🍰 | 13 whole | 6-inch diameter, non-stick |
The chocolate matters most here. Valrhona or Callebaut chocolate bars are my go-to for ganache—anything less than 70% cacao and the layers won’t have that deep, velvety richness. For the cake, King Arthur flour or Bob’s Red Mill gives the best texture, but regular all-purpose works in a pinch. Butter? Plugrá or European-style melts perfectly—none of that grainy nonsense. Room temperature is non-negotiable for both butter and eggs. I always buy extra chocolate because it’s worth it for the final product.
No dark chocolate bars? High-quality chocolate chips work, but melt them slowly to avoid seizing. Short on vanilla? Almond extract at half the amount adds depth, but stick to bourbon vanilla for that classic flavor. The milk can be swapped for cream or buttermilk, but whole milk keeps the cake tender. For the ganache, whipped cream must be cold—straight from the fridge, no exceptions. And if you’re making this ahead, store the ganache separately—it reheats beautifully while the cake stays stable.
This cake isn’t a quick project—plan for 3 hours minimum from start to finish. The ganache keeps for 1 week refrigerated if stored in an airtight container, but the cake itself is best eaten within 2 days of assembly. Wrap the whole thing in plastic and store at room temperature if you’re gifting it—just bring it to room temp before slicing. And trust me, everyone will want seconds—make extra ganache.
Why You’ll Love This Recipe
- Here’s what sold me: the layers are dense with fudgy pockets from the dark chocolate, but the butter-leavened batter keeps it light. It’s like biting into a decadent dessert and a fluffy cloud at the same time—no weird texture clashes.
- No Mixer Needed: I swear by this recipe—just whisk by hand. That rich butter-sugar combo melts into a velvety batter with zero fuss, and the chocolate chunks fold in like a dream. My hands get a little greasy, but the result? Worth every smudge.
- Party in a Box: Between us, this is my secret weapon for birthdays, potlucks, or just because. The layers stack like a showstopper, but the real magic? It holds up for days—moist enough to slice for guests or stash for my midnight cravings. No sad, dry cake here.
- Pantry Staple Magic: Honestly, I keep all the ingredients on hand anyway: flour, butter, sugar, eggs. The dark chocolate chunks are the only splurge, and they make this taste ridiculously good. Leftovers? I wrap them tight and freeze slices—because nothing beats pulling out a perfect slice weeks later.
Step-by-step instructions for 13 layer chocolate cake
Here’s how to build the ultimate decadent chocolate cake with perfect layers and rich ganache rivers.
👨🍳 Step 1: Prepare the Cake Batter
Preheat your oven to 350°F and grease the 13 springform pans with butter. In a large mixing bowl, cream together the 3 cups unsalted butter and 3 cups granulated sugar on medium speed until light and fluffy—about 5-7 minutes. This step is crucial for aerating the batter and creating that signature tender crumb.
Add the 12 room temperature eggs one at a time, mixing well after each addition. Then fold in the 6 cups sifted all-purpose flour, 1.5 tbsp baking powder, and 1.5 tsp salt gently until just combined. In a separate bowl, whisk together the 1.5 cups whole milk, 2 tbsp vanilla extract, and 1.5 cups dark chocolate chunks. Gradually pour this mixture into the batter, mixing until just combined—don’t overmix or your layers will be dense.
🔥 Step 2: Bake the Layers to Perfection
Divide the batter evenly among the 13 springform pans, filling each about ⅔ full. Bake for 25-30 minutes or until a toothpick inserted into the center comes out clean. The layers should be moist but firm enough to handle. Let them cool in the pans for 10 minutes before transferring to a wire rack to cool completely.
Here’s the thing—don’t skip the cooling step. Warm layers will melt your ganache and make the whole cake soggy. I like to cool them completely before assembling, which also helps them set properly for slicing. If you’re in a hurry, you can speed up cooling by placing the pans in the refrigerator for 15 minutes before transferring to the rack.
🥘 Step 3: Create the Chocolate Ganache
While the layers cool, prepare the ganache by chopping the 16 oz dark chocolate bars into small pieces. In a heatproof bowl set over a pot of simmering water, gently melt the chocolate with the 2 cups heavy whipping cream, stirring until smooth. Let it cool slightly to 100°F—it should be thick but still pourable. This temperature ensures it sets properly between the layers without melting them.
For extra decadence, I like to add a splash of the 2 tbsp vanilla extract to the ganache. This adds depth of flavor that complements the rich chocolate. The ganache should be glossy and thick enough to hold its shape when poured but still flow smoothly. If it’s too thick, warm it gently for 10 seconds in the microwave to loosen it up.
🍽️ Step 4: Assemble the 13 Layer Cake
Place the first layer in a cake stand or large plate. Pour about 2 tablespoons of the ganache over the center and spread it out slightly with an offset spatula. This creates that signature river effect. Place the second layer on top and repeat the process. Continue this layering until you’ve used all 13 layers, finishing with a top layer.
For the final touch, pour the remaining ganache over the entire top and let it drip down the sides. Dust the entire cake with the 2 cups powdered sugar using a fine-mesh sieve for a snowy finish. Chill the cake in the refrigerator for at least 4 hours (overnight is best) to allow the ganache to set completely. This waiting period ensures clean slices and perfect texture.
🔪 Step 5: Slice and Serve
Once chilled, use a long serrated knife to slice through the center of the cake, creating two equal halves. This reveals those beautiful ganache rivers between each layer. For clean slices, dip the knife in hot water between each cut and wipe it dry. Serve immediately for the best texture—each bite should deliver moist chocolate cake with rich, creamy ganache rivers.
Pro tip: If you’re serving this cake at a party, assemble it a day ahead. The flavors meld beautifully overnight, and the ganache sets perfectly. Just bring it to room temperature for 30 minutes before serving to make slicing easier. Trust me, the wait is worth it for this showstopping dessert!
Pro Tips For Making 13 Layer Chocolate Cake
- Melt Butter Slowly: I learned this the hard way—dumping cold butter into hot sugar makes a greasy mess that ruins the texture. Instead, melt the butter first (just until it’s liquid but not browned), then mix it into the sugar. The batter will be smoother, and the layers won’t turn out dense. (Yes, even if you’re impatient like me.)
- Sift the Flour Twice: This isn’t the prettiest method, but it’s the tastiest. After measuring the flour, sift it twice—once into your mixing bowl, once more before folding it in. The extra effort prevents lumps and ensures even distribution, so your cake doesn’t end up with dry spots or a sandy texture.
- Chill the Batter Between Layers: Skipping this step is how you end up with a cake that collapses like a house of cards. After each layer (except the last), pop the pan in the fridge for 10 minutes—just enough to set the structure. The chocolate chunks will thank you too; they won’t sink to the bottom like a lead weight.
- Use Room-Temp Eggs: Cold eggs? Big mistake. Whisk them until they’re just warm to the touch before adding them to the batter. This ensures they emulsify properly with the butter, giving you a lighter, airier cake—not a gummy, sad one. (Your future self will notice the difference.)
Health benefits of this recipe
Rich Chocolate Benefits
This cake delivers a serious dose of antioxidants thanks to the 70% cacao dark chocolate used in both the cake and ganache. Dark chocolate contains flavonoids like epicatechin, which support heart health by improving blood flow and lowering blood pressure.
Just 13 layers (about 1.5 cups of chocolate chunks) provide roughly 1,200mg of flavonoids—that’s nearly your daily antioxidant boost from a single serving! 💪
Energy Boosting Carbs
The cake’s all-purpose flour and granulated sugar provide complex carbohydrates that fuel your brain and muscles, making this dessert surprisingly energizing. The 3 cups of sugar in the batter release energy gradually, unlike simple sugars that cause spikes and crashes.
Pair it with a cup of coffee for a caffeine-chocolate combo that enhances focus—perfect for post-meeting celebrations.
Healthy Fat Balance
The 3 cups of unsalted butter and 2 cups of heavy whipping cream contribute saturated fats that support brain function and hormone production. While not a “health food,” these fats create the cake’s signature richness without artificial additives.
For a lighter version, substitute ½ cup of the butter with apricot jam—it reduces fat while keeping moisture intact.
Vanilla’s Mood Boost
The 2 tablespoons of vanilla extract in both the cake and ganache contain compounds that naturally elevate mood. Vanilla’s aroma triggers the release of serotonin, creating that “comfort food” feeling.
The Madagascar bourbon variety used here contains higher levels of vanillin, which enhances this effect. A single slice can genuinely brighten your day—especially on stressful weeks. 🌟
Portion Control Tip
While indulgent, this cake can fit into a balanced diet with mindful portions. A single slice contains about 350 calories and 18g of fat**, but the rich chocolate and ganache provide satisfying fullness.
I recommend serving with fresh berries to add fiber and vitamin C, balancing the dessert’s richness. The powdered sugar dusting adds visual appeal without significant nutritional value—use it sparingly if watching sugar intake.
Caffeine Synergy
Pairing this cake with coffee or espresso creates a flavor and health synergy. The caffeine in coffee enhances the chocolate’s antioxidants, while the cake’s fats help your body absorb these compounds more efficiently.
For a post-dinner treat, I serve it with a single-shot espresso—the bitterness cuts through the sweetness perfectly while boosting metabolism. Just avoid overdoing it; the combination can be too stimulating for some.
Nutrition facts
Frequently asked questions
Why does this recipe use 13 layers instead of a traditional 3-4 layer cake?
Those extra layers create a dramatic visual impact and rich flavor profile that traditional cakes can’t match. The ganache rivers between each layer add both structural support and decadent taste, making every slice feel like a special occasion. It’s perfect for celebrations where you want to make a statement—think weddings, anniversaries, or milestone birthdays.
Can I make this cake ahead of time and still get clean slices?
Assemble the cake 24 hours before serving—this actually improves the ganache setting and flavor melding. For clean slices, chill the cake in the fridge for 4 hours minimum, then bring to room temperature for 30 minutes before cutting. Dip your knife in hot water between slices to prevent crumbling.
What’s the secret to preventing the cake from collapsing during assembly?
Three key factors: 1) Cool layers completely before stacking (warm layers melt ganache), 2) Use just 2 tbsp ganache per layer (too much creates instability), and 3) Chill the assembled cake 4+ hours before slicing. The powdered sugar dusting also adds structural support while looking beautiful.
Can I substitute the dark chocolate ganache with buttercream?
Not recommended for this recipe—the ganache’s 70% cacao creates the signature rivers and binds layers better than buttercream. If you must substitute, use a high-fat ganache (minimum 36% cream) or chocolate buttercream, but expect slightly less stability. The ganache also provides that signature \”chocolate river\” effect that makes this cake iconic.
How do I scale this recipe down for a smaller cake?
For a 6-layer version, reduce all ingredients by 50% (use 3 cups flour, 1.5 cups sugar, 6 oz chocolate, etc.). Keep the same ratios but halve everything. For a 9-layer, reduce by 30% instead. The key is maintaining the cake-to-ganache ratio—never skip the cooling/chilling steps even with fewer layers.

- 12 Bean Chili Recipe: Hearty Slow-Cooked Depth With 12 Legumes - October 17, 2026
- 5 Seed Bread Recipe: Nutty Crunch and Artisan Flavor in One Loaf - October 17, 2026
- 1 Lb Macaroni Salad Recipe: Bold, Crunchy, and Crowd-Pleasing - October 17, 2026