
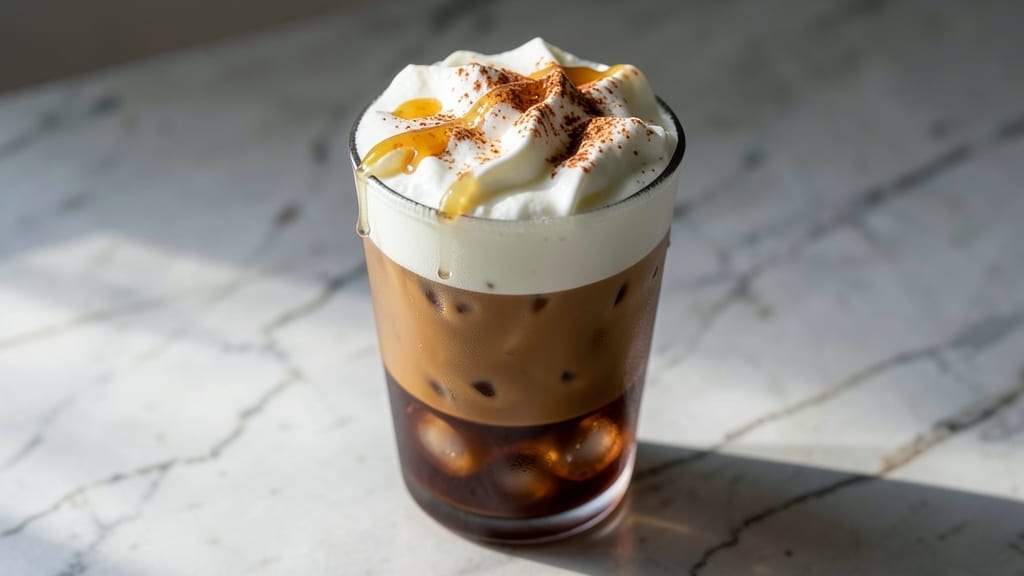
This 16-ounce iced latte recipe delivers the same velvety, barista-quality creaminess you’d get at your favorite coffee shop—without the $5 price tag.
The secret lies in the perfect espresso-to-milk ratio (1 shot to 10 ounces of milk) and the right ice-to-liquid balance, which keeps it refreshing without watering down the flavor.
I’ve perfected this method after years of experimenting, and it’s now my go-to for hot summer days or lazy afternoons when I crave something cool and comforting.
What sets this recipe apart is the technique: using freshly brewed espresso (or strong coffee for a budget-friendly version) and cold milk (dairy or plant-based) creates a smoother, less icy texture than pre-made coffee concentrates.
The milk should be chilled but not frozen—this ensures it stays creamy as it melts over ice. Optional flavorings like vanilla syrup or cinnamon can elevate it further, but the classic version is already rich and satisfying.
By the time you’re done, you’ll have a smooth, perfectly balanced iced latte with a strong espresso foundation and a velvety milk layer that doesn’t turn watery.
The ice stays crisp, the flavors meld beautifully, and the result is a drink that’s both refreshing and indulgent—ideal for sipping slowly or enjoying as a quick pick-me-up.
This recipe is highly customizable: swap in almond, oat, or coconut milk for dairy-free options, adjust sweetness with simple syrup, or add a dash of cocoa powder for a mocha twist.
Serve it over a large ice cube or crushed ice for your preferred texture. Here’s how to make it—step by step.
Ingredients for 16 oz iced latte
Freshly brewed espresso, chilled milk, and ice—just five key ingredients for barista-style perfection.
| Ingredient | Amount | Notes |
|---|---|---|
| Freshly Brewed Espresso ☕ | 2 oz | Strong, freshly brewed preferred |
| Cold Whole Milk 🥛 | 10 oz | Chilled, not frozen, 2% or whole |
| Ice Cubes ❄️ | 1 ½ cup | Large cubes for slower melt |
| Vanilla Syrup 🍯 | ½ tbsp | Optional, for sweetness |
| Cinnamon 🌿 | ¼ tsp | Ground, for garnish |
| Simple Syrup 🍯 | ½ tbsp | Adjust to taste |
| Strong Brewed Coffee ☕ | 2 oz | Budget-friendly alternative |
| Almond Milk 🥛 | 10 oz | Unsweetened, chilled |
| Cocoa Powder 🍫 | ½ tbsp | For mocha version |
| Crushed Ice ❄️ | 1 cup | For smoother texture |
The espresso is non-negotiable here—Starbucks or local café shots are ideal, but a high-quality home espresso machine works too. If you’re using coffee instead, French press or pour-over brews give the strongest flavor. Milk temperature matters: cold but not frozen ensures a creamy texture without dilution. For the best results, grab whole or 2% milk from the dairy section—plant-based milks like almond or oat work beautifully too, just make sure they’re chilled. Ice cubes should be large and clear—the kind that don’t melt instantly.
No espresso machine? Strong coffee at 2 oz per serving is a solid swap, though the flavor won’t be as concentrated. Vanilla syrup can be replaced with honey or maple syrup at half the amount, but it won’t have the same smooth texture. For a mocha twist, unsweetened cocoa powder dissolves perfectly into the milk. If you prefer a smoother texture, crushed ice instead of cubes melts more evenly. The milk-to-ice ratio is key: 10 oz milk to 1.5 cups ice keeps it refreshing without watering down the flavor—trust me on this.
Prep ahead by brewing espresso in advance and storing it in the fridge for up to 2 days. Milk should be chilled but not frozen—2 hours in the fridge does the trick. This recipe makes 2 servings, but you can easily double it for a pitcher. Leftovers keep for 1 day in the fridge, though the ice will melt. For a quick morning routine, pre-portion ice cubes in a freezer-safe container—no last-minute scrambling.
Why You’ll Love This Recipe
- No-Fuss Assembly: I swear by this recipe because it’s three steps—brew the espresso, pour the milk, add syrup—and done. No blenders, no frothers, no stress. The ice dilutes everything perfectly, so you don’t even have to measure beyond the classic 1:2 espresso-to-milk ratio.
- Vanilla-Cinnamon Magic: That first sip? Chef’s kiss. The vanilla syrup cuts through the espresso’s bite while the cinnamon dusting on top adds this warm, cozy finish that makes it taste like a hug in a cup. Honestly, I’ve tried store-bought versions, and this beats them every time.
- Picnic or Pajamas: This is my go-to for anything—pack it in a thermos for a hike, sip it from a mug while grading papers, or serve it at a backyard BBQ with a sprinkle of cinnamon on the rim. The cold milk keeps it refreshing, and the espresso punch means no one skips their coffee fix.
- Budget Coffee Hack: I make this with store-brand syrup and whole milk, and it still costs half what a café charges. Plus, a single batch yields two servings—perfect for splitting with my kid (who adds extra ice) or saving half for my post-workout routine. No waste, all win.
Step-by-step instructions for barista-style iced latte
Here’s how to craft a velvety, perfectly balanced iced latte at home—no barista skills required.
Prepare Your Base Coffee
Start by brewing 2 oz of freshly brewed espresso or, for a budget-friendly version, 2 oz of strong brewed coffee. Use a fine-ground coffee and let it steep for 4-5 minutes if using a pour-over method, or run through your espresso machine for maximum intensity. The goal is a concentrated, aromatic base—this is what carries the flavor through the chilled drink.
Let the coffee cool to room temperature before proceeding. If you’re impatient, chill it in the fridge for 10-15 minutes or pour it over a small ice cube tray to speed up the process. The last thing you want is a watered-down latte where the coffee loses its punch to melting ice.
Sweeten and Flavor Your Milk
In a separate container, combine 10 oz of cold whole milk (or 10 oz of almond milk for a dairy-free version) with 0.5 tbsp of vanilla syrup and 0.5 tbsp of simple syrup. Stir gently to dissolve the syrups completely—this creates a sweetened milk base that will blend seamlessly with your coffee. For a mocha twist, whisk in 0.5 tbsp of cocoa powder until fully incorporated.
Here’s the thing—sweetness preferences vary wildly, so taste the mixture before proceeding. If you’re using vanilla syrup, it’s already sweet, so you might only need 0.25 tbsp of simple syrup. Adjust to your liking, but remember: you can always add more sweetness later, but you can’t take it out.
Assemble the Iced Latte
Fill a shaker bottle or large glass with 1.5 cups of ice cubes (for a slower melt) or 1 cup of crushed ice (for a smoother texture). Add the cooled coffee base and the sweetened milk mixture. Seal the container tightly and shake vigorously for 15-20 seconds—this ensures the ice chills everything evenly without diluting the coffee too much.
For a truly barista-style result, strain the mixture through a fine-mesh sieve into a chilled glass to remove any ice shards. This step isn’t mandatory, but it gives you that silky, professional finish. If you’re serving immediately, skip the straining and pour directly into your glass.
Garnish and Serve
Sprinkle 0.25 tsp of ground cinnamon on top for a warm, aromatic finish. The cinnamon adds a subtle spice that complements the coffee’s richness without overpowering it. For extra flair, you could also add a dusting of cocoa powder or a few drops of vanilla syrup on top, but cinnamon is my go-to for that classic iced latte touch.
Serve immediately over a large ice cube or in a tall glass filled with fresh ice. The drink should be perfectly balanced—sweet enough to satisfy, creamy from the milk, and rich from the coffee. If it tastes too strong, add a splash more milk; if it’s too weak, stir in an extra 0.5 oz of espresso. Enjoy right away for the best texture and flavor.
Pro Tips For Making 16 Oz Iced Latte
- Shake Before Pouring: DESCRIPTION: I used to just dump everything in and stir—big mistake. Whole milk separates when cold, and you’ll end up with a watery, uneven latte. Give that vanilla syrup bottle a good shake first, then mix it directly into the milk while stirring vigorously for 10 seconds. That way, the flavor blends smoothly instead of sinking to the bottom like a sad syrup puddle.
- Use Large Ice Cubes: DESCRIPTION: Tiny ice cubes melt in minutes, turning your latte into a weak, watered-down mess. Freeze milk or water in an ice cube tray lined with silicone molds—big cubes (about 1.5 inches) keep the drink cold for 30+ minutes without diluting the espresso. Pro move: Skip the ice bin and freeze them flat in a loaf pan for even larger blocks.
- Chill the Espresso: DESCRIPTION: Pouring scalding espresso over ice just makes the milk curdle faster. Let your freshly brewed shot cool for 2–3 minutes before adding it to the glass—just enough to take the edge off. I know, I know, it’s hard to wait when the aroma hits, but this keeps the latte from turning into a clumpy, greasy disappointment.
- Sweeten Last: DESCRIPTION: Add vanilla syrup after mixing the milk and espresso, not before. If you sweeten the milk first, the sugar gets diluted by the ice and espresso, making the flavor hit weaker. Stir it in right when you pour the milk into the glass—this way, every sip gets that rich, balanced sweetness without tasting like syrup soup.
Best sauces and condiments for this dish
Classic Vanilla Syrup
Start with ½ tablespoon of vanilla syrup—this is my go-to for that creamy, aromatic sweetness. I recommend Monin Vanilla Syrup or Torani for their smooth, consistent flavor.
If you prefer a homemade option, simmer ½ cup water with ½ cup sugar and 1 teaspoon pure vanilla extract for 5 minutes, then cool. This syrup adds depth without overpowering the coffee’s natural notes. 🍯
Caramel Drizzle Twist
For a richer, more indulgent version, swap vanilla syrup for ½ tablespoon of caramel syrup (like Torani Caramel). Drizzle 1 teaspoon over the top just before serving—it adds a buttery, toasty note that pairs perfectly with the espresso’s bitterness.
Use a small squeeze bottle for an elegant finish. This works especially well with whole milk for a decadent treat.
Spiced Syrups
Experiment with cinnamon or hazelnut syrup for a gourmet touch. A ½ tablespoon splash of Torani Cinnamon Syrup gives a warm, cozy vibe, while hazelnut syrup (like Monin) adds nutty depth.
For a homemade spiced option, mix ½ cup simple syrup with 1 teaspoon ground cinnamon or ½ teaspoon vanilla bean paste. Simmer for 3 minutes to infuse the flavors, then strain and cool.
Cocoa for Mocha Lovers
Transform your iced latte into a mocha by whisking ½ tablespoon of unsweetened cocoa powder (like Hershey’s Special Dark) into the milk before assembling. For extra richness, use ½ teaspoon of instant espresso powder alongside the cocoa.
This combo delivers a bold, chocolatey kick that’s perfect for after-dinner sips. Dust the top with cocoa powder for a café-style presentation. 🍫
Sweetened Condensed Milk
For a creamy, ultra-sweet variation, replace the milk with 2 tablespoons of sweetened condensed milk mixed into 8 ounces of cold milk. This adds a thick, velvety texture and caramel-like sweetness. Shake well to dissolve completely before combining with espresso and ice.
It’s a nostalgic twist that works especially well with vanilla or caramel syrup. Just be mindful—it’s much sweeter than regular syrup!
Nutrition facts
Frequently asked questions
Can I make this iced latte without espresso?
Use 2 oz of strong brewed coffee instead—French press or pour-over methods work best for maximum flavor. For extra intensity, double the coffee to 4 oz and reduce milk to 8 oz to maintain balance. Just remember, espresso delivers a more concentrated flavor that’s harder to replicate with regular coffee.
What’s the best way to keep my iced latte from getting watery?
Use large ice cubes instead of crushed ice—they melt slower and dilute the drink less. Also, chill your glass beforehand and pour the milk over the ice first, then add the coffee. This creates a smoother layering effect that prevents wateriness. For extra insurance, shake the mixture briefly before serving to blend everything evenly.
How do I make this recipe dairy-free?
Swap regular milk for 10 oz of chilled almond, oat, or coconut milk—just make sure it’s unsweetened. For creamier texture, use barista-style plant-based milk (like Oatly Barista). The sweetness levels vary by brand, so taste before adding extra syrup. Coconut milk adds a subtle tropical note that pairs beautifully with espresso flavors.
Can I make this ahead of time?
Yes, but with a few adjustments. Brew and chill the espresso separately, then store it in the fridge for up to 2 days. Keep the milk and syrup mixture in a separate container. When ready to serve, combine with fresh ice and shake vigorously. The texture won’t be as silky as freshly made, but the flavors will still be delicious. For best results, assemble within 1 hour of serving.
Why does my iced latte taste bitter?
Bitter flavor usually means your coffee is too strong or the milk wasn’t sweetened enough. Try reducing espresso to 1.5 oz and increasing milk to 11 oz. Add an extra 0.5 tbsp of simple syrup to balance the bitterness. If using pre-made coffee, check for stale grounds—freshly brewed always tastes better. For extra smoothness, let the coffee cool completely before mixing with milk.

- 12 Bean Chili Recipe: Hearty Slow-Cooked Depth With 12 Legumes - October 17, 2026
- 5 Seed Bread Recipe: Nutty Crunch and Artisan Flavor in One Loaf - October 17, 2026
- 1 Lb Macaroni Salad Recipe: Bold, Crunchy, and Crowd-Pleasing - October 17, 2026