
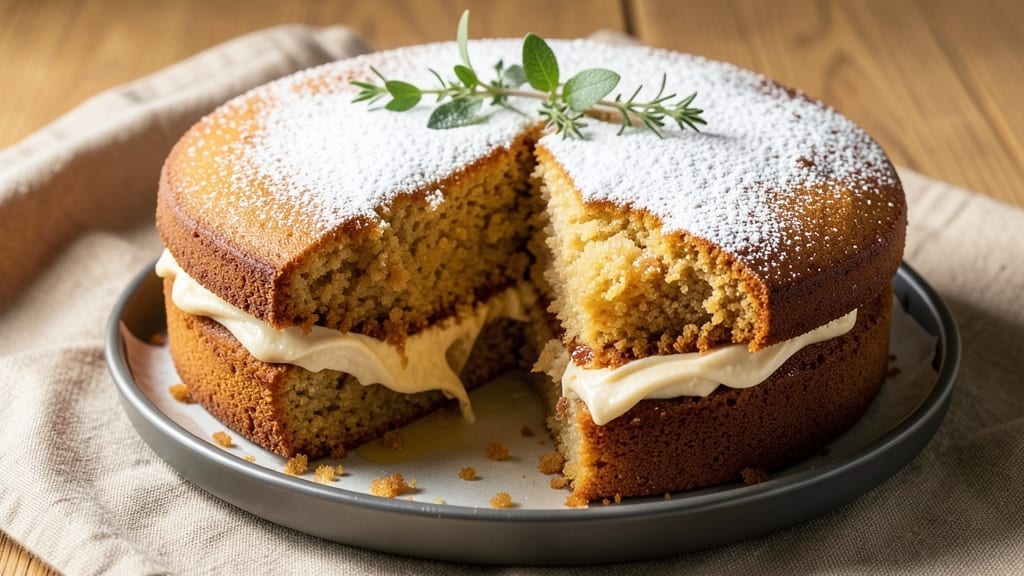
A 6-inch pound cake delivers the perfect balance of buttery richness and tender crumb—ideal for individual servings or elegant desserts. This recipe combines classic vanilla and buttermilk for a moist, flavorful cake that bakes evenly in a single layer.
The secret lies in precise measurements and a gentle baking process to avoid cracking while achieving a golden, domed top.
What sets this pound cake apart is its foolproof technique—no fancy equipment needed, just a standard 6-inch pan and a few simple ingredients. The buttermilk adds tangy depth, while vanilla extract enhances the natural sweetness of the cake.
Baking at 325°F ensures a slow, even rise, resulting in a cake that’s tender yet sturdy enough to slice cleanly.
By the time it emerges from the oven, you’ll have a perfectly golden cake with a fine crumb and just the right amount of moisture—no dryness or heaviness.
It’s versatile enough for vanilla buttercream, chocolate ganache, or even fresh berries. The best part? It’s easy to scale for larger pans if you’re feeding a crowd.
Whether you’re baking for a special occasion or a simple treat, this recipe delivers restaurant-quality results with minimal effort. The key is patience—letting the cake cool gradually before slicing ensures clean layers every time. Ready to bake?
Ingredients for 6 inch pound cake
Twelve ingredients for a flawlessly golden, domed pound cake with restaurant-quality texture.
| Ingredient | Amount | Notes |
|---|---|---|
| All-Purpose Flour 🌾 | 2 ½ cups | Sifted for even texture |
| Granulated Sugar 🍚 | 1 ½ cups | White or light brown preferred |
| Unsalted Butter 🧈 | 1 cup | Room temperature, cubed |
| Large Eggs 🥚 | 4 whole | Room temperature, separated |
| Buttermilk 🥛 | 1 cup | Fresh, not powdered |
| Pure Vanilla Extract 🌿 | 2 tsp | High-quality, no imitation |
| Baking Powder 🍞 | 1 ½ tsp | Diamond Crystal preferred |
| Salt 🧂 | ½ tsp | Fine sea salt preferred |
| Vanilla Bean Seeds 🌸 | 1 tbsp | Scraped from 1 pod |
| Vegetable Oil 🫒 | ¼ cup | Light, neutral flavor |
| Powdered Sugar 🍚 | ½ cup | For optional dusting |
| Aluminum Foil 📄 | 1 sheet | For tenting during bake |
The butter and buttermilk are non-negotiable for that signature moist crumb. European-style butter like Plugrá or Land O’Lakes has higher fat content, which gives superior richness. For buttermilk, culture it yourself with lemon juice and milk if you can’t find fresh—never use powdered. The vanilla extract should be pure, not imitation; Madagascar bourbon vanilla adds depth. Sift the flour and baking powder together to avoid lumps, and measure your sugar by spooning it into the cup, then leveling—never scooping directly from the bag.
No buttermilk? Substitute with 1 cup milk plus 1 tbsp vinegar or lemon juice, let sit 5 minutes. Running short on vanilla extract? Seeds from 1 vanilla bean (scraped) equal 1 tbsp extract. For a lighter texture, replace 2 tbsp of the butter with apricot jam or unsweetened applesauce. If your oven runs hot, reduce temperature to 300°F and add 10-15 minutes to baking time. The cake should pull away from the pan edges cleanly when done, with a golden dome and internal temperature of 205°F.
Cool the cake completely before slicing to ensure clean layers. Wrap tightly in plastic and store at room temperature for up to 3 days, or refrigerate for 5-7 days if using within a week. For longer storage, freeze the whole cake (unfrosted) for up to 3 months—thaw overnight at room temperature. The cake reheats beautifully; wrap slices in foil and warm in a 200°F oven for 5-10 minutes to restore moisture. Always dust with powdered sugar just before serving to maintain that elegant presentation.
Why You’ll Love This Recipe
- No Mixer Needed: I swear by this recipe—just a bowl, a whisk, and your hands. The butter gets creamed with sugar until light and fluffy (seriously, 5 minutes of elbow grease), then the eggs and buttermilk come in to make a batter so smooth it almost feels like cheating. Honestly, my stand mixer sits unused for this one.
- Buttermilk Magic: That tangy buttermilk? It’s what turns this cake from good to ridiculously good. It keeps the crumb tender without being gummy, and the butter—oh, the butter—makes every bite rich but never heavy. The sugar caramelizes just enough to give it that classic pound cake depth, like a hug in dessert form.
- Slice It Any Way: This cake is my meal prep MVP—cut it into squares for breakfast toast, cubes for coffee cake, or serve it whole at brunch. I’ve even used it as a base for trifles (just add whipped cream and berries). Between us, I’ve had it cold, warm, and even reheated with a drizzle of honey—it’s that versatile.
- Budget-Friendly Luxury: Six inches means one cake feeds a crowd or stretches my pantry for days. The ingredients? Basic but high-impact—flour, sugar, butter, eggs, and buttermilk. No fancy substitutions, no wasted leftovers (unless you count my kids sneaking slices after dinner). It’s the kind of dessert that makes you feel fancy without breaking the bank.
Step-by-step instructions for layered vanilla pound cake
This method delivers a perfectly moist, rich pound cake with tender layers that stay fresh for days.
Prepare the Cake Pans and Mix Dry Ingredients
Preheat your oven to 350°F and grease two 3-inch round cake pans thoroughly with the vegetable oil, then line the bottoms with the aluminum foil. I use a pastry brush to ensure every inch is coated—this prevents sticking and makes removal effortless. While the oven heats, sift together the 2.5 cups all-purpose flour, 1.5 tsp baking powder, and 0.5 tsp salt in a medium bowl. Set aside.
This dry mix is your foundation, and sifting ensures no lumps develop later. The baking powder will react with the buttermilk to create lift, while the salt balances the sweetness. Keep this mixture ready—you’ll need it in the next step.
Cream Butter and Sugar for Maximum Fluffiness
In a stand mixer fitted with the paddle attachment, beat the 1 cup unsalted butter and 1.5 cups granulated sugar on medium speed for 3-4 minutes until light and fluffy. You’ll see the mixture nearly double in volume and turn pale—this incorporates air, which creates the cake’s signature tenderness. Scrape down the sides of the bowl with a rubber spatula to ensure even mixing.
This step is non-negotiable. Under-creaming leads to dense cake, while over-creaming can introduce too much air. The butter should be room temperature but not greasy—press a cube between your fingers; it should hold its shape but yield slightly. If it feels cold, let it sit at room temperature for another 10 minutes.
Combine Wet Ingredients and Fold in Dry Mixture
Add the 4 whole large eggs, one at a time, mixing on low speed after each addition until fully incorporated. Then stir in the 1 cup buttermilk, 2 tsp pure vanilla extract, and 1 tbsp vanilla bean seeds until smooth. The batter should be thick but pourable—like heavy pudding. With the mixer on low speed, gradually add the sifted dry ingredients in three additions, mixing just until combined after each.
Here’s the thing—don’t overmix. You’ll know it’s perfect when the batter is just barely smooth with a few flour streaks remaining. Overmixing develops gluten, which makes the cake tough. The vanilla bean seeds add depth that extract alone can’t match, so scrape them directly from the pod for maximum flavor.
Bake in Layers for Even Cooking
Divide the batter evenly between the prepared pans, filling each about ⅔ full. Bake for 25-30 minutes or until a toothpick inserted into the center comes out clean. The cakes should be golden brown on top and spring back gently when pressed. I like to rotate the pans halfway through baking to ensure even browning—especially important for the smaller 6-inch size.
Don’t open the oven during baking or the cakes may collapse. The buttermilk creates steam that helps with rise, but you need that oven heat to stay consistent. When the cakes are done, transfer them to a wire rack to cool for 10 minutes before removing from pans. This brief cooling prevents them from breaking apart.
Layer and Dust with Powdered Sugar
Once completely cooled, place one cake layer on a serving plate and spread a thin layer of powdered sugar over the top. I use about 2 tablespoons for the first layer, then add the second layer. Dust the top and sides of the cake generously with the remaining 0.5 cup powdered sugar, tapping off any excess. The sugar creates a beautiful finish and adds a touch of sweetness that complements the cake’s rich vanilla flavor.
This cake keeps well at room temperature for up to 3 days or can be refrigerated for up to 1 week. For serving, slice with a serrated knife dipped in hot water and wiped clean—this ensures clean cuts every time. The layers should be moist but not wet, with a tender crumb that melts in your mouth.
Pro Tips For Making 6 Inch Pound Cake
- Cream Butter & Sugar Slowly: DESCRIPTION: I learned this the hard way—whipping butter and sugar too fast traps air inconsistently, leading to a cake that rises unevenly. Use a stand mixer on medium speed for 3-4 minutes, then scrape the bowl every 30 seconds. The butter should look fluffy but not greasy, and the sugar should dissolve completely before adding eggs.
- Measure Flour by Spooning: DESCRIPTION: Dipping a cup into the flour bag and scooping is a rookie move—it packs the flour too tightly, making your cake dense. Instead, spoon flour into the measuring cup, then level it off with a knife. For a 6-inch cake, this means about 1 ½ cups packed becomes 1 ¾ cups spooned—a difference you’ll taste.
- Don’t Overmix the Batter: DESCRIPTION: Once you fold in the buttermilk, stop mixing after just combining. Overmixing develops gluten, which turns your tender pound cake into a chewy loaf. Use a spatula to gently fold—think “marble swirls” in the batter, not a smooth, homogenous mix.
- Bake Until Internal Temp Hits 210°F: DESCRIPTION: Toothpick tests are unreliable for pound cake—it can come out clean but still be underdone. Use an instant-read thermometer and pull the cake when the center hits 210°F. This ensures even moisture distribution, especially in a small 6-inch pan where heat escapes faster.
Common mistakes when making this dish
Overmixing the Batter
This is the #1 mistake I see in home bakeries—overmixing the batter turns your tender pound cake into a dense brick. Once you’ve combined all ingredients, mix just until the dry ingredients disappear. You’ll still see a few streaks of flour, and that’s perfect.
Overmixing develops gluten, which creates a tough, chewy texture instead of that signature tender crumb. I always set a timer for 30 seconds after adding the dry ingredients to avoid going overboard. 💫
Incorrect Pan Prep
Skipping proper pan preparation leads to cakes that stick like glue. Always grease your 6-inch pans with vegetable oil and line the bottoms with parchment paper or aluminum foil. I use a pastry brush to coat every inch—don’t just drizzle oil in the bottom.
The sides need that fat barrier too. For extra insurance, dust the pans lightly with flour after oiling, but tap out any excess. This ensures clean release and perfect doming.
Room-Temperature Ingredients
Cold butter and eggs are the enemy of even baking. Your butter should be soft enough to press a thumbprint into it but not greasy, and your eggs should slide out of the shell without resistance.
I always let my butter sit at room temperature for 1-2 hours before starting, and I place eggs in warm water for 5 minutes to bring them up to temperature. Cold ingredients cause uneven cooking and can lead to cracks in your cake’s surface.
Opening the Oven Too Soon
Peeking at your cake too early disrupts the baking process and can cause your pound cake to sink or develop a dome that’s too flat. The buttermilk creates steam that helps with rise, and you need that oven heat to stay consistent.
I recommend waiting until at least 20 minutes have passed before checking, and even then, only open the oven if absolutely necessary. When you do check, do it quickly to minimize temperature loss.
Skipping the Cooling Phase
Rushing to remove your cake from the pan too soon is a recipe for disaster. Always let your pound cake cool in the pan for 10 minutes before transferring to a wire rack. This gradual cooling helps prevent cracking and ensures clean layers.
I’ve seen many home bakers try to remove cakes too early, only to have them fall apart when sliced. Patience here pays off with perfect results every time. ✨
Incorrect Baking Temperature
Baking at too high a temperature causes the outside to brown before the center is fully cooked, while too low a temperature leads to a dense, gummy cake. The ideal temperature for this recipe is 350°F, which allows for even cooking and proper rise.
If your oven runs hot, reduce the temperature to 325°F and add 10-15 minutes to your baking time. Always use an oven thermometer to ensure accuracy—many home ovens are off by 25°F or more.
Nutrition facts
Frequently asked questions
Why does this recipe use two 3-inch pans instead of one 6-inch pan?
Baking in two smaller pans creates a more even rise and prevents cracking in the center. A single 6-inch pan would cause the cake to bake too quickly on the outside while staying undercooked inside, leading to a dense texture. The two-layer approach ensures both golden browning and perfect doming.
Can I substitute buttermilk if I don’t have any?
Yes! Mix 1 cup milk with 1 tablespoon lemon juice or vinegar, then let it sit for 5 minutes until slightly thickened. This creates the same tangy acidity that activates the baking powder for proper rise. Just don’t use powdered buttermilk—it won’t work the same way.
How do I know when the cake is fully baked?
Insert a toothpick into the center—it should come out clean with no wet batter clinging to it. The cake should also spring back gently when pressed and have a golden dome. Baking times vary by oven, so always check at 25 minutes if unsure. A kitchen thermometer reading of 205°F at the center confirms doneness.
What’s the best way to store leftover pound cake?
Wrap the cake tightly in plastic wrap and store at room temperature for up to 3 days. For longer storage, refrigerate for 5-7 days or freeze the whole cake (unfrosted) for 3 months. To serve, let it sit at room temperature for 30 minutes before slicing for cleaner cuts. Reheat slices in a 200°F oven for 5 minutes to restore moisture.
Can I make this cake gluten-free?
Yes, but with adjustments. Replace the all-purpose flour with a 1:1 gluten-free baking flour blend (like Bob’s Red Mill) plus ½ teaspoon xanthan gum. You may need to add 1-2 tablespoons extra liquid since gluten-free flours absorb differently. Expect a slightly denser texture—this cake won’t be as tender as the original. Always test your blend first in small batches.

- 12 Bean Chili Recipe: Hearty Slow-Cooked Depth With 12 Legumes - October 17, 2026
- 5 Seed Bread Recipe: Nutty Crunch and Artisan Flavor in One Loaf - October 17, 2026
- 1 Lb Macaroni Salad Recipe: Bold, Crunchy, and Crowd-Pleasing - October 17, 2026