
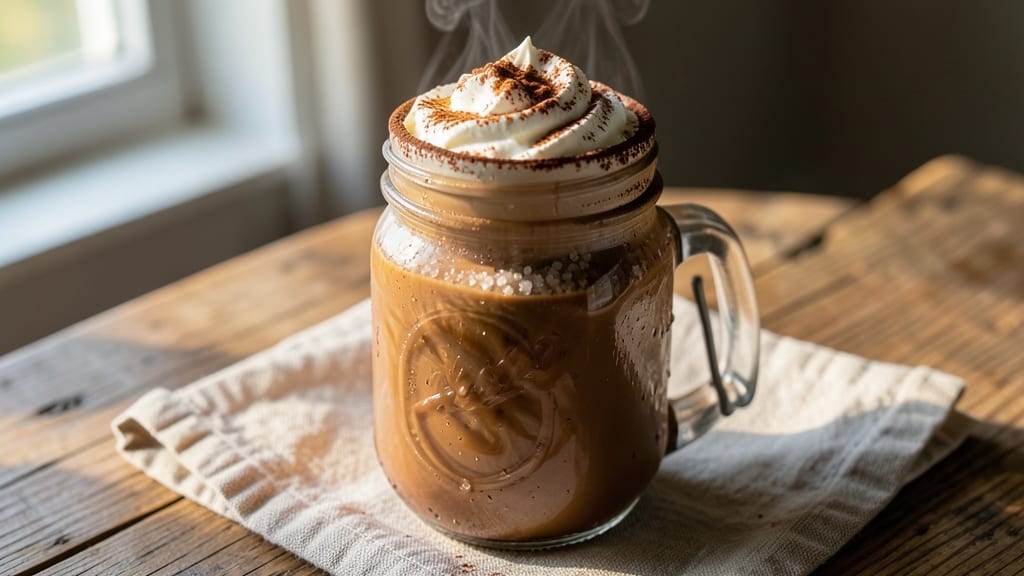
A 16-ounce mason jar hot chocolate transforms a simple drink into a cozy, Instagram-worthy ritual—perfect for chilly evenings or rainy afternoons. The key lies in layering rich cocoa with warm spices and velvety milk, then presenting it in a jar that makes every sip feel like a hug.
This isn’t just hot chocolate; it’s a textured, aromatic experience that turns a basic dessert into a moment of comfort.
What makes this recipe special is the balance of simplicity and sophistication: whisking melted chocolate into heated milk creates a smooth, luxurious base, while a sprinkle of cinnamon and a dash of vanilla elevate it to something extraordinary.
The jar itself becomes part of the magic—its sturdy glass keeps the drink warm, and its rustic charm makes it feel homemade, even when you’re using store-bought ingredients.
By the time you’re done, you’ll have a layered, spiced hot chocolate with a frothy top, a velvety middle, and a hint of crunch from optional toppings like whipped cream or marshmallows.
The contrast of temperatures and textures—warm liquid, cool cream, and crisp toppings—makes each sip feel like a small indulgence. It’s the kind of drink that turns a ordinary evening into something memorable.
This recipe works for adults and kids alike, and it’s easy to customize with flavors like peppermint, chai, or even a shot of espresso for a grown-up twist.
Whether you’re serving it at a holiday gathering or curling up with a book, the mason jar presentation makes it feel special without the fuss. Let’s get started—your coziest hot chocolate is just a few steps away.
Ingredients for 16 oz mason jar hot chocolate
Layered textures and velvety warmth—here’s what makes this mason jar hot chocolate unforgettable.
| Ingredient | Amount | Notes |
|---|---|---|
| Heavy Whipping Cream 🥛 | ½ cup | Full-fat for best texture |
| Whole Milk 🥛 | 1 cup | Warmed for smooth blending |
| Unsweetened Cocoa Powder 🍫 | ⅓ cup | High-quality Dutch-processed |
| Granulated Sugar 🍚 | ¼ cup | Adjust to taste preference |
| Vanilla Extract 🌿 | 1 tsp | Pure, high-quality extract |
| Ground Cinnamon 🌶️ | 1 tsp | Freshly ground preferred |
| Salt 🧂 | ¼ tsp | Fine sea salt preferred |
| Dark Chocolate Chips 🍫 | ¼ cup | 70% cocoa or higher |
| Mini Marshmallows 🍬 | ¼ cup | Or crushed regular marshmallows |
| Whipped Cream 🍦 | ½ cup | Homemade or store-bought |
| Crushed Peppermint Candies 🍬 | 2 tbsp | Optional for peppermint twist |
| 16-Ounce Mason Jars 🍶 | 4 whole | Clean and dry for serving |
The cocoa powder is your flavor foundation, so Dutch-processed makes all the difference—it’s smoother and less bitter. Grab a small bag from Whole Foods or Trader Joe’s for the best quality. Dark chocolate chips (70% or higher) add depth, but Ghirardelli or Lindt are worth the splurge if you’re treating yourself. The heavy whipping cream and whole milk create that luxurious, frothy texture—don’t cut corners here. And if you’re feeling fancy, organic vanilla extract from Penzeys elevates the flavor beyond basic extracts.
No heavy cream? Coconut cream works in a pinch, though the texture will differ slightly. Swap regular milk for almond or oat milk***, but the richness won’t be the same. If you’re out of mini marshmallows, crushed regular marshmallows or even white chocolate chips add a similar crunch. For a peppermint twist, swap the crushed candies for crushed candy canes***. And if you’re making this ahead, keep the dry toppings (marshmallows, crushed candies) separate until serving—trust me on this.
Prep the dry toppings first—they keep for weeks. Store the wet ingredients (chocolate mixture) in an airtight container in the fridge for up to 5 days. When ready to serve, simply layer the warm mixture with the toppings in the jar. Mason jars are dishwasher-safe, but hand-washing preserves their rustic charm. For a party, assemble the toppings in small bowls and let guests customize their own jars—it’s always a hit.
Why You’ll Love This Recipe
- Jarred Magic: I swear by this method—just layer the sugar, cocoa, and milk in the jar, then add the cream and vanilla on top. No measuring cups, no spills, no stress. The kids can even help (mostly).
- Silky Smooth Richness: That velvety whipping cream on top? It’s what turns this from “hot chocolate” to “oh my god, yes.” The cocoa melts into the milk just right, and the vanilla ties it all together like a cozy hug in a mug.
- Weeknight Hero: I make a batch on Sundays and stash the jars in the freezer. When the weather turns chilly or the kids come home from school, I just grab one, microwave it, and—boom—instant warmth. No last-minute grocery runs, no fuss.
- Budget-Friendly Luxury: Honestly, you’d pay $6 for this at a café, but here? The ingredients cost pennies. Heavy cream makes it decadent, but the sugar and cocoa stretch further than you’d think—perfect for when you want to treat yourself without breaking the bank.
Step-by-step instructions for layered mason jar hot chocolate
Here’s how to create your own cozy, layered hot chocolate that’s perfect for chilly evenings.
Warm the Milk and Cream
In a small saucepan over medium heat, combine the 1 cup whole milk and 0.5 cup heavy whipping cream. Warm until small bubbles form around the edges—about 3-4 minutes. Don’t let it boil, just heat until it’s steaming gently. This creates a silky base for your hot chocolate.
While warming, whisk the 0.33 cup unsweetened cocoa powder, 0.25 cup granulated sugar, 1 tsp vanilla extract, 1 tsp ground cinnamon, and 0.25 tsp salt together in a separate bowl. This ensures an even distribution of flavors throughout your hot chocolate mixture.
Create the Hot Chocolate Base
Once the milk mixture is warmed, slowly pour it into the dry ingredients while whisking continuously. This prevents clumping and creates a smooth, velvety texture. Return the mixture to the saucepan and cook over low heat for 2-3 minutes, stirring constantly until fully combined and slightly thickened.
Remove from heat and let it cool for 5 minutes. This cooling step is crucial—it allows the flavors to meld and prevents the whipped cream from melting too quickly when you assemble the jars. The mixture should be warm but not hot to the touch.
Assemble the Layered Hot Chocolate
Divide the cooled hot chocolate base evenly among the 4 whole 16-ounce mason jars. Using a spoon, carefully add 0.25 cup dark chocolate chips and 0.25 cup mini marshmallows to each jar. The chocolate chips will melt beautifully when heated, while the marshmallows add a delightful contrast of texture and sweetness.
Top each jar with 0.5 cup whipped cream, spreading it gently with the back of a spoon. Sprinkle the 2 tbsp crushed peppermint candies evenly over the whipped cream for a festive touch. The peppermint adds a refreshing contrast to the rich cocoa flavors.
Seal and Heat for Serving
Secure the lids on each jar and place them in a saucepan filled with about 2 inches of water. Bring the water to a gentle simmer over medium-low heat and let the jars heat through for 5-7 minutes. This gentle heating process melts the chocolate chips and marshmallows while keeping the whipped cream intact.
When ready to serve, remove the jars from the water bath and let them sit for 1 minute to allow the layers to settle. The result should be a perfect balance of rich cocoa, melted chocolate, gooey marshmallows, and creamy whipped cream—all contained in one convenient, portable jar.
Pro Tips For Making 16 Oz Mason Jar Hot Chocolate
- STIR WHILE HEATING: The cocoa powder hates clumps—trust me, I’ve scraped them out of jars more times than I’d admit. Heat the milk and cream on medium-low, stirring every 30 seconds with a whisk or chopstick to break up the powder before it turns to paste. If you walk away for even 30 seconds, you’ll regret it.
- SIFT THE COCOA FIRST: Unsweetened cocoa powder is sneaky—it packs like sand and creates lumps that ruin the texture. Sift it directly into the jar before adding liquids, then whisk it in. No sifter? Use a fork to break up clumps in the measuring spoon first. Smooth texture starts here.
- DON’T OVERMIX AFTER SWEETENING: Once you add the sugar, give it one quick stir to dissolve—no need to turn it into a frothy mess. Overmixing incorporates too much air, which can make the finished hot chocolate taste thin or separate when reheated. A gentle swirl is all you need.
- USE COLD CREAM: Heavy whipping cream straight from the fridge blends better and doesn’t curdle when heated. If you’re in a rush, at least chill it in the jar for 10 minutes before assembling. Warm cream turns the whole thing grainy, and no one wants that.
Dietary considerations for this dish
Dairy-Free Options
Skip the heavy cream and whole milk by using 1 cup full-fat coconut milk (canned, not carton) for a rich, creamy texture. Warm it gently over medium heat until steaming, then proceed with the recipe as written.
For extra indulgence, add 2 tablespoons coconut cream to the hot chocolate base—it mimics the velvety mouthfeel of dairy perfectly. 🥥
For a nut-based alternative, oat milk works surprisingly well when warmed with 1 tablespoon cornstarch (stirred in first) to thicken it. I’ve found Oatly Barista Blend holds up best to the heat without curdling, though it won’t be as rich as dairy. Always warm nut milks slowly to prevent separation.
Vegan Adaptations
Replace the dark chocolate chips with vegan chocolate chips (like Enjoy Life brand) and swap marshmallows for vegan marshmallows (such as Dandies).
The whipped cream can be made with coconut whipped cream—chill a can of full-fat coconut milk overnight, scoop out the solid cream, and whip it with 1 teaspoon powdered sugar and ½ teaspoon vanilla extract until fluffy. 🌱
For a dairy-free whipped topping, blend ½ cup silken tofu with 1 tablespoon maple syrup and ½ teaspoon vanilla until smooth, then whip with a hand mixer until light and airy.
This vegan topping holds its shape beautifully and adds a neutral base for toppings like crushed nuts or cacao nibs.
Low-Sugar Swaps
Cut the sugar in half (¼ cup instead of ½ cup) and boost sweetness with 1 tablespoon maple syrup or 1 tablespoon honey (added to the warm milk). For a zero-sugar version, use 1-2 tablespoons monk fruit sweetener (like Lakanto)—it dissolves smoothly and won’t alter the texture.
The natural sweetness of the cocoa powder will still shine through. 🍯
Balance the reduced sugar by adding ½ teaspoon instant espresso powder to the cocoa mix—it enhances chocolate flavor without adding sweetness. A pinch of sea salt (already in the recipe) also helps round out the flavors when sugar is reduced. Taste as you go and adjust to your preference!
Gluten-Free Notes
This recipe is naturally gluten-free, but always double-check labels on ingredients like vanilla extract (some brands use gluten-containing additives) and cocoa powder (a few brands process with shared equipment). Stick to certified gluten-free brands like Navitas Organics for cocoa powder and McCormick for cinnamon to avoid cross-contamination risks. ✨
For a nut-free version, ensure all toppings (like crushed peppermint candies) are certified nut-free. Brands like SmartSweets offer gluten-free and nut-free peppermint candies that work perfectly. Always read labels carefully—hidden gluten or nuts can sneak into unexpected places!
Allergy-Friendly Tips
If you’re allergic to soy, use sunflower whipped cream (like Reddi-wip Sunflower) instead of dairy-based whipped cream. It whips up light and holds its shape well, though it has a slightly tangy flavor that pairs nicely with chocolate.
For a nut-free alternative, toasted coconut flakes add crunch without risking cross-contamination. 🌿
For egg-free whipped cream, the silken tofu blend mentioned earlier is your best bet—it’s naturally egg-free and creates a stable topping. If you’re avoiding dairy entirely, opt for almond-free marshmallows (like Dandies Vegan) and check labels on cocoa powder for dairy processing warnings.
Nutrition facts
Frequently asked questions
Can I make this hot chocolate ahead of time?
Yes! Prepare the hot chocolate base up to 5 days in advance and store it in an airtight container in the fridge. When ready to serve, simply reheat the base in a saucepan over low heat until warm, then layer it in clean mason jars with fresh toppings. The toppings (whipped cream, marshmallows) should always be added fresh for the best texture.
Why does my whipped cream melt so fast?
Whipped cream melts quickly when exposed to heat. To keep it intact, assemble the jars just before serving and use the water bath method (heating the sealed jars in 2 inches of water for 5-7 minutes) instead of microwaving. For extra stability, chill the jars for 10 minutes before adding whipped cream.
How do I adjust the thickness of the hot chocolate?
If it’s too thin, simmer the mixture for 1-2 extra minutes to thicken. For a thinner consistency, add 1-2 tablespoons of milk or cream while whisking. The key is balancing heat and stirring—don’t let it boil, or it may separate. A smooth, velvety texture is ideal for layering.
Can I use regular chocolate bars instead of chips?
Chop 2 ounces of dark chocolate (70% cocoa or higher) into small pieces to replace the chocolate chips. Melt them gently in the warm milk mixture or add them directly to the jars—they’ll melt beautifully during the water bath step. For a smoother texture, use a high-quality chocolate bar.
What’s the best way to clean the mason jars afterward?
Let the jars cool completely, then rinse with warm water. For stubborn residue, soak them in warm, soapy water for 10 minutes before scrubbing with a bottle brush. Most mason jars are dishwasher-safe, but hand-washing preserves their quality. Store them upside-down to dry and keep lids sealed to prevent dust.
